Download a set of adb tools provided by Google. Android firmware using the FastBoot utility. Why ADB RUN is better
Need to flash Android using FastBoot, but don't know how? This article provides detailed instructions on using the FastBoot utility and how to use it to flash an Android device.
This manual will fully explain how to use FastBoot! If you don’t know how to install archived updates, then you need the article - Clockwordmod - what is it. Instructions for CWM recovery with pictures
Downloading and installing FastBoot
Before flashing Android using FastBoot, you need to download it and install it on the desired computer.
1. You can download the FastBoot utility with the official Android SDK program (heavy weight)
why ADB RUN is better
Launch
If you downloaded Separately Fastboot
After you have downloaded and installed FastBoot, open the " Command line »

and vve Enter the commands to go to the folder with the Fastboot utility (if you installed separately FastBoot)
cd/cd adb

If you downloaded ADB RUN
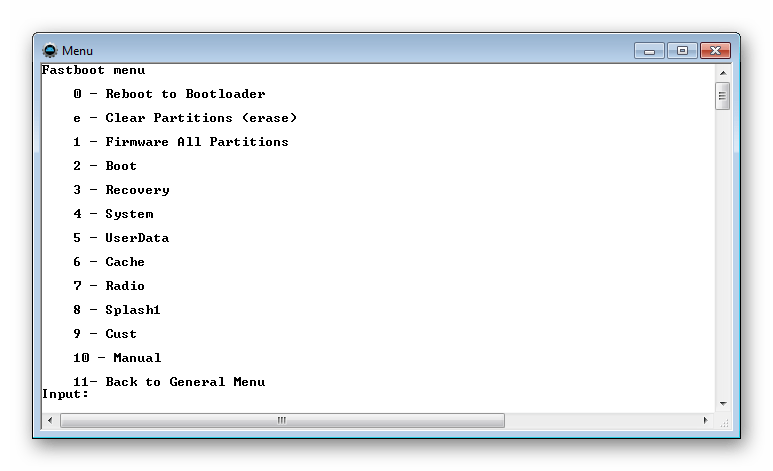
If your choice fell on the ADB RUN program, then launch it and select Manual -> ADB from the menu

Instructions for commands on how to flash Android using FastBoot
It is very important to write commands and firmware files as they are specified!
If your command is specified
fastboot flash cache NazvaniAFiLe.imgthen you need to write exactly like that, but not any other way. In other words, the case of letters is important, otherwise you will get an error cannot load 'image' - there is no such file.
Reboot commands into firmware mode (bootloader)
fastboot reboot-bootloaderThe command "sees" your Android PC
Get into the habit of checking before doing anything in Fastboot if the connection between your computer and Android is:
Checking whether your PC can see your Android
fastboot devicesExecute this command when the device is already in firmware mode (bootloader)
Nexus Bootloader Unlock and Lock Commands
Unlock bootloader for Nexus
fastboot oem unlockLock bootloader for Nexus
fastboot oem lockCommand to find out bootloader version
Shows the version number of the bootloader installed on Android
fastboot getvar version-bootloaderPartition formatting commands
Before flashing any partition in Android, you must first format it so that there are no problems with operation
fastboot erase Imya_razdela - erase partition: boot, radio, recovery, system, userdata and others
Erases the Cache partition
fastboot erase cacheErases the Data section
fastboot erase userdataErases the System partition
fastboot erase systemErases the Recovery partition
fastboot erase recoveryCommands for flashing a partition
After you have formatted the partition or partitions, you can start flashing the firmware
fastboot flash Imya_razdela imya_file.img - firmware of the selected partition: boot, radio, recovery, system, userdata and others
Flash the system partition (System)
fastboot flash system imya.imgFlash the cache partition
fastboot flash cache imya.imgFlash the data section
fastboot flash userdata imya.imgFlash the Recovery partition
fastboot flash recovery imya.img
Setting the power-on animation (firmware partition with animation)
fastboot flash splash1 splash.imgFlash all partitions (boot, recovery and system)
fastboot flashallInstead of imya.img- you need to enter the name of the file you are going to flash
Command to install update.zip
Flashes an update archive on Android in update.zip format or a ZIP archive with IMG images of various sections
fastboot update filename.zipFor Sony devices
Checking the connection of the Sony device, if the answer is 0.3 device, then it is connected
fastboot.exe -i 0x0fce getvar versionUnlock bootloader
fastboot.exe -i 0x0fce oem unlock 0xReceived_KeyMore detailed information on unlocking Bootloader Sony - How to unlock Bootloader Sony
Waiting for Device error
If you have the following message on in the command window for a long time: waiting for device- Means:
- The driver is not installed or installed incorrectly - reinstall or install
- Android device is not in Bootloader mode - translate
- Incorrect connection to the USB port - use the rear USB 2.0 ports of the computer, do not use USB hubs
ADB (Android Debug Bridge) is a driver for smartphones and tablets that connects the device to a computer and makes it possible to control its operation via the command line.
How to install ADB driver?
On most devices with MediaTek processor ADB drivers are installed automatically. For this download the archive , unpack it to your computer and run the Install.bat file.
If after installing the drivers and connecting the switched off smartphone to the PC in Device Manager The yellow light next to the name is lit, do the following:
- We log into the computer from an account that has administrator rights.
- Press the key combination - Windows+R(the Windows button is located between the left Ctrl and Alt).
- In the window that opens we write mmc devmgmt.msc(or devmgmt.msc) to bring up the device manager.
- On the smartphone in the menu “ Settings/For Developers"turn on" USB Debugging«.
- We remove the battery from the smartphone and then return it back (without turning on the device). If the battery cannot be removed, simply turn off the smartphone.
- We connect the smartphone to the computer using a USB cable.
- Device Manager. If a device with a yellow triangle appears in the ““ section, then install it on the computer without disconnecting the smartphone.
If the device appears in the section com ports or in unknown devices with the title " MT65xx Preloader" or " MTK usb port" or " DA USB VCOM“, you need to do a manual installation.
Manual installation of ADB drivers
To install adb drivers for a smartphone manually, you will need a computer, a USB cable and a few minutes of time.
- Download and unpack the folder with ADB drivers .
- We follow steps 1-5, which are described above.
- Right-click on the new device that appears in Device Manager. In the menu that appears, select Update drivers.
- Go to the previously unpacked folder. In it we go to the subdirectory Win7 and let's start installation. For 32 -bit operating systems select the file usb2ser_Win7.inf, For 64 -bit usb2ser_Win764.inf.
- We follow the instructions.
- Drivers are installed!
On Windows 8, 8.1 and 10, drivers are installed with signature verification disabled.
Disabling Driver Signature Verification in Windows
Disabling signature verification on Windows 8:
- Win+I -> Change computer settings -> General -> Special boot options -> Restart now.
- When shutting down, click Diagnostics -> Advanced options -> Boot options -> Restart.
- After a menu appears, select “Disable mandatory driver signature verification.”
Disabling signature verification on Windows 8.1:
- Win+I -> Settings -> Change computer settings -> Update and recovery -> Recovery -> Restart now.
- When shutting down, click Diagnostics -> Advanced options -> Boot options -> Restart.
- After a menu appears, press F7 and wait for the computer to restart.
- Next, install the drivers according to the instructions.
Disabling signature verification on Windows 10:
- Press and hold the Windows and shift keys.
- Next Start -> Shut down -> Reboot
- Release the Windows and shift keys, and select “Diagnostics”
- On the next page, select “Advanced options”
- Next, go to “Download Options”
- Just click “Reboot” and wait for the system to boot before the next step.
- After the restart, we will be on the system boot option selection page. Press the F7 key.
- The computer will restart and disable driver signature verification.
- Next, install the drivers according to the instructions.
If you specify the path to the driver file for the device, but the device manager insists that everything is fine with the drivers and does not want to update them, and the device appears in the " Android Composite ABD Interface"with a yellow triangle icon, then you need to make an edit in the file android_winusb.inf, which is in the folder MTK_Android_USB_Driver from downloaded in " Point 1» archive. We need to write in it PID\VID, which we first recognize from our computer. Right-click on the device with the yellow triangle/ Properties/Device ID. There will be 2 lines. These are the lines we need to copy to the file with drivers. Then we re-specify the path to this driver.
android_winusb.inf— make changes to this file.
%CompositeAdbInterface% = USB_Install, USB\VID_0BB4&PID_0C01&REV_0255
%SingleAdbInterface% = USB_Install, USB\VID_0BB4&PID_0C01
%CompositeAdbInterface% = USB_Install, USB\VID_0BB4&PID_0C01&REV_0255
VID\PID can change, set your own values.
Many of you have more than once encountered a situation where, in order to obtain root rights on an Android tablet or smartphone, install new firmware, restore the system and other things, you had to connect it to the computer and execute a series of adb or fastboot commands through the command line window (terminal ).
Most people enter these commands without understanding what they mean, simply following instructions found on the Internet. And if you want to get a better understanding of what happens when you execute them, today we'll take a look at the top ten commands that every advanced Android user should know.
But before you start getting acquainted with these commands, let me remind you that before your tablet or smartphone can execute them, you must make sure that your computer has Android SDK, and on the tablet or smartphone itself, the option “ USB Debugging».
How to install the Android SDK, which contains the adb and fastboot programs, read this material.
Let me also remind you that in Android 4.2 and higher, the “USB Debugging” item is hidden, and you can read how to access it.
For those who have forgotten how to launch a command line window in Windows, let me remind you that the easiest way to do this is by clicking on “Start”, after which you will need to type cmd in the search window and press the “Enter” key.
After all the preparatory work is completed, you can connect the device to the computer using a USB cable and start learning the commands.
1. adb devices command
This is probably the most important of all ten teams that will be discussed. Using it, we can find out whether the computer sees your Android device, and if it does, then whether it can communicate with it through terminal commands.
If everything is fine, then after entering the adb devices command in a Windows command line window or Linux terminal, you should see a line with the text List of devices attached, after which there will be a line consisting of the serial number of your device and its status - offline or online:

The offline state means that the device is in sleep mode. The online state signals that the tablet or smartphone is ready to carry out your commands.
2. adb push command
Using the adb push command, you can copy files to your tablet or smartphone. In this case, you must specify the path to the folder where you want to place the file on the device and the folder on the computer from where the file will be copied. The second path is not necessary if the file is located in the same folder where the adb program is located.
Here is an example of copying a video file superfreak.mp4 from a computer to a device, to the /sdcard/Movies folder using the adb push superfreak.mp4 /sdcard/Movies/ command

For Windows users, I would like to remind you that in Android, when specifying the path to files and folders, a forward slash - / is used, and not a backslash, as you are used to.
3. adb pull command
If the adb push command is used to transfer files to an Android device, then adb pull is used to copy files from the device to the computer. Just as in the previous case, you must indicate the path where you want to get the file on the device and the path where you want to place this file on the computer. The second path is not necessary if you want the file to go to the folder from which you ran the adb program.
Here is an example of copying the superfreak.mp4 file from the /sdcard/Movies/ folder of your tablet or smartphone to the Windows 8 desktop of user Jerry, C:\Users\Jerry\Desktop

If you want the file to go to the folder you ran adb from, just enter the command adb pull /sdcard/Movies/superfreak.mp4
4. adb reboot command
This command is often used during the process of rooting or installing new software, when we need to accept the changes that we have made on our device. After you enter the adb reboot command, your tablet or phone will reboot.

This command is also important because it can be placed inside scripts, which allows you to reboot the device automatically after completing all the necessary operations.
5. adb reboot-bootloader and adb reboot recovery commands
Using adb, you can not only reboot your Android device, but also reboot it into the bootloader. This mode is needed so that we can unlock the bootloader, which is necessary to obtain root rights and further install alternative firmware.

Some devices can be bootloaded using a specific key combination when they are turned on, but often the adb reboot-bootloader command is the only way to access the bootloader.
Similarly, the adb program can be used to access the recovery menu of a tablet or smartphone or recovery. This can be done using the adb reboot recovery command
6. Fastboot devices command
If you rebooted your tablet into bootloader mode, it will stop accepting adb commands. In this mode, we can communicate with the device using the fastboot program.
Using the fastboot devices command, you can find out if your device can accept commands from this program in bootloader mode. Since fastboot is a very powerful tool, some Android device manufacturers do not provide access to this program in bootloader mode.
Just like with adb, after entering the fastboot devices command you should see the serial number of your device.

Often the reason fastboot does not work is the lack of the necessary Windows drivers for your device.
7. Fastboot oem unlock command
Some manufacturers (for example, HTC or Asus) release special utilities that allow you to unlock the bootloader of their tablets and smartphones, after which you can install alternative recoveries, such as ClockworkMod. or TWRP and firmware from independent developers (custom firmware).
However, in many cases, you can unlock the bootloader of an Android device using the fastboot program. This is very easy to do - when your tablet or phone is in bootloader mode (step 5), just enter the following command in the command line window: fastboot oem unlock.
After this, you will need to follow the instructions that will be displayed on the screen of your tablet or smartphone.

Attention! After executing the fastboot oem unlock command, your device will be completely cleared of any programs you have installed and your personal data will also be deleted.
8. adb shell command
The adb shell command often confuses some novice users.
There are two ways to use this command. If you simply type adb shell in the command line window and press the Enter key, you will be taken to terminal mode, or the command shell of your Android device, where you can execute any Android shell commands.
Below you can see the result of running ls command in Android shell

This mode is well known to Linux and Mac computer users. If you are familiar with bash shell commands, you will have no problems working in this mode. Otherwise, I do not recommend using the adb shell mode until you understand the purpose of all its commands, since in this mode you have full access to the files on your device and can accidentally cause irreparable changes to the operating system.
The second way to use adb shell is to execute a single Android shell command using this construct: adb shell<команда>. For example, you can change file permissions using a command like “adb shell chmod 666 /data/filename”
9. adb install command
With the adb program, you can do more than just copy files to and from your device. This program also allows you to install applications on Android devices in the form of apk files. There is an adb install command for this. It's a bit like the push command: you have to specify the path where the file with the application you want to install is located. Therefore, the easiest way is to first copy the apk file to the folder with the adb program, after which you can install the program using the command adb install ApplicationFileName.apk

If you need to update the application, then in this case you need to use the -r switch and the command will look like this: adb install -r ApplicationFileName.apk.
Using the -s switch you can install applications on the memory card (if your firmware allows this). The -l switch allows you to lock the application during installation (by installing it in the /data/app-private folder). There are other keys for more advanced functions, but their description is the topic of a separate article.
10. adb uninstall command
Lastly, you can remove apps from your tablet or phone. To do this, use the command adb uninstall ApplicationFileName.apk
This command has the -k switch, which allows you, when deleting an application, not to delete its data and cache, but to leave them on the device.
Bonus: adb sideload command
This command will be very useful to owners of Nexus tablets and smartphones - with its help they will be able to update the official firmware on their devices. In other words, if your smartphone or tablet has not received an update over the air, you can download new firmware from the official website and update the device manually.
After you download the firmware file to your computer and connect your tablet or phone to it, you will need to reboot your device into recovery mode, select "Apply update from ADB", and then enter the following command in the command line window on your computer: adb sideload xxxxxxxx.zip, where xxxxxxxx.zip is the name of the zip file with the firmware.
You will find more detailed instructions on how to manually update the firmware of Nexus devices in this material.
Related materials:
Android firmware, i.e. writing certain file images to the corresponding sections of the device’s memory using special Windows software that almost completely automates the process is today not the most difficult procedure from the user’s point of view. If using such tools is impossible or does not give the desired result, the situation can be saved.
In order to flash an Android device via Fastboot, you will need knowledge of the console commands of the same mode of operation of the device, as well as certain preparation of the smartphone or tablet and the PC used for operations.
Due to the fact that in fastboot mode, manipulations with the device’s memory sections are performed virtually directly, when using the firmware method described below, some caution and attentiveness are required. Additionally, the following steps should probably only be recommended if you are unable to flash the firmware using other methods.
The user carries out every action with his own Android devices at his own peril and risk. The site administration is not responsible for possible negative consequences of using the methods described on this resource!
Strict implementation of the preparatory procedures determines the success of the entire process of flashing the device, so the implementation of the steps described below can be considered a prerequisite before carrying out operations.
Installing drivers
You can learn how to install a special driver for fastboot mode from the article:
System backup
If there is the slightest possibility, before flashing the firmware, a full backup copy of the existing partitions of the device’s memory must be created. The steps required to create a backup are described in the article:
Downloading and preparing the necessary files
Fastboot and are complementary tools from the Android SDK. We download the entire toolkit or download a separate package containing only ADB and Fastboot. Then unpack the resulting archive into a separate folder on drive C.

Through Fastboot it is possible to record both individual sections of the memory of an Android device and firmware updates as a whole package. In the first case, you will need image files in the format *.img, in the second – package(s) *.zip. All files that are planned for use must be copied to the folder containing unpacked Fastboot and ADB.

Packages *.zip We do not unpack it, you just need to rename the downloaded file(s). In principle, the name can be anything, but should not contain spaces or Russian letters. For convenience, you should use short names, for example update.zip. Among other things, it is necessary to take into account the fact that Fastboot is case-sensitive in sent commands and file names. Those. “Update.zip” and “update.zip” for fastboot are different files.
Launching Fastboot
Since Fastboot is a console application, working with the tool is done by entering commands of a specific syntax into the Windows command line (cmd). To launch Fastboot, the easiest way is to use the following method.

This add-on allows you to perform all the operations from the examples described below in a semi-automatic mode and without having to resort to manually entering commands into the console.

Unlocking the bootloader
Manufacturers of a certain number of Android devices block the ability to manage device memory sections by locking the bootloader. If a device has a locked bootloader, in most cases flashing its firmware via fastboot is not possible.
To check the status of the bootloader, you can send the following command to the device, which is in fastboot mode and connected to the PC:
fastboot oem device-info

But again we have to admit that this method of determining the blocking status is not universal and differs for devices from different manufacturers. This statement also applies to unlocking the bootloader - the methodology for carrying out the procedure differs for different devices and even for different models of the same brand.
Writing files to device memory sections
Having completed the preparatory procedures, you can proceed to the procedure for writing data to the device’s memory sections. Once again, we double-check that the image files and/or zip packages are loaded correctly and that they correspond to the device being flashed.
Attention! Flashing incorrect and damaged file images, as well as images from another device into the device leads in most cases to the inability to load Android and/or other negative consequences for the device!
Installing zip packages
To write to the device, for example, OTA updates, or a complete set of software components distributed in the format *.zip, the fastboot update command is used.

Writing img images to memory partitions
In many cases, searching for firmware in the format *.zip may be difficult to download. Device manufacturers are reluctant to post their solutions on the Internet. In addition, zip files can be flashed through recovery, so the advisability of using the method of writing zip files through fastboot is questionable.
But the ability to flash individual images into the appropriate sections, in particular "boot", "system", "userdata", "recovery" etc. via Fastboot when restoring the device after serious software problems, can save the situation in many cases.
To flash a separate img image, use the command:
fastboot flash partition_name file_name.img


In this way, the firmware is flashed using commands sent via the console. As you can see, the preparatory procedures take more time and effort, but if they are performed correctly, writing sections of the device’s memory occurs very quickly and almost always without problems.
Need to flash Android using FastBoot, but don't know how? This article provides detailed instructions on using the FastBoot utility, how to use it, where to download it from and how to flash an Android device.
This manual will fully explain how to use FastBoot! How to use Fastboot to clean partitions, flash IMG files, reboot and many others.
Downloading and installing FastBoot
Before flashing Android using FastBoot, you need to download this utility and install it on the desired computer:
- You can download FastBoot from the Android developers page included platform-tools .
- Or use the program Adb Run, more precisely better , in which everything is included, and also knows how to unlock the Android pattern.
Why is ADB RUN better?
Launching the Fastboot utility
Depending on what you chose, downloaded the fastboot utility separately or selected adb run, the launch may differ!
If you downloaded Separately Fastboot
Extract the files:
- adb.exe
- AdbWinApi.dll
- AdbWinUsbApi.dll
- fastboot.exe
- libwinpthread-1.dll
Move them to the C:\ drive, Windows folder. You have successfully installed ADB and Fastboot on your computer!
After you have downloaded and installed FastBoot, open the " Command line".
Windows command line example
Example of installing ADB and Fastboot.
If you downloaded ADB RUN
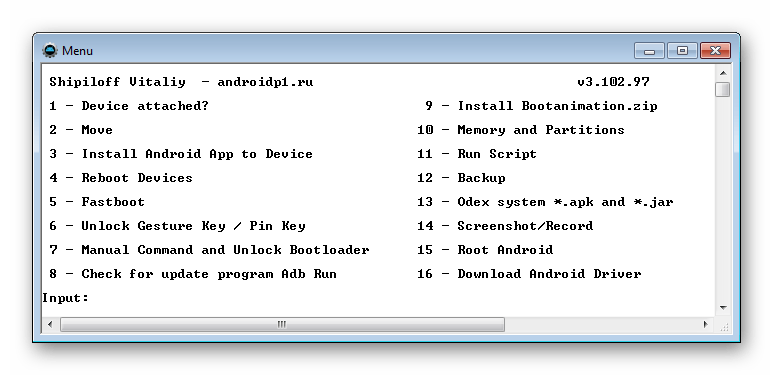
If your choice fell on a proprietary program ADB RUN, then run it, type A and press Enter. 
It is advisable to place the files that need to be flashed in the same folder as the Fastboot utility.
Instructions on how to flash Android using FastBoot
It is very important to write commands and firmware files as they are specified!
If you have the command:
fastboot flash cache NazvaniAFiLe.img
then you need to write exactly this way, and not any other way. In other words case is important otherwise you will get - there is no such file.
Reboot Commands
Fastboot to firmware mode (bootloader)
- In order to start working with an Android device using Fastboot, you first need to put your smartphone or tablet into bootloader mode using adb:
adb reboot bootloader
- Reboot Android from firmware mode (bootloader) to the same mode:
fastboot reboot-bootloader
- Reboot Android from bootloader firmware mode to bootloader mode:
fastboot reboot-bootloader
- Reboot Android to normal mode from bootloader firmware mode:
fastboot reboot
The command "sees" your Android PC
Make it a habit before doing anything in Fastboot to check if there is a connection between your computer and Android:
- Checking whether the PC “sees” your Android:
fastboot devices
This command must be executed when the device is already in firmware mode (bootloader)
Commands for unlocking and locking Google Pixel, Nexus bootloader in Fastboot
- Unlock bootloader for Pixel, Nexus:
fastboot oem unlock
fastboot flashing unlock
- Lock bootloader for Pixel, Nexus:
fastboot oem lock
Command to find out bootloader version
Shows the bootloader version number installed on Android:
fastboot getvar version-bootloader
Commands for formatting a partition in Fastboot
Before flashing any partition in Android, you must first format it so that there are no problems with operation
fastboot erase Imya_razdela— erase partition: boot, radio, recovery, system, userdata and others.
- Erases the Cache partition in Fastboot:
fastboot erase cache
- Erases the Date section (Data/UserData) in Fastboot:
fastboot erase userdata
- Erases the System partition in Fastboot:
fastboot erase system
- Erases the Recovery partition in Fastboot:
fastboot erase recovery
Commands for flashing Android partitions in Fastboot
After you have formatted the Android partition or partitions, you can proceed to the next step, flashing the firmware:
fastboot flash Imya_razdela imya_file.img— firmware of the selected partition: boot, radio, recovery, system, userdata and others.
- Flash the system partition:
fastboot flash system imya.img
- Flash the cache partition:
fastboot flash cache imya.img
- Flash the Data section:
fastboot flash userdata imya.img
- Flash the Recovery partition:
fastboot flash recovery imya.img

- Flash all partitions (boot, recovery and system):
fastboot flashall
Command to install update.zip
Flashes an update archive on Android in the update.zip format - a ZIP archive with IMG images of various sections:
fastboot update filename.zip
For Sony devices
Checking the connection of the Sony device, if the answer is 0.3 device, then it is connected:
fastboot.exe -i 0x0fce getvar version
Unlock bootloader
fastboot.exe -i 0x0fce oem unlock 0xReceived_Key
More detailed information on unlocking Bootloader Sony - How to unlock Bootloader Sony
Waiting for Device error
If you have the following message on in the command window for a long time: waiting for device- Means:
- The driver is not installed or installed incorrectly - reinstall or install
- Android device is not in Bootloader mode - translate
- Incorrect connection to the USB port - use the rear USB 2.0 ports of the computer, do not use USB hubs
Video example of working with the Fastboot utility
For those who don't understand anything!
For those who don’t understand anything, then use the proprietary application ADB RUN, this program contains almost all the commands that are needed for FASTBOOT!
Below is an example of how ADB RUN works - how to quickly flash a Recovery file using ADB RUN in less than 5 seconds (just don’t forget to switch to bootloader mode first)! 
That's all! Read more articles and instructions in the section Articles and Android Hacks. Stay with the site, it will be even more interesting!


