Network scanner Nmap and its capabilities. How to run a simple Nmap scan Nmap. Getting started
Are you concerned about the security of your or any other network? Protecting your router from unwanted connections is key to keeping your network safe. One simple method is Nmap or Network Mapper. This is a scanning program that checks which ports are open and which are closed, as well as other details. Security professionals use this program to test network security. To learn how to use this program, see Step 1.
Steps
Using Zenmap
- Zenmap is available for Windows, Linux, and Mac OS X operating systems. You can find installers on the official Nmap website.
-
Launch the “Nmap – Zenmap” GUI program. If during installation you left all the items untouched, then the program icon should appear on your desktop. If not, look in the start menu and launch Zenmap.
Enter the purpose of your scan. Zenmap makes network scanning a very simple process. First of all, select the scanning target. You can enter the domain (example.com), IP address (127.0.0.1), network (192.168.1.0/24), or a combination of these.
- Depending on your download and the purpose of your scan, using Nmap may violate your ISP's user policies. Always check local user rules when using Nmap when scanning outside of your own network.
-
Select your profile. Profiles are a group of modifications that change the scanning structure. Profiles allow you to quickly select different types of scans without having to make modifications on the command line. Choose the best profile for your needs:
- Intense scan- extensive scanning. Includes operating system, version, script recognition, tracing, and has an aggressive scan time.
- Ping scan- This scan determines the online status of the target of your scan, and does not scan ports.
- Quick scan- scans faster than a regular scan with aggressive scanning time and port sampling.
- Regular scan- this is a standard Nmap scan without any modifications. The result includes ping and open ports.
-
Click Scan to start scanning. Active scan results will be displayed in the Nmap Output tab. Scanning time will depend on the selected profile, physical distance to the target, and network configuration.
See your results. After the scan is completed, you will see the message “Nmap is done” at the bottom of the Nmap Output tab. You can now check your results, depending on the type of scan you selected. All results are collected in the Output tab, but by selecting other tabs, you can study the resulting result in more detail.
- Ports/Hosts- This tab will show port scans, including services running on those ports.
- Topology- Shows the trace for the scan performed. You can see how many “hops” it takes for your data to reach the desired goal.
- Host Details- Shows complete information about the target, number of ports, IP addresses, host names, operating systems, and more.
- Scans- this tab records the history of your previous scans. This way you can quickly restart a scan done in the past with a specific set of parameters.
Download the Nmap installer. You can find the installer on the developers website and download it for free. It is recommended to download from the developers' website to avoid the risk of downloading viruses or spoofed files. By downloading Nmap you also get Zenmap, a graphical interface for Nmap that makes the program easy to use for beginners when performing scans without knowing the commands.
Using the command line
-
Install Nmap. Nmap is a small and free program. You can download the program on the developer's website. Follow the instructions based on your operating system:
Open your command prompt. Nmap commands work from the command line and show the results right below the command. You can use the options to change the scan structure. You can run scans from anywhere specified in your command line.
-
Scan the ports you need. To start a simple scan, write nmap
. This will begin pinging the selected target and scanning ports. This scan is very easy to recognize. The results will be visible on your screen. You may have to scroll to the top to see the full results. - Depending on the download and the purpose of your scan, using Nmap may be against your ISP's rules. Always check local user rules when using Nmap when scanning outside of your own network.
-
Perform a modified scan. You can use command variables to change scan parameters, resulting in a more or less extensive scan. You can add multiple variables by leaving a space between each one. Variables are placed before the target: nmap
- -sS- This is a covert SYN scan. This scan is more difficult to detect than a regular scan but may take longer to complete. Most newer firewalls can detect –sS scanning.
- -sn- This is a ping scan. This scan does not use port detection, and only checks the online status of the target.
- -O- This scan determines the type of operating system of the target.
- -A- This variable includes detection of more extensive information: operating system, version, scripts, and trace.
- -F- enables fast scanning and reduces the number of scanned ports.
- -v- this variable shows more of your scan results, making them more readable.
-
Output the results of your scan to an XML file. You can configure the output of your scan results to an XML file and, subsequently, easily open them in any web browser. To do this use a variable -oX with the name of the file to output data. The complete command looks like this: nmap –oX ScanResults.xml
. - Your XML file will be saved in the current directory of your command line.
- Wondering how the scan goes? Press Spacebar or any button while the scan is running to view Nmap's progress.
- Target not responding? Try adding the variable “-P0” to your scan. As a result, Nmap's scan will begin its work even if the program "thinks" the target does not exist. This can be useful when the computer is protected by a firewall.
- If your scan takes a long time (more than 20 minutes), try adding the “-F” variable so that the Nmap scan will only affect recently used ports.
One of Nmap's most well-known features is remote OS detection based on analysis of the TCP/IP stack. Nmap sends a series of TCP and UDP packets to the remote host and examines virtually every bit in the responses. After running a dozen tests such as TCP ISN sampling, TCP option support, IP ID sampling, and initialization time analysis, Nmap compares the results with its nmap-os-db database, consisting of more than a thousand known sets of typical results for various operating systems and , when a match is found, displays information about the OS. Each set contains a free text description of the OS and a classification that includes the manufacturer name (eg Sun), OS name (eg Solaris), OS generation (eg 10), and device type (). OS, and a classification which provides the vendor name (e.g. Sun), underlying OS (e.g. Solaris), OS generation (e.g. 10), and device type (for general purposes, router, switch, game console, etc. .).
If Nmap can't detect the OS, but there are good reasons to do so (for example, at least one open and one closed port was found), then Nmap will provide a URL where, if you know exactly what OS is being used, you can provide a set its characteristics. By doing this, you will contribute to Nmap's database of known OSes, making it more useful to everyone else.
The OS detection option also activates some other tests that allow you to take advantage of the information collected during operation. One of them is the TCP Sequence Predictability Classification. This allows you to roughly determine how difficult it is to establish a false TCP connection with a remote host. This can be useful for hacking and exploiting trust-based programs (rlogin, firewall filters, etc.) or for hiding the source of an attack. This type of spoofing is rarely used anymore, but many machines are still vulnerable to this type of attack. The difficulty number is based on statistical sampling and may fluctuate. It is usually better to classify using English phrases like « worthy challenge» or « trivial joke» . This information will only be displayed when verbal mode is enabled (-v). When verbal mode is activated with the -O option, information about the generation of the IP ID sequence is also output. Most cars are in class « incremental» , which means they increment the ID field in the IP header for each packet sent. This makes them vulnerable to spoofing attacks and advanced information gathering attacks.
Also, during OS detection, an attempt is made to find out the operating time of the target machine. Using TCP timestamps (RFC 1323), Nmap tries to guess when the machine was last rebooted. The information may not be accurate because... The timestamp counter was not reset, was overflowed, or was hidden in some way. Information is displayed only verbally.
Paper documentation on the operation, use and configuration of the OS detection option is located on.
The OS detection feature is enabled and controlled using the following options:
O (Enable OS detection)
Enables the OS detection function, the operation of which is described above. You can also use the -A option, which enables OS detection among other functions.
--osscan-limit (Use the OS detection function only for "promising" hosts)The OS detection feature is much more effective if at least one open and one closed TCP port is detected. Set this option and Nmap will not even attempt to detect the OS of hosts that do not meet this criterion. This can save a lot of time, especially when -PN scanning many hosts. This option will only have effect if you enable the OS feature by specifying the -O or -A options.
--osscan-guess ; --fuzzy (Guess the OS detection results)When Nmap is unable to determine an exact match, it will sometimes provide closest matches to the scan results. For Nmap to do this by default, the matches must be very close. Either of these (equal) options causes Nmap to analyze the results more aggressively. Nmap will still report when a non-perfect match is found, and will also display the percentage of match for each set of characteristics.
--max-os-tries (Sets the maximum number of attempts to detect the OS)When Nmap tries to determine the OS on a target host and cannot find a perfect match, it will usually try again. By default, Nmap makes five attempts if favorable conditions exist to detect the OS, and twice otherwise. Setting --max-os-tries to a lower value (eg 1) speeds up Nmap, but you miss some entries that could possibly be used to identify the OS. A large value can be set to allow more attempts under favorable conditions. This is rarely done, except when it is necessary to generate a more detailed set of OS characteristics for inclusion in the Nmap database.
Nmap is a very popular open source network scanner that can be used on both Windows and Linux. Nmap or Network Mapper was developed by Gordon Luon and is currently used by security professionals and system administrators around the world.
This program helps system administrators very quickly understand which computers are connected to the network, find out their names, and also see what software is installed on them, what operating system and what types of filters are used. The functionality of the program can be expanded with its own scripting language, which allows administrators to automate many actions.
For example, scripts can automatically detect new security vulnerabilities in your network. Namp can be used with good and bad intentions, be careful not to use nmap against the law. In this tutorial we will look at how to use namp to scan ports on the Linux operating system. But first you need to try to understand how this utility works.
In computer networks, all connected devices have their own IP address. Each computer supports the ping protocol, which can be used to determine whether it is connected to the network. We simply send a ping request to the computer, and if it responds, we assume that it is connected. Nmap takes a slightly different approach. Computers also react in a certain way to certain network packets; the utility simply sends the necessary packets and looks at which hosts sent the response.
But you probably already know about this. What's more interesting is how Nmap finds out what services are running on a machine. The essence of all network programs is based on ports. To receive a message from the network, the program must open a port on your computer and wait for incoming connections. And to send a message over the network, you need to connect to a different program (destination) port. The program will then need to open the port on which it will wait for a response.
The nmap utility, while scanning the network, goes through the available range of ports and tries to connect to each of them. If the connection is successful, in most cases, by transmitting several packets the program can even find out the version of the software that is waiting for connections to this port. Now that we've covered the basics, let's look at how to use nmap to scan ports and networks.
Nmap Syntax
The Nmap launch command is very simple; all you need to do is pass it the target IP address or network in the parameters, and also specify options if necessary:
$ nmap options address
Now let's look at the main options that we will need in this article.
- -sL- just create a list of running hosts, but do not scan nmap ports;
- -sP- only check if the host is accessible using ping;
- -PN- consider all hosts accessible, even if they do not respond to ping;
- -sS/sT/sA/sW/sM- TCP scanning;
- -sU- UDP scanning nmap;
- -sN/sF/sX- TCP NULL and FIN scanning;
- -sC- run the script by default;
- -sI- lazy Indle scanning;
- -p- specify the range of ports to check;
- -sV- detailed examination of ports to determine service versions;
- -O- determine the operating system;
- -T- scanning speed, the higher the faster;
- -D- mask scanning using fictitious IPs;
- -S- change your IP address to the specified one;
- -e- use a specific interface;
- --spoof-mac- set your MAC address;
- -A- determination of the operating system using scripts.
Now that we've covered all the basic options, let's talk about how nmap port scanning works.
How to Use Nmap to Scan Ports on Linux
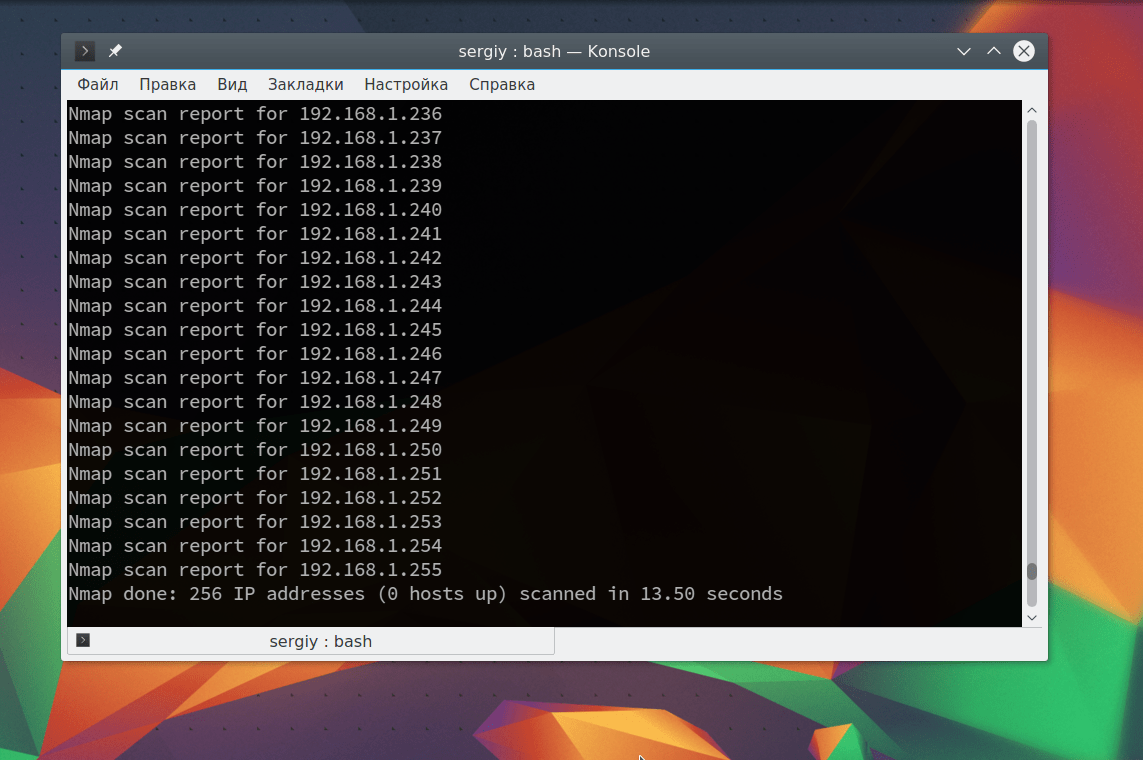
Next, let's look at nmap examples. First, let's look at how to find all devices connected to the network; to do this, just use the -sL option and specify the mask of our network. in my case it is 192.168.1.1/24. You can find your local network mask by running the command:
From the output for the interface you are using, take the number after the slash, and before the slash indicate the ip of your router. The command to scan the nmap network will look like this:
nmap -sL 192.168.1.1/24
Sometimes this scan may not produce any results because some operating systems have protection against port scanning. But this can be bypassed by simply using ping to scan all IP addresses on the network; for this there is the -sn option:
nmap -sn 192.168.1.1/24

As you can see, the program has now detected active devices on the network. Next, we can scan nmap ports for the desired host by running the utility without options:
sudo nmap 192.168.1.1

Now we can see that we have several ports open, all of which are used by some service on the target machine. Each of them can be potentially vulnerable, so it is not safe to have many open ports on a machine. But that’s not all you can do; next you’ll learn how to use nmap.
To find out more detailed information about the machine and the services running on it, you can use the -sV option. The utility will connect to each port and determine all available information:
sudo nmap -sV 192.168.1.1

Our machine is running ftp, so we can try to take a closer look at this service using standard nmap scripts. Scripts allow you to check the port in more detail and find possible vulnerabilities. To do this, use the -sC and -p option to set the port:
sudo nmap -sC 192.168.56.102 -p 21
We executed the default script, but there are also other scripts, for example, you can find all scripts for ftp with the command:
sudo find /usr/share/nmap/scripts/ -name "*.nse" | grep ftp
Then we will try to use one of them, for this we just need to specify it using the --script option. But first you can look at the information about the script:
sudo nmap --script-help ftp-brute.nse

This script will try to determine the FTP login and password on the remote host. Then run the script:
sudo nmap --script ftp-brute.nse 192.168.1.1 -p 21
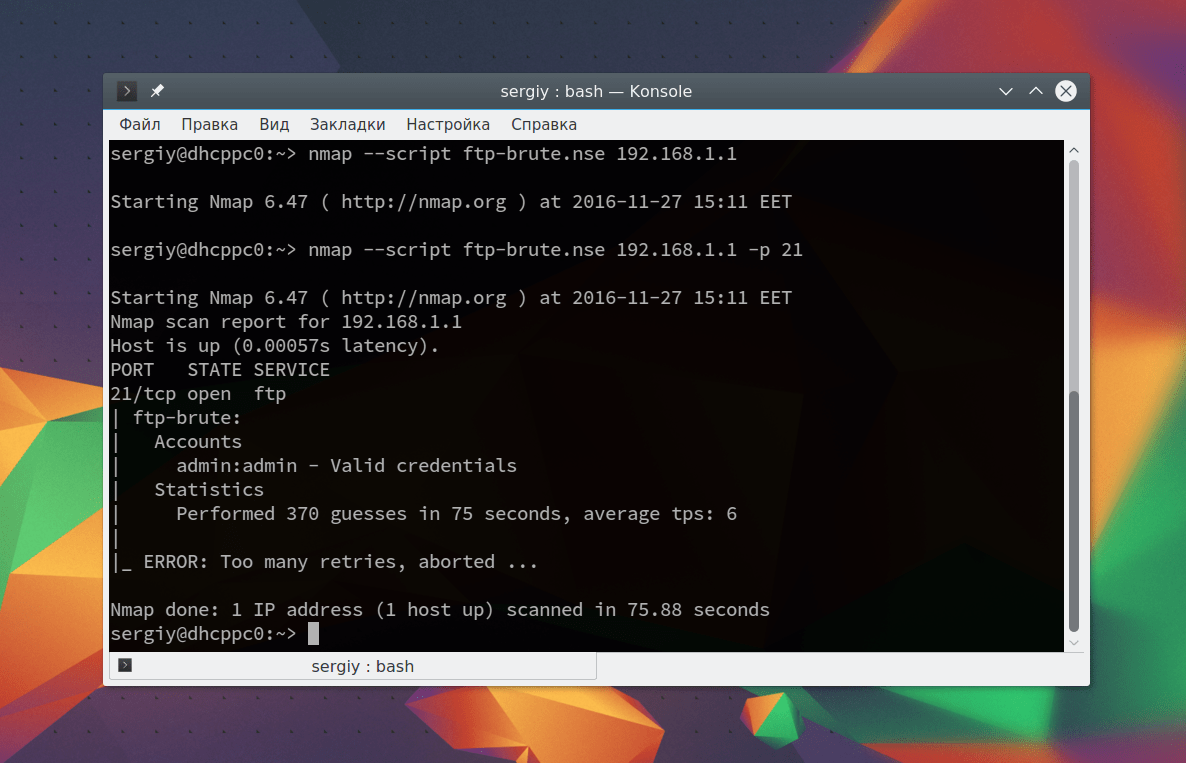
As a result, the script picked up the login and password, admin/admin. This is why you don't need to use the default login options.
You can also run the utility with the -A option; it activates a more aggressive operating mode of the utility, with which you will get most of the information with one command:
sudo nmap -A 192.168.1.1

Please note that almost all the information we have seen before is here. It can be used to increase the protection of this machine.
One of the first tasks when exploring any network is to reduce the (sometimes quite large) set of IP ranges to a list of active or interesting hosts. Scanning every port of every IP address is slow and unnecessary. Of course, what makes a host interesting for research is largely determined by the purpose of scanning. Network administrators may only be interested in hosts running a particular service, while those interested in security will be interested in all devices with IP addresses. Administrators' goals of discovering running hosts on a network can be satisfied with a simple ICMP ping, but people testing a network's ability to resist external attacks need to use a variety of query sets to bypass the firewall.
Because the tasks that require host discovery are so varied, Nmap provides a wide variety of options for different methods. The task of discovering hosts is sometimes called a ping scan, but it is far superior to the usual ICMP requests associated with the ubiquitous ping utilities. Users can skip the ping scan step entirely by using the scan to list option (-sL) or simply disable it (-PN), or scan the network using arbitrary combinations of multiport TCP SYN/ACK, UDP, and ICMP requests. The purpose of all these requests is to obtain responses indicating that the IP address is currently active (in use by the host or network device). On most networks, only a small percentage of IP addresses are active at all times. This is especially true for address spaces like 10.0.0.0/8. Such networks have 16 million IP addresses, but I have seen them used by companies with no more than a thousand machines. Host discovery can find these machines in this vast sea of IP addresses.
If no host discovery options are specified, Nmap sends a TCP ACK packet on port 80 and an ICMP echo response request to each target machine. The exception is ARP scanning of all targets on the network. For unprivileged Unix shell users, a SYN is sent instead of an ACK packet using the connect system call. These defaults are equivalent to the -PA -PE options. Such scanning is sufficient for local networks, but for security research it is necessary to use more complex sets of queries.
The -P* options (which determine the type of ping scan) can be combined. You can increase your chances of bypassing a strict firewall by sending multiple requests of different types, using different TCP ports/flags and ICMP codes. Also keep in mind that even if you specify various -P* options, by default ARP scanning (-PR) will also be performed for LAN targets, because it is almost always faster and more efficient.
By default, after detecting hosts, Nmap begins scanning the ports of each active machine. This will be the case even if you specify using non-standard host discovery methods, such as using UDP requests (-PU). Read about the -sP option to learn how to perform host discovery only, or use the -PN option to skip host discovery and perform a port scan on all target machines. You can configure host discovery using the following options:
SL (Scanning to List)
This scan type is a "lite" version of host discovery, which will simply create a list of hosts on a given network without sending any packets to the target machines. By default, Nmap will still perform reverse DNS resolution to look up hostnames. It's often surprising how much useful information ordinary hostnames can contain. For example, fw.chi is the name of a Chicago company's firewall. At the end, Nmap also reports the total number of IP addresses. This type of scanning is also a good way to verify that you actually know the IP addresses of the targets you need. If the hostnames contain domain names that you are not familiar with, then it is worth doing further research to avoid scanning the wrong company's network.
Because Since the goal is simply to compile a list of target hosts, options with a greater level of functionality such as port scanning, OS detection or ping scanning cannot be combined with the option in question. If you want to disable ping scanning but want to use options with such a high level of functionality, then read about the -PN option.
-sP (Ping scan)This option tells Nmap to perform a ping scan (determine hosts) and then list available hosts, i.e. those who responded to the requests. Route detection and NSE scripts are also used if necessary, however further testing (such as port scanning or OS detection) is not performed. By default, this option is considered one step more thorough than scanning for a simple list of hosts, and can be used for the same purposes. It allows you to explore the target network without attracting attention. Knowing which hosts on the network are currently running is more valuable to attackers than simply the list of IP addresses and network names provided by the -sL option.
This option is also useful for system administrators. It can be used to count the number of machines running on a network or monitor server availability. This is often called a "ping sweep" and the results provided by this option are more trustworthy than regular pinging of broadcast addresses because most hosts do not respond to such requests.
By default, the -sP option sends an ICMP request this reply and a TCP ACK packet to port 80. When used by an unprivileged user, it sends only a SYN packet (using the connect system call) to port 80 of the target machine. When a root user scans for local network targets, ARP requests are used until --send-ip is specified. For greater flexibility, the -sP option can be combined with any of the -P* options (except -PN). If any of these request types and options to specify port numbers are used, then the default requests (ACK and these are responses) are omitted. When there is a strict firewall between the Nmap machine and the target network, then the use of such advanced scanning methods is recommended. Otherwise, some of the hosts may not be defined, because The firewall blocked the request or response.
-PN (Do not use ping scanning)Tells Nmap to skip the host discovery step entirely. Typically, Nmap uses this step to discover active machines that can be subject to a more in-depth scan. By default, Nmap performs in-depth scans such as port scanning, version detection, or OS detection of only detected running hosts. After disabling the host detection stage with the -PN option, Nmap will scan everyone specified target IP address. So, if a network with a Class B (/16) address space is defined for scanning, then all 65,536 IP addresses will be scanned. Because By skipping the step of discovering hosts and compiling a list of scan targets, Nmap will perform the requested functions as if each IP address was active. For machines on the local network, ARP scanning will be performed (until you specify --send-ip), because Nmap needs MAC addresses to further scan target hosts. This option was previously specified by the P0 flag (zero is used), but has been renamed to avoid confusion with PO IP pinging (the letter O is used).
-PS <список_портов> (TCP SYN ping)This option sends an empty TCP packet with the SYN flag set. The default port is 80 (can be set at compile time by changing DEFAULT_TCP_PROBE_PORT_SPEC in nmap.h). Alternative ports are specified as parameters. The syntax is the same as for the -p option, except that T: type specifiers are not allowed. Examples: -PS22 and -PS22-25,80,113,1050,35000. Keep in mind that there should not be a space between the list of ports and -PS. If several requests are given, they will be sent in parallel.
When the SYN flag is set, it indicates to the remote system that you are trying to establish a connection. If the destination port is closed, an RST (reset) packet is sent in response. If the port is open, the remote system will take the second step in the 3-step sequence of establishing a TCP connection by responding with a SYN/ACK TCP packet. The system running Nmap drops a nearly established connection by responding with an RST packet instead of an ACK, which would result in a full connection being established. The RST packet is sent by the kernel of the system running Nmap in response to an unexpected SYN/ACK packet, not by Nmap itself.
Nmap doesn't care if the port is open or closed. Replies with RST or SYN/ACK packets as described above indicate to Nmap that the host is available and can respond to requests.
On Unix machines, only the root user can typically send and receive raw TCP packets. For an unprivileged user, a connect system call is initiated for each target port. Therefore, when attempting to establish a connection, a SYN packet is sent to the target host. If the connect call receives a fast response or an ECONNREFUSED failure, then the TCP stack has received a SYN/ACK or RST packet, and the host is marked as available. If the connection is not established due to timeout, the host is marked as down. This mechanism is also used for connections using the IPv6 protocol, because raw IPv6 packet construction is not yet implemented in Nmap.
-PA <список_портов> (TCP ACK ping)This type of ping is very similar to the one described above. The difference is, as you might have guessed, that instead of setting the SYN flag, the TCP ACK flag is set. Such an ACK packet aims to recognize data during an established TCP connection, but such a connection does not exist, so remote hosts will always respond to such a request with an RST packet, thereby giving away their existence.
The -PA option uses the same default port as SYN requests (80), and can also accept a list of ports in the same format as a parameter. If an unprivileged user attempts to use this option or the target is in IPv6 format, then the mechanism using the connect call described above is used. This mechanism is imperfect, because when using the connect call, a SYN is sent instead of an ACK packet.
The reason Nmap provides both types of pings (SYN and ACK) is to improve the chances of bypassing firewalls. Many administrators configure routers or other simple firewalls to block incoming SYN packets except those intended for public services such as a website or mail server. This prevents all other connections, while at the same time allowing users to access the Internet unhindered. This approach does not require a lot of resources from firewalls/routers and is widely supported by various hardware and software filters. To implement this approach, it has the --syn option. When a firewall uses these rules, requests with the SYN (-PS) flag set that are sent to closed ports are likely to be blocked. In such cases, it is more profitable to use requests with the ACK flag, because they are not subject to these rules.
Another popular type of firewall is a firewall that blocks all unexpected packets. Initially, this feature was only supported in the most advanced firewalls, although it has become increasingly popular over the years. The Linux firewall Netfilter/iptables implements this mechanism using the --state option, which categorizes packets depending on the state of the connection. It is better to use SYN packets against such systems, because unexpected ACK packets are likely to be detected as bogus and blocked. The solution to this predicament is to send both SYN and ACK requests by specifying the -PS and -PA options.
-PU <список_портов> (UDP ping)Another function used to discover hosts is UDP ping, which sends an empty (until the --data-length option is specified) UDP packet to given ports. The list of ports is specified in the same format as for the -PS and -PA options described above. If ports are not specified, the default is 31338. The default port can be set at compile time by changing DEFAULT_UDP_PROBE_PORT_SPEC in nmap.h . By default, a non-widespread port is selected, because sending requests to open ports is not desirable for this type of scanning.
The purpose of a UDP request is to receive an ICMP packet with a "port unreachable" error in response. This indicates to Nmap that the machine is running and accessible. Other types of ICMP errors, such as host/network unreachable or TTL exceeded, indicate that the machine is down or unreachable. Lack of response is interpreted in the same way. If such a request is sent to an open port, most services will simply ignore the empty packet and send no response. Therefore, the default port is 31338, because... it is unlikely to be used by any service. Only some services, such as the Character Generator (chargen) protocol, will respond to an empty UDP packet, and this will also indicate to Nmap that the machine is available.
The main advantage of this type of scanning is that it allows you to bypass firewalls that filter only TCP requests. For example, I once had a Linksys BEFW11S4 wireless broadband router. The device's internal interface filtered all TCP ports by default, while responding to UDP requests with a "port unreachable" error message, rendering its operation useless.
-PE ; -PP ; -PM (ICMP ping packet types)In addition to non-standard host discovery methods using TCP and UDP requests, Nmap can also send standard packets used by the ubiquitous ping program. Nmap sends an ICMP packet of type 8 (echo request) to the target IP address, expecting a packet of type 0 (echo reply) from the available host in response. Unfortunately for network researchers, many hosts and firewalls now block such packets instead of responding to them as required by RFC 1122. For this reason, scanners that use only ICMP requests are rarely useful when scanning unknown targets on the Internet. But they can be useful to system administrators who monitor the internal network. Use the -PE option to enable this type of scanning.
But Nmap uses more than just the standard echo request. The ICMP standard (RFC 792) also defines timestamp requests, information requests, and address mask requests with codes 13, 15, and 17, respectively. Although they serve to find out some information such as an address mask or the current time, they can be easily applied to detect targets. The system that answers them is working and available. Currently Nmap does not use information queries because... they are not widely used. RFC 1122 specifies that « the host SHOULD NOT send such messages» . Timestamp or address mask requests can be sent by specifying the -PP and -PM options, respectively. A response to a timestamp request (ICMP code 14) or an address mask request (code 18) indicates that the host is reachable. These requests can be useful when administrators are blocking echo request packets but are unaware that other types of ICMP requests can be used for the same purposes.
-PO <список_протоколов> (ping using IP protocol)The newest option for host discovery is IP ping, which sends IP packets with a protocol number specified in the packet header. The protocol list is specified in the same format as the port list in the TCP and UDP host discovery options described above. If no protocol is specified, the default IP packets will be ICMP (protocol 1), IGMP (protocol 2) and IP-in-IP (protocol 4). Default protocols can be set at compile time by changing DEFAULT_PROTO_PROBE_PORT_SPEC in nmap.h . Keep in mind that for ICMP, IGMP, TCP (Protocol 6) and UDP (Protocol 17), packets are sent with the "correct" protocol headers, while for other protocols packets are sent without additional information after the IP header (not yet specified). option --data-length).
This method expects responses based on the protocol of the original request, or an ICMP unreachable message, indicating that the protocol is not supported by the remote host. Both answer options indicate that the target host is accessible.
-PR (ARP ping)One of the most popular uses for Nmap is scanning local area networks (LANs). On most local area networks, especially those that use the private address ranges defined in RFC 1918, a large number of IP addresses are not in use at any given time. When Nmap attempts to send a raw IP packet, such as an ICMP echo request, the operating system must determine the MAC address (ARP) corresponding to the destination IP in order to correctly address the frame. This is often slow and problematic because... operating systems were not written with the expectation that they would have to send millions of ARP requests to unreachable hosts in a short period of time.
ARP scanning allows Nmap to use its own optimized algorithms instead of ARP requests. And if Nmap gets a response, then it doesn't even need to worry about other types of host discovery based on IP packets. This makes ARP scanning faster and more reliable. Therefore, it is used by default for scanning local networks. Even if other scan types are specified (such as -PE or -PS), Nmap still uses ARP scanning for machines on the local network. If you absolutely do not want to use this type of scanning, then specify the --send-ip option.
--traceroute (Trace the path to the host)Tracking occurs after a scan, using the results of that scan to determine the port and protocol that can be used to achieve the target. The procedure works with all types of scanning except scanning using the connect system call (-sT) and lazy scanning (-sI). All tracking uses Nmap's dynamic timing model and is carried out in parallel.
The route snooping procedure works by sending low TTL (time-to-live) packets in an attempt to receive an ICMP Time Exceeded message in response from intermediate nodes between the scanner and the target host. Standard implementations of the route snooping procedure begin with the TTL equal to 1 and then increase it until the target host is reached.In Nmap's implementation of this procedure, the TTL is first set high, and then the TTL is decreased until it becomes 0. This allows Nmap to use "smart" caching algorithms to increase the speed of route tracing. On average, Nmap sends 5-10 packets per host, depending on network conditions. In the case of scanning a single subnet (for example, 192.168.0.0/24), it may be necessary to send only one packet per every host.
--reason (Show reasons for port and host states)Shows information about the reasons why each port is set to a certain state, and why each host is running or not. This option displays the packet type from which the port or host state was determined. For example, an RST packet from a closed port or an echo response from a running host. The information that Nmap can provide is determined by the type of scan or ping. SYN scanning and SYN pinging (-sS and -PS) are described in great detail, and information about scanning using TCP connections (-sT) is limited to the implementation of the connect system call. This feature is automatically enabled when the debug option (-d) is used, and the results of its operation are stored in XML files, even if this option was not specified.
-n (Do not resolve DNS names)Indicates Nmap never do not perform reverse DNS name resolution for each detected active IP address. DNS resolution can be slow even with Nmap's built-in parallel IP address resolver, so this option can reduce scan time.
-R (Resolve DNS names for all purposes)Specify Nmap Always Perform reverse DNS name resolution for each target IP address. Typically, DNS resolution is applied only to accessible hosts.
--system-dns (Use system DNS resolver)By default, Nmap resolves IP addresses by sending queries directly to the name servers specified on your system and then parsing the responses. Many queries (often dozens) are executed in parallel to increase performance. Set this option to use your system IP address resolver (one IP address per getnameinfo system call). This is slow and rarely useful until you find a bug in the Nmap parallel resolver (if you find it, please notify us). The system converter is always used to scan using the IPv6 protocol.
--dns-serversBy default, Nmap determines the DNS server (for rDNS resolution) from your resolv.conf file (Unix) or from the registry (Win32). You can use this option to specify alternative servers. This option is ignored if you use --system-dns or IPv6 scanning. Using multiple DNS servers will often increase scanning speed, especially if you choose official servers for your target's IP space. This option can also increase stealth because... your queries can be forwarded by any recursive DNS server on the Internet.
This option is also useful when scanning private networks. Sometimes only a few nameservers provide the correct rDNS information, and you may not even know where they are. You can scan the network for an open port 53 (possibly using the version detection function), then try to list (-sL) by specifying all the nameservers in turn with the --dns-servers option until you find one that works .
12/09/2016
SoftPerfect Network Scanner is a program designed primarily for system administrators. The program allows you to scan your computer for sharing and also check whether open ports are listening. The program shows all shared resources, including system ones, which is very helpful in troubleshooting network problems. In addition, the program can install one or more such resources, for example, a network driver. There is a function for auto-port detection, scanning for vulnerabilities and determining the range of user IP addresses. Network Scanner can use various protocols for scanning. In and...
24/12/2015
PortExpert is a small but very useful program that will help you track all applications connected to the Internet. The application displays detailed information about all active processes found. Checking with PortExpert will help identify all threats and unwanted elements in the system that slow down its operation. Monitoring of all active applications is carried out using TCP/UDP. With PortExpert you can quickly determine the location of remote servers and see all hidden processes. The program allows you to search for the necessary information and automatically identify all related services.
30/10/2015
Nmap is a program for testing various networks to detect open ports or other network security threats. I must say that this program is one of the simplest in its class and has many different methods that help detect open ports or other threats. The main interface of the program is a regular command line and a notification window. You can enter various data on the command line, for example, you can specify checking only certain ports or addresses. Please note that to work with the program, it is advisable to have knowledge about the device...
26/03/2015
Advanced IP Scanner is a useful utility that performs instant and high-quality scanning of networks of dozens of computers. It checks and provides accurate information on IP, MAC addresses, helps to obtain data about connected devices, and even determines machine names. The application checks ports and finds folders that are accessible; it will help you find out the manufacturers of routers and network cards. The scanner works perfectly with all machines running the Radmin server. To connect to these machines, it is recommended to install Radmin Viewer. Another useful and important feature is the ability to remotely turn off the machine...
13/03/2015
Wireless Network Watcher is a useful utility that scans all wireless networks and shows all devices and machines that will be connected at a given time. For each device or machine found, the program provides IP, MAC addresses and the name of the network card, the name of the device or computer. The user can customize the format of the displayed MAC address. You can scan in the background and also place an icon in the Windows taskbar for instant access. You can set a specific sound to detect new connected devices. Moreover, it gives users the opportunity to choose the...


