How to make a distribution from Android. How to distribute mobile Internet from a smartphone via Wi-Fi? We set up an access point (Wi-Fi router) on a phone with Android OS. Setting up an Android device as a router
In this short instruction I will show you how you can share the Internet via Wi-Fi from a Samsung phone. I had the opportunity to write instructions using the example of a Samsung Galaxy J5 smartphone, with the new Android 7.0 Nougat system already installed. The same as on Samsung Galaxy S8 and other models. I think this article will be relevant for a long time and will be useful to many. In fact, setting up the Hotspot and tethering feature on Android 7.0 is very simple, just like on other versions and devices. But many users still have questions about this function.
We will distribute mobile Internet via Wi-Fi network to other devices. It will be possible to connect other smartphones, laptops, TVs and other devices. We will have a Samsung phone as a router. In the “Access point and modem” settings you can also distribute the Internet via Bluetooth and even via a USB cable. Via Bluetooth is not very relevant now, but via cable it might come in handy. For example, if you need Internet on a desktop computer that does not have . You can use your phone as a wired modem to access the Internet through your mobile operator.
Note! Since we will be distributing mobile Internet, I advise you to clarify the terms of your tariff plan. What is your megabyte limit and what is the fee over the limit. Devices connected to the hotspot may siphon all traffic and additional charges may apply.
Some operators block the distribution of the Internet to other devices. Therefore, there is an option that it may not be possible to share the Internet.
Let's start setting up the access point.
Internet distribution via Wi-Fi from a Samsung phone
Open the top curtain. If your mobile Internet is disabled, then turn on "Mobile data" and go to settings. In settings, open the "Connections" section.
Next, open the “Access point and modem” section. We turn on Wi-Fi distribution with the switch opposite the “Mobile access point” item. The status "Enabled" should appear. If you have Wi-Fi turned on, the phone will prompt you to turn it off.

If you noticed, there is an option to activate Bluetooth modem and USB modem.
Our Samsung already distributes a Wi-Fi network to which we can connect our devices. By default, the smartphone itself sets the network name (AndroidAP) and password. To view and change them, as well as view the list of connected devices, just click on the “Mobile access point” item itself.

The network name and password can be changed if desired. Just click on them and change. The password must be at least 8 characters long and the network name must be in English letters.

I connected my Windows 10 laptop to the Wi-Fi network provided by the Samsung Galaxy J5. The device immediately appeared in the list of connected devices. If you click on it, you can see some information, or change the device name.

In my case, the Internet on my laptop via a Samsung smartphone worked immediately and without problems. In the screenshots above, you probably noticed that I only get 2G (EDGE). Of course, using such Internet on a computer is not very pleasant. But now there is very good 3G/4G coverage, and everything flies there. Even if you distribute the Internet to several devices at the same time.
If you plan to use the mobile hotspot function somewhere outdoors, then I advise you to take a power bank with you, since mobile Internet paired with an access point will very quickly drain the battery of your smartphone. I also advise you to disable this function when you do not need it. Well, keep an eye on your traffic consumption and the terms of your tariff plan. So as not to receive a “terrible” bill for mobile Internet later.
Leave all questions and suggestions in the comments. Best wishes!
This year, tariff plans with unlimited mobile Internet have caused a great stir. MTS, Beeline, MegaFon, Tele2 and Yota have similar offers. Tariff plans do indeed provide for no restrictions on speed and traffic (at least that’s what the operators say). However, it was not entirely without restrictions. The biggest drawback of these plans is that they are only for smartphones. It is also not possible to use the phone as a WI-FI access point and there is a restriction on the use of file-sharing networks. Many subscribers are interested in whether it is possible to bypass these restrictions? If you put in some effort, you can bypass restrictions on Internet distribution via Wi-Fi, use a SIM card in a modem, and download files from torrents.
As part of this review, we will look at all the ways to bypass restrictions on Internet distribution via Wi-Fi (TETHERING). It is difficult to single out one single method, so you will have to independently determine the most suitable option for you. The guide is relevant for all tariffs with unlimited mobile Internet, which are characterized by restrictions on Internet distribution via WI-FI (, “MegaUnlimit” MegaFon, Beeline postpaid tariffs, Yota tariff plan for a smartphone).
All ways to bypass restrictions on Internet distribution
On the Internet you can find many instructions on how to bypass restrictions on Internet distribution. Unfortunately, not all of them are relevant and most do not achieve the desired result. We checked all the options and identified the most effective ones. With their help, you can bypass restrictions on Internet distribution via Wi-Fi, but we cannot guarantee a 100% result.
We will consider the following methods for bypassing restrictions on Internet distribution via Wi-Fi:
- Changing IMEI on the distribution device;
- Changing/fixing the TTL value (TTL Editor and TTL Master programs);
- Editing the host file on your computer.
Let's look at each technique separately (you can use them all). If you have any difficulties, ask questions in the comments. We also recommend visiting the relevant sections of the 4pda.ru forum, where many recommendations are collected on how to bypass restrictions on Internet distribution.
Changing IMEI on the distribution device
If you want to use a SIM card in a modem or distribute the Internet using a Wi-Fi router, you need to change the IMEI on the distribution device. You need to use the IMEI from a smartphone running on the Windows operating system. You can use any other IMEI, but then the risk increases that after some time all your efforts will be in vain. Traffic to Windows resources from a computer does not raise suspicions, since mobile devices running the Windows operating system also access approximately the same resources.
Also note that the IMEI that you are going to register in your device should not be registered in the same network. That is, you cannot connect to the network simultaneously from two devices with the same IMEI. If you can’t find the IMEI from the Windows background, you can generate it. You can download IMEI Generator WinPhone.
You can change IMEI in two ways:
- Through engineering mode;
- Via the console (Terminal Emulator).
Which method is more convenient is up to you to decide. We will provide detailed instructions for both options.
Changing IMEI through engineering mode:
- We dial in the phone: *#*#3646633#*#*, after which the engineering mode opens;
- Go to the Connectivity tab.
Select: CDS Information > Radio Information > Phone 1; - Above the AT+ line we add: EGMR = 1.7,"your_IMEI";
- To change the IMEI to the second SIM card (if any), repeat the previous step, but write: EGMR = 1.10,"your_IMEI";
- Press the SEND AT button and reboot.
- Attention
If all else fails, try putting a space after AT+.
There is another way to change IMEI, which involves using a terminal emulator. The emulator works similarly to the Windows command line. The utility can be downloaded for free from Google Play. Find the Terminal Emulator for Android app and install it on your smartphone. The number of commands that must be executed in the emulator to change IMEI may differ depending on the phone model. In most cases you will need to enter the following code:
su
echo -e "AT +EGMR=1,7,"YOUR_IMEI""> /dev/smd0.
If you have a dual-SIM device, then to change the IMEI to the second SIM you need to add:
echo "AT +EGMR=1,10,"YOUR_IMEI""> /dev/pttycmd1.
If you need to change the IMEI of your router or modem, then
Change/fix TTL value
The TTL number represents the lifetime of traffic packets. By default, for most operating systems on smartphones, it is 64. When connecting to the operator’s network, the device transmits the default value to it. If a modem or router is used to connect to the Internet, the TTL value is reduced by one unit, as a result of which the operator recognizes that the subscriber is using a SIM in a device other than a smartphone. The same applies to using a phone as a Wi-Fi access point (the smartphone acts as a router and the TTL is reduced).
Bypassing restrictions on Internet distribution via Wi-Fi by changing TTL is quite possible. You need to change the value so that packets from other devices (possibly non-rooted) when losing one from the TTL have the same value as the default TTL on the donor. Devices running the iOS and Android operating systems have a default TTL of 64. To distribute the Internet, you must assign TTL=63 to the donor.
Changing/fixing the TTL value is possible manually and using special programs. First, let's look at a method that involves changing the TTL using programs.
Let's start with the TTL Master program (previously the program was called Yota Tether TTL). For the program to function, root user rights are required. read in a separate review. Using the program, you can change the TTL value in one click. You can download the utility from Google Play. To change TTL, the free version is enough. Instructions for using the program are not required, since everything is already very clear. After launching the application, your current TTL will be indicated, as well as the TTL that must be specified in the appropriate field. Enter the required TTL and click on the “Apply” button. Now try to distribute the Internet via Wi-Fi from your smartphone. The TTL Editor program works on a similar principle.
You can change TTL on Android without using the above programs (root rights are required).
To change TTL, follow these steps:
- Turn on Airplane mode on your phone;
- Install and launch the ES Explorer application (you can use another one with similar functionality). Go to the following path: proc/sys/net/ipv4, find a file there called ip_default_ttl, open it and change the value from 64 to 63. Don't forget to save your changes before exiting the application;
- Disable Airplane mode to allow your smartphone to connect to the network;
- Turn on Wi-Fi distribution and you can connect your phone or tablet to the network.
If you need to connect your computer to your phone, then in addition to the above steps you need to perform the following manipulation:
- On the computer, click Start -> Run -> write regedit in the line;
- The registry opens, go to -> HKEY_LOCAL_MACHINE \SYSTEM\CurrentControlSet\Services\Tcpip\Parameters;
- In the right window, right-click -> New -> New DWORD value (32 bits) -> Call it “DefaultTTL”;
- Right-click on the new parameter -> Change -> On the number system, put a dot “Decimal”, enter the value in the field (64);
- Save everything and restart the computer.
Now you can distribute the Internet via Wi-Fi from your smartphone. The method works, as evidenced by numerous reviews.
The above instructions are relevant for the Android operating system. If you need to change TTL on another OS, modem or router, then follow this link and use the corresponding guide.
Editing the host file on your computer
The hosts file is designed to match domain names (sites), which are written using symbols, and the corresponding IP addresses. It is necessary to edit this file in order to block resources through which the operator detects Internet distribution. Unfortunately, it is physically impossible to assemble a universal hosts file, so install a traffic analyzer and monitor on which resources the operator detects the distribution. A lot of useful information on editing the hosts file can be found by clicking on the link above (4pda.ru).
The hosts file is located in the folder with the Windows operating system, usually the “C” drive on the user’s computer. To quickly access a file, press the “Windows” + “R” key combination on your keyboard. This will open the Run window. In the “Open” field, enter the command: %systemroot%\system32\drivers\etc and click on the “OK” button. Next, the “etc” folder will be opened, in which the “hosts” file is located.
Conclusion
Bypassing restrictions on Internet distribution via Wi-Fi is quite feasible, but no one can guarantee that the results obtained will last for a long time. We have repeatedly tested various ways to bypass restrictions and most of them stopped working after some time. You can try the techniques described in this article or find other methods on forums, but operators will always ensure that the restrictions they set are difficult to bypass.
If you know of working schemes that were not mentioned in the review, share them in the comments.
Many of us have access to the Internet, and most of us have more than one device in our home that can potentially connect to Internet resources. Computer, phone, tablet, laptop, organizer - all of this can be used to surf the global network. But on the same phone it is somewhat difficult and expensive to use the traffic offered by the mobile operator. But buying a router for one device, you see, is unprofitable. However, there are quite simple and convenient alternative connection options, which are discussed below.
Internet distribution via Wi-Fi without a router
Imagine that you have a laptop or computer with a Wi-Fi adapter that is connected to the Internet. And you want to make it an access point to the global network for other devices. First of all, you need to disable your antivirus firewall or Windows Firewall. If you do not do this, then distributing the Internet from your computer will not work, no matter how much you manipulate the connection settings. It is also worth remembering that in order to distribute Internet traffic, the computer or laptop must be turned on.
To disable the Windows Firewall, do the following:
- Open the control panel. In the Windows search (magnifying glass icon next to “Start”), enter control and select the “Control Panel” item in the search results.
Through Windows search, find and open “Control Panel”
- Click on the item “Windows Firewall” or “Windows Defender Firewall” depending on the version of the system you have installed.
Open the Windows Defender Firewall panel
- Click the link “Turn Windows Defender Firewall on or off.”
- Check the “Disable…” checkboxes and confirm the changes by clicking OK.
Disable the firewall and save changes
Switch the view to small or large icons.
The “Control Panel” contains operating system controls
After this, you can safely begin creating a wireless connection.
It is possible that your computer's firewall function has been taken over by the antivirus program's firewall. In this case, you will have to disable it too. Moreover, it is a firewall, and not protection against viruses and malware. Do not weaken your computer's security under any circumstances.
Via command line
One of the easiest ways to create a virtual connection is to use the command line (CL). It is very convenient because you set the connection parameters yourself and can turn the network on or off at any time.

These manipulations complete the creation and activation of the Wi-Fi virtual network. Now we have a working virtual network that we can already connect to, and we also have permission to transfer data over it. However, access to the Internet is not yet available; it needs to be opened. For this:
- Open the “Control Panel” and select the “Network and Sharing Center” item.
"Network and Sharing Center" is one of the main computer management tools
- You will see a list of networks to which you are connected. Select the one that provides your computer with access to the Internet, and click the button next to the word “Connections:”.
The Network and Sharing Center shows a list of your computer's network connections and information about each of them.
- In the window that opens, click on the “Properties” button.
Select “Properties” to configure the network connection
- Go to the “Access” or Sharing tab. Select the network you created, most likely it will be called “Wireless Connection” (Local Area Connection) with a number at the end. We check the boxes allowing users of this network to access the Internet. Confirm the changes with the OK button.
Opening access to the Internet from the selected network
- After this, your Wi-Fi network can be detected by any device within a radius of 10 meters, and you can enter it if you know the password.
There is a small disadvantage to using this method: after each reboot of the computer, the virtual network must be turned on again, which is not very convenient. But you can create a basic auxiliary interface.

As a result, we have command files for starting and stopping the virtual network, which greatly simplifies working with it.
Video: how to set up Internet distribution via Wi-Fi from a laptop using the command line
Using third party programs
Craftsmen have long been renowned for their ability to create products that are significantly more convenient than standard Microsoft processes. Distributing the Internet without a router is just one of the areas that amateur programmers have chosen. Let's take a look at some of the popular utilities they've written.
MyPublicWiFi
The MyPublicWiFi program is perhaps the most basic. The process of working with it is very simple: you launch it, click the Set up and Start Hotspot button, and the program itself creates a virtual network. You can change some data, for example, the network name or password (choose something different from the standard ones).
MyPublicWiFi automatically creates a virtual network
WIFI Hotspot Creator
Another representative of the class of programs for distributing the Internet through the creation of a virtual network is WIFI Hotspot Creator.
WIFI Hotspot Creator also creates a virtual network with the click of a button
This utility works in a similar way: with one click it creates a virtual network. The only difference from the previous program is that you need to manually select the connection that will supply Internet traffic. Then press the Start button and a Wi-Fi connection will appear, ready to use.
Programs that work on the principle of MyPublicWiFi and WIFI Hotspot Creator only create a virtual network. You need to disable the firewall and allow Internet distribution, as described in the instructions above, yourself.
Internet distribution via USB to a smartphone with Android OS
Thanks to the capabilities of Android, you can very quickly distribute the Internet to your smartphone via a USB cable. You don't need any additional software or any drivers for this. Although a little preparatory work is, of course, necessary.
- First, connect your smartphone with a USB cable to your computer, then open the settings in it, scroll down and select the “For Developers” item.
In the settings, select “For Developers”
- In the menu that opens, check the box next to “USB Debugging”. Now you can connect your phone to your computer.
Enable “USB Debugging”
- Then we return to the settings and click on the “Advanced” item. Depending on the OS version, the item may also be called “More...”. The main thing is that it is next on the list after “Data Transfer”.
Select "Advanced" or "More..."
- Check the box next to “USB Internet”. At this point, the preparatory work with the smartphone is completed, and you can proceed to the PC settings.
We create a local network with a computer by enabling the “USB Internet” function
- Open TsUSiOD. Most likely, you already have an additional local network in addition to the one you had before. Click on “Change adapter settings” (the button in the left column).
Click on the item “Change adapter settings”
- Right-click on the connection that has access to the Internet and select “Properties”.
Open the Internet connection properties
- Go to the “Access” tab, select “Local Area Connection*11” or something similar that you have created, and check the “Allow...” checkboxes. Save the changes with the OK button.
In the access settings, we allow local network access to the Internet
- Next, open the properties of the network that connects the computer and phone.
Open the properties of the local connection
- We open the same fourth Internet protocol and change the checkboxes to manual address settings.
- We enter the following data:
- IP address: 192.168.137.5 (the last cell can be filled with any number other than 1);
- subnet mask: 255.255.255.0;
- default gateway: 192.168.137.1;
- preferred DNS server: 8.8.8.8;
- alternative DNS server: 8.8.4.4.
- We check the correctness of the entered data and save the changes with the OK button.
In the window that opens, select “IP version 4 (TCP/IPv4)” and click “Properties”.
Open the settings of the protocol “IP version 4 (TCP/IPv4)”
Change the IP address from 192.168.137.1 to 192.168.0.1 and save the changes. The Internet on your phone will work after this.
It is possible to create a local network between computers and distribute the Internet within it if one of the computers is connected to the Internet. The disadvantage of this method is that if you have two PCs, then one of them must have two network cards, and this is not always convenient. If you have cable Internet and a laptop, then it is very difficult to distribute the Internet over a local network: you will need to buy additional adapters or hubs, since a laptop always only has one network card.
Setting up a computer that distributes the Internet
When you connect two computers with a network cable, a local network will automatically be created between them. We immediately go to “Change network adapter settings”, as in the example above. In the same way, we allow access to the Internet for the newly created local network, not forgetting to first disable the firewall.

By these actions, we set the network parameters to ensure the possibility of transmitting Internet traffic packets within it.
Setting up connections on receiving computers
Receiving computers must be configured in an almost identical manner.
Now the network between the two computers is configured: all addresses match each other, and Internet traffic packets are transmitted.
Video: how to distribute the Internet over a local network
Pros and cons of distributing the Internet without a router
Each user, without the use of additional equipment, can turn his computer into a real hub and create a network of several computers through a chain of local connections. The advantages of this approach are obvious: you don’t need to spend money on extra devices, buy one or more routers, and you can simply connect computers to one another. But it also has disadvantages. You can distribute the Internet only within one network, and it’s good if it’s Wi-Fi: you can connect several devices to it at once. And if this is a local network, then you can distribute the Internet to only one computer at a time. If you distribute the Internet in a chain, then each computer must have two network cards. For the sake of uninterrupted access to the Internet from the last computer in the chain, the entire series of devices must operate in constant mode. That is, in some cases, routerless distribution can be very inconvenient to use.
At the same time, using a Wi-Fi router frees you from such inconveniences. Even the weakest routers cover a much larger distribution area than standard laptops, as well as a minimum of four cells for local connection.
When it comes to comparing transfer speeds, the slowest way to connect to the Internet is a laptop Wi-Fi hotspot. In some models, the data transfer rate of the wireless adapter does not exceed 5–25 Mbit/s. If the tariff provided by your provider provides a higher speed, then the devices connected to the virtual network will be significantly limited in traffic. In addition, the Wi-Fi network is affected by physical obstacles. Thus, devices located behind a wall at a distance of 5–6 meters may experience communication difficulties: gaps and “holes” in the transmission of information packets are possible. Therefore, this method of Internet distribution is considered the cheapest in terms of costs, but the most unreliable and unsuitable for large houses.
At the same time, access via the local network is more reliable and faster. Their disadvantage is the lack of mobility: in the case of a phone, you are limited by the length of a standard USB cable (using an extension cord will affect the speed), and with a network cable you can get confused, and in most cases it has very fragile plugs. Of course, in the case of a PC this is not a problem, but if the second device is a mobile phone or a laptop traveling throughout the house, then there will be inconvenience. Internet transmission over a local network is practically unlimited in speed: the average speed of an Ethernet cable is 100 Mbit/s, a USB cable depends on the manufacturer, the minimum is 10 Mbit/s.
Distributing the Internet from a computer to other devices is quite simple. The main thing is to follow the instructions, and then you will be able to enjoy all the delights of the Internet not on one computer, but on several devices at once.
Immediately after you have done this, all devices nearby will be able to connect to the new access point. However, initially this point uses standard settings from the phone manufacturer, that is, it will be called something like “Sony Xperia Neo” and use a password when connecting. To view this password or even change all these parameters, go to the “Access point setup” item, which is located immediately below the switch that turns it on.
Setting up an access point for a Wi-Fi network on an Android device
By clicking on it, you will see two fields - “Network name” and “Security”. And if the first one simply determines what exactly your WiFi network will be called on other devices, then the second one is worth talking about in more detail.
In total, the “Security” field offers you three options - WPA PSK, WPA2 PSK, as well as the “No” option, which means that your network will not be password protected and anyone can connect to it. And if the first two names don’t mean anything to you, let’s look at them in more detail.
- WPAPSK is WiFi Protected Access, that is, a system for protecting WiFi routers from unauthorized connections. The main tool for this protection is a password that must be entered on each device. The PSK prefix stands for a simplified protocol used by Android devices.
- WPA2 PSK is an improved security protocol that supports stronger encryption. The downside is that on weaker devices the speed may drop in this mode, and some WiFi devices simply do not support this protocol at all (for example, Nintendo DS). However, if you only need to distribute the Internet to an Android tablet, there should be no problems.
Jpg" alt="Wi-Fi access point" width="150" height="267" srcset="" data-srcset="http://androidkak.ru/wp-content/uploads/2015/10/tochka-dostupa..jpg 168w" sizes="(max-width: 150px) 100vw, 150px">
!}
 .jpg" alt="Basic access point settings" width="150" height="267" srcset="" data-srcset="http://androidkak.ru/wp-content/uploads/2015/10/nastroyki-tochki-dostupa..jpg 168w" sizes="(max-width: 150px) 100vw, 150px">
!}
.jpg" alt="Basic access point settings" width="150" height="267" srcset="" data-srcset="http://androidkak.ru/wp-content/uploads/2015/10/nastroyki-tochki-dostupa..jpg 168w" sizes="(max-width: 150px) 100vw, 150px">
!}

This is done by creating a mobile hotspot on the phone, which thus provides access to the Internet. In this article we will demonstrate how this is done using an Android phone as an example.
Step No. 1. Open Android settings.
First, you need to open Android settings. To do this, open the list of all applications and find the application called “Settings”. You can also open settings using the top curtain.
Step No. 2. Open the “Other networks” section.
After opening the settings, go to the “Other networks” section. On some phones, this settings section may be called “More” or something else. But, it will always be located next to the Wi-Fi and Bluetooth settings.

Step No. 3. Open the “Modem and access point” subsection.

Step #4: Turn on the access point.
Now you need to enable the access point. To do this, move the "Portable Hotspot" switch to the on position. On some phones, to enable the access point, you need to check the box next to the corresponding item.
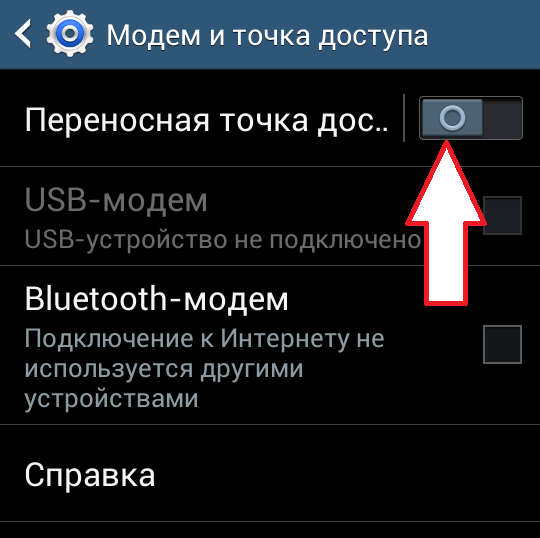
After turning on the Wifi hotspot, a window may appear asking you to confirm the action. Here we simply click on the “Yes” button.

Step No. 5. Look at the password for your access point.
In order to connect to the access point on your phone, you need to know the password. To do this, after turning on the access point, open the “Portable access point” section.

Here you can find out the name of your access point (its SSID), as well as the password.

Step No. 5. Connect to Wifi using a computer.
Once the access point has been created, you can begin connecting the computer. To do this, click on the Wifi icon on the taskbar.

After this, a list of available Wifi networks will appear on the screen. Among them will be the hotspot created by your phone. Select it and click on the “Connection” button.

After this, a window will appear asking you to enter a security key. Enter the password for our access point on the phone.
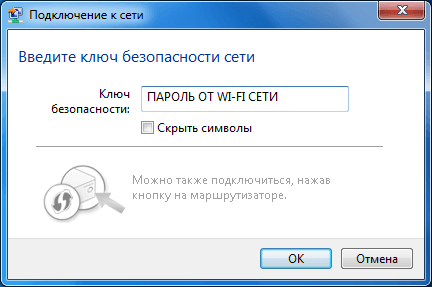
That's all, if the password is correct, the computer will connect to the access point and the Internet should work.


