How to set a computer shutdown timer. How to set the Windows shutdown timer. Quickly disable the timer
Many users of home computer systems and office workers are well aware that sometimes it is necessary to use a computer shutdown timer. We will further consider Windows 7 as an example, although in all other modifications of this operating system the actions are completely similar.
But what is this for? There are a lot of situations that can be cited. For example, a person watches a movie on the computer in the evening, but realizes that he can fall asleep and the computer will remain on. An office worker, in order to avoid access to the terminal while he is away, may forget to put the system into sleep mode. Thus, it is necessary to decide in advance the question of how to set the computer shutdown timer (Windows 7). There are several simple ways to carry out this procedure, which will be discussed further.
How to Set a Computer Shutdown Timer (Windows 7): Basic Methods
The methodology behind setting a preferred amount of time before the computer shuts down on its own is quite simple.
As in any other system, in Windows 7, turning off the computer using a timer can be done either using the built-in tools of the system itself, or using special third-party programs. Very often you can find not even full-fledged applications, but so-called widgets that are installed on the “Desktop” in the same way as is done in mobile devices.
As the most commonly used tools in Windows 7, shutting down your computer using a timer can be done either from the command line or from the Run menu. Both methods are almost identical to each other, the only difference is in the commands entered, although they can equally be used both ways.
Set the computer shutdown timer (Windows 7) from the command line
First, let's look at the actions with the command line, called through the execution console (Win + R) by entering the cmd combination. Note that in this case it is not necessary to run it with administrator rights, since the enable or disable commands used work at the user level as well.

After calling a command console window reminiscent of old DOS systems, you need to enter the line shutdown /s /t XXXX (or -s -t), where XXXX is an arbitrary time interval value expressed in seconds (for example, for one hour it is 3,600 ). After this, the enter key is pressed, and a message appears on the screen indicating the period after which the computer will shut down and the final shutdown time.
Setting shutdown in the Run console
Basically, to avoid using the command console, the computer shutdown timer (Windows 7) can be activated directly from the Run menu, which looks much simpler.

After calling the menu, you need to write in it a line similar to the first example, but using other attributes: shutdown -s -f -t XXXX. Please note that while execution attributes can be written on the command line without spaces, here they are required.
In both examples, the “-f” attribute does not have to be used, but its use will allow the system to be shut down forcibly if any programs freeze.
Using the Task Scheduler

In Windows 7, you can also set the computer to turn off using a timer using the so-called “Task Scheduler,” which can be called up through the administration section in the computer properties or “Control Panel” or found through the search engine of the main “Start” menu. This program is standard and is present in absolutely all modifications of Windows systems:
- In the editor, you should use the "Scheduler" library section located on the left, and on the right in the action menu - create a simple task.
- Next, in the name field you need to enter the desired name of the task (for example, “Shutdown”).
- Then (which is very important) indicate the execution mode (once, daily, etc.).
- After this, the continue button is pressed, in the programs and scripts section, the shutdown command is selected with the browse button or the shutdown command is entered manually, and the above attributes are written in the add arguments field (-s -f or /s/t/XX, where XX is the time period, again, expressed in seconds).
- Then all you have to do is click the continue button and “Done” again.

Quickly disable the timer
Now a few words about how to disable the computer shutdown timer (Windows 7). Based on the described methods of activating it, you can accordingly use two methods of disabling it:
- The first method, if you were using the Command Prompt or Run Console, is to call them again and issue the command “shutdown /a” for the Command Prompt or “shutdown -a” for the Run Console without the quotes.
- In the same way, the question of how to disable the computer shutdown timer (Windows 7) can be easily resolved in the “Task Scheduler” itself. In this case, all actions boil down to finding the created task in the library section in the middle column and deleting it through the corresponding line in the RMB menu.
The most popular programs and widgets for setting a timer
However, many users may find the above methods too complicated, and some do not like to delve into Windows settings at all. In this case, some third-party utility can be used, generally referred to as the “Computer Shutdown Timer” program (Windows 7).
You can find a lot of such utilities, they all have a minimal size and, as a rule, do not require installation. But after launch, widgets appear on the “Desktop”, and applications constantly “hang” in the system tray. Actually, that’s why access to their settings is carried out differently.

- PowerOff is a small utility with settings for specific times of shutdown, sleep, reboot, etc.;
- TimePC is a program that allows you not only to set a shutdown, but also to put the computer into hibernation mode and wake the system from it according to specified time parameters;
- AutoShutdown - “Computer shutdown timer” widget (gadget) (Windows 7) with capabilities similar to the first two utilities, but always present on the “Desktop”;
- Ultimate Shutdown and PC Autos are simple gadgets for controlling PC operating modes.
Conclusion
As you can see, in Windows 7, turning off the computer by timer can be activated in several ways. Which of these should you prefer? It seems that the most logical solution is to use the system’s tools and tools, although third-party widgets can also be a simple solution. That's just how you like it.
However, in the case of the “Scheduler”, the decision to activate the timer looks somewhat more complicated. In addition, special attention should be paid to its operation modes. It is clear that when setting daily operation, when a person forgets about the installed settings, the computer will turn off at a strictly defined time, and the user will begin to puzzle over why this is happening.
But disabling it in the form of the described commands for the command line and execution console allows you to cancel shutdown not only by timer, but also by standard procedure. True, to use this method, a person must have a good reaction and have a prepared means of quick access to commands at hand.

But, by and large, even in multimedia players, after watching a movie or listening to a music album, you can set the action to turn off the system by setting the appropriate action in the settings.
Surely every PC user sooner or later wondered what would be nice if the computer itself could stop working at a strictly defined time that we need.
Such a useful function may, for example, be needed when we download movies at night and go to bed, because it is no secret that in many regions of Russia night Internet traffic is much cheaper than daytime traffic or is not charged at all.
And in this case, we will have to try hard not to oversleep in the morning in order to turn off the PC in a timely manner and stop downloading files.
How to set a timer to automatically turn off your computer
We may also simply forget to turn off our computer when we are late, for example, for work. In general, as they say, cases are different. Therefore, the function of automatically turning off a PC is absolutely necessary for everyone.
Setting a timer to automatically turn off your computer is an easily solved problem
In fact, there are an incredible variety of ways to solve this problem - from the built-in tools of the Windows operating system (all configurations - 7, 8, 10) to programs specially developed for this purpose.
The simplest and most accessible methods of how to set a shutdown timer on a computer or laptop and where you can download such a shutdown timer for free in Russian will be discussed in this article.
Set the shutdown timer using Windows tools
Perhaps the most accessible ways to set a timer to automatically turn off our computer are the useful tools provided in the operating system itself to solve this issue. I'll tell you about the two simplest of them.
Method 1. Set the timer via the command line
So, first we need to open the command line. This can be done in two ways - either through the "Start" menu - "All Programs" - "Accessories" - "Run", or by simultaneously pressing two "R + Win" keys on the keyboard.
Call up the “Run” window by simultaneously pressing “R” and “Win”
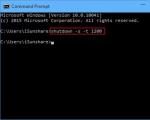
In the window that appears, enter the following: “shutdown -s -t N”.
Attention! N is the time value in seconds before the required automatic shutdown of the computer.
Let's say we need the PC to turn off after 10 minutes, therefore, through simple mathematical calculations in our heads, we get the value N = 600 seconds. We substitute this value into our formula “shutdown -s -t 600”, which in this form is entered into the “Run” window, as shown in the photo:
Write the required command in the "Run" line
A message appears warning you that the system will stop working in 10 minutes
Thus, there are 10 minutes left before the computer automatically turns off. After this time, the PC will be turned off and all programs will be closed. In this case, we will be given the opportunity to save our work, as is done when we normally end the session and turn off the computer manually.
Note: In order to force all programs to close when the scheduled time expires, we add the “-f” parameter to our formula.
To force the computer to shut down without saving open documents, add the "-f" parameter
If for some reason you change your mind about turning off the computer using the set timer, then you can cancel your action by calling the command line again, into which you now need to enter the command “shutdown -a”.
To disable the timer that reports the time until the computer turns off, enter the command shutdown -a
After executing this command, we will see a pop-up window stating that the automatic shutdown of the computer has been cancelled.
A window will appear informing you that shutdown has been cancelled.
Naturally, this method of starting a timer is not entirely convenient for regular use. Therefore, it can be easily improved if you follow these instructions:
Note: In order to change the shortcut icon to any other one of your choice, right-click on our shortcut, then select “Properties”, then “Change Icon”.
We change the appearance of our icon at our discretion
Method 2: Windows Task Scheduler will help you shut down your PC automatically
Another simple way to set a time to automatically shut down your computer is to use the Windows Task Scheduler. To implement it, follow the step-by-step guide:
Simultaneously press the "Win" and "R" keys and call the command line;
In the line that appears, write the command “taskschd.msc” and click “Ok”, thus calling the Windows system task scheduler;
In the "Run" window, write the command "taskschd.msc" and click "OK"
In the menu on the right of the “Task Scheduler”, select the option “Create a simple task”;
In the task scheduler, click "Create a simple task"
Now come up with a name for the task and click “Next”;
Specify the name of the task at your discretion
We indicate the task trigger, for example, “one time” and click “Next”;
Set the required task trigger
Now set the date and time to run the task and click “Next”;
Specify the date and time when you need to run this task
Select "Run the program" and click "Next"
The last window of the Task Scheduler “Running a program” appears and the line “Program or script”, where we enter the command “shutdown”, and in the line “Add arguments” we write “-s”, click “Next”.
Fill in the lines “Program or script” and “Add arguments”
Now, strictly at the specified time, the task scheduler will launch a program to automatically turn off the computer.
Universal timer programs for turning off a PC
Above, we looked at ways to achieve automatic shutdown of a computer or laptop at a designated date and time without resorting to third-party programs, but only using the Windows system itself. Now it’s worth talking about the software that will help solve this problem even easier.
The PowerOff program will help you cope with the task
And the first program that we will look at will be a small universal utility with a timer function PowerOff.
Run the executable file of the program
A multifunctional panel opens before us, with the help of which you can perform not only a programmed shutdown of the computer, but also many other tasks.

Control of electrical appliances that require periodic switching on for a certain time: street lighting, heating, aquarium compressor - can be done with smart sockets, with a countdown function. The socket timer can be mechanical or electronic. Each of them has its own characteristics and functionality.
Functions
A socket with a timer can be used to solve a wide range of problems.
First of all, a programmable household socket allows you to save energy. It will turn off the electric heating while the owners are away and turn it on before they arrive for the period of time necessary to achieve normal temperature. Not every socket with a timer is designed to control powerful heating devices, so when purchasing, you should read the instructions.
An automatic socket with a timer allows you to regulate outdoor lighting and control irrigation in an automated mode. It will also, according to a given schedule, control the electrical equipment of aquariums, terrariums and swimming pools.
Electronic timers allow you to program a time schedule without a strict time reference, with random on-off cycles. This mode of operation simulates the presence of people, even if they are not actually in the house, which will scare away the criminally inclined contingent.
Sockets with countdown timers are also available. Devices of this type are used on washing machines and electric stoves. The required time is indicated by turning the time relay knob; after it has been counted, the load is turned off.
Types of timers
The devices under consideration are divided according to the principle of operation of timers into mechanical and electronic.
The simplest version of a mechanical timer is a countdown timer made on the basis of a clock mechanism, which is wound by turning the handle.

The greatest demand is for sockets with mechanical daily programs. Because the electric motor of a clock mechanism requires electrical energy to operate, they are sometimes called electromechanical timers. Batteries are used as backup power. The load control program is created mechanically through a series of segments at 15-minute intervals.
An electronic timer for a household outlet makes it possible to set programs for the week and month, as well as display the real time and parameters of the specified programs on a liquid crystal display.
Features of the electromechanical timer
 A mechanical socket with a disk timer is programmed using a rotating actuator disk and buttons (petals) located around its circumference. The disc is marked with marks at 15 or 30 minute intervals. Using the buttons you can turn the load on and off. Models are produced in which a raised button will turn it off, while for others it will turn it off. On the side of the timer there is a button to switch the operating mode - continuous voltage supply and adjustable.
These devices allow you to switch the load at intervals of 15 minutes without limiting the number of switchings. But installing programs with complex algorithms here, much less arbitrary ones, is almost impossible. Mostly daily and weekly cycles are used.
Setup instructions
The instructions for the device clearly show how to correctly set up a mechanical timer for an outlet. It all comes down to the following steps:
- set the mode switch to the constant voltage position;
- by rotating the actuator disk, set the real time - a mark with its value opposite the fixed one;
- to configure the connection and disconnection time periods, you need to press or release the buttons corresponding to the desired period;
- insert the plug of the connected device into the timer plug;
- connect to a power outlet;
- move the mode selection button to the “Adjustable” position.
When operating, the device makes a low buzzing sound. The established mode can be performed every day. When editing it, the socket with the timer must be disconnected from the power supply.
For more information on setting up a mechanical socket, see the following videos:
Electronic timers
These devices make it possible to set up to 140 programs for controlling electrical appliances. Many of them have an operating mode that creates a “presence” effect, which allows you to control the lighting in the house in a chaotic manner at a specified time (for example, from 19.00 to 24.00). The shortest period of time specified is 1 minute.

The advantages of electronic timers are:
- the ability to specify the days of the week for executing a given program;
- manual and automatic activation;
- autonomy – the capacity of the backup battery allows you to save settings for 4 days;
- availability of a separate program with a validity period of more than 2 years.
Setting up an electronic timer
Before setting up an electronic type timer, you need to know what the existing keys are for:
- MASTER CLEAR – completely resets all device data.
- CLOCK – multi-purpose, responsible for:
- Real time setting. Pressed together with HOUR, MIN, WEEK;
- switching time formats - twelve and twenty-four hours. Pressed together with TIMER;
- setting winter or summer time in conjunction with ON/AUTO/OFF.
- TIMER – delay time programming. Pressed together with the WEEK, HOUR, MIN and CLOCK keys.
- WEEK – used to set the day of the week.
- HOUR – sets the hours.
- MIN – sets the minutes.
- ON/AUTO/OFF – turns on the desired operating mode – ON/AUTO/OFF.
- RANDOM – turns on the presence mode.
- RST/RCL – disables and enables programs.
The setup begins with setting the real time. When the CLOCK key is held down, the hours are set using the HOUR key, and the minutes using the MIN key. The desired format, 12 or 24 hours, is set with the TIMER key.
Setting the days of the week is done using 2 keys. First press CLOCK and use the WEEK key to select the day of the week. The choice of summer or winter time is made by pressing the ON/AUTO/OFF key while pressing and holding CLOCK.
Operating modes

Electronic timers have four main operating modes:
- disabled, regardless of the settings, load control is disabled. To enable the mode, use the ON/AUTO/OFF key to set the value to Manual OFF;
- included. Switching to this mode is carried out by selecting the Manual ON value using the ON/AUTO/OFF key;
- auto. This mode is activated when selecting the AUTO mode using the ON/AUTO/OFF key. After which the installed program begins to execute;
- execution of the “presence” mode. It turns on after pressing the RANDOM key and setting the R value.
To create programs, press the TIMER key. You can also select previously created programs. Then perform the following sequence of actions:
- when you briefly press TIMER, the indicator will show ON 1. This indicates that the load connection time is being adjusted;
- Use the WEEK key to select the day of the week. Hours and minutes are set using the HOUR and MIN keys.
- after setting the connection time, press the TIMER key again - the indicator will show OFF 1. After this, in the above order, set the disconnection time;
- The next program is configured in the same way. Quick viewing of created programs is carried out by pressing and holding TIMER;
Once all settings have been completed, press CLOCK to save them and exit programming mode. The smart plug with digital timer is ready for use.
Learn more about electronic timer settings in this video:
As a result, when choosing timers, it is necessary to take into account that the cost of electronic devices is much higher than their electromechanical counterparts. Their purchase is justified if there is a need for a weekly or monthly implementation of a given program or for use in the “presence” mode. If you need a regulator with a daily cycle, preference should be given to a socket with a mechanical timer.
Automatic shutdown of the computer is an extremely useful option that will help you out more than once. It will come in handy in cases where your PC or laptop is busy with a long process and you need to leave. In this case, you can configure the computer to turn off - when the desired operation is completed, it will turn off on its own. And you can calmly go to bed, go to work or do your other things.
Most often, configuration is required if you:
- check your PC for viruses;
- convert video files;
- install a computer game;
- download large files;
- copy important data, etc.
There are many options here, but the point should be clear.
The first is using built-in Windows tools. The second is using additional software. Read about the last method here:. And this article describes all the possible ways to configure the computer to turn off at a given time using built-in Windows tools.
All of the methods below are universal and work on Windows 7, 8 and 10. Therefore, no matter what operating system you have, you can schedule your computer to shut down in any convenient way.
The first method on how you can enable automatic shutdown of a computer or laptop is to use the “Run” section. To do this:
The following window will appear confirming that everything was done correctly.

The number 3600 is the number of seconds. It can be anything. This particular command activates the automatic shutdown of the PC after 1 hour. The procedure is one-time only. If you need to turn it off again, you must do it again.
Instead of the number 3600, you can write any other number:
- 600 – shutdown after 10 minutes;
- 1800 – after 30 minutes;
- 5400 – in an hour and a half.
I think the principle is clear and you can calculate the required value yourself.
If you have already activated the computer to shut down and for some reason changed your mind, then call this window again and write the line shutdown -a . As a result, the scheduled automatic shutdown will be cancelled. If everything is done correctly, the following message will appear.

Shutting down the computer via the command line
Another very similar method is through the command line. To enable this option:

If you suddenly change your mind about performing this operation, then open this window again and enter – shutdown -a.

This command only works when you have already set the time to turn off the computer, but it has not yet arrived.
By the way, if this procedure needs to be performed regularly, then there is an easier way. To avoid opening the Run window or Command Prompt, create a shortcut (for example, on your desktop). And in the “Object Location” field write the following line C:\Windows\System32\shutdown.exe -s -t 5400(the number can be any). Click Next, then enter a name for the shortcut and click Finish.

Now, when you need to set your computer to shut down, just click on this shortcut. And this option is immediately activated (you will see a confirmation message).
For convenience, you can create another shortcut to remove turning off the computer (in case you need it). But here you need to write down the following: C:\Windows\System32\shutdown.exe -a(no period at the end).

Turn off the computer according to schedule
And the last method is to turn off the computer by time using the “Scheduler”. Suitable if you need to perform this procedure regularly: daily, weekly, etc. In order not to constantly launch the command line, you just need to set the time to turn off your computer or laptop once and that’s it.
To do this:


This is how you can set the computer shutdown time. Daily or monthly settings are carried out in approximately the same way. Some fields will be different, but there is nothing complicated there - you'll figure it out.
What should I do if I need to edit or delete this task? In this case, go back to the “Scheduler” and open the “Library” tab. Find your task in the list here (by name) and double-click with the left button.

In the window that opens, go to the “Triggers” section and click on the “Edit” button.


If you no longer need to shut down your PC on a schedule, then go to the “Library”, select your task, right-click, and then click “Delete”.

A few words in conclusion
Many modern programs have a checkbox “Turn off the PC after the procedure is completed.” Most often, it is available in those utilities that take a long time to complete their work - for example, disk defragmentation, scanning a laptop or computer for viruses, etc.
Be sure to check that each program has this checkbox. If it is, then you will not need to configure the PC to turn off at a time. It's much easier and more convenient. If it is not there, then you will have to configure it manually.
By the way, how to correctly calculate the time when you need to turn off your PC? Usually programs show an approximate value when a specific procedure (virus scan or defragmentation) will be completed. Look at it and add another 20-30% (or more) on top. In any case, your PC will be turned off before you wake up in the morning or come home from work in the evening.
Sometimes users have to leave the computer for a while to complete a certain task on its own. After completing the task, the PC will continue to idle. To avoid this, you should set a sleep timer. Let's see how this can be done in the Windows 7 operating system in various ways.
There are a number of ways that allow you to set a sleep timer in Windows 7. All of them can be divided into two large groups: the operating system’s own tools and third-party programs.
Method 1: Third-party utilities
There are a number of third-party utilities that specialize in setting a timer to turn off your PC. One of these is SM Timer.
- After the installation file downloaded from the Internet is launched, a language selection window opens. Click on the button "OK" without additional manipulations, since the default installation language will correspond to the language of the operating system.
- Next opens Installation Wizard. Click on the button here "Next".
- After this, the license agreement window opens. It is necessary to move the switch to the position "I accept the terms of the agreement" and press the button "Next".
- The additional tasks window opens. Here, if the user wants to install program shortcuts on Desktop and on Quick Launch Toolbars, then you must check the boxes next to the appropriate parameters.
- After this, a window will open containing information about the installation settings that were previously entered by the user. Click on the button "Install".
- After the installation is complete, Installation Wizard will report this in a separate window. If you want SM Timer to open immediately, you need to check the box next to the item "Start SM Timer". Then click "Finish".
- A small window of the SM Timer application opens. First of all, in the top field from the drop-down list you need to select one of two operating modes of the utility: "Shutting down the computer" or "End session". Since our task is to turn off the PC, we choose the first option.
- Next, you should select the time counting option: absolute or relative. When absolute, the exact shutdown time is set. It will occur when the specified time of the timer and the computer’s system clock coincide. In order to set this counting option, the switch is moved to the position "IN". Next, using two sliders or icons "Up" And "Down" located to the right of them, the shutdown time is set.

Relative time shows how many hours and minutes after activating the timer the PC will be turned off. In order to set it, set the switch to the position "Through". After this, in the same way as in the previous case, we set the number of hours and minutes after which the shutdown procedure will occur.
- After the above settings have been made, click on the button "OK".


The computer will turn off after a set amount of time or when the specified time arrives, depending on which countdown option was selected.
Method 2: Using Third Party App Peripheral Tools
In addition, in some programs, the main task of which is completely unrelated to the issue at hand, there are secondary tools for turning off the computer. This feature can be found especially often in torrent clients and various file downloaders. Let's see how to schedule PC shutdowns using the example of a file download application.


Now, when the specified time is reached, the download in the Download Master program will be completed, immediately after which the PC will shut down.
Method 3: Run window
The most common option for starting a computer auto-shutdown timer using built-in Windows tools is to use a command expression in the window "Run".


If the user wants the computer to forcefully shut down programs when the computer is turned off, even if no documents are saved, then it should be set in the window field "Run" after specifying the time after which the shutdown will occur, the parameter "-f". Thus, if you want a forced shutdown to occur after 3 minutes, then you should enter the following entry:
shutdown -s -t 180 -f
Click on the button "OK". After this, even if programs with unsaved documents are running on the PC, they will be forcibly terminated and the computer will be turned off. When entering an expression without a parameter "-f" The computer, even with a timer set, will not turn off until documents are manually saved if programs with unsaved content are running.

But there are situations when the user’s plans may change and he will change his mind about turning off the computer after the timer has already started. There is a way out of this situation.


Method 4: Create a mute button
But constantly resorting to entering the command through the window "Run", entering code there is not very convenient. If you regularly use the shutdown timer, setting it at the same time, then in this case it is possible to create a special button to start the timer.
- Click on the desktop with the right mouse button. In the context menu that opens, hover the cursor over the position "Create". In the list that appears, select the option "Label".
- Starts Wizard to create a shortcut. If we want to turn off the PC half an hour after the timer starts, that is, after 1800 seconds, then enter into the area "Specify location" the following expression:
C:\Windows\System32\shutdown.exe -s -t 1800
Naturally, if you want to set the timer for a different time, then you should specify a different number at the end of the expression. After that, click on the button "Next".
- The next step is to assign a name to the shortcut. By default it will be "shutdown.exe", but we can add a more understandable name. Therefore, to the area "Enter a name for the shortcut" We enter the name, looking at which it will immediately be clear what will happen when you press it, for example: "Start shutdown timer". Click on the inscription "Ready".
- After these steps, a shortcut for activating the timer appears on the desktop. To prevent it from being faceless, the standard shortcut icon can be replaced with a more informative icon. To do this, right-click on it and select the item in the list "Properties".
- The properties window opens. Moving to the section "Label". Click on the inscription "Change icon...".
- An information alert will be displayed indicating that the object shutdown has no icons. To close it, click on the inscription "OK".
- An icon selection window opens. Here you can choose an icon to suit your every taste. In the form of such an icon, for example, you can use the same icon as when turning off Windows, as in the image below. Although the user can choose any other one to his taste. So, select the icon and click on the button "OK".
- After the icon is displayed in the properties window, click on the inscription there too "OK".
- After this, the visual display of the PC auto-shutdown timer start icon on the desktop will be changed.
- If in the future you need to change the time the computer turns off from the moment the timer starts, for example, from half an hour to an hour, then in this case we again go to the shortcut properties through the context menu in the same way as discussed above. In the window that opens, in the field "Object" change the numbers at the end of the expression with "1800" on "3600". Click on the inscription "OK".


Now, after clicking on the shortcut, the computer will turn off after 1 hour. In the same way, you can change the shutdown period to any other time.
Now let's see how to create a cancel button to turn off your computer. After all, the situation when it is necessary to cancel the actions taken is also not uncommon.


Method 5: Using the Task Scheduler
You can also schedule your PC to shut down after a specified period of time using the built-in Windows Task Scheduler.
- To go to the task scheduler, click the button "Start" in the lower left corner of the screen. After that, select a position in the list "Control Panel".
- In the area that opens, go to the section "System and Security".
- Next, in the block "Administration" choose a position "Task execution schedule".

There is also a faster option for switching to the task schedule. But it is suitable for those users who are used to remembering command syntax. In this case, we will have to call up the already familiar window "Run" by pressing the combination Win+R. Then you need to enter the command expression in the field "taskschd.msc" without quotes and click on the inscription "OK".
- The task scheduler starts. In its right area, select a position "Create a simple task".
- Opens Task creation wizard. At the first stage in the field "Name" The task should be given a name. It can be completely arbitrary. The main thing is that the user himself understands what we are talking about. Let's assign a name "Timer". Click on the button "Next".
- At the next stage, you will need to set a task trigger, that is, indicate the frequency of its execution. Move the switch to position "One time". Click on the button "Next".
- After this, a window opens in which you need to set the date and time when auto shutdown will be activated. Thus, it is specified in time in an absolute dimension, and not in a relative one, as it was before. In the appropriate fields "Begin" set the date and exact time when the PC should be turned off. Click on the inscription "Next".
- In the next window you need to select the action that will be performed when the time specified above occurs. We should turn on the program shutdown.exe, which we previously launched using the window "Run" and a label. Therefore, we set the switch to position "Run program". Click on "Next".
- A window opens where you need to specify the name of the program that you want to activate. To the region "Program or script" enter the full path to the program:
C:\Windows\System32\shutdown.exe
- A window opens that provides general information about the task based on the previously entered data. If the user is not satisfied with something, then click on the inscription "Back" for editing. If everything is in order, check the box next to the parameter "Open the Properties window after clicking Finish". And click on the inscription "Ready".
- The task properties window opens. Near parameter "Run with highest privileges" check the box. Switch in the field "Customize for" put in position "Windows 7, Windows Server 2008 R2". Click "OK".


After this, the task will be queued and the computer will turn off automatically at the time specified using the scheduler.
If the question arises, how to disable the computer shutdown timer in Windows 7, if the user changes his mind about turning off the computer, do the following.


After this action, the task to auto-shut down the PC will be cancelled.
As you can see, there are a number of ways to start the computer auto-shutdown timer at a specified time in Windows 7. Moreover, the user can choose ways to solve this problem, both with the built-in tools of the operating system and using third-party programs, but even within these two directions between specific methods There are significant differences, so the appropriateness of the chosen option must be based on the nuances of the application situation, as well as the personal convenience of the user.