Sync Folders for Mac is the best data synchronization assistant. Synchronizing devices from the mega-corporation Apple Data synchronization program for mac and windows
The popularity of Apple products in Russia is constantly growing, but still few people decide to use only a Mac without a PC. Therefore, most Mac drivers work on both Mac OS X and Windows. It is also not uncommon for a person to have a PC at work and a MacBook at home, or vice versa: at home a laptop running Windows, and at work a Mac. Consequently, the problem of data synchronization immediately appears. How to make contacts, letters, notes and other little things the same on all devices?
This issue is even more acute for owners of PDAs and smartphones that allow them to work with e-mail. It turns out that we already have three devices, the information on which must be somehow unified and brought to a common denominator. How to do this? Apple offers several solutions: first, you can use the iSync program included in the distribution of the Mac OS X operating system.
This is a very simple utility that allows you to synchronize Mac OS X with Nokia, Vertu, Sony Ericsson, Motorola and Palm mobile phones. True, not all models are supported (for the missing ones you will have to look for special plug-ins from third-party developers), and most importantly, there is no possibility of synchronization with devices based on Windows Mobile and PC computers. Here another Apple solution comes to the rescue (only this one is paid): .

MobileMe is a set of online services that includes a virtual hard drive, me.com email, and a contacts book. You can create a mailbox (@me.com) and all your emails will be automatically delivered to your iPhone, iPod Touch, Mac and PC. Same with contacts. This way the synchronization problem will be solved. However, MobileMe also has its own disadvantages and features (read about MobileMe in!), but if we talk only about synchronization issues, then the main disadvantage here is the inability to work with another (not @me.com) mailbox and, again, lack of support for Windows Mobile phones.
Thus, none of Apple’s solutions at the moment can fully satisfy the needs of Mac users who have WinMobile mobile devices and PC computers. Therefore, you need to look for third-party products. Our material today is dedicated to one such product.
SyncMate
Utility for Windows
The program “weighs” only 9 MB, which allows you to quickly download it from even over weak Wi-Fi. It installs on Mac OS X, but to work with a PC you will need to install an additional utility on Windows (this is necessary so that SyncMate on Mac can recognize your PC). It is even smaller - 5.8 MB.

True, this utility has practically no functions. The only thing it can do is show the synchronization log. Otherwise, its purpose is purely auxiliary - to make your PC visible to SyncMate on Mac. One of the disadvantages is that when you launch the utility, it immediately hides in the system tray (nothing appears on the screen), and at first (while you are not yet used to it) the question arises: did it start or not? And in order to open the settings window, you need to double-click on the SyncMate icon in the system tray. It is curious that the icon always (even when the utility is active) remains gray. It only turns color when the Mac is connected.

Now let's take a look at SyncMate on Mac itself.
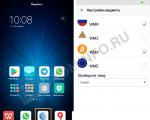
SyncMate interface and list of possible devices
The SyncMate interface makes an ambiguous impression: on the one hand, everything seems clear, but on the other hand, it cannot be called stylish, and even the SyncMate icon looks like a foreign element in the Dock. However, these are subjective feelings. It is quite possible that you will like the SyncMate interface.

When launched, the program prompts us to choose what we will synchronize the Mac with. The choice is as follows: another Mac, Windows PC, WinMobile device, Google account (this will be useful for owners of PDAs based on Google Android), S40 phones, USB Flash Drive and Sony PSP. You can also back up information to online storage.

In principle, the list is impressive, but the absence of the iPod touch and iPhone is striking. However, to work with them there is iTunes, and in addition – the already mentioned MobileMe. So let’s try SyncMate to synchronize with those devices with which this is impossible using Apple’s means. First of all, with a computer.
Sync Mac and PC
For testing, we used a computer with Windows 7 Ultimate and Microsoft Office 2010 beta. And on the Mac, Mac OS X 10.6.2 Snow Leopard and Microsoft Office 2008 For Mac Business Edition were installed.
As already mentioned, to connect a Mac to a PC, you need to run the utility on the PC and at the same time SyncMate on the Mac. After that in Connection Setup Wizard select an item Windows PC.

In the window that opens, you must enter the IP address of the PC. Next, you need to choose what exactly you want to synchronize. SyncMate offers the following list here: Contacts, Calendar, Tasks, Notes (Entourage, Mail and Sticky Notes) and Folders. However, we will see such variety only in the Expert version, which costs 950 rubles. The free option allows you to sync only your contacts and calendar.

You can select the direction of synchronization: for example, if you have a new PC, and before you used a Mac, then select This Mac -> PC. You can also choose the option This Mac PC, which will apply the latest changes to both computers.
A very interesting feature is folder synchronization. This can be useful in cases where you need to transfer some files from one computer to another, but you don’t have a flash drive or a double-sided USB cable at hand (however, even if you do, it’s much more convenient to do this via a wireless connection).

In the synchronization menu, put a tick on Folders, then select a folder on the Mac and a folder on the PC where you want to transfer the files. Then we start the process.
Backup
One of the interesting features of SyncMate is backing up information from your Mac to an external USB drive or online storage. How is this done? In the case of a flash drive or external hard drive, everything is simple: we connect it/her to the Mac, select USB Flash Drive from the list of devices, indicate the folders that we want to “back up” and start the process.

If we are going to use online storage, then we first need to register an account, and for this we need to receive a registration code (the online backup function is only available in the Expert Edition). But - first things first. So you have chosen Backup. After this, a window like this will appear in front of you.

You need to select Register a new account.
You will then be asked to enter your email address and create a password. It's funny that all this is in English (although the program is Russified).

After this, you will need to enter the Registration Code, which will be sent to you in a letter (to the email address you specified). Unfortunately, the letter can take quite a long time. I waited for him for several hours.
After you enter the code, your account will be registered. In the future, to gain access to it, you will simply need to enter your email and password.

Now let's see what opportunities have opened up for us.

We can “back up” contacts (Address Book, Entourage), calendar (iCal, Entourage), tasks (To-Do List), Safari bookmarks and notes (Mail, Entourage). It's disappointing that there is no way to save iTunes libraries and just folders with files online. But all this can be saved to a flash drive or external hard drive (see above). So these two options ( USB flash drive And Backup) complement each other. Of course, we can't help but remember Apple's backup offerings: iDisc online storage (as part of a MobileMe subscription) and Time Machine combined with Time Capsule. And we have to admit that SyncMate cannot compete with them in terms of backup capabilities (especially if there is a need to make full and regular backups or save files selectively), but the cost of the solutions is not comparable (for example, a MobileMe subscription will cost $99 per year). In addition, SyncMate has only one (and far from the most important) function.
Synchronization with WinMobile and other devices
In addition to syncing with your computer, SyncMate can synchronize with a variety of other devices. True, the set of possibilities here will be different in each case. The largest package of synchronization functions is available when working with WinMobile-based devices. In the Expert Edition, you can synchronize not only contacts and calendar with your WinMobile phone, but also folders, notes, time and much more (full list). There are even completely original things, for example, synchronizing Safari and Firefox bookmarks. I wonder if anyone uses the Safari browser on a WinMobile device? :-)

In general, this is an analogue of ActiveSync on Windows, only with more advanced capabilities. For example, there is an SMS message manager (you can view and edit SMS messages from a WinMobile device on your Mac), and the time synchronization function is also very useful (if you have different times on your Mac and on your phone, SyncMate can bring them to a common denominator ; however, it would be nice to link this function to the Internet in order to adjust devices not to each other, but to the exact “present” time).

Let's say a few words about how you can connect a WinMobile phone and a Mac. SyncMate supports two options: via USB cable and via Wi-Fi. But the latter option still requires a preliminary USB connection to install the corresponding utility on the device. After the utility is installed, you can disconnect the cable and synchronize your phone over a wireless connection. To do this, you will need to enter the phone's IP into SyncMate, but here the installed utility will already come to the rescue (there is an option Show my IP/Name; By the way, again: where is Russification?).
Once the connection is established, you can carry out all of the above synchronization options. But my first attempt to open the message manager (when connecting the HTC Touch communicator via Wi-Fi) ended with the program freezing. This is probably not SyncMate's fault, but, one way or another, it is much more reliable to work via USB. You can also connect a PSP via USB, but the Nokia S40 synchronizes only via Bluetooth.
Addition
After the article was written, a new version of SyncMate was released - 2.5. Below is a list of innovations (according to the manufacturer):
- Added the ability to automatically synchronize data (Autosync). Allows you to set different synchronization conditions: sync when the device is connected, sync every X minutes, etc.
- Real-time data synchronization (the option is only available when synchronizing folders between Mac OS X and other Macs, Sony PSP, Windows PC and USB drives). As soon as the data changes in one of the two devices, it is immediately updated in the second device.
- Built-in video converter that converts videos into various
formats: AVI, MPG, MP4, WMV, ASF, 3GP, thus allowing you to resize the video and convert this video to any format that is supported by your device (iTunes and Video plugin).
- When synchronizing Safari bookmarks between Mac OS X and Windows PC, you can choose which browser on Windows PC to save these bookmarks in (Opera, Firefox, Chrome).
- Added the option to synchronize iTunes&Video and iPhoto between several Mac OS X computers.
- Synchronization of Mac and Windows Mobile devices is possible via Bluetooth (synchronization via Wi-Fi or via USB is also supported).
- Ability to search by SMS messages and Call History.
- Export SMS messages to TXT, CSV, HTML formats.
- Ability to ignore USB devices if you do not want to synchronize with them.
Conclusions
If you have an Apple computer or laptop, but in addition to it you also have Windows devices, then SyncMate will be almost irreplaceable. Especially considering that the basic version of the program is free (it will allow you to synchronize your contacts and calendar). If your needs are greater, and you are completely satisfied with the SyncMate interface, then you should take a closer look at the Expert Edition, which significantly expands the synchronization capabilities. And although the program can and should be improved in a number of areas (for example, it would be nice to expand the capabilities of backup and synchronization with a PC, as well as improve the stability of working with WinMobile via Wi-Fi), it fully justifies its cost (950 rubles).
Some people believe that Android devices and Mac OS computers cannot communicate. Perhaps this misconception was partly true in the distant past, but nowadays there are many methods, applications and services that allow you to use your Android OS device with Mac OS. In one article it is impossible to describe all the means available to us for this, but we will try to tell you about the best of them. Many of the services discussed below are cloud-based and make the process of exchanging information between devices simple and painless, although we will also touch on methods associated with using a USB connection.
Synchronizing documents
Unlike iPhone, transferring files to Android devices is quite simple. The method for downloading files may differ slightly depending on the version of Google Android you are using, but in general it works on the same principle. Android OS allows you not only to synchronize certain types of documents, but to download any information at all, using your smartphone as a regular flash drive. Many Android devices use USB Storage Mode, which becomes active when the device is connected to a computer or laptop running Mac OS. At the same time, you will see a USB connection notification on the device display. This notification just needs to be opened and the connection allowed. After this, you will have a connected USB flash drive on your computer, which you can safely open and load the information you need onto it. After you finish downloading the files, safely remove your device using the special icon located next to the device in the Explorer window. Disconnecting your Android device from your computer without first removing it may damage the drive and the information stored on it.
Some newer Android devices require the use of a special program to sync with your computer. Google recommends using Android File Transfer
(AFT), which is very easy to manage and allows you to easily manipulate files and folders stored on devices. And although the capabilities of AFT are quite sufficient for most users, other programs, such as Droid NAS
, also allow for wireless exchange of information between devices. Droid NAS makes your device visible in Finder as a shared computer, allowing you to transfer files over Wi-Fi. Another way to wirelessly synchronize is using the free AirDroid service, which allows you to access files stored on the device through a regular web browser. Instructions for using AirDroid can be found here.
Music
There are several ways on how you can sync music between your PC and Android device. First of all, you can simply download music to your device using simple copying, which we talked about in the previous point. However, some may find it inconvenient to connect a device every time to download a new song, not to mention the amount of storage on your device may not allow you to download all your music. Numerous cloud services will help you cope with these problems. Unfortunately, the Google Music service (which is perfect for us in this situation) is not yet available in all countries, so many will have to look for other solutions (Dropbox, etc.). On the other hand, using cloud services requires not only configuration, but also a constant connection of devices to the Internet, so for us personally, the good old manual method of downloading files is the most preferable.
Photos
There are several ways to sync your photos between two devices, allowing you to save your photos to your Mac OS PC right after you take them on your Android device. The main advantage of these methods is that you only need to do the initial setup, and then all operations will be carried out automatically without your intervention. An added benefit is that you will never lose your photos since they will be backed up on your computer and in the cloud. The already mentioned Dropbox service is ideal for such photo synchronization, so we recommend using it. After installing and setting up Dropbox, all photos taken using your Android device will be automatically saved on your Mac OS computer in the Camera Uploads folder.
As in the case of music, there is also nothing stopping you from using more traditional methods to synchronize pictures, as well as the already mentioned applications such as AFT and Droid NAS. And if you like to experiment, we recommend that you pay attention to two more interesting solutions that are implemented using the SyncMate Expert application and the AirSync addon from DoubleTwist. However, keep in mind that using all these methods is unlikely to achieve the same simplicity and automation as with Dropbox.
Movies
The large display found on many Android devices is great for watching movies. However, not everyone uses services such as Netflix, Hulu Plus or HBO Go to watch. Many people find it more convenient (and it’s hard to disagree with this) to download a movie from your computer directly to your phone in order to be able to watch it offline. Movies are typically larger in size than other files, so they may take time to download. Those. if you are late for the train, then starting to download a movie is not the best idea.
To download a movie from Mac OS to an Android device, you can use any of the methods listed above (AirDroid, SyncMate, DoubleTwist, Droid NAS, AFT), but keep in mind that wireless methods are usually slower than wired methods, so downloading For large files, we recommend using a USB cable and applications like Android File Transfer. But in general, as you might have guessed, there are no particular problems with downloading videos to Android. If you have any difficulties, they will most likely relate to the inability to play some video formats. However, this problem is easily solved by installing an additional video player (for example VLC or MX Player
), which includes a large set of codecs and is capable of playing almost any multimedia format. Another problem may be the lack of sufficient user memory in the device and, as a result, the inability to download a large number of videos. One possible way out of this situation is to use the Dropbox service we have already mentioned, but you should keep in mind that to work with it you will need a good Internet connection and a large amount of available traffic.
Contacts and calendar
For many people, losing contacts from their address book can be a serious problem. The days when people stored numbers, addresses and dates of birth in their heads are far behind us. Today, almost everyone relies on their information to be stored in the device's memory. Gone are the days when the only means of synchronizing such information was a USB connection. Google, Apple and some other companies provide wireless synchronization between all devices that are connected to a single account.
The good news is that Google and Apple work well together when it comes to syncing your contacts and calendar. On a Mac OS computer, all you need to do is connect to your Google account in the Contacts and Calendar apps. To do this, you need to launch the application and open its settings (this can be done not only in the application itself, but also by clicking on the application name in the menu and selecting “Settings”). On the settings page, you will need to click on the Accounts icon, which is located at the top. In the Contacts application, you will need to select the “On My Mac” option and then check the special box in the window that opens to start synchronizing with Google. Please note that the Google account you added to the application must be the same as the one used on your Android device. The calendar synchronization process is similar, but instead of the “On My Mac” option, you will need to click on the “+” icon, which is located at the bottom of the window, and select Google from the list of available services. Again, we remind you that the same Google account must be used everywhere.
On your Android device, you should open the settings, go to the accounts section and make sure that the “Calendar” and “Contacts” items are checked in the account you are using. If everything is set up correctly, any changes will now be synced across both of your devices. In general, synchronization will be quite fast, but sometimes there may be slight delays that you shouldn't worry too much about. If you are a user of the iCloud cloud service and are in no hurry to completely switch to services from Google, we recommend that you pay attention to the SmoothSync for Cloud Calendar applications
and SmoothSync for Cloud Contacts
. With their help, you can easily synchronize information from iCloud with your Android device.
Browser bookmarks
Bookmark synchronization is one of those features that, once you start using it, you'll wonder how you ever managed without it. Thanks to it, you can easily switch between your devices and calmly continue the work you started. The easiest way to ensure synchronization of bookmarks, open pages and browser settings between different devices is to use the Google Chrome browser. In the latest versions of the Google Android platform, the Chrome browser is already installed by default, and if it is not there, then you can try downloading Chrome
in the Google Play app store. The version of Google Chrome for Mac OS can be downloaded. In both browsers (on a computer and an Android device), you need to connect your Google account. In the Google Chrome settings, you can also select the services you plan to synchronize. We would like to draw your attention to the fact that if you are using Android OS version lower than 4.0, then installing Chrome may not be available. In this case, we recommend using the SyncMate application
, the free version of which will allow you to synchronize your bookmarks.
The list of applications described above is far from exhaustive. You may know other useful applications for synchronizing Android and Mac OS, as well as additional areas of interaction between these systems. It would be very kind of you if you share the information you know in the comments to this article.
First, let's look at why you might need to synchronize two Apple devices. Firstly, this is a convenient feature that helps you quickly transfer content from one gadget to another. Secondly, synchronization helps save time. After all, the same manipulations with a flash drive took up a lot of your time, especially if it still needs to be formatted.
Selecting a second device
Naturally, this is not so remarkable, however, it is no secret that synchronizing iOS and Mac OS X is not an easy task. Usually it runs crookedly and obliquely. But this article will describe the simplest method for optimizing them. We will synchronize MacBook Air and iPhone/iPad.

iCloud is an incredible application that will make your work much easier. To do this, it transmits the required stored data via a special wireless connection to the desired device. The program is very popular, and thanks to its functionality, it has deserved its laurels quite rightly.
What could be better than an application like this? An application that even works with Windows! We conclude that the application is suitable for all Mac owners without exception.
The point is that the program binds you to the account of a free online service, and not to the gadget itself. You can log into your account from any device and all the necessary information/content will be with you. Information about calls or SMS, all files from another original (native) device will be fully accessible. Even if the original device is broken, you can easily log into your account from another MacBook and work with the previously saved information. Such qualities are ideal for people who work on a computer.
You will have access not only to the necessary programs, but also to save all files. Whether it's a text editor or a photo with a filter, you always have the opportunity to get to the document. Using a hard drive, you can protect all your data, and the iCloud service will take care of saving your settings.
The application is not a virtual hard disk. This is a service that transfers stored information via a wireless network automatically, and file storage is completely secure.
Process
With iOS5 and newer modifications, you no longer have to worry about a wired connection. The first thing you need to do is launch it on your iPhone or iPad, open “Settings” and “General” on the device. Now look for the item “Sync with iTunes over Wi-Fi”. If your device has an earlier operating system, you should first connect the USB cable and launch iTunes. Next, at the bottom, look for “Sync this iPad over Wi-Fi” and click. Click “Apply”.
Note
The iPad/iPhone and the MacBook itself must be connected to the same Wi-Fi network. It is worth saying that synchronization is faster through the wire. This is important, don't forget. iTunes must also be enabled on both devices. iTunes must be updated to version 10.5 to work with the service. Follow the exact instructions. If interaction with the service is still not established, it is best to contact the help center.
Manual synchronization
If there are problems with automatic synchronization, there is an option to carry out the process manually. First, connect the MacBook Air to the device, then turn on iTunes. Click on the “Devices” button, it is located in the upper right part of the screen. If it is not there, you should first click on “Media Library”. Now in the main section of the application, select “Browse”. Check the box next to “Process music and videos manually”/“Process music manually”. Now all you have to do is click on “Apply”.
Bottom line
The article covered in detail the question of what iCloud is and how to use it. And now, if the first method fails, you have a chance to try synchronization again.
The process, which is not at all difficult, can help in work and simply using gadgets. And support for different operating systems makes the program indispensable. If you only have one Apple device, then the application is unlikely to help you.
Fair, not overpriced and not underestimated. There should be prices on the Service website. Necessarily! without asterisks, clear and detailed, where technically possible - as accurate and concise as possible.
If spare parts are available, up to 85% of complex repairs can be completed in 1-2 days. Modular repairs require much less time. The website shows the approximate duration of any repair.
Warranty and responsibility
A guarantee must be given for any repairs. Everything is described on the website and in the documents. The guarantee is self-confidence and respect for you. A 3-6 month warranty is good and sufficient. It is needed to check quality and hidden defects that cannot be detected immediately. You see honest and realistic terms (not 3 years), you can be sure that they will help you.
Half the success in Apple repair is the quality and reliability of spare parts, so a good service works directly with suppliers, there are always several reliable channels and your own warehouse with proven spare parts for current models, so you don’t have to waste extra time.
Free diagnostics
This is very important and has already become a rule of good manners for the service center. Diagnostics is the most difficult and important part of the repair, but you don't have to pay a penny for it, even if you don't repair the device based on its results.
Service repairs and delivery
A good service values your time, so it offers free delivery. And for the same reason, repairs are carried out only in the workshop of a service center: correctly and according to technology can only be done in a prepared place.
Convenient schedule
If the Service works for you, and not for itself, then it is always open! absolutely. The schedule should be convenient to fit in before and after work. Good service works on weekends and holidays. We are waiting for you and working on your devices every day: 9:00 - 21:00
The reputation of professionals consists of several points
Company age and experience
Reliable and experienced service has been known for a long time.
If a company has been on the market for many years and has managed to establish itself as an expert, people turn to it, write about it, and recommend it. We know what we are talking about, since 98% of incoming devices in the service center are restored.
Other service centers trust us and refer complex cases to us.
How many masters in areas
If there are always several engineers waiting for you for each type of equipment, you can be sure:
1. there will be no queue (or it will be minimal) - your device will be taken care of right away.
2. you give your Macbook for repair to an expert in the field of Mac repairs. He knows all the secrets of these devices
Technical literacy
If you ask a question, a specialist should answer it as accurately as possible.
So that you can imagine what exactly you need.
They will try to solve the problem. In most cases, from the description you can understand what happened and how to fix the problem.
I think everyone is very familiar with this situation when you often have to dump various documents onto a flash drive, edit them on other computers, and then download the modified version again to your Mac (Mac only, it can’t be otherwise :)). Agree that it is extremely inconvenient to waste your precious time on such a routine like this.
That’s why a brilliant thought came to me, what if I found some kind of program that would automatically or on demand synchronize files between a Mac and a flash drive and thereby allow me to always have the most “latest” versions of documents on both devices.
After testing several programs, I chose the small Sync Folders utility, which is perfectly suited for solving file synchronization problems (even in its free version).
How to Set Up Sync Folders for Mac
I won’t go on and on about how cool the paid version of the program is and how many cool things it can do; I have enough free functions too. This is what the program looks like when opened.
As you can see, everything is extremely concise. First of all, I suggest setting up the great and mighty, go to the settings > localization tab and select Russian from the drop-down list.
Synchronization
Task name— It makes sense if you need many different synchronization tasks with different parameters.
Folders A and B— Here you set the path to the synchronized folders.
Advice. I recommend creating a folder on your Mac in which all documents necessary for synchronization will be stored, for example, “My Docks”.
Filter folder- When you enter certain rules, you can exclude subfolders from data exchange.
For example: ! = Folder1, and! = Folder2, and! = Folder3
Filter file- Same with files. For example, you don’t want to synchronize files with the extension doc and pdf, then write this rule: !end=.doc, and !end=.pdf
Sync Mode— There are two of them in the basic version of the program:
(bidirectional synchronization mode) - I’ll explain it in simple terms: if the text.doc file was deleted from folder A, then during subsequent synchronization its “brother” from folder B will also be deleted. Therefore, you should use this mode with extreme caution.
By checking the “move files for deletion to a special folder” checkbox, the program will create a folder _DelSyncFiles in which the changed files identified during synchronization will be stored. There are also two storage modes:
- replacing (replacement) - The old ones will be replaced by new ones
— adding (adding) — All versions of files will be stored until your Mac’s memory runs out.
When all the necessary parameters have been set, all you have to do is click “Sihr task”.
Tasks
On this Sync Folders tab, only the auto-sync item deserves attention; I set it to 3600 seconds (1 hour).
Latest changes
Logs
Synchronization error logs are displayed here, and which ones can be found in the next tab.
Settings
Frankly, I didn’t touch anything else here other than changing the language :)
Conclusion
As you can see, Sync Folders for Mac is a very simple and unpretentious program; once you set it up, you can forever close the question of the relevance of data on your computer and external media.
P.S. And if you are interested in how to make a full backup of your Mac with subsequent automatic synchronization, then I recommend reading about.