How to install local Apache server with Php, MySQL, phpMyAdmin on Windows computer. How to install local Apache server with Php, MySQL, phpMyAdmin on Windows computer Installing apache 2.4 php 7
And so we installed the nginx server, now it’s time to install php 7.1 on ubuntu. The nginx + php7 combination has proven itself very well, saving money and server resources.
Installing php 7.1
First, let's add a repository from which we will download and install php 7.1.
Sudo add-apt-repository ppa:ondrej/php
sudo apt install -y language-pack-en-base sudo LC_ALL=en_US.UTF-8 add-apt-repository ppa:ondrej/phpNote: If the system encoding is different from utf-8, then problems may occur when adding the php 7.1 repository. So let's run these two commands
Let's update the list of repositories
Sudo apt update
If everything is fine, let's proceed with the installation...
Apt install php7.1 php7.1-fpm php7.1-opcache php7.1-zip php7.1-xmlrpc php7.1-xsl php7.1-mbstring php7.1-mcrypt php7.1-mysql php7.1-odbc php7.1-pgsql php7.1-pspell php7.1-readline php7.1-recode php7.1-snmp php7.1-soap php7.1-sqlite3 php7.1-sybase php7.1-tidy php7.1-xml php7.1-json php7.1-ldap php7.1-intl php7.1-interbase php7.1-imap php7.1-gmp php7.1-gd php7.1-enchant php7.1-dba php7.1-bz2 php7.1-bcmath php7.1-phpdbg php7.1-cgi php7.1-cli
We agree with the installation and wait until everything is completed.
And so everything is ready - php 7.1, and extensions are installed. If other versions of php5 were installed on the system, you can remove them by running the command:
Apt autoremove php5* -y && apt purge php5* -y && apt clean php5*
Setting up php 7.1
php setup will be as follows:
- Fixing vulnerabilities
- Increasing the upload file size
- Increasing script running time
- Setting up opcache
Open php.ini
Sudo nano /etc/php/7.1/fpm/php.ini
looking for a line
;cgi.fix_pathinfo = 1
uncomment the line and put 0 in place of one
Cgi.fix_pathinfo = 0
Let's increase the size of the downloaded files. Find post_max_size and bring it to form
Post_max_size = 100M
Let's increase the script processing time, look for max_execution_time and set it to 300 seconds - usually needed for working with large mysql tables
Opcache.enable=1 opcache.enable_cli=1 opcache.memory_consumption=64 opcache.interned_strings_buffer=4 opcache.max_accelerated_files=7963 opcache.revalidate_freq=20
Save the file. Restart php7.1-fpm
Service php7.1-fpm restart
Install MySQL server and phpmyadmin
sudo apt install mysql-server-5.7During installation we will be asked to set a password for the administrator mysql server. Fulfill the request.
All is ready. Now let's install the database manager
Sudo apt install phpmyadmin
During installation, it will most likely ask you to select a web server, select any, if it asks you to set a password for the database, set it.
Now we’ll make a symbolic link to the directory where our website will be located
Ln -s /usr/share/phpmyadmin /var/www/html/my.site.ru
You can access the database manager at
My.site.ru/phpmyadmin/
In the future, you can create your own nginx configuration file for the phpmyaadmin database manager, and transfer it to a subdomain like mysql.my.site.ru, and set server authorization.
If you have any questions, write in the comments.
// echo get_the_post_thumbnail(get_the_ID(), "relatedthumbnail"); // display my thumbnail size?>In the first article we looked at how to install Apache on Windows7. Now let's look at how to connect the PHP language to our server.
Installing PHP
1) Download the zip archive with php from the site http://windows.php.net/download/. I chose Thread Safe - php-5.3.5-Win32-VC6-x86.
2) Unzip php into the folder c:/php-5.3.5/
3) Connect php to Apache. Open the file httpd.conf. It is in the folder conf in the place where you installed Apache. I have this C:Program Files (x86)Apache Software FoundationApache2.2conf .
To connect php as a module, you need to add only 3 instructions to the httpd.conf file:
(codecitation)
LoadModule php5_module c:/php-5.3.5/php5apache2_2.dll
AddType application/x-httpd-php phtml php
PHPIniDir "c:/php-5.3.5/"
(/codecitation)
These lines should be placed approximately in the middle of the httpd.conf file, for example, immediately after the LoadModule directives. For me they end on line 128 of the file. The exact location of these directives is not critical, but they should not be placed at the beginning or at the very end of the httpd.conf file.
Note.
- The first line loads the PHP module implemented in the php5apache2_2.dll library
- The second line sets the correspondence between files with the php extension and the application/x-httpd-php mime type, which is processed by the PHP module.
- The third line allows you to explicitly specify the location of the php.ini configuration file.
4) Creating a configuration file in php. The c:/php-5.3.5 directory contains several configuration file templates. Let's take the file as a basis c:/php-5.3.5/php.ini-production and rename it to php.ini.Thus, the PHP configuration file (php.ini) will be located in the c:/php-5.3.5 directory and this is where all PHP configuration changes should be made.
After making changes to httpd.conf and creating the php.ini file, restart Apache.
5) Check. In the C:Program Files (x86)Apache Software FoundationApache2.2htdocs folder, create a file index.php with the code:
(codecitation)
(/codecitation)
Now go to http://localhost/index.php in your browser. If everything is done correctly, you will see a purple table with php settings.
Additional php settings
Enable short support php entries, in php.ini find the short_open_tag function and enable it: short_open_tag = On
In php.ini, specify the path to php extensions; to do this, uncomment and fill in the extension_dir line. This is what it looks like for me:
(codecitation)
extension_dir = "c:/php-5.3.5/ext"
(/codecitation)
(codecitation)
extension=php_mbstring.dll
(/codecitation)
and the line extension=php_mysqli.dll to work with MySql databases data:
(codecitation)
extension=php_mysqli.dll
(/codecitation)
If you Linux user, then refer to the article "".
PHP 7 output
On this moment PHP 7.0.0 Alpha release 2 is available. The first beta will appear in the very next few days. Neither alphas nor betas are recommended for real work. But you can already try them on the test server.
Moreover, the changes in PHP7 are very significant:
- Increase PHP 7 performance up to two times compared to PHP 5.6 (wow!)
- Expected 64-bit support
- Many fatal errors are now Exceptions
- Removing old and unsupported SAPIs ( software interfaces server applications) and extensions
- The NULL operator is coalescing (??)
- Combined comparison operator (<=>)
- Return Type Declaration
- Scalar type declaration
- Anonymous classes
PHP of any version is almost always paired with a server and a database management system. If you don’t have a server at all, then refer to the article “”. When you get to installing PHP in that article, come back here.
If you already have a server, then you will find general questions about updating in the article “”.
Features of installing PHP 7 on Windows
I installed on Apache 2.4 VC14. If you haven't updated your server yet, do so. Links and details for this manual.
To download PHP 7.0 go to
Hidden from guests
Always download all programs only from official websites!
Select version Thread Safe(64-bit or 32-bit like your Apache server).
Definitely needed Visual C++ Redistributable for Visual Studio 2015! If you have already upgraded your Apache server, then that server also needs this package. Those. you should have already installed it. If this is not the case, then go to
Hidden from guests
And download the package of the appropriate bitness.
After downloading, install it.
If you use when installing the server, then unpack the contents of the downloaded archive from PHP into the directory C:ServerbinPHP.
Go to this directory, find the file php.ini-development and rename it to php.ini.
Open this file with any text editor, find the line there
; extension_dir = "ext"
And replace it with
Extension_dir = "ext"
Now we need to enable extensions for PHP, since without them most sites and scripts will not work. Attention: At the moment, some extensions cannot start the server, so take a closer look below. Find a group of lines:
;extension=php_bz2.dll ;extension=php_curl.dll ;extension=php_fileinfo.dll ;extension=php_gd2.dll ;extension=php_gettext.dll ;extension=php_gmp.dll ;extension=php_intl.dll ;extension=php_imap.dll ;extension =php_interbase.dll ;extension=php_ldap.dll ;extension=php_mbstring.dll ;extension=php_exif.dll ; Must be after mbstring as it depends on it ;extension=php_mysqli.dll ;extension=php_oci8_12c.dll ; Use with Oracle Database 12c Instant Client ;extension=php_openssl.dll ;extension=php_pdo_firebird.dll ;extension=php_pdo_mysql.dll ;extension=php_pdo_oci.dll ;extension=php_pdo_odbc.dll ;extension=php_pdo_pgsql.dll ;extension=php_pdo_ sqlite.dll ; extension=php_pgsql.dll ;extension=php_pspell.dll ;extension=php_shmop.dll
And replace them with the following lines. Please note that some extensions are left disabled because when they are enabled Apache does not start!
Extension=php_bz2.dll extension=php_curl.dll extension=php_fileinfo.dll extension=php_gd2.dll extension=php_gettext.dll extension=php_gmp.dll extension=php_intl.dll extension=php_imap.dll ;extension=php_interbase.dll extension=php_ldap. dll extension=php_mbstring.dll extension=php_exif.dll ; Must be after mbstring as it depends on it extension=php_mysqli.dll ;extension=php_oci8_12c.dll ; Use with Oracle Database 12c Instant Client extension=php_openssl.dll ;extension=php_pdo_firebird.dll extension=php_pdo_mysql.dll ;extension=php_pdo_oci.dll extension=php_pdo_odbc.dll extension=php_pdo_pgsql.dll extension=php_pdo_sqlite.dll extension=php_pgsq l.dll ; extension=php_pspell.dll extension=php_shmop.dll
Now we find the following group of lines:
;extension=php_soap.dll ;extension=php_sockets.dll ;extension=php_sqlite3.dll ;extension=php_tidy.dll ;extension=php_xmlrpc.dll ;extension=php_xsl.dll
These extensions can all be enabled:
Extension=php_soap.dll extension=php_sockets.dll extension=php_sqlite3.dll extension=php_tidy.dll extension=php_xmlrpc.dll extension=php_xsl.dll
Save and close the file.
Now let's move on to the Apache configuration file. For those who installed according to my instructions, this file is here C:ServerbinApache24confhttpd.conf
Open it with any text editor. We find the lines with which we connected PHP 5 and delete them.
And describes only distinctive points, which relate to installing Apache24 and PHP7 on Windows. Description of installation MySQL DBMS remains the same and is not repeated in this instruction.
Before you continue reading, pay attention to whether you really need to install and configure all this under Windows? Maybe you should pay attention and not waste your time and nerves setting up the same thing directly in Windows? In any case, read the article about. Perhaps it will save you not only time, but also health.
This manual is intended for developers with basic knowledge Apache and PHP. This manual will describe only difference V installing Apache and PHP with basic instructions for installing PHP 5.6. If you do not know what a WEB server, http protocol and PHP interpreter are, then you can always learn about it in more detail by reading the documentation.
I will not answer in the comments questions the answer to which is in this or the main instructions; the link to the main instructions is indicated in the first paragraph, as well as questions that relate to understanding the work of Apache and PHP, and even more so to questions about errors in development. For this, there are appropriate resources, literature, forums, and courses. However, you can always ask any question you are interested in. Perhaps someone from the community can help you.
So, let's go!
Installing Apache 2.4 VC14
- Loading Apache 2.4 binaries VC14 for your system via the link http://www.apachelounge.com/download/ Download the 64-bit version of the server. At the time of writing these lines, the file was called like this: httpd-2.4.17-win64-VC14.zip
- If you need any additional modules, you can download them there (not necessary for the basic installation)
- Download and install Visual C++ Redistributable for Visual Studio 2015 updates from the Microsoft website.
- Unzip the contents of the folder Apache24 from the downloaded archive to D:\USR\apache. Please note that in D:\USR\apache you need to put not the Apache24 folder from the archive, but its contents. There is no need to install anything.
- Change the value in the file ServerRoot on "d:/USR/apache" (line 37) and value DocumentRoot(And Direcroty) on "d:/USR/www" (lines 243 and 244). You should also uncomment line 219 and change it to: ServerName localhost:80
- We change the log storage parameters in the same file (find the parameters and change): ErrorLog "D:/USR/log/apache-error.log" CustomLog "D:/USR/log/apache-access.log" common
- Install the Apache service. Open the command line on behalf of the Administrator and insert the following line there: D:\USR\apache\bin\httpd.exe -k install
- We monitor error messages during service installation. If everything is done correctly, there should be no errors. If, after executing the line, the command line does not appear again, then you did something wrong. Simply use the copy and paste functions to avoid typing errors.
- Create a shortcut on the desktop for D:\USR\apache\bin\ApacheMonitor.exe and/or put it in startup (to open the startup window in WIN8..10 you need to press WIN+R, then enter shell:Startup and click OK)
- Launch ApacheMonitor. A shortcut will appear in the system tray. Left-click on it and select Apache24 -> Start.
- In the browser go to http://localhost/ - you should see It works!
- If you don’t see such an inscription, we figure out what went wrong (we read the logs, google, try to figure out the problem ourselves, since we decided to understand the intricacies of the web server)
Installing PHP 7
- Loading latest version VC14 x64Thread Safe via the link http://windows.php.net/download/. Please note that you need VC14 and exactly Thread Safe. The file you need will most likely be named something like: php-7.0.0-Win32-VC14-x64.zip
- Extracting the contents of the archive into D:\USR\php. As with Apache, there is no need to install anything.
- To file D:\USR\apache\conf\httpd.conf add the lines: LoadModule php7_module "d:/USR/php/php7apache2_4.dll" AddHandler application/x-httpd-php .php # Path to the php.ini file PHPIniDir "D:/USR/php"
- And we change meaning parameter DirectoryIndex on index.html index.php (line 278)
- Using ApacheMonitor restart Apache (Apache24 -> Restart)
- We go to the browser http://localhost/index.php and make sure that PHP is working (the browser will display PhpInfo).
- Making a copy of the configuration file template D:\USR\php\php.ini-development With name D:\USR\php\php.ini- This is a configuration file for PHP.
- Editing the configuration file D:\USR\php\php.ini. Using the search, we find inside the file, uncomment it and change the parameters. Note that the extension parameter specifies a set of PHP extensions. Uncomment the extensions that you need. In the example, the extensions that I needed. Specify your time zone, not mine: extension_dir = "D:/USR/php/ext" sys_temp_dir = "D:/USR/tmp" extension=php_curl.dll extension=php_gd2.dll extension=php_gettext.dll extension=php_mbstring. dll extension=php_mysqli.dll extension=php_openssl.dll date.timezone = Europe/Zaporozhye
If you have problems running curl, please refer to these instructions.
- Execute on the command line php -m to view the list of connected extensions.
- Restarting Apache using ApacheMonitor
The installation and configuration of everything else has not changed. Please refer to the PHP 5.6 Installation Guide for details.
At htmlAcademy and I work there as a mentor. As part of the intensive course, students will have to improve their work environment and this note is aimed at simplifying this difficult task for a beginner. Eat different ways raising a full-fledged LAMP stack, but we will go the classic way. Let's configure all components separately (without using ready-made combines) and start with PHP (there will definitely be a note discussing ready-made LAMP assemblies). Since I plan to work as mentors at PHP intensives in the future, I am going to write similar instructions for repetition in other operating systems (Linux, macOS). As they say, it’s better to sweat once, but then it will become easier for everyone. So let's get started.
Download PHP for Windows
Go to the official website and download current version PHP. At the time of writing, this is - 7.1.4 . There are several distribution options available on the page. I have Windows 7 x64, so I choose a zip archive with VC14 x64 Thread Safe.
Please note that there are two distribution options available for download: Thread-Safe (TS) And Non-Thread-Safe (NTS). The choice depends on how you plan to use the interpreter. TS is recommended to be used for a single web services process (for example, configured via the mod_php module for Apache). NTS is recommended for using IIS (Internet Information Service) and alternative FastCGI web servers (for example, Apache with the FastCGI module) and command line.
Install PHP 7.1
Let's start preparing PHP for comfortable work from the command line. In the previous step, you downloaded the archive with the PHP distribution. Unlike most programs, PHP is supplied in a simple archive, and not as an installation package. Therefore, you will have to extract the files yourself to any directory convenient for you. I prefer to store such things in the root of the system drive. Create a directory in the root of the “C:” drive (or any other place) "php" and extract the contents of the downloaded archive into it.

Many files will appear in the directory, but we are most interested in:
- go-pear.bat– script for installing PEAR. You can read more about PEAR in the official documentation.
- php.exe– allows you to execute PHP scripts from the console;
- php-win.exe- allows you to execute PHP scripts without using the console;
- php-cgi.exe– required for executing PHP code in FastCGI mode;
- php7apache2_4.dll– integration module with the Apache 2.4.X web server;
- phpdbg.exe– debugger;
- php.ini-development– example configuration PHP file for the developer environment (development)
- php.ini-production– example of a PHP configuration file for a production environment
Connecting the configuration file
We have the unpacked distribution kit, let's connect the configuration file for it. We are going to do experiments, so we will take as a sample php.ini-development. Make a copy of this file to php directory (C:\php) With name php.ini. IMPORTANT! Make a copy, not a simple rename. During development, you may need to change the configuration file and there is every chance of making a mistake that will be difficult to detect.
In such cases, there is nothing better than returning to the reference settings. In our case, it will be enough to copy the file again php.ini-development V php.ini. So, at the end of the actions, the php.ini file should appear in the directory with php. In further notes we will definitely talk about its contents in more detail.

Testing PHP from the command line
At this step, the so-called “installation” is completed. Open your console ( cmd.exe, the shortcut is available in the Accessories menu) and enter the command:
C:\php\php.exe --version
The result will be something like this:
PHP 7.1.4 (cli) (built: Apr 11 2017 19:54:37) (ZTS MSVC14 (Visual C++ 2015) x64) Copyright (c) 1997-2017 The PHP Group Zend Engine v3.1.0, Copyright (c) 1998 -2017 Zend Technologies
The result confirms that PHP is working. For example, try creating a new script file (I created the “test.php” file right in the root of the “C:” drive) and place the text in it:
Now try executing this file and see the result:
C:\php\php.exe –f test.php
Function phpinfo() displays PHP configuration information in a convenient form. We'll talk about this function later.
Simplifying access to php.exe
PHP is ready to work, but you must admit that entering the path to the PHP interpreter into the console every time is quite inconvenient. To make your life easier, let's make some small changes to the environment variables. Let's launch the applet in the control panel "System"(or just press the hotkey "Windows + Pause Break". Then click on the button "Change settings". In the window that appears "Properties of the system", let's go to the bookmark "Additionally". Find and click on the button "Environment Variables".
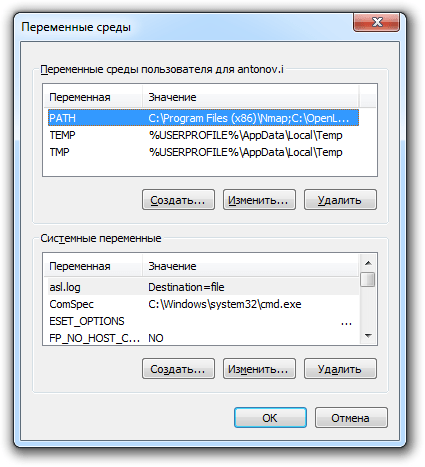
Find a variable in the list "PATH" and press the button "Change", the variable editing window will appear. In the “Variable value” field we need to add the path to the directory with PHP. Go to the very end of the line and, separated by semicolons, indicate the path to the directory with PHP: C:\php;

That's it, click "Ok". Now reboot the system (alas, you have to). After restarting Windows, you can access PHP simply: php. For example, to display the version name, just write:
Php –version
And to interpret the test.php file located in the root of the “C:” drive:
Php –f C:\test.php
Or even launch the built-in web server:
Php -t C:\ -S 127.0.0.1:8888 Listening on http://127.0.0.1:8888 Document root is C:\ Press Ctrl-C to quit.
To test, open a web browser and try going to http://127.0.0.1:8888/test.php. Please note that after the parameter –t we specify the path to the directory that will become the root directory of the web server. All scripts located in this folder will be available for request from the client. I have one file on drive “C:” 1.php and that is exactly what I am asking for.

Assoc .php=phpfile ftype phpfile="C:\php\php.ee" -f "%1" -- %~2
A little more about environment variables
Now let's talk about how PHP will look for the configuration settings file (remember, php.ini). The documentation provides a complete search chain. To avoid unnecessary complications, I recommend immediately adding a new one to the environment variables - "PHPRC" and as a value specify the path to the directory with the configuration file. My config is located in the same directory as the main php files, therefore I specify the value of the variable -
"C:\php". A reboot will be required after making the change.

That's all for me. The first part of the manual for beginners is ready.


