Is it possible to make a flash drive like a hard drive? How to make a flash drive as a hard drive: step-by-step instructions, advice from experts. Creating a bootable USB flash drive using UltraISO
When there is not enough free space on your hard drive and you cannot free it up, you have to consider various options to increase space for storing new files and data. One of the simplest and most affordable ways is to use a flash drive as a hard drive. Many people have medium-sized flash drives, so they can be freely used as an additional drive connected to a computer or laptop via USB.
A regular flash drive is perceived by the system as an external portable device. But it can easily be turned into a drive so that Windows will see another hard drive connected.
In the future, you can install an operating system on it (not necessarily Windows, you can choose among “lighter” options, for example, based on Linux) and perform all the same actions that you do with a regular disk.
So, let's move on to the process of turning USB Flash into an external HDD.
In some cases, after completing all the steps below (for both Windows bitmaps), you may need to reconnect the flash drive. First, safely remove the USB storage device, and then reconnect it so that the OS recognizes it as an HDD.
For Windows x64 (64-bit)
- Download and unpack the archive.
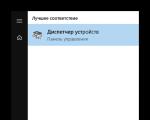
- Connect the flash drive and run "Device Manager". To do this, just start typing the name of the utility in "Start".

Or right click on "Start" select "Device Manager".

- In the thread "Disk devices" select the connected flash drive, double-click on it with the left mouse button - it will start "Properties".

- Switch to tab "Intelligence" and copy the property value "Equipment ID". You don’t need to copy everything, but up to the line USBSTOR\GenDisk. You can select lines by holding Ctrl on the keyboard and left-clicking on the desired lines.
An example in the screenshot below.

- File F2Dx1.inf from the downloaded archive you need to open it using Notepad. To do this, right-click on it and select "Open with...".

Select Notepad.

- Go to section:
You need to remove the first 4 lines from it (i.e. lines up to %attach_drv% = f2d_install,USBSTOR\GenDisk).

- Paste the value that was copied from "Device Manager", instead of the deleted text.
- Before each line you inserted, add:
%attach_drv% = f2d_install,
It should look like the screenshot.

- Save the modified text document.
- Switch to "Device Manager", right-click on the flash drive and select "Update drivers...".

- Use the method "Search for drivers on this computer".

- Click on "Review" and indicate the location of the edited file F2Dx1.inf.

- Confirm your intentions by clicking the button "Continue installation".
- Once the installation is complete, open Explorer, where flash will appear as “Local Disk (X:)” (X will be replaced by the letter assigned by the system).
For Windows x86 (32-bit)

After this, you can split the flash into partitions, install the operating system on it and boot from it, and also do other actions, as with a regular hard drive.
Please note that this will only work on the system on which you have completed all the above steps. This is due to the fact that the driver responsible for recognizing the connected drive has been replaced.
If you want to run a flash drive as an HDD on other PCs, then you need to have the edited driver file with you, and then install it through the “Device Manager” in the same way as indicated in the article.
In this article we will show you how to make sure that USBflash drive or SDthe card was detected in the Windows system like a regular local hard drive. You might ask, why is this necessary? The fact is that Windows by default defines USB flash drives and memory cards as removable drives, which cannot be divided into several partitions using Windows standards. And even if you split the flash drive into two or more partitions using third-party utilities (in the same Linux), then only the first of them will be available in the Windows OS (by the way, built-in appeared in Windows 10 1703). Those. Windows supports normal operation with multi-partitions only for HDD drives, which are defined in the system as local (i.e. non-removable).
RMB bit and USB media
Windows operating systems recognize USB flash drives as removable/removable devices due to the presence of a special bit descriptor on each device R.M.B.(removablemediabit) . If, when polling a connected device through the StorageDeviceProperty function, the system determines that RMB=1, it concludes that the connected device is a removable drive. Thus, in order to convert a USB flash drive into a hard drive from the system's point of view, it is enough to modify this descriptor. This can be done directly (which is quite risky due to differences in hardware implementations of specific devices, and is not always possible), or indirectly, by replacing the response of a USB device using a special driver that allows you to filter information in the device response.
Advice. Some manufacturers produce special utilities for flashing the controller of their flash drives. First of all, try to find such a utility and/or firmware on the manufacturer’s website. This is the most correct way. If you don’t find such a utility, follow the recommendations from this article.
Connect a USB flash drive to any free port on your computer, then open Disk Management Manager ( diskmgmt.msc) and make sure that its type is defined in the system as Removable(Removable device) .
You can also see the device type on the Volumes tab in the disk properties (as we see here Type: Removable). 
Or using the diskpart command:
List volume

In this article we will look at two ways to change the RMB bit on a USB flash drive - by using the Hitachi filter driver (changes are made only at the driver level on a specific computer) and changing the bit in the controller firmware using the BootIt utility from Lexar (a more universal method, but there is a number of restrictions and does not apply to all models of flash drives and SD cards). Although both of these methods are quite old and I originally tested them on Windows 7, they continue to be relevant and work equally well in modern Windows 10.
Lexar BootIt utility
Recently I came across a rather interesting utility - LexarBootIt. This is a free, portable program that can change the RMB of a removable drive to make a removable USB device fixed (or vice versa). Even though the Lexar BootIt utility is designed for Lexar devices (Micron, Crucial), it can also work with flash drives from other manufacturers. The BootIt utility supports all versions of Windows, from Windows XP to Windows 10.
Important. The utility is guaranteed to work for Lexar drives. Judging by the reviews, the “Flip removable bit” function does not work on fast USB 3.0 flash drives. In addition, when flashing the controller, you will lose the warranty on the flash drive and may make it inoperable.
You can download BootIt on the Lexar website (lexar_usb_tool) or from our website ().
- Run BootIt.exe with administrator rights
- Select your flash drive from the list of devices
- Click on the button Flip Removable Bit
- Save the changes by clicking OK.

Reconnect the device and use Device Manager to make sure that its type has changed from Removable to Basic.

If the BootIt utility did not help change the RMB bit on a removable drive, try using the following method, based on the Hitachi Microdrive filter driver
Filter driver for Hitachi Microdrive flash drives
In order for a USB flash drive or SD card to be recognized in the system as a hard drive, we need a special filter driver that allows us to modify the data transmitted through the system stack of the current device driver. We will use a filter driver for USB flash drives from Hitachi ( Hitachi Microdrive driver), which at the OS driver level allows you to change the type of flash drive device from removable to fixed (USB-ZIP -> USB-HDD). Thanks to the use of this driver, you can hide from the system that the connected device is removable. As a result, the system will consider that it is working with a regular hard drive, which can be divided into partitions that will be simultaneously accessible in the system.
Archives with Hitachi Microdrive driver:
- 32 bit systems - (3.0 KB)
- Hitachi Microdrive version for 64 bit systems - (3.8 KB)
You need to download the driver version for your system according to its bit capacity. Both archives have the same structure and consist of two files:
- cfadisk.inf– installation file with driver settings
- cfadisk.sys- Hitachi driver file
The next stage is identifying the device code of our flash drive. To do this, in the disk properties on the tab Details in the parameter Device Instance Path select and copy ( Ctrl+C) device instance code. 
In our example it would be:
USBSTOR\Disk&Ven_Linux&Prod_File-CD_Gadget&Rev_0000\0123456789ABCDEF&0
Let's say we plan to install the driver on 64 bit system. Using any test editor, open the file for editing cfadisk.inf. We are interested in the cfadisk_device and cfadisk_device.NTamd64 sections.
%Microdrive_devdesc% = cfadisk_install,IDE\DiskTS64GCF400______________________________20101008 %Microdrive_devdesc% = cfadisk_install,IDE\DiskTS64GCF400______________________________20101008
We change the value DiskTS64GCF400______________________________20101008 to the code of our device.
Important! In the device instance code, it is necessary to discard the part after the second “\” (in our example we discard 0123456789ABCDEF&0).
We get:
%Microdrive_devdesc% = cfadisk_install,IDE\USBSTOR\Disk&Ven_Linux&Prod_File-CD_Gadget&Rev_0000 %Microdrive_devdesc% = cfadisk_install,IDE\USBSTOR\Disk&Ven_Linux&Prod_File-CD_Gadget&Rev_0000
Save the file.
If the driver is installed on a 32 bit system, you need to download the recommended archive, unpack it and open the cfadisk.inf file for editing. Let's find the section :
%Microdrive_devdesc% = cfadisk_install,USBSTOR\Disk&Ven_LEXAR&Prod_JD_LIGHTNING_II&Rev_1100 %Microdrive_devdesc% = cfadisk_install,USBSTOR\Disk&Ven_JetFlash&Prod_TS1GJF110&Rev_0.00 %Microdrive_devdesc% = cfadisk_install,USBSTOR\ DISK&VEN_&PROD_USB_DISK_2.0&REV_P
Then we change the data in the last line, indicating the code of the instance of our flash drive, i.e. in our example we get:
%Microdrive_devdesc% = cfadisk_install,USBSTOR\Disk&Ven_LEXAR&Prod_JD_LIGHTNING_II&Rev_1100 %Microdrive_devdesc% = cfadisk_install,USBSTOR\Disk&Ven_JetFlash&Prod_TS1GJF110&Rev_0.00 %Microdrive_devdesc% = cfadisk_install,USBSTOR\ Disk&Ven_Linux&Prod_File-CD_Gadget&Rev_0000

Advice. If you want the USB flash drive to be displayed with a specific name in the device manager, you need to edit the value of the Microdrive_devdesc variable, for example like this:
Microdrive_devdesc = "Transcend 64GB DIY SSD"
Installing the Hitachi Microdrive driver instead of the native USB drive driver
It remains to replace the driver used by the USB flash drive.
Important! If the Hitachi Microdrive USB driver is installed on a 64-bit system, then... There is no digital signature for this driver, you will have to either.
Open the Drivers tab and click the button Update Drivers. 
Let's indicate the folder to the directory into which the downloaded archive with the Hitachi driver is unpacked: 
Let's select a new driver. 
We ignore the warning about the missing driver digital signature. 
Advice. In Windows 10 and Windows 8, when installing the driver, the following error appears:
Windows found drivers for this device, but an error occurred when trying to install the drivers.
Hitachi Microdrive
Third party inf does not contain signature information

To disable driver digital signature verification, run the following commands:
bcdedit.exe /set nointegritychecks ON
bcdedit.exe /set TESTSIGNING ON
Restart your computer and try to install the driver again.
All that remains is to restart the computer and, by opening the disk manager, make sure that your flash drive is now recognized as a regular hard drive ( Type: Basic), and the Hitachi driver is used as the driver.

By opening Explorer, you can also make sure that the icon of the flash drive has changed; it is now displayed as a hard drive, a regular drive. 
Now you can work with this flash drive like a regular HDD: create partitions, specify the active partition, create dynamic disks, install software that does not work from flash drives, etc.
Important. On other Windows computers without this driver, the second partition of the device will not be available.
To remove the Hitachi Microdrive driver, open the disk properties and on the Driver tab, click the Update Driver button - the system will install the native driver itself.

Advice. If after installing the Hitachi driver the system stops booting with BSOD, you need to boot the computer from the Windows installation disk / Live CD and manually delete the following files:
- cfadisk.sys in the %windir%\System32\drivers directory
- Directory "cfadisk.inf_amd64_..." from %windir%\System32\DriverStore\FileRepositoty
Restart your computer
You need to understand that this solution will only work on the system on which the appropriate driver is installed.
USB flash drive- a common device that everyone who has their own personal computer probably has at home. Today there is a wide variety of flash drives. As a rule, they have a plastic or metal body, although there are also more original options. But what to do if the casing of your flash drive is damaged or for some reason no longer suits you, but you don’t want to buy a new one? In this article we will tell you how to replace the old plastic or metal casing of your flash drive with a new wooden one.
How to make a case for a flash drive?
In order to make a wooden case for a flash drive, we will need the following tools:
USB flash drive without housing.
A piece of wood.
Drill or other drilling device.
Sandpaper.
Silicone.
Clamps, 2 pcs.
Pencil.
Let's start making!
1. First, determine the size of the body you need and use a saw to cut out a rectangle of the appropriate size from a piece of wood along the marked marks.


3. Using a drill, cut through holes in the large and medium pieces of wood and a through hole in the smallest piece. The holes should be of such a size that the USB drive can easily fit into them and hold well. In the middle part, which will serve as a lid, small gaps should be made inside the hole so that the lid can close tightly and open easily.
4. Insert the USB drive into the through hole of the small piece so that the connector protrudes on one side and the rest of the flash drive is on the other. If the flash drive does not fit tightly in the hole, fix it with silicone.

5. Now stick the protruding long part of the flash drive into the hole of the largest piece, after applying hot glue to both parts and using a press, glue them into one body. It is necessary to use a press so that both parts are tightly fastened together, and after grinding no gaps are visible between them.

6. Now thoroughly sand the entire body with sandpaper to give it a neater, smoother appearance. You can also coat the case with paint or varnish. Our original wooden flash drive is ready!
To make a bootable USB flash drive, you need to find and download a ready-made image, then format the flash drive and burn the image using the UltraISO program.
Where to download the boot image
A few words about what an image is. This is, as it were, an archive with all the files, only without compression. It is much more convenient and faster to write such a single file than thousands of small files. In addition, the image also stores service records that help make the flash drive bootable.
The program has a free trial period. This is quite enough for recording a self-booting flash drive.
We must install and run the program as an administrator. To do this, right-click on the shortcut and select:
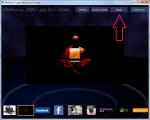
If a request arises for permission to make changes on this computer, we agree. Now click "". The words “hard drive” should not worry you, now your flash drive will become, like, a hard drive.

In the window, be sure to select your flash drive from the list and the recording method “USB-HDD+”

While recording the image, all data will be erased, so don’t be afraid to format the disk, and this will also increase the likelihood of loading. Click “Format” and in the window select a disk the size of your flash drive, but usually it’s the only one there and is already selected by default.

What to pay attention to:
- File system FAT. If only NTFS is selected, then format it the first time to NTFS, then again, but this time to FAT32. If you still can’t choose, then leave it as is.
- Allocation unit size (cluster size): default or 4096 bytes.
- The “Quick (cleaning table of contents)” checkbox should be checked.
Click “Start”. Formatting is quick, but if it writes an error that the device is busy, then simply close the files and folders opened from the flash drive. It may simply issue a request for formatting permission, because... The disk is being used by some program. If the “Bad volume label” error occurs, then in the “Volume label” field, leave only letters and numbers, or delete everything from there altogether. After the process is complete, close the formatting window and click “Burn.”
What to do if you have two logical drives
This occurs when a large disk is divided into two logical partitions. Those. The system has two disks: the first is small, the second is large. In this case, it may be problematic to copy all the information to another location before formatting.
What to do? The actions depend solely on the image and its boot files, so I cannot give universal recommendations. But, the description on torrent trackers often has everything.
Let me explain why you need to do everything using the UltraISO program and select “USB-HDD+” in the recording method. The fact is that in this way the flash drive becomes, as it were, a hard drive in the eyes of the BIOS, and this is necessary because otherwise nothing will be loaded. Therefore, you need to transfer the data somewhere and format/rewrite everything. Or read the description for a specific hand, there are simple options.
You can also try to first write down the files according to the recommendations from the distribution, for good luck. Suddenly, someone had already used a flash drive as a boot drive before and formatted it as needed.
How to boot a computer from a bootable flash drive
I am dedicated to this issue. In short, after turning on the computer, you need to quickly press the F12 or F9 or F10 button. In general, it depends on the model. Thus, a menu should appear in which you need to select your flash drive.
You can also press F2(+Fn), F1, Esc, Enter and other buttons to get into the BIOS. There you can select a boot device according to the description from the article at the link. Attention should be paid to the “UEFI/Legacy Boot” option. Here you need to select “Both” or “Legacy Only”, in general, anything except “UEFI Only”. Otherwise, it will not boot from the flash drive if the image was not UEFI-compatible, which is usually the case. Also set the “CSM Support” option to “Yes”, this is useful if your hard drive is divided into GPT partitions.
Why you might need a bootable USB flash drive
Yes, for almost any reason when diagnosing and restoring a computer, laptop or Windows 7/8/10 operating system. For example:
- To recover 100% from viruses
- Check your hard drive for errors
- Make a system backup or restore it
- Fix Windows Errors
- Delete undeletable
- Windows 7/10
I also boot from a flash drive when something goes wrong to prevent equipment failure, when I see that everything from the flash drive works as it should.
Well, why can’t you do all this from your working Windows? The thing is that Windows blocks access to many system files. And that’s why it happens that you can’t delete a file or folder and nothing helps. Also with a backup copy, because... You cannot even copy system files such as the registry and its user branches. True, there is shadow copying for this case, but still.
On an infected system, treating a virus can be a thankless task. Because a virus that is already in memory will block the operation of the antivirus and appear again and again.
It is also impossible to reliably check the disk for errors when the operating system is working with the disk, but it always does this, even when you are not doing anything.
The bootable flash drive usually contains a portable version of Windows XP/7/8/10, i.e. the same Windows on which you can run programs from the same flash drive. And the set of programs includes all the necessary, working, time-tested and time-tested :)
Also, there are utilities for backup/restore, diagnostics and treatment that work without starting Windows.
Today, old USB drives, supplanted by the ubiquity of high-speed Internet and cloud services, are no longer as popular as they used to be. Nevertheless, it is still too early to completely write them off as scrap. Here are 10 cases in which you will have to look in the depths of your desk for your old flash drive.
1. Try Linux
Free Linux-based operating systems attract many people, but not everyone is willing to spend the time and effort to fully install them on their main computer. Having a USB drive of sufficient capacity completely solves this problem.
Any user, even those with very little computer knowledge, will be able to download the distribution they are interested in and create a bootable USB flash drive based on it. After this, all that remains is to restart the computer and boot into the new system. If you like it, you can consider installing it as an operating system.
2. Use portable apps
If you often travel or have to use other people's computers, you can record your favorite applications on removable media and run them directly from there. There are special tools for this, the most famous of which is Portableapps.com.
The Portableapps.com platform provides convenient launching and organization of portable applications stored on a flash drive. You can connect your USB drive to almost any Windows computer and use all the programs and files you need.
3. Record your trip details
Yes, it is more convenient and safer to store many data in, but not in all cases. For example, you go on vacation to a place where network access is expensive or simply unavailable. The same goes for planes, trains, buses and cars.
The right decision would be to prepare for the trip in advance: record a sufficient number of films, music, books and other necessary files on a flash drive that will allow you to pass the time on the road and not depend on slow and expensive cellular communications.
4. Defeat viruses
If your computer has been infected with viruses, getting rid of them will not be so easy. Modern viruses are able to disguise themselves and block anti-virus software in such a way that it is simply impossible to deal with them in an active state.
In this case, special recovery utilities will come to the rescue, such as Anvi Rescue Disk, ClamWin Portable, Avira PC Cleaner or Emsisoft Emergency Kit, which are recorded on a removable drive and can scan the system directly from there. As a rule, they already contain the latest updates and are distributed completely free of charge.
5. Restore the system
Sometimes the computer simply refuses to boot. Therefore, it is better to prepare a life preserver in advance for this unpleasant case.
There is a special utility for this in the Windows 10 operating system. You can find it in the main menu of the operating system called “Recovery Disk”. You just need to connect, run the rescue disk creation tool, and then follow the instructions that appear on the screen.
6. Speed up Windows
Almost all new computers are equipped with enough RAM for comfortable work. However, older cars can slow down desperately due to its lack.
Windows provides the ability to increase RAM using an external flash drive. Connect it to your computer, and then click on its icon in Explorer. Select Properties from the context menu and then go to the Ready Boost tab. If the drive is suitable, then here you can activate the Ready Boost feature to speed up Windows.
7. Secure passwords
Not all flash drives are suitable for this task, but only those that support FIDO U2F - a special technology for universal two-factor authentication. In this case, the drive acts as a USB token that stores keys and independently performs cryptographic operations.
After a simple setup process, you can use your USB drive to securely log into accounts including Google, Dropbox, Dashlane, LastPass. Today, this type of authentication is supported by many programs and online services.
8. Showcase your portfolio
When applying for a job, people now look not so much at education and work experience, but at real examples of completed projects. If your activity is related to digital technologies, then it is most convenient to record your portfolio on removable media before the interview in order to show it to a potential employer. It may include a resume, video, slide show, presentation.
9. Surf safely
We are talking about installing a special version of a browser based on TOR technology on a removable storage device, which provides a completely private mode for browsing web pages. After the session ends and the flash drive is disconnected, there is no evidence left on the user’s computer by which one could trace the browsing history and downloaded data.
10. Record your favorite music
The era of tape cassettes, on which fans carefully stored albums of their favorite bands, is irrevocably a thing of the past. However, today their place may well be taken by USB drives.
Record selections of your favorite music so that you always have it with you. Your computer may burn out, the Internet may break down, or the cloud music service may go bankrupt, but this will not in any way affect the list of tracks in your music player.