How to confirm google account on android after reset. How to create a Google account without verifying your number? What is account verification?
Verifying your YouTube account unlocks new features. The service offers to go through this procedure during registration, and it is also available to channel owners at any time. A verified account allows you to:
- upload videos longer than 15 minutes;
- add arbitrary pictures as previews to videos (without confirmation, you can only select frames from the video for the screensaver);
- enable channel monetization;
- add external links to end screens, tooltips;
- use the video editor and change videos after uploading them to YouTube.
All information will appear after confirmation in the “Status and Functions” tab.
We'll tell you how to verify your YouTube account and what's required to get the checkmark. We will also clearly demonstrate this process from start to finish.
To confirm go to the Creative Studio and click on the "Channel" tab. Here you will see the status of the channel.

If the channel has not yet been confirmed, you will see a blue button. Click on it.

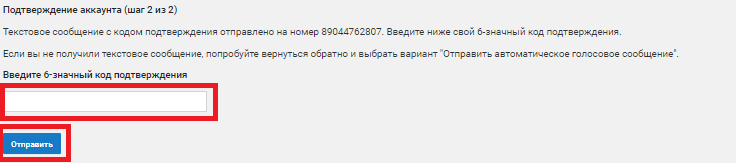
A window will open in front of you. Select your country of residence and a convenient confirmation method: voice or SMS message. Enter the phone number where the message will be received and press the blue “Send” button.

Enter the 6-digit code received on your phone as a message and click “Send”. If the code does not arrive, check if the phone number is correct. If it is entered incorrectly, then return to the previous step and correct it. If there is still no code after this, try the second method.
The channel will be confirmed after these actions.

Click on the “Continue” button. A page will open showing information that the channel has been confirmed.

If you have several YouTube channels, then know that in 12 months no more than 2 accounts are connected to one number.
Getting a tick isn't that easy. You need to meet certain requirements. Go to the channel and home page you will see whether there is a checkmark or not - if there is, it will be located next to the name. It will also be displayed to the right of the channel name under each video.

You can often see checkmarks on the accounts of large companies, organizations, and channel owners with a large audience. This badge increases the authority of the channel and inspires the trust of viewers - it does not provide other privileges. Another checkmark is necessary in order to prove to viewers the authenticity of your channel, because on YouTube you can find dozens of re-uploads of videos.
Conditions and requirements for receiving a tick
The main condition for receiving a tick is 100,000 subscribers. But a few years earlier, this number was different, which is why you can see that even accounts with a smaller audience have checkmarks. Other requirements to receive the badge:
- at least 900,000 views over the last 3 months;
- the account is linked to the Google+ page;
- The channel contains no copyright infringements and adheres to YouTube's Community Guidelines.
If your channel does not have 100,000 subscribers, but it is growing quickly or belongs to a large brand, moderators will often revise the conditions for receiving a tick in your favor.
YouTube may deny a user a check mark without giving any reason. But practice shows that the badge is received by all users whose channel is free of violations and has gained a certain number of views and subscribers.
Google is developing, this is especially noticeable in big cities. Very few organizations have not yet appeared among his countless marks. However, a significant part of them is not confirmed, and there are several reasons for this:
- First, business owners simply don't know what do they have There is page in Google Business, and therefore are not aware of the possibility of its confirmation.
- Secondly, many entrepreneurs underestimate page in Google Business as a tool for promoting yourself on the Internet. There is already an article on this topic:
- Thirdly, many are stopped by the need to wait letters from Google to confirm the page.
We all know firsthand how Russian Post works: a letter can arrive in a week, a month, or not at all.
All these factors stop entrepreneurs, and if you are reading this article, then most likely you have already decided verify rights to a business account on Google+. How to do it? Let's look at all the possible ways.
I have already briefly mentioned this method; I will just say a few more words. In my experience, on average 1 email out of 10 is lost, and the typical delivery time for correspondence is 2-3 weeks. There are cases when letters arrived literally within 3-4 days, but my experience and the experience of my friends says that you should not rely on this.
Method 2: Website
Your organization's Google account can be verified if your website is connected to the system Google Webmaster, and the email specified in Webmaster matches the email associated with the organization's account.
However, Google Help says that such account verification may or may not happen. However, it is not clearly stated which categories of business fall under the “simplified” procedure and which do not.
There is one more negative point: Google Webmaster is usually in demand, first of all, by the site developer - the web studio that produced it - to track the indexing of the site by search engines, monitor errors, and so on. Linking Google Business and Google Webmaster to the same email account is an inconvenient idea and fraught with bad consequences.
My experience shows that confirmation of a business account using this method occurs in about 1 case out of 4.
 Google Certificate
 Method 3: Contact a Google Certified Representative
The simplest and quick way, which allows you to verify your organization's business account within one or two days. The only exceptions are organizations providing services of an intimate nature, such as erotic massage. In this case, confirmation may be delayed and take up to 2 weeks.
All you need to do is find out the email of a Google Certified Representative and provide administrative access to your business page (how to do this). Be sure to require a link to your mobile phone! You should receive a confirmation code from Google, which a company representative will enter to confirm the information is correct. Also, to confirm information about the company, you will need a screenshot of the official website with contact information or a photo of a corporate business card. After providing this data, confirmation of company data will take 1-2 days. Also, a certified representative will help you avoid mistakes when creating a business page and avoid problems when confirming your data. Be sure to ask the representative to show you his work done for Google.
What is the price?
- Listing your information on Google Business is free for life.
Initially, verification on Instagram served as an identifier for the public pages of celebrities and influential people. This icon aroused great interest among large brand companies, as it attracted attention and stood out from the crowd. The account verification icon from Instagram showed that the company was really serious. Of course, this did not mean and does not mean that all those who do not have official confirmation are fakes. But the badge really helps you stand out by giving you priority rankings in search results, as well as access to some additional features. Therefore, official confirmation is a special status on Instagram, which many ordinary users are now striving for.
So, let's figure it out how to make a verified account on Instagram.
It is worth understanding that the administration of the social network does not hand out badges left and right. You need to go through a certain procedure and wait for a decision. If you are not a mega-popular person with a million followers, then you will have to work a little to get a verification badge.
Of all the social networks, Instagram is the most difficult to get official status. There are no specific automated algorithms; all decisions on issuing a verification badge are made manually by moderators. Therefore, technically it is simply impossible to deceive the system.
Sometimes the administration itself gets in touch with the owner of the profile, who has many subscribers and is very active. They offer to confirm your account. But not everyone is so lucky. However, you can try. To do this you need:
1. Submit an application to the Instagram administration and wait for a letter to the email you specified.
2. After responding to your application, you need to scan your passport with your photo and send the scan to the social network support service.
3. If the administration approves your application, then next to your nickname you will see the coveted icon. You will be notified of the refusal by email.
To submit a request to the administration, go to your profile in the “Settings” section, then “Support”, then “Report a problem” and click “Other”. A blue icon will appear, click on the cursor next to it. Now you can write a letter to the administration asking for verification. Be sure to indicate your Facebook link; if this link is not there, you will 100% be rejected.
There is an easier way to tell the administration about your desire to receive a blue tick. In the “Settings” block, go to Linked accounts, select a social network and enter your login information. Click on the “Login” button and wait for the administration to contact you.
Some want to get a tick so much that they begin to actively increase the number of their subscribers with all possible ways, including cheating bots. There are special services for this that generate subscribers. You need to be as careful as possible with such programs, since the administration will definitely check the subscription history and profiles of your followers. If it turns out that you have a lot of bots and fakes, you will be rejected.
They will also look at your profile content. Photos must be high quality, unique and personal. If you only have photos from the Internet, then you are unlikely to pass verification. Also, provide as much information about yourself as possible, fill out your profile as thoroughly and correctly as possible. If you have a commercial company account, then your popularity and image among clients will play a decisive role.
Now you know, how to verify account on Instagram. It is worth understanding that the administration will need time to carefully check everything and make a decision. There is no need to bother the moderators with messages and requests to speed up. After submitting your application, please wait patiently. If the administration considers your contribution to this social network significant, then you will receive the coveted tick.
The average user of a phone with Android versions 5.1 and higher most often does not know what to do if he forgot his account data, and then full reset settings, a smartphone with the new protective function Device Protection begins to require you to confirm your Google account and does not allow you to log in. We will describe several ways to solve this problem that is relevant for modern Google devices.
There is no password for the account on the Android device
If the owner of the device has forgotten the Google password associated with the gadget, recovery can be done in the same way as for regular Gmail email. The easiest way to do this is to contact Google service Account Recovery, which will help you recover information step by step:

The user, of course, did not forget that the device was inoperative. Therefore, you can use two options:
- remove the SIM card and install it on another device to receive a verification code from Google;
- refuse this, indicating that you cannot use the device.
In the latter case, if you specified a backup mailbox during registration, an email will be sent to it with a link to the password reset page. There you can set up a new account and log in to your account on your Android phone.
If you did not specify any recovery data
Sometimes, when registering, users do not provide a backup email address or telephone number. Then resetting a password that the device owner has forgotten will be more difficult - you will have to answer a lot of leading questions:
- first you will need to indicate your email for communication;
- the last password for your Google account that you can at least roughly remember;
- approximate dates of creation and last visit;
- mailbox addresses you frequently use;
- other Google apps you use—calendar, mail, etc.—and the dates you started using them.
Next, all you have to do is send your answers to the service that restores Google access, after which you will either see a record of successful confirmation of the account ownership of you and an offer to change the password for Android, or they will be sent to you at the specified email address for communication. additional instructions to provide access.
You don't remember your login
If you were the one who filled out your profile when buying a new phone, then probably for your own mailbox you are using the same name. You can also remember it in Google Account Recovery. For this:

After filling out the captcha, you can send a message. If the data is entered correctly, the recovery should complete without problems.
How to bypass account verification
But usually the owner of the device, if the device was set up in a store, does not remember not only the electronic Gmail, but also does not have any information to restore this data, as a result of which devices with Android 5.1 and higher remain blocked. Fortunately, the creators of the OS have not yet managed to fix all the “holes”.
These devices, after resetting the settings and even after flashing them, are inoperative until the owner confirms the account.
We will describe below what to do if it is impossible to complete the data verification procedure. In general, you can “cure” a gadget using the settings menu, although sometimes it’s not possible to get there right away. Let's describe a couple of ways to bypass the blocking.
Method one
After execution Hard Reset and the account verification window appears, do the following:

After going to the settings menu, you will need to reset the settings using the standard method:
- go to the recovery and reset section;
- in the “Reset settings” folder, activate the corresponding command for your device.
Current Google account will be deleted, after which you can start making new settings for your gadget.
Second way
If a data confirmation window appears:


