After the antivirus, the Internet disappeared. Dr.Web - Frequently asked questions. Use AdwCleaner to remove malware components that block Internet access
It's no secret that Dr Web is a huge success among users thanks to its technology for protecting computers, laptops and other devices. In its work it uses sophisticated algorithms that allow it to identify a variety of virus files and programs, as well as stop and destroy them. But often, protecting the computer from outside influence, Dr Web blocks the necessary programs, as well as the Internet.
Dr Web blocks the Internet
One of the properties of the Dr Web antivirus program is reliable protection computer on the Internet. Wherein Dr Web blocks the Internet. This is done using the built-in firewall.
Firewall blocks internet
As a rule, when the Firewall option is enabled, access to the Internet is blocked. Disabling this parameter, accordingly, opens access to the network. This fact is complicated by the fact that there is no need to disable the firewall every time. However, every time the system boots again, firewall blocks internet again. And again I have to turn it off.
In order to once and for all allow access to the network to the Dr Web firewall, you must first disable the firewall, and secondly Allow and activate the changes, after which Apply all this. In simple words, in the settings select Allow all, which means all packets are allowed through. This is all located in the Dr Web firewall settings.
To get started with the Firewall you need to:
select the program operating mode;
configure settings for known networks.
Default Firewall automatically creates rules for known applications. Regardless of the operating mode, events are recorded.
The program's default settings are optimal for most applications and should not be changed unless necessary.
Settings Allow local connectionsallows all applications to make connections seamlessly on your computer. The rules will not apply to such connections. Clear this check box to apply filtering rules regardless of whether the connection is over a network or within your computer.
Operating mode selection
Select one of the following operating modes:
Allow unknown connections – a mode in which all unknown applications are granted access to network resources;
Create rules for known applications automatically - learning mode , in which rules for known applications are added automatically (used by default);
Interactive mode - training mode , in which the user is given full control over the response Firewall;
Block unknown connections – a mode in which all unknown connections are automatically blocked. Known compounds are processed Firewall according to the specified filtering rules.
Training mode
In this mode, rules for known applications are added automatically. For other Firewall applications provides you with the ability to manually deny or allow an unknown connection, as well as create a rule for it.
Firewall
Interactive mode
This mode gives you full control over how the Firewall responds to detect an unknown connection, and thus the program is trained while you work at the computer.
When an attempt is detected from the operating system or user application to access network resources Firewall checks whether filtering rules have been set for these programs. If there are no rules, then a corresponding warning is displayed, where you are asked to choose either a temporary solution or create a rule according to which similar connections will be processed in the future.
Blocking unknown connections mode
In this mode, all unknown connections to network resources, including the Internet, are automatically blocked.
When an attempt is detected from the operating system or user application to access network resources Firewall checks whether filtering rules have been set for these programs. If there are no filter rules, then Firewall automatically blocks access to the network and does not display any messages. If filtering rules for a given connection are specified, the actions specified in them are performed.
Allow unknown connections mode
In this mode, access to network resources, including the Internet, is granted to all unknown applications for which filtering rules are not specified. When a connection attempt is detected Firewall does not display any messages.
Firewall - fire wall, aka firewall, also known as a firewall) is a program that controls the exchange of data between your computer and the rest of the network. The main task of a firewall is to monitor network activity generated by applications and prevent attempts by hackers or malware to send any information from your computer to the network or, conversely, to unauthorizedly receive it from a remote source.
What is interactive firewall mode?
In this mode, you are given the opportunity to train the firewall to respond to attempts by a particular program to exhibit network activity.
When it detects access to network resources, Dr.Web Firewall checks whether filtering rules have been set for these programs. If there are no rules, then a corresponding request is displayed in which the user can select a one-time action for the firewall or create a rule according to which similar network activity of the application will be processed in the future.
This mode is the default.
How to prevent a program from accessing the Internet?
To prevent a specific program from using the network, you need to create a new rule. Click on the mini-agent (spider) icon, which is located in the lower right corner of the screen, and click on the image of a closed castle.
When the User Account Control window appears, click on the “Yes” button and, if necessary, enter the administrator password.
Click on the settings window button (gear).

The Dr.Web settings window will open. Go to the “Security Components” → “Firewall” section. Click the "Change network access for applications" link. The application rules settings window will open.
- If the application is present in the list, then right-click on it and select the “Edit” option in the window that opens. In the “Edit rule set” window that opens, use the “Access to network resources” drop-down list to set the “Deny all” mode.
- If the application you need is not yet in this list, click on the “+” button. The New Application Rule Set window opens. Using the Browse button, specify the path to the application's executable file or specify the process of this application (if it is running at the moment). Using the “Access to network resources” drop-down list, set the mode to “Deny all”.
Firewall icon in red. What to do?
A red icon indicates that the firewall is disabled. To activate it, right-click on the Dr.Web icon on the taskbar. In the menu that opens, hover your mouse over the line Firewall and select the item from the drop-down list Turn on.
If the icon remains red, there are two options:
- Program error - in such a situation, you should contact technical support.
- The license does not support the use of a firewall - currently the use of a firewall is only available in the Dr.Web Security Space, Dr.Web Anti-Virus and Dr.Web Bastion products.
The firewall notification window appears. What to do with him?
When a notification window appears, it indicates that the application that the firewall responded to does not have a processing rule set. You can do one of the following:
- Allow- network activity of the application will be allowed for the duration of the current session. After restarting the computer or calling the program again, the firewall prompt will be issued again.
- Prohibit- prohibition of network activity of the program. Only for the current session.
- Create a rule- when you configure a rule for an application, the firewall will automatically fire according to this rule. By selecting this item, you will see a window in which you will be offered two actions to choose from:
- Apply predefined rule- in the drop-down list you need to determine whether the application should be allowed access via the specified protocol or denied.
- Create your own rule- you can create a new rule for the firewall to work with the current program.
Note: Always try to create rules to automate your firewall.
How to create a rule for an application (program) in Dr.Web version 8 and lower?
Right-click on the Dr.Web icon in the notification area. In the menu that opens, hover the cursor over the Firewall line and select the item from the drop-down list Settings. Go to the tab Applications.
To create a rule for an application, click Create. In the window that opens, you need to specify the path to executable file program for which the rule is being created and select
- type of rule for launching network applications:
- Allow- allow the application to launch processes.
- Forbid- prevent the application from starting processes.
- Not specified
- and the type of rule for accessing network resources:
- Allow everything- application access to the network will be allowed.
- Ban everything- the application's access to the network will be blocked.
- Special- access will be determined by user-specified parameters.
- Not specified- distribute the settings of the selected Firewall operating mode to this application.
If the firewall is running in learning mode, there is no need to configure rules manually - it is easier to configure access for each application at the time of its first network activity, directly from the firewall alert window.
How to disable the firewall?
Click on the mini-agent (spider) icon, which is located in the lower right corner of the screen, and click on the image of a closed castle.
You did everything as expected, removed the virus, but now you understand that you cannot connect to the Internet. The following article will help you get your Internet settings back after virus software has deleted them.
1. Check your Web browser settings
The virus can redirect your browser to another host, so it’s worth checking your proxy server settings. You must make sure that your web browser is configured properly. Otherwise, you will receive an error message: “ Internet Explorer cannot display this web page." Follow these steps to fix the proxy error:
Open IE
. Open Internet Options
. Then select the Connections tab.
. Select Network Settings.
. Check Automatically detect parameters and uncheck the remaining boxes.
If your proxy server was configured differently, then after the changes described above and clicking the Apply button, the Internet connection should be restored. Just refresh the page by pressing F5.
If it doesn't help, read on.
2. WinSock recovery
Typically, damage to WinSock appears due to the removal of some viruses that change system settings related to the Internet connection. You will need to take several steps to repair your WinSock. (In Windows 7, you can click "diagnostics")

In Control Panel > Network Sharing Center and shared access> Change adapter settings. Right-click on the connection, and select "Diagnostics". This will help fix a damaged WinSock.
If this cannot restore WinSock or you have another Windows version You will have to manually restore your network settings to resolve the issue. You need to remove the Winsock entries and then reinstall the TCP/IP protocol.
Reinstall WinSock by editing the registry
First you need to make a copy of the registry by creating a system restore point. Go to Start > Programs > Accessories > System Tools > System Restore. System will restore and create a restore point.
Then, open the registry editor, press WIN+R and type regedit in the dialog box. You should now be in the Registry Editor.
Warning: Running commands in the registry may damage your computer. Please use caution.
In the Registry Editor, locate the following keys and right-click on the desired key and select remove:
1. HKEY_LOCAL_MACHINE\System\CurrentControlSet\Services\Winsock
2. HKEY_LOCAL_MACHINE\System\CurrentControlSet\Services\Winsock2

Restart your computer after you remove the WinSock keys.
If you do not restart your computer after you have removed the WinSock keys, the next step will not work properly.
Step 2: Install TCP/IP
1. Right-click on the network adapter properties, and then click Properties.
2. Click Install.
3. Select Protocol, and then click Add.
4. Select Have from disk.
5. Specify the path: C:\Windows\inf, and then click OK.
6. From the list of available protocols, select Internet Protocol (TCP/IP), and then click OK.
7. Restart your computer.
The above steps should help you repair your browser and/or your damaged WinSock if you are unable to connect to the Internet after removing the virus. And you need further assistance, please contact our specialists.
Hello. I want to say right away that I have read all the articles on your site and some others. And I not only read, but also tried to apply all the advice, except for a clean reinstallation of the system. Nothing helped. Apparently, not all the secrets of WiFi have yet been studied.
Now comes the crux of the problem. After correct DrWeb removal Using a proprietary utility, WiFi stopped connecting. HP Pavillion dv7 laptop, first Dlink dir620 router, then Tenda AC6, Win 10 system. The picture is the same. The laptop connects to the network “Without Internet access”, but the router doesn’t even see it. After Windows reinstallation saving WiFi settings works without problems until the first reboot of the laptop. Then everything again as I described above. Yes, all other devices and gadgets (smartphones, tablets, all-in-one PCs) work with this network and router without problems.
I’ll repeat again: I tried all sorts of driver updates, resetting and forgetting the network, and all the other tips from the articles.
Question: what to do, how to set up WiFi?
Answer
Hello. Sometimes such problems occur after uninstalling antiviruses. However, I have not yet heard that Dr.Web somehow affects the operation of the Internet connection after removal. Or maybe it's just a coincidence. Usually, reset network settings helps in such situations.
Check your proxy server settings. Here .
If this does not help, then I would try to install Dr.Web again. Then delete.
https://download.drweb.ru.
Yes.


The installation wizard, having detected a previous version of the antivirus, will offer to remove it. Click Delete.

If during removal previous version errors occur and the antivirus cannot be removed, use the utility for emergency removal of “residues” from incorrect/damaged Dr.Web installations, which can be downloaded from the link: https://download.geo.drweb.com/pub/drweb/tools/drw_remover .exe
During the process of uninstalling the previous version, you must answer the system's question about clearing the quarantine contents. Click Yes to remove data from quarantine, or No to save them.

If you are upgrading from version 7.0, you must respond to the request to delete antivirus settings. Click Yes to delete settings, or No to save them.

Disable Self-Defense.

Yes.

Step 3. Installation new version
Yes.

The installation wizard window will open. Check the box and press Further. You can read the text of the license agreement by clicking on the appropriate link.

Install Dr.Web Firewall and press Further.

and press Further.

Review Further.

Install Installation options.


Updating Dr.Web antivirus from version 8 to version 9.0
The update is free for users over earlier versions Dr.Web
Step 1. Download and run the installer
Download the antivirus distribution kit from the Doctor Web website using the link https://download.drweb.ru.
Run the downloaded file. If you are installing on Windows Vista or later, you will be prompted by User Account Control (UAC), click Yes.
Step 2: Detect the previous version and remove it
The installation wizard, having detected a previous version of the antivirus, will offer to update it. Click Update.

During the upgrade process, the installation wizard will remove the previous version. If errors occur during the removal of the previous version and the antivirus cannot be removed, use the utility for emergency removal of “residues” from incorrect/damaged Dr.Web installations, which can be downloaded from the link: https://download.geo.drweb.com/pub /drweb/tools/drw_remover.exe . Or contact the service technical support by the address .
When uninstalling the previous version, you must answer the system's question about clearing the quarantine contents and deleting the settings of the old version of Dr.Web Security Space. Select the checkboxes for the item you want to remove and click Further.

To continue removal, the antivirus will need to disable self-defense. To do this, enter the confirmation code shown in the picture in the provided line and press Remove a program.

After uninstalling the previous version of the antivirus, you will be prompted to restart your computer. Click Reboot now.

Step 3. Install the new version
After restarting the PC, the antivirus installation should start automatically. If this does not happen, then find the installation file you downloaded earlier and run it.
If the installation is performed on Windows Vista or later, the User Account Control (UAC) prompt will appear again. You also need to click Yes.

The installation wizard window will open. Check the box I accept the terms of the license agreement and press Further. You can read the text of the license agreement by clicking on the appropriate link.

If you need to install the Dr.Web firewall, in the next window, check the box Install Dr.Web Firewall and press Further.

If you need to connect to Dr.Web cloud services, check the box I want to connect to services (recommended) and press Further.

When upgrading to version 9.0 from earlier versions, the antivirus automatically finds the key file during installation. If the file is not found, click Review and specify the path to the existing key file (which was used old version). Then click Further.

To complete the antivirus installation, click Install. To view the settings, click on the link Installation options.

After completing all necessary actions The installation wizard will ask for permission to reboot. Save all necessary data and restart your PC.

If you are faced with a lack of access to the Internet or some sites have stopped opening, then two options are possible: a virus is blocking access to some sites or your antivirus has removed a malicious program that has changed the operating system settings that determine the connection to the Internet. These may be browser proxy server settings, settings network card(Internet Protocol version 4), LSP stack configuration, etc.
As a result, you are faced with a situation where websites stop opening. Messages appear that “The web page is unavailable”, “You are not connected to the network”, “The proxy server is not responding” and other similar ones.
Ways to solve the problem “No Internet access”
The instructions below will help you solve problems with Internet access. Moreover, a variety of methods are used, from the simplest to those requiring special programs. Do them one by one. If Internet access is restored at any stage, then you can stop and not perform the following. If you have any questions, leave a comment below, ask a question in the section on our website, or contact us for help.
1. Restore your browser's proxy server settings.
Internet Explorer, Microsoft Edge and Google Chrome
All three of these Internet browser Explorer, Microsoft Edge And Google Chrome use the same proxy server settings. To return them to their original values, do the following.
Launch Internet Explorer. Click on the gear-shaped button located in the upper right corner of the browser (). A menu will open as shown in the following picture.

Click on the item Browser properties. You will be shown a window with several tabs. Select a tab Connections.
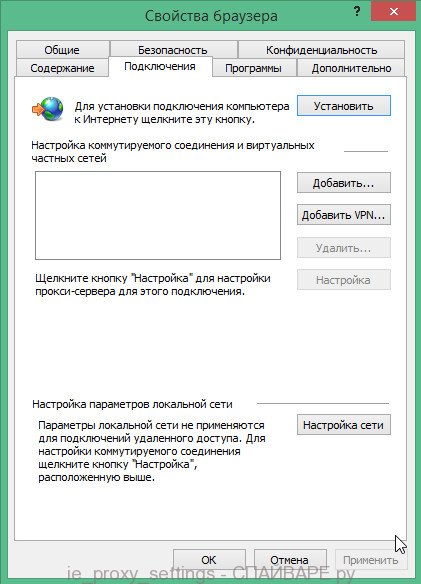
Click on the button Network configuration as shown below.

In chapter Proxy server uncheck the box next to the inscription Use a proxy server for local connections. Click OK once again OK.
Mozilla Firefox
Launch Firefox. Open the browser menu by clicking on the button in the form of three horizontal stripes (), which is located in the upper right part of the window. You will see the main Firefox menu, like in the picture below.

Here click on the gear icon with the inscription Settings. A window with Firefox settings will open in front of you. Click on the inscription Additional.

In the window that opens, in the section Compound, click on the button Tune. This action will open the settings that determine which proxy server the browser should use.
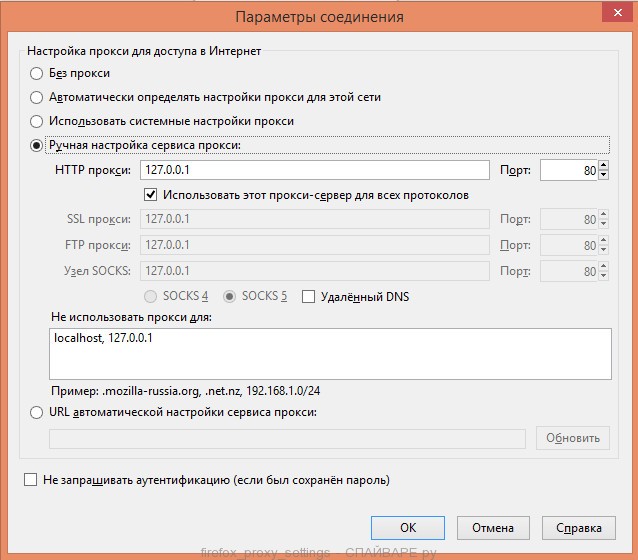
Select an item No proxy and click on the button OK. Restart your browser.
2. Restore Internet Protocol version 4 settings.
Windows XP, Vista, 7
Click on the button Start, in the menu that opens, select Network connections.
Windows 8, 8.1, 10
Press the Windows key and the X(H) key on your keyboard at the same time. A menu will open as in the following figure.

Select an item Network connections.
A window will open in front of you with a list of all network connections.

Click on the name of your adapter (network card) and select Properties.

A window will open with the properties of the selected network adapter. In the list of components, find the item Internet Protocol Version 4(TCP/IPv4).

Double-click on the selected item. In the window that opens, check the boxes Obtain an IP address automatically And Get DNS server address automatically.

Click OK once again OK.
By setting these settings in this way, you will enable Windows to obtain the IP address and DNS server address from the router, modem or router. If your computer uses a static network address, then enter it in the previous step.
3. Clear DNS cache.
The DNS cache stores a table of correspondence between the site name and its IP address. Some viruses can replace this correspondence and thus block the opening of certain sites, as well as redirect users to various misleading web pages.
Like the following picture.

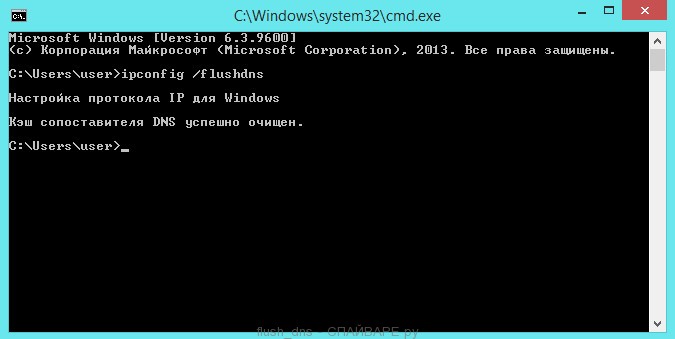
Enter in the field Open team cmd and press Enter. Will open command line. Type ipconfig /flushdns in it and press Enter.
4. Restore the LSP stack configuration.
LSP is a software service in operating system Windows consisting of several layers. Each layer defines one program. All information requested from the Internet passes through this group of layers. Thus, if one of them, or a program that is bound to one of the layers, is incorrectly deleted, the entire LSP service will crash, resulting in the Internet connection becoming unavailable.
Windows XP, Vista, 7
Press the Windows key and the R(K) key on your keyboard at the same time. A window will open as in the following figure.
Enter in the field Open team cmd and press Enter.
Windows 8, 8.1, 10
Press the Windows key and the X(H) key on your keyboard at the same time. A menu will open as in the following figure.
Select an item Command Line (Administrator).
A command prompt will open. Type netsh winsock reset in it and press Enter.
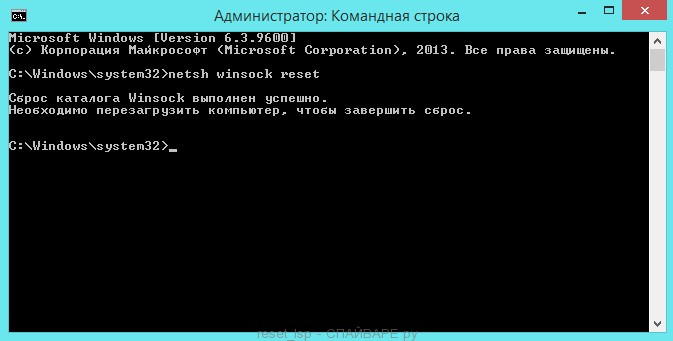
Restart your computer.
5. Use AdwCleaner to remove malware components that block Internet access.
AdwCleaner is a small free utility created by programmer Xplode. It will quickly scan your computer and remove components malware, which can block access to the Internet or to specific sites.
Download, if the file download does not start automatically. After the program has finished downloading, run it. The main AdwCleaner window will open.

Click on the button Scan. This process can take up to several tens of minutes. When the scan is completed, you will see a list of detected malware components.

Click on the button Cleaning. AdwCleaner will begin cleaning your computer. To complete the process, you will need to restart your computer.
6. Use TDSSKiller to remove hidden Trojans and rootkits that block Internet access.
TDSSKiller is a free utility created by Kaspersky Lab. It can find and remove many different rootkits such as TDSS, Cidox, RLoader, Phanta, ZeroAccess, SST, Pihar, Sinowal, Cmoser and the like.
On the page that opens, click on the green button Download

Click on the button Start checking. The program will begin scanning your computer.
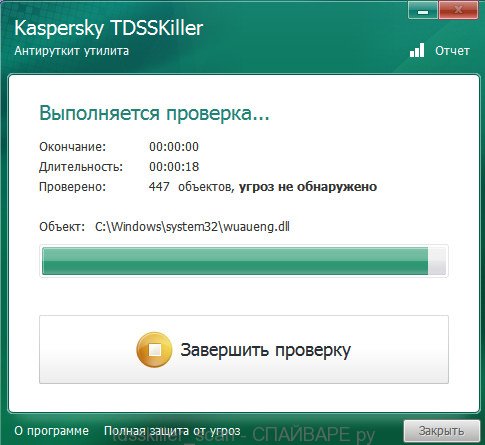
Wait until the scanning is completed and the detected rootkits are removed. When the program finishes, the computer must be restarted.
7. Use Malwarebytes Anti-malware for additional scanning.
Malwarebytes Anti-malware is an excellent program created by Malwarebytes. It easily removes a wide variety of Trojans, rootkits, malicious and potentially unnecessary programs. The program is absolutely free for home use.
On the page that opens, click on the green button Download, if the file download does not start automatically. Run the downloaded file.

After the installation is complete, you will see the main screen of the program.

The program update procedure will start automatically. When it ends press the button Run scan. Malwarebytes Anti-malware will begin scanning your computer.

When scanning your computer is complete, Malwarebytes Anti-malware will open a list of malware components found.
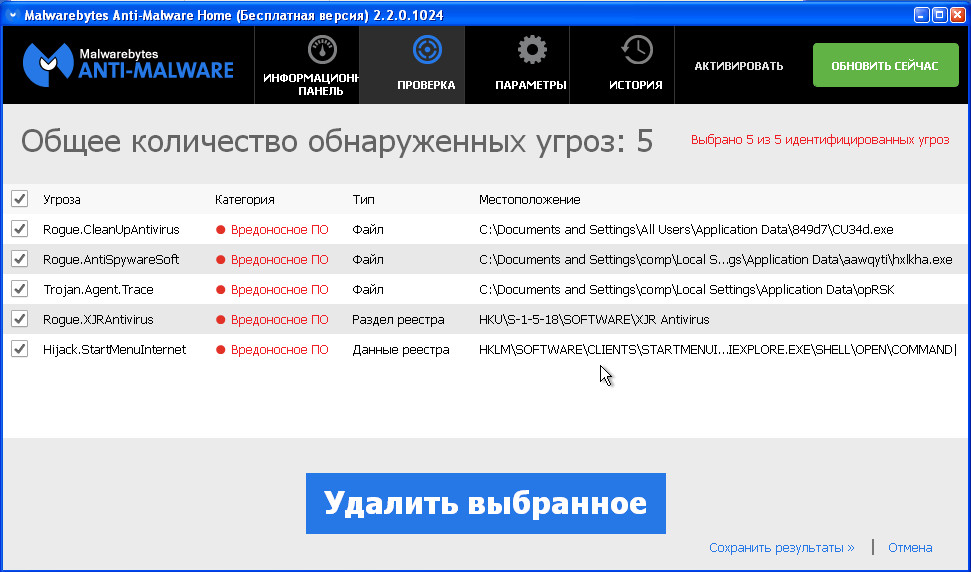
Click on the button Delete selected to clean your computer from malware that may be blocking Internet access.
Conclusion
By following these instructions, you should be able to solve the problem with no Internet access. Unfortunately, there are variants of infection when these instructions may not help you, in this case, contact our.
To avoid infecting your computer in the future, please follow three small tips.
1. Always try to download programs only from official or trustworthy sites.
2. Keep anti-virus and anti-spyware programs updated to latest versions. Also note that you have automatic Windows update and all available updates are already installed. If you are not sure, then you need to visit the Windows Update website, where they will tell you how and what needs to be updated in Windows.
3. If you are using Java, Adobe Acrobat Reader, Adobe Flash Player, then be sure to update them on time.


