Installing the latest CPU microcode. Correcting errors in the CPU Updating the microcode of the intel processor
I present the donor BioStar A740G M2L+ (AMD 740G / SB710) and the recipient BioStar A740G M2+ (AMD 740G / SB700). The motherboard with the letter “L” is more recent and officially supports AM3 processors, unlike the other one, which is limited to only supporting AM2+ processors. Begging to be comparative analysis Their BIOSes.
From the office we only load the site Last update BIOS firmware for each of these motherboards:
- for A740G M2+ latest beta A74GM916.BSS for September 2009
- for A740G M2L+ - file 74GCU511.BSS- for May 2010
Next, arm yourself with the MMTOOL utility (I used versions 3.22, 3.23 and 3.26 - I did not find any differences in operation). To work with MMTOOL, BIOS firmware file extensions must be renamed to *.rom.
Now we launch two MMTOOLs and load the firmware files from two mats into them. plat. Please note: different sizes in the “Source size” column (and in “Size in Rom” too, of course) of module 11 “P6 Micro Code” in each of the firmwares.
Let's go to the CPU PATCH section for a detailed comparison:
The donor file 74GCU511.rom - cpu_list contains 14 lines with support for CPURev.ID + 1 empty (Fig. 1).
The beta version of the recipient A74GM916.rom - cpu_list contains 13 lines with support for CPURev.ID + 1 empty (Fig. 2).
After analyzing the lists of these two BIOSes, it becomes obvious that for the newer motherboard the developers used more recent patches for AMD processors, where the microcode of two lines with CPURev.ID 1043 and 1062 (dated 2009/07/31) and one line with CPURev were corrected .ID 10A0 added (dated 2010/02/17).
Method No. 1 - modification of distinctive lines.
These three distinctive lines are extracted from the donor 74GCU511.rom - the actions “Extract a Patch Data” + “Apply” + 1 last empty line and saved in separate files.First, in the CPU PATCH section of the recipient file A74GM916.rom, two lines with CPURev.ID numbers 1043 and 1062 (whose microcode is older than we will insert further) and the last empty line are deleted - the actions “Delete a Patch Data” + “Apply” ( Fig.3).
After this, the newer microcode from the four previously received patch files for CPURev.ID 1043, 1062, 10A0 and an empty line are inserted one by one (Fig. 4).
Please pay attention to the dimensions (“Source size” and “Size in Rom”) of module 11 “P6 Micro Code” before and after applying these changes to the recipient file.
After application, these dimensions for the recipient (Fig. 6) will become identical to the dimensions of the same module in the donor file 74GCU511.rom (Fig. 5).
It is worth noting that it is not difficult to understand how the module size is formed (each line in the CPU PATCH section takes 2048 bytes).
It is better to save changes under a new file name.
Next, this file is checked so that MMTOOL opens again without errors.
Method No. 2 - modification by replacing the entire module.
Actually, it is precisely this that is described on the Internet (for example, partially).In MMTOOL we load the donor file 74GCU511.rom, go to the “Extract” tab and look for the line “P6 Micro Code”. Then we select it, in the “module file” field we give it the name ncpucode.bin and execute Extract module “in uncompressed form”.
Now load the recipient file A74GM916.rom into MMTOOL, go to the “Replace” tab and again look for the line “P6 Micro Code”. Select it, wait for Browse and select our donor module ncpucode.bin. Click Replace and then agree to replace this module.
Again, pay attention to the dimensions (“Source size” and “Size in Rom”) of module 11 “P6 Micro Code” before and after replacing this module in the recipient file.
After application, these dimensions for the recipient (Fig. 7) will become identical to the dimensions of the same module in the donor file 74GCU511.rom (Fig. 5).
If we compare the results of both methods (Fig. 6 and Fig. 7), then there is a noticeable difference of 10 bytes in the RomLoc address of the “User Defined or Reserved” module, next to the updated “P6 Micro Code” module - perhaps these are features of the operation of MMTOOL...
Conclusion and afterword.
In this way, from different BIOS firmwares, different mat. boards on socket AM2+ (and even AM3 for comparison), you can find the latest microcodes for each type of CPURev.ID, both in Award and AMI bios, then combine them into a single ncpucode.bin.Subsequently, it turned out to be 32768 bytes in size from 16 lines (microcodes) with the latest dates from among the studied firmware of various BIOSes: with 15 various types processor revisions for socket AM2+ (040A, 0413, 0414, 041B, 0433, 0680, 0C1B, 1000, 1020, 1022, 1040, 1041, 1043, 1062, 10A0) and the 16th line for RevID 0000 (apparently not cue universal microcode for revisions of processors not described in other lines - IMHO, for example future ones).
By combining your own ncpucode.bin by importing the necessary patches (microcodes) for each required processor revision, you can use absolutely any AMI BIOS firmware with the “P6 Micro Code” module as a laboratory one.
However, when saving the firmware file, an unpleasant feature of MMTOOL was noticed - for some reason the utility added 8 zero bytes to the end of the “P6 Micro Code” module - it turned out to be 32776 bytes in size. When extracting the ncpucode.bin file from the laboratory firmware using the same MMTOOL, the output file also became 32776 bytes in size.
You can edit this with simple editors accessible to everyone. But I also (accidentally) discovered alternative way: when the universal utility BIOS_EXT.EXE extracted all modules from the laboratory firmware, the file ncpucode.bin was already the correct size of 32768 bytes - the BIOS_EXT.EXE utility itself correctly identified the end of the “P6 Micro Code” module when saving it to a file.
If the LGA 775 chipset and motherboard can theoretically support XEON 771, but the native BIOS does not support it, and there is no modified one, then you can modify the BIOS yourself.
IMPORTANT
1. You make all changes to the BIOS firmware (.ROM file usually) at your own peril and risk. In the event of an error, a guaranteed “brick” is obtained from the motherboard
2. The file size of the original firmware and the modified version must match down to the byte.
3. Flashing the modified BIOS file back into the chip can only be done using a proprietary utility from the motherboard developer (must be downloaded from the manufacturer’s website).
4. In the top motherboards ah, the BIOS itself has a built-in firmware update module (for example, EZ Flash 2 utility for ASUS P5Q in the Tools section) - the best option.
How to do it better:
1. Should I still look on the Internet for a ready-made option with XEON support?
2. Download from the official website latest version firmware and add microcodes?
As you can see, the second option is safer, you download anyway original firmware from the motherboard manufacturer's website, i.e. The latest version and the absence of errors are guaranteed (more precisely, the correction of all previously found errors). When downloading a ready-made version from third-party resources (for obvious reasons it will not be on the original site) - you can get a crooked version and kill the BIOS.
You can first assess the presence of XEON microcodes in the BIOS firmware.
— get the current AMI BIOS image via Universal BIOS Backup ToolKit 2.0
— look at the contents of the received ROM file via AMIBCP V 3.37

Option for BIOS AMI (American Megatrends Inc).
1. Download the latest version BIOS from your motherboard manufacturer's website
3. Download microcodes for XEON 771 processors: lga771_microcodes
4. Find out the CPUID of your processor using AIDA64 or a similar program (it looks like cpu0001067Ah). If BIOS will be sewn up before installing the processor, then skip this step.

5. Unpack the archives MMTool And lga771_microcodes and leave from files with the extension .bin only those files whose beginning matches the CPUID of your computer (for example, cpu0001067a_plat00000044_ver00000a0b_date20100928.bin)
If we don’t know what code, then we sew everything up.

A. Let's launch MMTool. Press button (1) Load ROM and load the latest BIOS for your motherboard into the program. If you have the latest BIOS, then you can also use the utility to merge the BIOS backup from your PC and edit it.
B. Go to tab (2) CPU Patch, then with button (3) Browse, open the file .bin corresponding to your CPUID.
C. Leave the options at default "Insert a Patch data" and press button (4) Apply.
After updating with a modified BIOS you need to reset the settings through the reset button or jumper, if the motherboard supports such a reset, or by removing the BIOS battery for a couple of minutes. Then the processor is correctly perceived by the computer and works as it should.
Basic Input Output System - basic input/output system, abbreviated as BIOS. A small chip on the motherboard that is the first to receive control when the PC is turned on. Provides: basic PC settings, checking PC components at startup...
In the first lines of this post, I would like to sincerely and without sarcasm thank a forum participant on the clockers, under the nickname WebBlast, for popularizing this method.
Today is the first of April, but this is just a coincidence. The method works and almost nothing is bricked.
Pre-UEFI BIOS have a mechanism for updating microcodes without updating the BIOS itself. For one reason or another, this mechanism does not always work, but if it works, then in general the update procedure comes down to booting the system from a special external media and then rebooting.
What is important to understand:
- One microcd is replaced by another, not added. Those. in the situation with the 771 mod, we often get a loss of support for a similar Core 2 Quad, i.e. its microcode is replaced with Xeon microcode.
- If the system is not stable, it is not recommended to use this method, and a Xeon system is often not stable without microcodes.
- You cannot update the microcode on an old processor.
- The program does not operate with the concept of a platform at all. Those. for example, the microcode for the 1067A processor, version FA and platform 0 will be replaced with the microcode for the 1067A processor, version FC (newer) and platform 2. However, the microcode for the FC version and platform 0 will not be replaced with the microcode FC and platform 2. Program It will tell you that everything has already been updated.
It should also be added that this method is almost ideal for updating Feng’s mods (aka genius239239) to the microcodes of the 2010 version.
And so, for those who are not interested in reading and who have a floppy drive, a simple solution is proposed - write (IMA/ZIP, 305kb) to a floppy disk, reboot and... that's it. The screen will probably say that the microcode has been updated and everything is fine.
For those who do not have a disk drive, but have a flash drive, there is also a way, but a little more complicated:
After booting the PC from such a flash drive, the microcode for any 45/65nm Core/Core2 generation processor will be updated. Of course, if the BIOS is not UEFI and if the board is not an evil OEM and so on... but there is a chance.
Examples of the program running on the same board, but with different BIOS versions:
- A successful example. ASUS P5QVM DO, BIOS 0206:
=========================================================================
The microcode update was successfully loaded permanently into the BIOS.
You do not need to run this utility again, unless a new
processor is installed or a new version of the utility is used. - NOT successful example. ASUS P5QVM DO, BIOS 0403:
Database file being used is PEP.DAT
=========================================================================
| Processor Update Utility for Intel(R) P6 and Intel NetBurst(R) |
| Microarchitecture Family of Microprocessors |
| Version 7.14, 09/23/2005, Production |
| Copyright 1995 -2004, Intel Corporation. |
=========================================================================
The system BIOS supports the microcode update API.
Searching database file for Processor Signature =0001067A Platform ID =1
Attempting to permanently install the microcode update(s) in your system BIOS.Checking microcode update for processor signature 1067A and platform ID 01:
BIOS microcode update revision = A07
Database microcode update revision = A0B
This utility can load a newer microcode update into the BIOS.
ERROR: Update not permanently loaded into the BIOS. BIOS rejected
Database microcode update revision = A0BMicrocode updates can only be temporarily loaded into processors.
You will need to run this utility again after each system power-up or reset.
Processor #2:
Pentium(R) III processor detected.
Processor Signature =0000067A
Processor microcode update revision = A07
Database microcode update revision = A0B
This utility can load a newer microcode update.Update #1 Processor Signature=1067A Platform ID=11 Revision=a0b
2 successful load(s) .
All Updates Loaded and Verified!- Older versions of HPUSBFW do not work under Win10, but version 2.2.3 and newer create a bootable USB flash drive without any problems.
- This method works perfectly from a USB flash drive with FreeDOS created using RUFUS tools.
- Yes, RUFUS’ FreeDOS does not load on all systems, but there is a solution, see point 1.
You can optimize the performance of the Intel or AMD CPU installed in your computer by installing the latest version of its microcode. Optimization is achieved mainly by correcting errors in the standard microcode received from the motherboard firmware.
BIOS/UEFI firmware updates for your motherboard usually contain new firmware versions for supported motherboard central processors. For this reason, you should first ensure that you are using the latest BIOS/UEFI version.
This guide allows you to optimize the performance of only those central processors that were developed by Intel and AMD.
Notes:
- Installing the package software with microcodes can lead to unstable operation of the computer. For this reason, you should install this package only when you experience any problems with the functioning of your computer's central processor!
- Do not install a software package with microcodes for central processors if it is released earlier than the BIOS/UEFI firmware of your computer's motherboard!
1. Central processors manufactured by Intel
In case of using a production central processor Intel you can proceed as described below.
Note: do you need a software package with microcodes for central processors manufactured by Intel that is newer than what is in the official distribution repository? In this case, you can download the software package file with the extension .deb from
Synaptic Package Manager Software
Synaptic Package Manager"Search on your computer"), enter your request "Synaptic" "Synaptic Package Manager" Synaptic package manager "Search" "microcode" and press the button "Search" next to him.
3.201501106.1 (in this case, version 3 of the package was created on November 6, 2015).
« intel-microcode" and press the button "Apply"
dmesg | grep microcode
Enter
2. Central processors manufactured by AMD
If you are using processors manufactured by AMD, this guide will only be relevant for those that were released after 2006 (AMD K10 and newer). If your computer has one of these CPUs, you can proceed as follows.
Note: Do you need a software package with microcodes for AMD CPUs that is newer than what is in the official distribution repository? In this case, you can download the software package file with the extension .deb from the Debian distribution repository, which contains the latest packages. After downloading the package file, you should find it using the file manager and double-click to install the microcodes on the system. After installation is complete, you must restart your computer.
A. If you are using Ubuntu distribution, you will have to install Synaptic Package Manager(this can be done using the application Software). In Linux Mint, this package manager is present immediately after installation.
B. The first thing you should do is run Synaptic Package Manager. On Ubuntu, you can do this by clicking on the white Ubuntu logo at the top of the sidebar ( "Search on your computer"), enter your request "Synaptic" and select the first of the proposed application options "Synaptic Package Manager". No need to use field quick search main window software packages Synaptic package manager, since the corresponding mechanism is unreliable; instead you should press the button "Search" on the toolbar, enter a query in the search field of the dialog box that opens "amd64-microcode" and press the button "Search" next to him.
C. Now you should check the creation date of the software package with the microcodes of the central processors: this package must be created later than the BIOS / UEFI firmware of the motherboard of your computer! The creation date of the package in question is reflected in its version number, for example 2.20160316.1 (in this case, version 2 of the package was created on March 2, 2016).
D. It's time to check the box next to the software package name "amd64-microcode" and press the button "Apply" on the application toolbar.
E. Once the software package installation is complete, you must restart your computer.
F. After rebooting, it is worth checking that one of the installed microcodes loaded correctly by entering the following command in a terminal window (use the copy/paste functions to avoid errors):
dmesg | grep microcode
After finishing entering the command, press the key Enter for its execution. If the microcode was successfully downloaded, you will see several messages indicating this.
Want to learn about other settings and techniques for working with Linux systems? This website contains a large amount of similar materials.
Hello dear friends, Artyom is with you.
Back in January of this year, reports appeared about new hardware vulnerabilities in Intel and AMD processors.
Not long ago microcode updates for Intel processors (revision 84) were released, and I decided to check how things are in practice.
Although the information has long been known to everyone, I will still tell you a short background story.
Hardware vulnerabilities in processors are called Meltdown and Specter, and they were identified by researchers from Google groups Project Zero.
Specter has two attack variants codenamed CVE-2017-5753 and CVE-2017-5715.
Meltdown has one attack variant codenamed CVE-2017-5754.
P. S. CVE is an abbreviation for English " Common Vulnerabilities and Exposures» – a database of well-known information security vulnerabilities.
Seeing these notations for patch descriptions, you will immediately understand what’s what and why.
Moreover, the easiest way to operate in practice is Meltdown, to which all modern Intel processors are susceptible.
In order to get rid of Meltdown you need to update the processor microcode or patch the kernel operating system.
Specter, on the other hand, is more difficult to implement, but fixing the vulnerability requires individually patching each program you use.
Chips from AMD are less susceptible to Meltdown-type vulnerabilities (although it was initially stated that they were not susceptible at all).
This type of malicious code runs extremely slowly on them, but still works.
Both AMD and Intel processors are susceptible to Specter-type vulnerabilities; there are no options here.
Processors with ARM architecture are also susceptible to the same vulnerabilities, but now we will only talk about computers with processors of the x86-64 family.
P. S. Security research never stops and something else can always appear, including in AMD processors and Intel.

Important note! While the video was being edited and clock material was being written for the site, new research appeared in the field of processor security.
New variants of the Specter vulnerability have been identified, codenamed CVE-2018-3640 (the so-called attack variant 3a) and CVE-2018-3639 (attack variant 4).
Let me remind you that Specter can be fixed by updating the software used, such as browsers and so on.
However, the latest variant of the CVE-2018-3639 attack will also require updating the processor microcode on Intel chips, which may slightly reduce performance.
AMD claims that the company’s chips will not require new microcode from these attacks, and everything will work out with regular Windows patches and other software.
These vulnerabilities have a low priority threat for ordinary home computers.
Since there are no new updates yet, I will focus on the original topic of my video.
We will talk about the microcode of Intel processors, but the microcode is still different and does not correct the Specter 4 attack variant.
If you use Windows operating systems, these links will be useful to you:
Here you can find all the current patches (and their names) that fix the vulnerabilities of this group.
For example, the very first patch for Windows 10 was released on January 3, 2018 under the name KB4056892.
However, there was a problem in that Meltdown software patches reduced the performance of Intel-based systems.
Somehow I didn’t have any free time to conduct my own small tests.
However, now with the release of new versions of firmware for motherboards, I began to wonder how things are in this area.
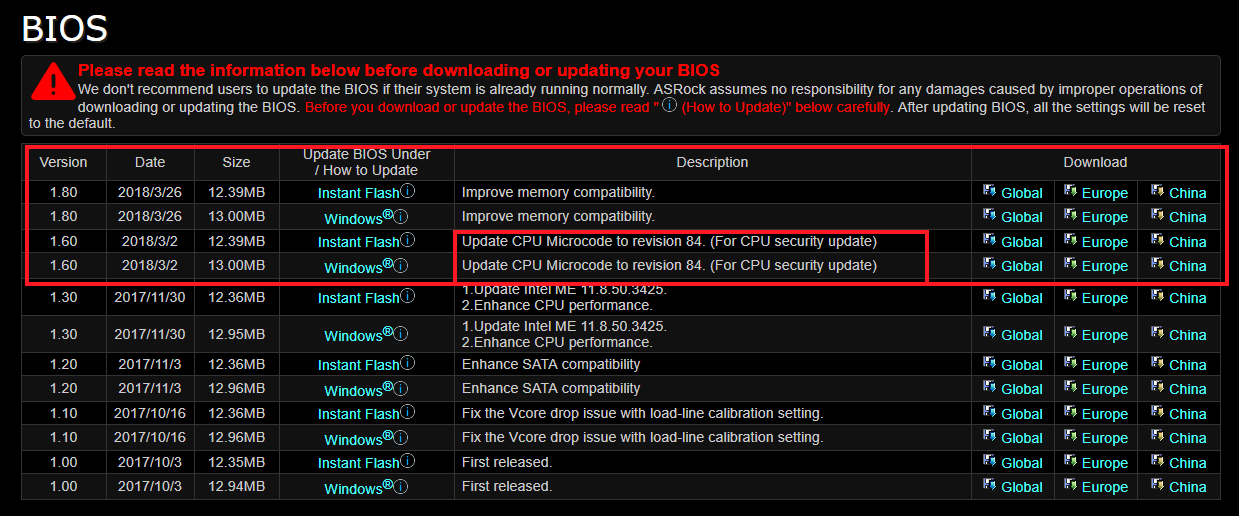
I use motherboard ASRock board Z370 Gaming K6 and accordingly I turn to the manufacturer’s official website to download the latest BIOS.
Updated microcode for Intel processors appeared in BIOS version 1.60, which was released on March 2, 2018.
I will install an even more recent version of BIOS version 1.80, which was released on March 26, 2018.
To begin with, I'm interested in testing fixes to the processor microcode without additional software patches.
The operating system is Windows 10 version 16299.371 without additional installed patches for Meltdown and Specter hardware vulnerabilities.
P. S. All conclusions drawn will apply only to new Intel processors, because new BIOS versions are unlikely to appear for old motherboards.
If you are interested, you can do tests with software patches on older Intel processors.
Full configuration of my computer:
CPU: Intel Core i5 8600K.
Cooler processor: Arctic Cooling Liquid Freezer 240.
Maternal pay: ASRock Fatal1ty Z370 Gaming K6.
Operational memory: GoodRam Iridium DDR4 2400 MHz (2×8 GB IR-2400D464L15S/8G).
Video card: Asus Dual GTX 1060 6 GB (DUAL-GTX1060-O6G).
Drives: Sata-3 SSD Plextor M5S and Sata-3 HDD Seagate 1 TB (ST1000DM003).
Frame: Fractal Design Define R5.
Block nutrition: Fractal Design Edison M 750 Watt.
The first test is the performance of the CPU caches and random access memory VAida 64 Cache & Memory Benchmark.

As you can see, there are no significant differences in the operation of the RAM subsystem and processor caches.
The next test concerns the operation of the disk subsystem.
Unfortunately, I do not have a high-speed M.2 SSD drive, so I will test my Plextor M5S on a regular SATA-3.
As a result, the ATTO Disk Benchmark test produces almost identical results.

The same applies to the performance in the CrystalDiskMark 5.2.1 test.

Performance test in CrystalDiskMark and new Intel processor microcode. Specter and Meltdown
At least for SATA-3, there is no drop in performance during read and write operations.
The next test is 7zip, which will show performance when packing and unpacking archives.

The same picture is observed here; there is no difference in performance when installing a new, corrected BIOS.
Since I create content, I couldn’t leave aside video editing.
I use Vegas Pro 13 as my editing program and regardless of the BIOS version used, the render time has not changed.

Video sources have a resolution of 1080p, a bitrate of 50 Megabit/s and a frame rate of 50 frames per second.
Sony AVC/MVC with a bitrate of 16 Megabit/s was selected as the rendering profile; you can see all other profile settings on your screens.

Now let's talk a little about games.
Those projects that were installed on my computer in this moment time (Assassin's Creed Origins, FarCry 4 and Crysis 3).
All frame indicators were taken using MSI programs Afterburner 4.4.2.
In general, the results do not need commenting.

Performance tests in Assassin's Creed Origins games. Specter and Meltdown


If you use the new version of the processor microcode after revision 84, then the difference in performance cannot be noticed - everything works just as quickly and smartly.
The only interesting thing would be to see how M.2 works SSD drives with NVMe interface.
Perhaps in the future I will conduct a series of more tests with software patches for Windows 10 and with the corrected CPU microcode installed at the same time.
I hope you found it interesting. If so, then share my note on in social networks with your friends.
This way there will be much more such notes :)
Also, don’t forget to join the VKontakte group and subscribe to the YouTube channel.


