Windows loads and then a black screen. Black screen after Windows boots: what to do? Restoring the Windows Registry and Explorer
It's unlikely that anyone will like to see after Windows boot black screen. However, sometimes this happens not only to beginners, but also to real computer gurus. True, the reasons why a black screen occurs after loading Windows XP are quite different. If beginners with their accidental actions can damage a part system files or break the boot manager, then the “experts” check various programs, can cause a system crash and, as a result, get a black screen after loading Windows. Please note that such a malfunction is inherent in all operating systems - both Windows of all versions and Linux, which is famous for its reliability. Moreover, in the second it is even easier to “break” the system. But let's return to the creation of Microsoft Corporation. The reasons why a user sees a black screen after loading Windows can be caused not only by his inept actions, but also by a malfunction of the software and hardware components.
Video adapter
Since the video card is responsible for displaying the image on the screen, it is quite possible that the time has come to check its performance. It is worth recalling the sensational story of desoldering chips produced by Nvidia. A video adapter based on such a problematic solution could work quite successfully in 2D mode, but when switching to hardware 3D functions it would freeze, and the user would see a black screen after loading Windows 7. It's simple - this system (and subsequent ones) uses some adapter functions to render the Aero interface. Thus, you need to check the card on another computer or, conversely, the system unit itself, but with a different video solution. However, before looking for an adapter, it is worth checking the driver status. Sometimes, due to a glitch in this control program, a black screen appears immediately after Windows boots. In this case, you should reinstall the driver. To do this, after turning on the computer, after the BIOS screen disappears, press the F8 button and select “Safe Mode” in the menu that appears. After booting into the operating system, you need to uninstall the video driver through “Uninstall Programs” in the Control Panel. After reboot you can install new version control program.

Winchester
The following reason may be due to an error in the download. For example, a power outage and a computer shutdown can cause file system will be damaged. Accordingly, downloading is not possible. To restore, you will need a disk with a Windows distribution. On one of the installation screens you will be asked to launch the recovery console - you need to use this software mechanism and scan the system partition of the hard drive for errors.
Memory
One of the things about electronic component failures is that they cannot be predicted. Today a device can work stably, but tomorrow it will fail. Sometimes the system cannot boot because faulty cells appear in the memory modules. To check, you need to prepare a bootable CD or flash drive with the MemTest program and check the entire volume random access memory.

Programs and people
Sometimes, after booting the system, a black screen is displayed for the simple reason that during the previous session, another video card output was selected as priority in the driver settings - for example, television. To solve it, you need to select “Last working configuration” through the F8 menu (described earlier).
You need to immediately clarify what “after loading” means. You should not think that this applies to the case when the user turns on the computer, but it does not react to this in any way and the monitor screen remains black, as before turning on the PC. “After loading” means that the user sees on the monitor screen the results of the so-called post (power on self tests), BIOS messages about the computer configuration, the initial Windows 7 welcome screen. But then the usual desktop is displayed (or may not be displayed) in black, and sometimes with some details in the lower right corner. Why doesn't Windows start in its normal mode?
Let's list the most common reasons occurrence of a black screen (in order of increasing difficulty in eliminating them):
- Short-term hardware faults, such as power outages.
- Problems with the video card, such as a damaged video driver file.
- Virus attack attempting to damage system files and/or the Windows registry.
- Attempts to update a pirated copy of Windows 7.
- Problems with OS activation.
The simplest reason is a short-term loss of power in the electrical network, which can be checked by trying again to turn on the computer and boot Windows 7. If this was the reason for the black screen, then when you start Windows again, the black screen will disappear and everything will work as it should. Otherwise, the user will have to work a little harder.
In any case, the absence of a normal desktop means that Explorer (explorer.exe) was not launched for one of the reasons given above. First, let's assume that for some reason the explorer does not start, and we will try to start it. For this:
- Use the Ctrl+Alt+Delete or Alt+Ctrl+Shift buttons to open the task manager.
- In its window, open the “Applications” tab.
- Click on “Create a new task”.
- In the window with this name, set explorer and click “OK”.
Now you need to restore the normal launch of Explorer so as not to perform the described steps every time you start Windows.
In order to avoid the difficulties of editing the system registry, we will use the AVZ utility. We launch it and open the “File” item in the main menu, then click on “System Restore”. A window opens with a list of recovery actions. In it, check the items “Restore Explorer settings” and “Restore Explorer launch key”, then click “Perform selected operations”.
 Finishing AVZ works We reboot, after which the explorer starts normally.
Problems with the video system
Typically, a black screen occurs for two reasons - due to overheating of the video chip or distortion (substitution) of the video card driver file by some malicious application. The first of them is easy to determine if you find out the temperature of the video chip using one of the many computer health monitoring utilities, for example, AIDA64. As a rule, the video chip overheats when the fan blowing on it stops or when it is overloaded with modern “heavy” games. For most video cards, the maximum temperature limit for the video processor is 100 degrees Celsius. If a black screen appears when the PC is running due to overheating of the video processor, then repeated attempts to boot will lead to nothing - you should wait a while for its temperature to drop, then try to boot again.
Black screen as a result of a virus attack
Problems with the video card driver, as a rule, arise either due to the impact of viruses on the video driver file or after an unsuccessful attempt to update it and the resulting incompatibility of the new video driver with the OS version. In any of these cases, you should boot Windows into safe mode. To do this, after turning on the computer, you need to press F8 until additional options boot and select safe mode. If after booting in this mode the black screen disappears, then most likely you need to reinstall the video card driver. Of course, reinstalling the video driver is only possible when Windows starts, and other than a black screen, there are no other problems. To reinstall the driver, you need to go to the website of the video card manufacturer, download the most latest version driver and install it. You can also update the driver in another way. You need to go to the device manager, select the desired video adapter in it, right-click on it (RMB) and select “Update drivers” from the menu.
But we cannot turn a blind eye to the possible consequences of exposure to viruses. In this case, restoring system files and rolling back to the last working system configuration can help.
Recovering system files
To do this, use the sfc system utility. It is launched in a command mode window as an administrator by typing the command sfc /scannow. This utility will check system files for corruption and, if necessary, restore them. Sometimes it may ask you to install a disk with a Windows 7 distribution, but usually this does not happen, and the files are restored from their copies on the hard drive. 
Last Known Good Configuration
This feature is available in the Advanced Boot Options menu, which you can access by holding down the F8 key immediately after turning on the computer. 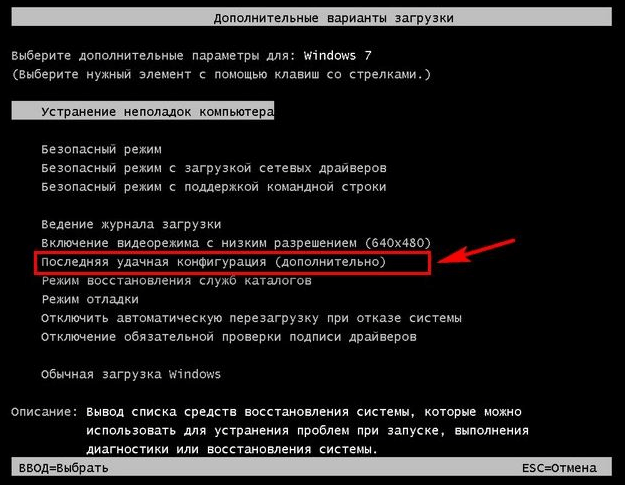
It is possible that restoring a successful configuration will not help, since it may also be corrupted by a virus attack. It remains to apply the following recovery option.
Rollback to one of the previously created restore points
This can restore the contents of system files and the registry and get rid of their corruption and deletion as a result of viruses. To perform such a recovery, the following steps are required.
We boot into safe mode, call up the control panel, in which we select the “System” item. A window appears, on the left side of which select “System protection”. After this, we are presented with a window that looks like: 
If the system partition hard drive If “Enabled” is not indicated in the “Protection” column, then there is no point in continuing further, since there are no rollback points due to the fact that the user did not bother about it. However, let’s assume the opposite - the user has shown concern for the “health” of his PC and the system drive is protected. Then you can click on “Restore” and get a window asking you to select one of the rollback points:
 This picture shows the dot that was automatically created by the system when installing Avast antivirus. If you check the “Show other restore points” checkbox, you can select earlier rollback points. You should choose the point at which the system was as stable as possible. Having set the rollback point, click “Next”, after which the system recovery process starts, which ends with a reboot. You can be sure that there will be no problem with a black screen when booting the system.
Problems with activating and updating a pirated copy of Windows 7
These two points of the reasons for the appearance of a black screen are closely related, so the author of the article combined them into one point.
It will not be a big secret to say that many users install unlicensed Windows versions 7. Therefore, they may periodically experience a black screen after installing system updates distributed by Microsoft. Authentication occurs with every update installed system, and in the case of a “pirate”, when the system boots, the user receives a black screen, in the lower right corner of which there is an inscription stating that a fake copy is installed operating system, which was not authenticated. Moreover, some curious but inexperienced users try to verify its authenticity with their own hands, and as a reward for their curiosity they receive a black screen. Why, because he knows that this is a pirated version.
In this case, you can get rid of the black screen by following these steps. You need to go to the “Center” through the control panel Windows updates,” in which you need to click “View update log”, and in it “Installed updates”. In the window that opens, the user will see all installed updates, among which he needs to find KB971033, remove it and reboot.
To prevent this from happening again, this update should be disabled altogether. To do this, in the Update Center, select “Search for updates” and search for this ill-fated update. Then you need to right-click on it and select “Hide update” from the menu. In addition, you need to remove the check mark in the small window next to the update name, then click “OK”.
Well, in order to finally “discourage” the system from checking authenticity with each update, it is recommended to edit the system hosts file, which is located on the system partition in the Windows/System32/drivers/etc directory, placing the line 127.0.0.1 validation.sls.microsoft in it. com.
In contact with
Answer
Hello. Do you have any USB ports? How did you determine this? The system, as far as I understand, does not boot. Or is it impossible to boot from a flash drive?
Disconnect all devices from your computer. Leave only the mouse, keyboard and monitor.
To solve the error No boot disk has been detected or the disk has failed, you can try resetting BIOS settings to factory ones.
AnswerAbout fifteen years ago, my friend, an avid Beatle fan, decided to write a book about the Beatles. Until then, he had no experience working on a computer. I turned to a private craftsman (he didn’t know me at that time), he assembled a computer for him, as I understood, from what was no longer needed and thrown away anyway...)) Four memory sticks, a Pinnacle card, a DVD-writing drive drive and three hard drives of different capacities... Later, for some reason, his Internet provider installed an additional network modem...
In short, the computer's power supply was clearly overloaded and the computer was not cooled well. The system “crashed” twice a week... The person who assembled the computer quickly got tired of it and found a plausible excuse to get rid of this client’s problems.
This is where I turned up.)))
Reinstalling the system was not always successful. I didn’t have to do it every time and, at some point, I began to use a block of three fans from an old Soviet computer. Removed the cover system unit, disconnected two of the three hard drives, directed the air flow inside the computer and... installation success is almost guaranteed.....
After some time, my friend learned to install the system on his own, without my help, and when he got tired of it, he bought a new computer.
The case I described is, of course, not entirely common, but, as it turned out later, good airflow during installation of Windows never interferes - it helped me two or three times in my memory.
I have a terabyte “Seagate”, which was not helped by any cooling and I was never able to install the system on it. And judging by the state of its connectors, approximately several thousand people tried to do this before me...)))
However, for me it “has taken root” in the box for the NexStar self-powered external hard drive. Every cloud has a silver lining.)))
Very often people underestimate the importance of the power source, or more precisely, the power system, and even more precisely, the frequency parameters of the integrating chains. Usually, after estimating the power consumption by eye, they install a power supply with a small margin, without thinking about other parameters at all.
During the operation of computer chips, high-frequency “crawls” occur on the power buses, which can greatly affect the performance and even the serviceability of RAM chips, etc. It is important that the thickness of the tracks is printed circuit board was sufficient and that “smoothing” capacitors were installed near each chip on the power buses.
During development computer technology, experienced specialists place several capacitors on the chip, differing in capacity by one order of magnitude, to effectively smooth out ripples. For example, 1uF electrolyte, 0.1mf and 22nf ceramics, in close proximity to the chip.
Soviet electronics, which over the past three decades have all gone into dredges, were not without reason “stuffed” with ceramic thermostable capacitors with a high palladium content.
Nowadays, everyone wants to save money, we want to buy a “cooler” motherboard and cheaper, and manufacturers want to sell us more and do not install smoothing capacitors in the required quantity (to reduce the cost). Everyone saves and relies on each other, but the end result is a lottery.
As a result, we get a power supply of, say, 500 W (power supply manufacturers also like to save money), in practice, at half the load it no longer “pull”, and if you look at the power bus with an oscilloscope, the ripples can reach half a volt or more.
A sign that the “mother” is not in order is the swelling of electrolytes - high-frequency “breakthroughs” are destructive for them, they overheat and explode when swelling.
Installing Windows puts a serious load on the entire system. Working HDD, memory processor "on full blast", all this heats up and at any stage of installation it can give an error. A comparable load can occur when playing, for example, tanks. But if we are “knocked out” of the game, so what? - they came in again and didn’t pay attention... But if Windows failed during installation - yes, we’ll notice right away...
My life experience suggests that most failures occur for reasons not related to the programs - dust interferes with cooling, the fan is not lubricated and rotates poorly, electrolytes are swollen, microcracks have appeared, again, from overheating, and people also have a lot of cockroaches in their apartments, who strive to hide in a warm computer and lay their offspring there...
Sometimes, when loading the system, users encounter such an unpleasant problem as the appearance of a black screen on which only the mouse cursor is displayed. Thus, it is simply impossible to work with a PC. Let's look at what are the most effective ways Troubleshoot this problem in Windows 7.
Most often, a black screen appears after the welcome screen has been opened. Windows window. In the vast majority of cases, this problem is caused by an incorrectly installed Windows update, when some kind of failure occurred during installation. This makes it impossible to start system application explorer.exe ( "Windows Explorer"), which is responsible for displaying the graphical shell of the OS. Therefore, instead of a picture, you just see a black screen. But in some cases the problem may be caused by other reasons:
- Damage to system files;
- Viruses;
- Conflict with installed applications or drivers;
- Hardware faults.
We will explore options to resolve this issue.
Method 1: Restoring the OS from “Safe Mode”
The first method involves using "Command line", launched in "Safe Mode", to activate the explorer.exe application and then roll back the OS to a working state. This method can be used when the device has a restore point created before the black screen problem appeared.
- First of all, you need to go to "Safe mode". To do this, restart the computer and when you turn it on again after sound signal hold down the button F8.
- The system boot type selection shell will launch. First of all, try activating the Last Known Good Configuration by using the arrow keys to select the indicated option and press Enter. If the computer starts normally, then consider that your problem is solved.

But in most cases this does not help. Then in the boot type shell, select the option that requires activation "Safe Mode" with the support "Command line". Next click Enter.
- The system will start, but only a window will open "Command line". Type into it:
After entering, click Enter.
- The entered command activates "Conductor" and the graphical shell of the system will begin to display. But if you try to restart again, the problem will return, which means that you should roll back the system to a working state. To activate a tool that can perform this procedure, click "Start" and go to "All programs".
- Open the folder "Standard".
- Login to the directory "Service".
- In the list of tools that opens, select "System Restore".
- The starting shell of the standard tool for resuscitating the OS is activated, where you should click "Further".
- Then a window opens where you should select the point to which the rollback will be performed. We recommend using the most recent option, but which was certainly created before the problem with the black screen appeared. To expand your choice, check the box "Show others...". After highlighting the name of the optimal point, press "Further".
- In the next window you only need to click "Ready".
- A dialog box will open where you must confirm your intentions by clicking "Yes".
- The rollback operation will begin. At this time, the PC will restart. After turning it on, the system should start in standard mode, and the problem with the black screen should disappear.


Method 2: Recovering OS files
But there are cases when the OS files are so badly damaged that the system does not boot even in "Safe Mode". It is also impossible to exclude the possibility that you simply may not have the required restore point on your PC. Then you should perform a more complex procedure to resuscitate the computer.
- When you start your PC, go to the boot type selection window, as demonstrated in the previous method. But this time, choose from the items presented "Troubleshooting..." and press Enter.
- The recovery environment window opens. Select from the list of tools « Command line» .
- The interface opens "Command line". In it, enter the following expression:
Be sure to click Enter.
- The shell will start "Registry Editor". But you need to remember that its sections will not relate to the current OS, but to the recovery environment. Therefore, you need to additionally connect the registry hive of the Windows 7 that needs to be fixed. For this purpose in "Editor" select a section "HKEY_LOCAL_MACHINE".
- After that press "File". In the list that opens, select "Load bush...".
- The hive loading window opens. In it, go to the partition of the disk on which your operating system is located. Next, go sequentially to the directories "Windows", "System32" And "Config". If, for example, your OS is located on drive C, then full path for transition should be as follows:
C:\Windows\system32\config
In the directory that opens, select the file called "SYSTEM" and press "Open".
- After this, a new partition will be created in the folder "HKEY_LOCAL_MACHINE". Now you need to open it.
- In the directory that opens, select the folder "Setup". On the right side of the window, among the elements that appear, find the parameter "CmdLine" and click on it.
- In the window that opens, enter the value in the field "cmd.exe" without quotes, then click "OK".
- Now go to the parameter properties window "SetupType" by clicking on the corresponding element.
- In the window that opens, replace the current value in the field with "2" without quotes and click "OK".
- After that, go back to the window "Registry Editor" to the section that you previously connected and select it.
- Click "File" and select from the drop-down list "Unload the bush...".
- A dialog box will open asking you to confirm your decision by clicking "Yes".
- Then close the window "Registry Editor" And "Command line", thus returning to the main menu of the recovery environment. Click here on the button.
- After rebooting the PC will automatically open "Command line". Enter the command there:
Click here Enter.
- The computer will be checked for the integrity of the file structure. If violations are detected, the recovery procedure for the corresponding element is automatically activated.

- Once the recovery is complete, enter the following command:
shutdown /r /t 0
Click Enter.
- The computer will restart and turn on normally. It is important to take into account that if the system files were damaged, which caused the black screen, then it is quite possible that the root cause of this could be a virus infection of the PC. Therefore, immediately after restoring the computer’s functionality, check it with an anti-virus utility (not a standard anti-virus). For example, you can use Dr.Web CureIt.


If none of the above methods help, then in this case you can install Windows 7 on top of the working operating system while maintaining all settings, or completely reinstall the OS. If these actions do not produce results, there is a high probability that one of the computer’s hardware components has failed, for example, the hard drive. In this case, it is necessary to repair or replace the broken device.
The main reason why a black screen appears when the system boots in Windows 7 is incorrect installed update. This problem can be “treated” by rolling back the OS to a previously created point or performing a file recovery procedure. More radical actions also involve reinstalling the system or replacing elements of the computer hardware.
Suddenly after another Windows startup 7 instead of the login screen account or desktop, a black background may appear with a cursor on it. Before we begin solving the problem, let’s delve into its essence, because even a few template instructions for different cases will not always help.
Most often, a black screen and a cursor on it are the result of a virus or malware. software. This program interferes with system settings, making it so that instead of the explorer.exe process it starts itself or completely replaces the above-mentioned file (many remember the Win32 family of viruses that hid files and directories, replaced them with their own “bodies” and even copied their icons for disguise). After all, he is responsible for GUI Windows: everything the user sees on the desktop, etc.
One cannot help but remember Avast antivirus, which tends to block system processes, including explorer.exe due to excessive activity when starting the PC.
The likelihood of sudden conflicts between video card drivers and the operating system is low, although if they have been recently updated, it increases significantly. And drivers downloaded from nowhere or the use of driver packs only fuel the situation.
More deplorable will be the appearance of bad sectors on the hard drive, especially when they contain fragments of system files, such as explorer.exe. We won’t ignore partially damaged RAM sticks either, but last but not least.
First of all, let's try to start the computer in one of the additional boot options - from the last successful configuration. It is a set of system parameters stored in the registry for the state of drivers, applications and services with which Windows 7 successfully booted for the last time. If, before restarting or shutting down the PC, you installed something, edited the registry or the list of automatically launched applications, this method will clearly help. To implement it we do the following steps.
- Let's reboot.
This is done using the Reset key or through the task manager.
- In the second case (it is recommended to use it) we call the dispatcher using Ctrl + Alt + Del.
- Move the mouse cursor to the “File” main menu item and call the “New task” command.

- Execute the command “shutdown /r” to reboot the system.

- After the BIOS information appears, click F8 until a menu of additional boot options appears.
- Using the cursor keypad, select “Last successful configuration” and press Enter.

Did not help? This means the source of the trouble is different. Let's move on.
Avast
If the “seven” is protected by a comprehensive antivirus solution from Avast, the application may be the culprit for the fact that the explorer does not load. Removing the antivirus is not an option, but adding the file with which the problem is occurring to the exceptions is necessary.
It’s not relevant for all versions of Avast, but it’s worth a try since similar behavior has been noticed.
- Open the Task Manager.
- We launch the “AvastUI.exe” process, as in the previous case, finding executable file in the folder with installed antivirus(in Program Files).
- In the application menu, click “Security”.
- Then go to the “Antivirus” subsection, where we click on the “Behavior Screen” tab.

- Click “Browse” or enter the path to the reliable process manually - as shown in the screenshot.

- Click “OK” and restart.
Has the blinking cursor appeared on a black background again? Let's move on.
Manually launching Explorer
There are several simple ways to open the program responsible for the graphical interface on the problematic computer.
- If we stop at this option, we reboot again, and after completing the hardware self-test procedure, press F8.
- In the window, select “Safe Mode with Command Line Support.”

- In text CMD line enter “explorer.exe” and press Enter.

If the process does not start, then the corresponding file is damaged, missing, or cannot be accessed.
Rolling back the system, which we will touch on later, restoring the “seven” from the installation flash drive, fighting viruses and their consequences, or editing registry entries will help here. In the latter case, you will have to acquire boot disk with an antivirus program, start from it, selecting CD/USB with the distribution kit in the BIOS antivirus program. Depending on it, the method of starting a scan may differ, but the meaning is obvious: we find and remove all viruses at least on the system volume.
If viruses are annoying
Even a laptop that is not currently infected with viruses can crash, displaying a black screen without or with a cursor. By the way, in the first case, the source of the problem may be the video driver. And all because the virus did its own thing, replacing the path to explorer.exe with its own. It is noteworthy that the following method works even without booting into safe mode, and you can also call the Registry Editor through the task manager.
- Open the “Run” window through the task manager.

- We write “regedit” and press Enter.

- Expand the HKLM branch.
- Go to the Software section.

- We follow the path indicated in the screenshot.

- Open the Shell key editing window.

- In the “Value” field, set “explorer.exe” and apply the settings.

- Let's reboot.
If this does not help, you will have to return to one of the previously saved states of the computer’s operating system.
Rollback
Here we will do time travel, provided that the system recovery function is activated.
- Through the task manager, open the command execution dialog.
- We register rstrui.exe and execute the command.

- We indicate the recovery options (it makes sense to select the last created rollback point before the black screen appeared or stop at the recommended one).

- Click “Finish”.

- We get acquainted with the warning and click “Yes”, but there is no other choice.

Once the process is complete, a notification will appear.

The next time you turn on your PC, the desktop should appear.
When the graphics driver is naughty
Rolling back drivers during a system rollback is extremely rare. It's good if the installation graphics driver was made quite recently, and if it was installed a couple of weeks ago, when resuscitating the “Seven”, many files and applications may be damaged. Rolling back the driver will help you get rid of such software, and only if the problem does not occur when you start it in safe mode.
- Let's start in safe mode.
- Calling context menu my computer and click “Properties”.
- Click “Device Manager” in the vertical menu on the left.

- Open the “Properties” of the video adapter used (there may be several of them in the system: integrated, discrete, built into the central processor).

- In the “Driver” tab, click “Roll Back”.

You can also try to remove or update the video adapter driver by downloading it from the official website.
Before this, you should test the RAM sticks using a utility like Victoria 4.47, check the HDD for failed memory cells (chkdsk C: /f) and the integrity of important system resources (command “sfc /scannow”). They are executed via the command line.
Black screen after standby
After resuming from standby mode, a black background may appear instead of the desktop or user selection interface. In such cases, there will be several options, depending on the situation:
- rollback or installation more old version graphics driver, if problems began after updating the video card driver, especially when using driver packs or installers downloaded from third-party resources;
- alternately switching between the four main values of the ACPI Suspend Mode parameter (responsible for software control power supply for computer components), located in the BIOS section called Power;
- reinstalling Windows 7 using original image, and not the next author’s assembly - it is likely that it caused the problem (the deletion and disabling of some system functions to save disk space and facilitate assembly could have had an effect);
- updating drivers for USB controllers, mice and keyboards downloaded from their official support resource;
- disabling the PC to go into standby mode;
- prohibiting one of the input devices from waking up the PC from standby mode.
Let's look at the last option in more detail. You can restore your PC using a mouse or keyboard. It is possible that one of the devices is blocking the computer from returning to a normally functioning state, and this is easy to determine, at least by the increased activity of the fan blades. In this case, deactivating the option to disable sleep mode for the mouse or keyboard will help.
Do not disable it for both devices at the same time, because you will not be able to exit sleep mode later!


