Making a bootable Clover USB flash drive with MACOSX from Windows. Installing and configuring the Clover bootloader on your hard drive Where is the boot file stored in clover
Clover- a bootloader that can load macOS and Windows with Linux. But its main feature is loading Mac OS X. This is exactly why it was created. The basis of Clover is EDC2+Duet.

Clover v2.4k is an open source bootloader that uses technologies from the Chameleon, rEFIt, XNU, VirtualBox projects.
Main features:
- Downloading macOS 10.xx systems, Windows EFI and Linux EFI;
- Clover EFI provides operating systems runtime services, which is not possible with BIOS-based bootloaders;
- Basically, Clover automatically detects installed hardware and sets the necessary properties by default, but the user can change the settings in the config.plist file;
- Clover allows you to use the Boot Volume panel in System Preferences;
- The boot volume can be specified by UUID in the config.plist file;
- Automatic editing of SMBIOS tables to comply with the standard version 2.6;
- Automatic editing of ACPI tables to comply with the standard version 4.0;
- The modified DSDT table can be loaded from the root partition of the OS or from the EFI directory;
- On-the-fly DSDT correction - through built-in corrections and custom templates;
- Restoring the functionality of reboot, sleep and awakening;
- Automatic connection of ATI, NVidia and Intel video cards with customization options;
- Restoring USB functionality up to standard 3.0;
- Property injection for devices on the PCI bus, incl. sound and network cards;
- Ability to configure power management and processor frequencies;
- Loading or resetting additional ACPI tables (SSDT-xx, APIC, BOOT, SLIC, SLIT, SRAT, UEFI, etc.);
- Loading third-party OS kernel extensions;
- Making changes to the kernel and OS extensions on the fly;
- Full support for NVRAM functionality;
- Setting a pause before loading the OS, customizable appearance, the ability to take screenshots by pressing F10;
- Saving pre- (F2 key) and post-boot reports for diagnostics and debugging.
Full description of Clover, user manual. PDF
The current revision of the description is 4571.
Clover Configurator 5.4.3.1
Clover, starting with version r3251, disables SIP like this:
What's new:
Screenshots:

- Version:
- Developer: apianti, asava, blusseau, dmazar, slice2009, download-fritz, brockbackups
- System requirements: Macintosh from version 10.5 on any hardware
- Interface language: English + Russian
- Size: 8.96 MB
- visit official website
Key Features
- Loading systems from the Mac OS X 10.4 - 10.8 family.
- Loading Windows systems EFI and Linux EFI (under debugging).
- Download LegacyOS (Windows XP, Linux, DOS).
- Support for RuntimeServices, which is not possible for previous generations of bootloaders.
- Automatic detection of the equipment you use and assignment of all necessary properties by default. Possibility to change them in config.plist.
- Reboot to another system through the "Boot Volume" panel.
- Assigning your own UUID in config.plist. Full compliance with what is written and seen in the system.
- Updated SMBIOS to version 2.6.
- Updated ACPI to version 4.0. Your DSDT can be loaded from the partition from which you will be loading or from the directories of the loader itself.
- Loading the following ACPI tables (SSDT-xx, APIC, BOOT, SLIC, SLIT, SRAT, UEFI...).
- Assigning an address and value for the register responsible for the ability to reboot via config.plist.
- Sleep/Wake system.
- Force assignment of PCIRootUID in config.plist.
- Injection of ATI and NVIDIA video cards, as well as the presence of " manual settings" via config.plist.
- USB patch (LegacyOff, Ownership, Builtin, clock-id) to USB 3.0.
- Injecting HDA properties.
- Injecting the Ethernet builtin property.
- CPU Turbo support at bootloader level.
- Generate P- and C-states for your processor.
- Loading kexts from the loader directory.
- Fixing FireWire (security mode) error.
- Manual setting GUI: support for themes, icons, fonts.
- Support for national languages.
- Saving GUI screenshots by pressing the F10 key.
- Saving boot.log and preboot.log from the GUI by pressing the F2 key.
Getting Clover
Getting a binary copy of CloverCloverV2-rev582.zip or manually
Installation
Preparing a USB flash drive
Installing Clover with an installer
- Reading the introduction
Manual installation
Instructions for experienced OS X, *nix users and those who want to customize the bootloader as much as possible and know how to use a terminal.
Settings
How to fix DSDT using Clover
Add additional lines to the ACPI section of the /EFI/config.plist file:Remove /EFI/ACPI/patched/DSDT.aml if you get a kernel panic.
All mask values are shown below. Some patches require the DTGP patch (0x0001) to work properly.
Masks 0x00FF:
0000 0000 0000 0001 = 0x0001 = FIX_DTGP
0000 0000 0000 0010 = 0x0002 = FIX_WARNING
0000 0000 0000 0100 = 0x0004 = FIX_SHUTDOWN
0000 0000 0000 1000 = 0x0008 = FIX_MCHC
0000 0000 0001 0000 = 0x0010 = FIX_HPET
0000 0000 0010 0000 = 0x0020 = FIX_LPC
0000 0000 0100 0000 = 0x0040 = FIX_IPIC
0000 0000 1000 0000 = 0x0080 = FIX_SBUS
Masks 0xFF00:
0000 0001 0000 0000 = 0x0100 = FIX_DISPLAY
0000 0010 0000 0000 = 0x0200 = FIX_IDE
0000 0100 0000 0000 = 0x0400 = FIX_SATA
0000 1000 0000 0000 = 0x0800 = FIX_FIREWIRE
0001 0000 0000 0000 = 0x1000 = FIX_USB
0010 0000 0000 0000 = 0x2000 = FIX_LAN
0100 0000 0000 0000 = 0x4000 = FIX_WIFI
1000 0000 0000 0000 = 0x8000 = FIX_HDA
How to use DSDT patches:
0000 0000 1111 1111 = 0x00FF = Enable mask correction: bit(0) ~ bit(7).
1111 1111 0000 0000 = 0xFF00 = Enable mask correction: bit(8) ~ bit(15). You need to enable the DTGP method (0xFF01) first.
You can fix DSDT for one function. You need a DTGP patch to work without DSDT.aml.
0000 0000 0000 1001 = 0x0009 = DTGP + MCHC
0000 0000 0010 0001 = 0x0021 = DTGP + LPC
0000 0000 1000 0001 = 0x0081 = DTGP + SBUS
0000 0001 0000 0001 = 0x0101 = DTGP + DISPLAY
0000 0010 0000 0001 = 0x0201 = DTGP + IDE
0000 0100 0000 0001 = 0x0401 = DTGP + SATA
0000 1000 0000 0001 = 0x0801 = DTGP + FIREWIRE
0001 0000 0000 0001 = 0x1001 = DTGP + USB
0010 0000 0000 0001 = 0x2001 = DTGP + LAN
0100 0000 0000 0001 = 0x4001 = DTGP + WIFI
1000 0000 0000 0001 = 0x8001 = DTGP + HDA
Or fix DSDT for multiple functions. You need a DTGP patch to work without DSDT.aml.
0000 0101 0000 0001 = 0x0501 = DTGP + DISPLAY + SATA
0011 0001 0000 0001 = 0x3101 = DTGP + DISPLAY + USB + LAN
1011 0101 0000 0001 = 0xB501 = DTGP + DISPLAY + SATA + USB + LAN + HDA
For ease of calculation, you can use standard application"Calculator".
Clover assembly
Assembling Clover by hand
To assemble you need to have Command Line Tools for Xcode - DownloadStart
CD
mkdir src
cd src
curl - -C -L -O ftp://ftp.gnu.org/gnu/gmp/gmp-5.0.4.tar.bz2
curl - -C -L -O ftp://ftp.gnu.org/gnu/mpfr/mpfr-3.1.0.tar.bz2
curl - -C -L -O http://www.multiprecision.org/mpc/download/mpc-0.9.tar.gz
HFSPlus.efi.zip - download manually.
cp ~/Downloads/HFSPlus.efi.zip ./
svn co https://edk2.svn.sourceforge.net/svnroot/edk2/trunk/edk2 edk2
cd edk2
svn co https://cloverefiboot.svn.sourceforge.net/svnroot/cloverefiboot Clover
make -C BaseTools/Source/C
CD Clover
cp ~/src/HFSPlus.efi ~/src/edk2/Clover/HFSPlus/Ia32/HFSPlus.efi
cp ~/src/HFSPlus64.efi ~/src/edk2/Clover/HFSPlus/X64/HFSPlus.efi
./cbuild.sh -xcode -ia32 -release
This script creates Clover32, but it is also needed to configure EDK2. Now we must adjust this configuration.
Libraries
cd ~/src/gmp-5.0.4
mkdir build
cd build
../configure --prefix=/opt/local
make
sudo make install
cd ~/src/mpfr-3.1.0
mkdir build
cd build
../configure --prefix=/opt/local --with-gmp=/opt/local
make
sudo make install
cd ~/src/mpc-0.9
mkdir build
cd build
../configure --prefix=/opt/local --with-gmp=/opt/local --with-mpfr=/opt/local
make
sudo make install
Compiling the gcc-4.6.2 x64-linux-gnu compiler.
cp ~/src/edk2/Clover/mingw-gcc-build.py ~/src/edk2/BaseTools/gcc/
cd ~/src/edk2/BaseTools/gcc/
./mingw-gcc-build.py --arch=x64
Configuration files
cp ~/src/edk2/Clover/build_rule.txt ~/src/edk2/Conf/
cp ~/src/edk2/Clover/tools_def.txt ~/src/edk2/Conf/
cp ~/src/edk2/Clover/MdeModulePkg.dec ~/src/edk2/MdeModulePkg/MdeModulePkg.dec
Building Clover64 and rEFIt
cd ~/src/edk2/Clover/
./cbuild.sh -gcc46 -x64 -release
cd rEFIt_UEFI/
./build64.sh
The ~/src/edk2/Build folder contains the build results
Building Clover using CloverGrowerV1.5
Needed for work Command Line Tools.Download CloverGrowerV1.5.zip
Unpack to your home folder
Open the Terminal
Enter cd CloverGrowerV1.5
I./CloverGrower.sh
Press Enter (a link for the "clover" command is created)
Press p (this is better)
Then we follow the instructions
Making Clover & Chameleon Boot USB Flash Disk
under Windows XP and higher.


Full (partial - format only) installation of Clover bootloader on USB Flash drive:
On the menu Options->Configuration choose:
1. Boot Data set (set of loader files):
- Built-in (built-in revisions " Clover&Chameleon«),
- External (external) - downloads a zip archive with a folder and file structure similar to the installed bootloader,
- Not Install (do not install) - formatting only with installation of boot sectors.
2. Format options (formatting options):
- Boot records (boot sectors) -> Clover ,
- Align to sectors: 8192 (default)
- Align to sectors: 63 (if some strange/old BIOSes don't see the flash drive)
- Rest default.
3. Multi Partitioning (breakdown into volumes):
- Boot Partition Size (the size of the boot volume is up to your taste) - uncheck this box if you do not plan to create a second volume on the same disk (for example, for the MACOSX distribution).
4. Enable Fixed Disk
(activation of work with non-USB drives) — warning -> « at one's own risk«!
5. Press the button " OK
«.
6. In the main program window -> Destination Disk
(destination drive) - select the required object (USB Flash Drive) for installation.
7. Press the button “ Format Disk
«.
8. We wait and enjoy the result of the program.
Edit (if necessary) the loader configuration files
Extract the HFS(HFS+) partition image from the distribution package for deployment to a USB Flash drive:
The 10.9 Mavericks image is not bootable! Therefore, we use the converted image from here
For use:
Unpack the .zip archive, and the 5.hfs file in it can be immediately deployed to a flash drive via BDU.
Uploading the MACOSX distribution onto the second volume of a bootable USB Flash drive:
1. We carry out full installation Clover bootloader on USB Flash Drive with the checkbox checked Boot Partition Size.
2. We get USB Flash Drive
, divided into two volumes
. (Note: Unfortunately, by default, the OS Windows does not support multi-volume USB Flash Drive, therefore, only one partition will be available under Windows.)
3. Download the MACOSX distribution selected for installation. This distribution, of course, must match everyone necessary requirements
for installation on PC
4. Extract the image from the distribution kit HFS(HFS+) partition
(this will be a file with the extension hfs
)
The path to obtain the desired HFS image will depend on the degree of nativeness of your source distribution:
- For various distro assemblies, you can try extracting through the menu: Tools -> Extract HFS(HFS+) partition from DMG-files .
- What you are using may not be the original InstallESD.dmg taken from the retail packageInstallOSXMountainLion.app/Contents/SharedSupport/ but again packaged original image to another image and with a different name, for example OSXMountainLion.dmg. InstallESD.dmg from the repacked archive is easier to find and extract with the 7zFM.exe program. And only then, from it, get the HFS image we need.
5. In the main program window -> Destination Disk
- choose our USB Flash Drive
-> Part2
.
6. Press the button " Restore Partition
«.
7. In the explorer window that opens, select the unpacked file with the extension *. hfs
. The file size must be no larger than Part2
.
8. We wait and enjoy the result of the program
Note!!!
When installing OS X from this flash drive Recovery section HD is not created automatically!
If you really need the Recovery HD section, download a separate package from the Apple website:
RecoveryHDUpdate.pkg
Using this package, follow the link to create a full-fledged Recovery HD partition for OS X Mavericks
Basic system setup and kext installation
So, here we are in the system. While she can do little, we won’t go online, the graphics don’t work, and in general everything looks very bad. This needs to be fixed.
Let's figure out what kexts are.
Kext(Kernel Extension) - kernel extensions that launch this or that equipment incompatible with the original Mac (For example, where in the aimak we find network card from Realtek or a sound card?). These are what we need now.
First we need the PostInstall folder, which you unpacked into the CLOVER section on bootable USB flash drive. From there, we first need the Kext Utility, which allows us to install kexts on the system. We launch it, enter the user’s password, wait until we see the inscription “All done”.
Install the kext on the network card (Network folder, sorted into folders for each network card), simply drag it into the program window. We wait until the “All done” message appears. Next, go to the CLOVER section of our flash drive, then to kexts, then to Other. Copy FakeSMC.kext from there to any place (Better in the same PostInstall), then install it in the same way as the kext on the network card. You will also need a USB 3.0 kext. It was in the Legacy_13.2_EHC1.kext.zip archive, which you extracted in PostInstall. Let's install it.
Done, we set up the Internet, USB and allowed the system to boot at all (FakeSMC.kext imitates the System Management Control chip, which is only present on motherboards Apple. Without this kext the system simply will not start).
Now let's install the bootloader. Go to the PostInstall folder→ Clover_v2.3k_r3949. There is a *.pkg file, open it.
Click continue, read the information about the bootloader (I’m lying, click continue too). Next, in the lower left corner, click “Configure”.
For UEFI boot, set the following settings:
We'll talk about legacy loading later, since everything is a little more complicated there and you'll have to patch DSDT.
Click “Install”. Let's go through the bootloader installation process.
Done, the bootloader is installed.
Step 5. Bootloader setup
After installation, we will receive a clean, unconfigured Clover bootloader, which needs to be slightly configured. Open Clover Configurator (in the future, I do not recommend using this program for point-by-point editing of the bootloader config).
First, we need to get to the EFI partition with the bootloader. In the left menu, click Mount EFI. Next, click Check partition, a table of all partitions will appear. The partition we need should be on the same partition as Apple_HFS, it appears as EFI EFI. Click Mount partition. In the list, select the disk we need (For example, disk0s1). Please note that there is a bug where all sections are not visible. Roll the mouse wheel so you can scroll between sections and select the one you need.
Next, click Open Partition. It will open a “folder” with the desired section. Go to EFI>CLOVER. Copy plist.config to the PostInstall folder for convenience. Also, just in case, copy it somewhere else, since the one we just copied will be edited. And one more for backup. Copy and open plist.config.
We see something like this:
ACPI - We don’t touch the fixes, we drop (DropOEM) our video card (DropOEM_DSM works when two DSDT patches are encountered. Therefore, we leave the original autopatch method as the bootloader, and disable ours, if one appears).
Go to the BOOT section.
So this is where we need to dig in. We set the arguments ourselves, depending on the system.
V (verbose) - the already familiar “text” boot mode. It is better not to enable it, but to register it manually if necessary.
arch — architecture. In my case x86_64
npci - the key is already known to us. We post if necessary. I recommend doing the first boot without it, but in Verbose mode.
darkwake - responsible for sleep patterns and hibernation. Has 7 modes. If the dream does not start by changing hibernatemode in the terminal, then I recommend using trial and error to find the desired darkwake mode.
cpus=1 - launch using only one core. I don't recommend choosing.
nvda_drv=1 — activation of the NVidia web driver, which we will install a little later. Choose if you have nVidia.
nv_disable=1 — disable non-video graphics and run on the native Mac driver. It’s better not to choose, but to register manually if necessary.
kext-dev-mode=1 and rootless=0 have already been explained earlier.
Let's go to the right subsection.
Default Boot Volume — the partition from which the disk selection to boot will begin by default. By default LastBootedVolume (last selected partition).
Legacy - Legacy Boot for old ones Windows versions and Linux. It very much depends on the hardware and the design of the BIOS, so several algorithms have been developed:
LegacyBiosDefault - for those UEFI BIOS that have the LegacyBios protocol.
PBRTest, PBR — PBR Boot options, this is just too much. In my case PBR works.
XMPDetection=YES is an important parameter. Fixes quantity random access memory, slots, slots, frequency and number of channels.
DefaultLoader — if there are several bootloaders on the partition, select the default one. Must not be empty!
Timeout — time before automatic boot.
Fast - an option that skips the selection of a partition and immediately proceeds to downloading.
1 (Timeout -1) — disabling the autoboot.
We skip the CPU section, the bootloader itself will pick up the necessary values. Devices is also better to skip if you have nothing to fake. Disable Drivers - disable unnecessary drivers at boot. GUI - setup appearance bootloader. I think there is no need to explain anything here, there are no special parameters here. Screen resolution, language and menu theme. It's simple. Graphics - graphics settings and injections.
Do not touch the Inject NVidia parameter! There will be artifacts at launch. It is designed to run older GT line cards
Kernel and Kext Patches - patches and kernel customization. By default, Apple RTC is selected. It's better not to touch. SMBIOS is the juice, customization and counterfeit of the poppy.
To configure factory information, click on the magic wand icon. Next, select iMac (if PC) or MacBook (if laptop).
ACHTUNG 3
Don't add anything to Memory and Slots. These are purely cosmetic parameters that clover picks up at the loading stage. Incorrectly set parameters can cause conflicts.
WARNING: Nvidia video cards without policy-kext edits they only work on iMac13.1 and iMac14.2 Mac models.
In AppleGraphicsControl.kext/Contents/PlugIns/AppleGraphicsDevicePolicy.kext/Contents/info.plist we correct Config1 to none here:
It should work now.
Ready. We don’t touch anything else, we’ve done the basic settings. We save our file. Now copy it to the CLOVER folder EFI partition, log in, replace. Let me remind you that before this you should have made a backup.
We're almost there. Now all that remains is to start the video card. The PostInstall folder contains the WebDriver*.pkg package. Open it and install it. Then he asks us to reboot. Let's reboot.
Now let's make sure that we are not booting from a flash drive, but With hard drive in UEFI mode. Select Boot macOS Sierra from Macintosh HD. Let's start.
Note
Done, here we are in the system. In the picture I showed approximately what the axis will look like after all the settings. Pay attention to how the system understood your Mac, as well as the processor frequency.
A sure sign that the Nvidia driver is working will be its logo on the taskbar. I turned it off, by the way, since it gets in the way, but you can access the invisibility control panel through “ System Settings...". We can check the Internet through Safari. USB 3.0 is trite by plugging a flash drive into a 3.0 port.
Additionally
- Sound
When it comes to sound, the situation is different. If you have an external sound card, then simply download the drivers for it from the manufacturer’s website (analog devices, such as mixing consoles, do not require drivers and start up immediately). For built-in sound card use one of these kexts:
Regarding AppleHDA
Actually, that's all. Afterwards we get macOS Sierra ready to use.
UPD from 05/14/2017
— In the comments, kind people re-uploaded the file from mega to torrent. This is due to the fact that many people have problems downloading a file from mega. To be honest, I didn’t know that Mega has a limit on download speed (I use a premium account). Also, please write all questions to me on VK, but check the comments first. There is a chance that your problem has already been solved there. Again, I am not responsible for any risk this may cause to your computer. I also want to clarify one point that the article is presented solely for educational purposes. The very fact of installing a hackintosh on a PC is a gross violation of Apple's policy regarding their system, which is punishable by law. The author does not encourage the use of MacOS on non-Apple computers and does not encourage change source code systems.
— The end
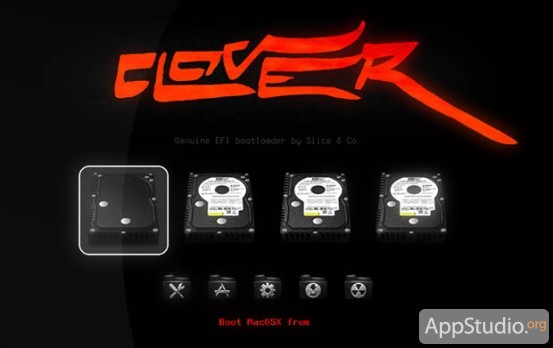
About the wonderful downloader Clover. In fact, we have been following this project since its inception - every month Clover is becoming more and more functional, and in the very near future it can be declared the best modern downloader.
But the main thing about Clover is that it is created by our compatriot, slice. You can chat with him on the applelife.ru forum, tell him about bugs, suggest new features, and the chance of being heard is much greater than in the case of Chameleon or XPC.
We can talk about Clover for quite a long time, so today we will limit ourselves to a brief overview of the capabilities, advantages and disadvantages of the bootloader.
The backstory of Clover is simple: the previously fashionable XPC bootloader did not want to work on the slice laptop, so he decided to create his own, less picky hackintosh bootloader, at the same time developing the accumulated experience in the field of running EFI on BIOS boards.
Today, Clover is a dynamically developing EFI bootloader that has caught up and surpassed its competitors in terms of capabilities. Compatibility is also fine: owners of most modern motherboards based on Intel processors can try it in action.
Clover's functions can be divided into two groups - what all similar loaders can and should be able to do, and what only this loader can do. The first group includes:
- EFI boot support for Mac OS X and Windows
- loading the patched DSDT table
- ability to selectively load individual ACPI tables
- generation of P-States and C-States for the processor (this eliminates the need to register the processor section in DSDT)
- loading kexts from a third party directory
- injection of video cards, sound and Ethernet
- ability to replace computer UUID
- USB patching
But much more interesting distinctive features Clover:
- With this bootloader you will be able to use the “Boot Volume” settings panel as a human being. You will be able to switch between installed systems just like on a real Mac
- Clover, although it is an EFI boot loader, can boot Legacy systems that other EFI boot loaders refuse to see. For example, if you did not install Windows through an EFI environment, Clover will still be able to boot the system
- Clover can boot Linux, not only in Legacy mode, but also through the EFI environment
- Clover can extract and patch DSDT on the fly! True, at the time of writing this feature is under active development, but we have no doubt that it will soon be fully operational. This feature allows the user to avoid the hassle of DSDT altogether. The bootloader will do everything itself
- on motherboards with UEFI, Clover can boot directly from the UEFI environment without emulating anything. Thus, the long-standing dream of many hackintosh users is coming true - to use real EFI modules on PC boards
- Clover's appearance is highly customizable. You can change not only icons, logos and backgrounds, but even fonts
- Clover allows you to take screenshots directly from its graphical interface (F10), and can also record a detailed log of the boot procedure (F2)
- Clover allows independent configurations for different computers to be stored on the same bootable media. For example, you can create a miracle flash drive that will equally successfully load both a desktop and a laptop
Clover is installed in much the same way as Chameleon - you will need to replace the boot sectors. Installation on flash drives is supported, hard disks and hidden EFI partition of GPT disks. The convenient PKG installer eliminates the need for the user to enter commands in the Terminal; everything is perfectly automated.
Clover resides in the EFI folder of the partition whose boot sectors are replaced. The file and folder structure is as follows:
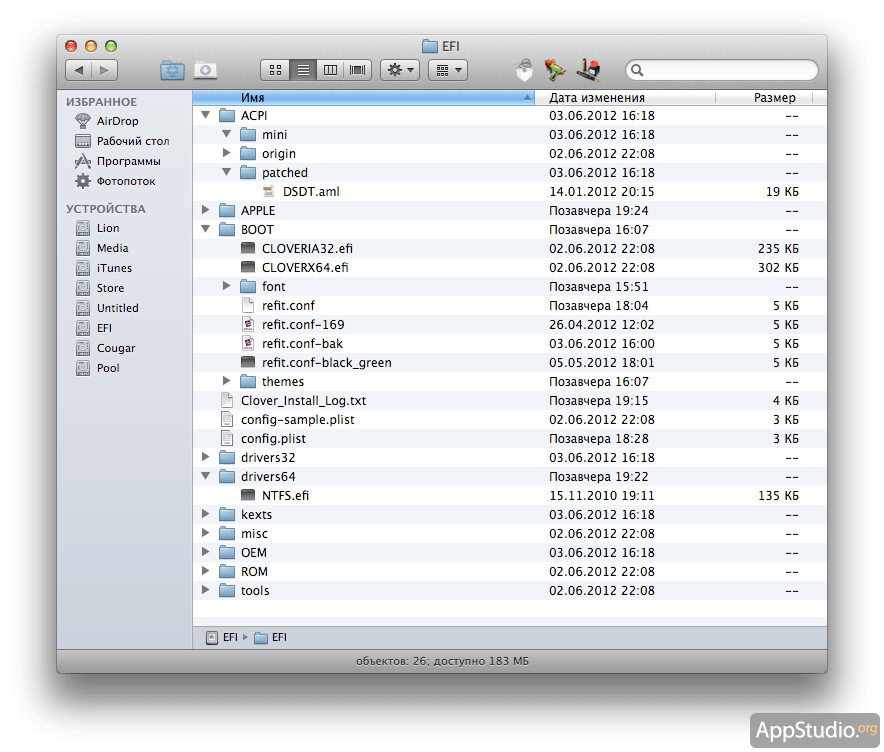 Your patched DSDT file should be placed in the EFI/ACPI/patched folder. Additional EFI modules are located in the drivers32 and drivers64 folders. Drivers for various systems (including Mountain Lion) are placed in the kexts folder according to its system versions. Sets of settings for various computers are located in subfolders within EFI/OEM.
There are two main settings files in Clover:
- EFI/BOOT/config.plist is responsible for everything related to Hackintosh. All basic parameters are set here
- EFI/BOOT/refit.conf - Clover appearance settings
Themes for Clover are unpacked into the EFI/BOOT/themes folder. In addition, each theme usually has its own refit.conf file. By the way, there are already enough topics for Clover, here are just a few examples:


But beauty is a secondary matter; the most important thing is that Clover works properly on your hardware configuration. And for this you will have to tinker with the config.plist file. The names of the keys in this file differ from the formats accepted in Chameleon, iBoot or XPC, so it will not be possible to do without editing. Here is an example of the contents of config.plist:
SystemParameters
Boot-args
darkwake=0
prev-lang:kbd
ru:0
DefaultBootVolume
Lion
CustomUUID
8A2EBD6C-8F0D-58AC-8745-92С4A1FD177A
InjectSystemID
No
BiosVendor
Apple Inc.
BiosVersion
MP51.007F.B00.0903051113
BiosReleaseDate
10/28/10
Manufacturer
Apple Inc.
ProductName
MacPro5,1
Version
1.5
Family
Mac
SerialNumber
G8031788GWR
BoardManufacturer
Apple Inc.
BoardSerialNumber
C020321R035DC771H
Board-ID
Mac-F221BEC8
ProcessorType
0x0601
CPUFrequencyMHz
2667
BusSpeedkHz
133330
QPI
2500
GraphicsInjector
No
StringInjector
Yes
DeviceProperties
PCIRootUID
0
HDAInjection
Detect
LpcTune
Yes
DropOemSSDT
No
GenerateCStates
No
GeneratePStates
No
smartUPS
No
PatchNMI
No
FixDsdtMask
0x0000
The top section specifies boot flags, the default computer language, boot volume (by name), and hardware UUID.
The SMBIOS section is intended for specifying information about the Mac model that your Hackintosh is compatible with. All parameters from here are identical to the information that is entered in other loaders.
In the CPU section you enter information about your processor - its hexadecimal identifier, frequency, bus speed (note - in kilohertz) and QPI.
The Graphics section allows you to enter information about your video card. You can enter the amount of memory (VRAM key), number of video outputs (VideoPorts), framebuffer (AMD cards only, FBName key), card NVCAP and display-cfg value.
The PCI section allows you to inject strings, change the PCI Root number, enable or disable HDA and LPC patches.
Finally, the ACPI section contains many parameters related to processor operating parameters (C-States, P-States), sleep mode, and NMI patch. The DSDT patch is enabled on the fly here - instead of 0x0000, you need to enter a hexadecimal mask corresponding to the sum of the codes of the fixes you need. Details.
You can find a detailed FAQ on installing and configuring Clover on the AppleLife forum.
Clover has plenty of advantages, we think this is clear from what was written above. But there are also several annoying drawbacks:
- long loading time. Alas, Clover takes much longer to load than XPC (almost three times). On motherboards with UEFI the situation is better
- problems with iCloud. Many users complain about the inability to log into iCloud. Absolutely no fixes help. The problem is probably related to the UUID injection mechanism - either Clover does not substitute it everywhere, or where it is not necessary to substitute it
- problems with EFI systems. While Clover is not very friendly with Windows 8, there may be blue screens death, the computer may freeze when turned off or when entering sleep mode. Of course, I want to blame clumsy Windows for this, but in this case it’s definitely not her fault;)
Otherwise, Clover is an excellent option for a novice hackintosh user who does not want to spend time and effort on thoroughly fine-tuning the system. Clover automates many routine tasks previously faced by those wishing to organize a hackintosh. This bootloader really makes hackintoshes one step closer to real Macs.


