Get root using adb. Android: ADB, Fastboot, Linux commands and life hacks. Useful ADB commands
I compiled the Top commands and lifehacks that will simplify and elevate you to new level when using the command line!
Are you just starting to use the command line or terminal while learning and modifying Android? Perhaps it is still difficult for you to navigate and everything looks very difficult and boring. The site will tell and show how to improve your skills and experience in the Android OS!
This material assumes that you already know what ADB is and you have used it at least once!
Top commands and lifehacks in Android
1. Adb command adb devices
Always at the very beginning of using the terminal use the command:
This way you will definitely know whether everything is connected correctly, and not bang your head against the wall and look for a problem somewhere else.
2. Adb command adb reboot normal
Stuck in the Reocvery menu and can't exit? There is an exit! Use the command:
adb reboot normal
This command will help you get out of the “reboot only in recovery” state, provided that you have not broken the system.
3. Adb command adb install -r
If you install and reinstall applications using the terminal, then you should use the command:
adb install -r some.apk
If you do not use the -r prefix, then attempting to reinstall the application will fail.
4. ADB command adb shell pm list packages
View all installed applications on your Android, you can also easily and simply with using adb:
adb shell pm list packages
After which you will see a list of all applications that have ever been installed.
5. ADB application launch command
Once we know the list of applications, you can launch it from the terminal, to do this, enter the command:
adb shell am start -n Nazvanie.app/EGO.ACTIVITY
You can find out the applications by reading this article.
6. Adb command adb shell su -c “command”
If you started using bat and shell scripts, then when you try to execute something from under Root, it will end with a blinking cursor in the terminal, and the Linux command itself will not be executed! There is an exit! use su -c:
adb shell su -c " cp /sdcard/del.sh /data/local/tmp "
Now your scripts will work as they should!
7. Linux mount command
Do you have Root rights installed, but the system does not allow you to write or create a folder?
It's very simple (if you don't have an HTC), you need to remount the partition for recording - mount -o rw,remount,rw /partition to make it work:
from a computer, via command line
adb shell su -c "mount -o rw,remount,rw /system"
from a terminal on an Android device
mount -o rw,remount,rw /system
8. Linux cd command
You may be familiar with the cd command, you know how to use it, how to go to the desired directory, but there is a life hack that will help you navigate faster. Use the command:
In order to quickly move to the very root file system, rather than typing every time cd..
9. Use Linux pwd and ls command
These two commands will help you not to get lost in the abundance of files and directories and Android sections.
Linux command:
Will show full path from the root to your current position.
Linux command:
Will show absolutely all files and directories, including hidden ones, in the current location.
10. Linux chmod command
You may also be familiar with the command needed to set permissions for directories and files. But you can move to the next level by automating actions and specifying them en masse, rather than tediously entering them one by one:
This command will assign rights to absolutely all files in the current directory.
11. Fastboot erase command
Always! Before flashing anything in fastboot mode, format the partition, this action will help you avoid problems with Android.
fastboot erase recovery
fastboot erase system
fastboot erase data
12. Fastboot command fastboot -w
Wipe in fastboot mode? Yes Easy:
12. Fastboot boot command
Just flashed Recovery, but don’t want to hold the buttons with your hands to reboot into it? Then execute it using the command:
fastboot flash recovery recovery.img<--- прошивка recovery
fastboot boot recovery.img<--- переход в режим recovery
12. Note, the “TAB” key
Keyboard key is very useful and necessary! If you need to type a long directory, then you just need to write the first three letters and press “TAB” and everything is already written for you, this also applies to commands and files.
That's all! Read more articles and instructions in the section. Stay with the site, it will be even more interesting!
Many of you have more than once encountered a situation where, in order to obtain root rights on an Android tablet or smartphone, install new firmware, restore the system and other things, you had to connect it to the computer and execute a series of adb or fastboot commands through the command line window (terminal ).
Most people enter these commands without understanding what they mean, simply following instructions found on the Internet. And if you want to get a more complete understanding of what happens when they are executed, then today we will get acquainted with the ten basic commands that every advanced Android user should know.
But before you start getting acquainted with these commands, let me remind you that before your tablet or smartphone can execute them, you must make sure that your computer has Android SDK, and on the tablet or smartphone itself, the option “ USB Debugging».
How to install the Android SDK, which contains the adb and fastboot programs, read this material.
Let me also remind you that in Android 4.2 and higher, the “USB Debugging” item is hidden, and you can read how to access it.
For those who have forgotten how to launch a command line window in Windows, let me remind you that the easiest way to do this is by clicking on “Start”, after which you will need to type cmd in the search window and press the “Enter” key.
After all the preparatory work is completed, you can connect the device to the computer using a USB cable and start learning the commands.
1. adb devices command
This is probably the most important of all ten teams that will be discussed. Using it, we can find out whether the computer sees your Android device, and if it does, then whether it can communicate with it through terminal commands.
If everything is fine, then after entering the adb devices command in a Windows command line window or Linux terminal, you should see a line with the text List of devices attached, after which there will be a line consisting of the serial number of your device and its status - offline or online:

The offline state means that the device is in sleep mode. The online state signals that the tablet or smartphone is ready to carry out your commands.
2. adb push command
Using the adb push command, you can copy files to your tablet or smartphone. In this case, you must specify the path to the folder where you want to place the file on the device and the folder on the computer from where the file will be copied. The second path is not necessary if the file is located in the same folder where the adb program is located.
Here is an example of copying a video file superfreak.mp4 from a computer to a device, to the /sdcard/Movies folder using the adb push superfreak.mp4 /sdcard/Movies/ command

For Windows users, I would like to remind you that in Android, when specifying the path to files and folders, a forward slash - / is used, and not a backslash, as you are used to.
3. adb pull command
If the adb push command is used to transfer files to an Android device, then adb pull is used to copy files from the device to the computer. Just as in the previous case, you must indicate the path where you want to get the file on the device and the path where you want to place this file on the computer. The second path is not necessary if you want the file to go to the folder from which you ran the adb program.
Here is an example of copying the superfreak.mp4 file from the /sdcard/Movies/ folder of your tablet or smartphone to the Windows 8 desktop of user Jerry, C:\Users\Jerry\Desktop

If you want the file to go to the folder you ran adb from, just enter the command adb pull /sdcard/Movies/superfreak.mp4
4. adb reboot command
This command is often used during the process of rooting or installing new software, when we need to accept the changes that we have made on our device. After you enter the adb reboot command, your tablet or phone will reboot.

This command is also important because it can be placed inside scripts, which allows you to reboot the device automatically after completing all the necessary operations.
5. adb reboot-bootloader and adb reboot recovery commands
Using adb, you can not only reboot your Android device, but also reboot it into the bootloader. This mode is needed so that we can unlock the bootloader, which is necessary to obtain root rights and further install alternative firmware.

Some devices can be bootloaded using a specific key combination when they are turned on, but often the adb reboot-bootloader command is the only way to access the bootloader.
Similarly, the adb program can be used to access the recovery menu of a tablet or smartphone or recovery. This can be done using the adb reboot recovery command
6. Fastboot devices command
If you rebooted your tablet into bootloader mode, it will stop accepting adb commands. In this mode, we can communicate with the device using the fastboot program.
Using the fastboot devices command, you can find out if your device can accept commands from this program in bootloader mode. Since fastboot is a very powerful tool, some Android device manufacturers do not provide access to this program in bootloader mode.
Just like with adb, after entering the fastboot devices command you should see the serial number of your device.

Often the reason fastboot does not work is the lack of the necessary Windows drivers for your device.
7. Fastboot oem unlock command
Some manufacturers (for example, HTC or Asus) release special utilities that allow you to unlock the bootloader of their tablets and smartphones, after which you can install alternative recoveries, such as ClockworkMod. or TWRP and firmware from independent developers (custom firmware).
However, in many cases, unlocking the bootloader Android devices You can use the fastboot program. This is very easy to do - when your tablet or phone is in bootloader mode (step 5), just enter the following command in the command line window: fastboot oem unlock.
After this, you will need to follow the instructions that will be displayed on the screen of your tablet or smartphone.

Attention! After executing the fastboot oem unlock command, your device will be completely cleared of any programs you have installed and your personal data will also be deleted.
8. adb shell command
The adb shell command often confuses some novice users.
There are two ways to use this command. If you simply type adb shell in the command line window and press the Enter key, you will be taken to terminal mode, or the command shell of your Android device, where you can execute any Android shell commands.
Below you can see the result of running ls command in Android shell

This mode is well known to Linux and Mac computer users. If you are familiar with bash shell commands, you will have no problems working in this mode. Otherwise, I do not recommend using the adb shell mode until you understand the purpose of all its commands, since in this mode you have full access to the files on your device and can accidentally cause irreparable changes to the operating system.
The second way to use adb shell is to execute a single Android shell command using this construct: adb shell<команда>. For example, you can change file permissions using a command like “adb shell chmod 666 /data/filename”
9. adb install command
With the adb program, you can do more than just copy files to and from your device. This program also allows you to install applications on Android devices in the form of apk files. There is an adb install command for this. It's a bit like the push command: you have to specify the path where the file with the application you want to install is located. Therefore, the easiest way is to first copy the apk file to the folder with the adb program, after which you can install the program using the command adb install ApplicationFileName.apk

If you need to update the application, then in this case you need to use the -r switch and the command will look like this: adb install -r ApplicationFileName.apk.
Using the -s switch you can install applications on the memory card (if your firmware allows this). The -l switch allows you to lock the application during installation (by installing it in the /data/app-private folder). There are other keys for more advanced functions, but their description is the topic of a separate article.
10. adb uninstall command
Lastly, you can remove apps from your tablet or phone. To do this, use the command adb uninstall ApplicationFileName.apk
This command has the -k switch, which allows you, when deleting an application, not to delete its data and cache, but to leave them on the device.
Bonus: adb sideload command
This command will be very useful to owners of Nexus tablets and smartphones - with its help they will be able to update the official firmware on their devices. In other words, if your smartphone or tablet has not received an update over the air, you can download new firmware from the official website and update the device manually.
After you download the firmware file to your computer and connect your tablet or phone to it, you will need to reboot your device into recovery mode, select "Apply update from ADB", and then enter the following command in the command line window on your computer: adb sideload xxxxxxxx.zip, where xxxxxxxx.zip is the name of the zip file with the firmware.
You will find more detailed instructions on how to manually update the firmware of Nexus devices in this material.
Related materials:
There are many tools for working with a smartphone connected via a USB cable or Wi-Fi. Particularly advanced tools allow you to move files, install and uninstall software, view contacts, take screenshots and even send SMS, but no graphical tool can compare with the power that the Android console can provide. In this article we will talk about ADB (Android Debug Bridge) - a standard tool for debugging and working with the Android console from a computer.
The commands described in the article can be executed directly on the device by downloading a terminal emulator from the market, but it is more convenient to do this, of course, from a computer via adb.
ADB Basics
To start working with ADB, you should activate it on your device and install the adb utility and drivers on your computer. The first task is performed by enabling “USB Debugging” in the “For Developers” settings item (if this item is hidden, click seven times on the build number in the “About Phone” menu).
To install ADB on your computer, download Adb Kit and unpack it into any folder (I recommend using folder names without Russian characters). We also download and install ADB drivers.
You need to work with adb from the command line. Press Win + R and enter cmd, then go to the folder in which adb is located. For my folder the command would be:
Cd\android
In order not to do all these manipulations every time, you can add the desired folder to the Path variable. To do this, go to “Control Panel -> System -> Extra options systems -> Environment Variables", find the Path variable and add to the end of the line, separated by a semicolon, the path to the folder with adb. Now, after starting the console, you can immediately enter the necessary commands.
Let's check our connection to the phone using the following command (it should display a list of connected devices):
adb devices
You can work with ADB via Wi-Fi. To do this, you need root rights and the WiFi ADB application. We launch the application, press the switch and connect to the smartphone using the connect command and the IP address shown by the application:
INFO
You can copy the console output after selecting it with the mouse, as well as paste the copied command or file name into the console with the right mouse button. Enabled in the console properties.Installing programs
ADB can be used to install applications without having to copy them to your smartphone. All you need to do is run the following command:
Adb install d:/downloads/filename.apk
You can also add additional keys to the command. Will be useful -e- reinstall the application while saving the data and -d- install a version less than the current one.
Programs can be removed, but to do this you need to know the name of the package (I’ll tell you how to find out a little later). Using the game Angry Birds Seasons as an example, the command would look like this:
Adb uninstall com.rovio.angrybirdsseasons
Application backup
Android has built-in backup functions that can also be launched using the command line. To do this, use the adb backup command and a set of options:
Adb backup [options]<приложения>
- -f indicates the name of the file being created and its location on the computer. If the key is missing, the backup.ab file will be created in the current directory;
- -apk|-noapk indicates whether to include only the application data or the apk itself in the backup (does not include it by default);
- -obb|-noobb specifies whether to include .obb extensions for applications in the backup (not included by default);
- -shared|-noshared specifies whether to include the contents of the application on the SD card in the backup (not included by default);
- -all indicates the need to backup all installed applications;
- -system|-nosystem indicates whether to include in backup system applications(enables by default);
- - list of packages for backup.
If we want to create a backup of all non-system programs, including .apk, to a specific location, then the command will look like this:
Adb backup -f c:\android\backup.ab -apk -all -nosystem
After entering, you must confirm the start of the backup on the device itself. To restore the resulting backup, you need to run the appropriate command:
Adb restore c:\android\backup.ab 
Console within a console
Along with the mentioned console, which is a DOS console for Windows, Android also has its own. It is called via adb shell and is essentially a standard Linux console, but with an incomplete set of commands, which can be expanded by installing BusyBox from the market. There are two ways to use this console. In interactive mode it is launched with the command
adb shell
The $ sign appears in the console (hereinafter in the text this sign will mean the need to enter the preliminary adb shell command), and after that you can enter a series of commands, receiving a response after each. The second method is if you need to enter only one command, you can write it in a row using the adb shell.
The shell uses standard commands for copying, moving and deleting files: cp, mv And rm. You can change directories ( CD) and view their contents ( ls). In addition to standard Linux commands, which you can learn about from any reference book, Android has several of its own specialized tools, but to use some of them, you will have to gain root rights on your smartphone, and after launching the console, run the su command:
adb shell su
This needs to be done if, in response to any command, you see a line similar to “access denied” or “are you root?”. If successful, the $ sign will change to #.


Taking a screenshot
Done in one line:
Adb shell screencap /sdcard/screen.png
After this, the picture needs to be pulled out of the device with the command adb pull:
Adb pull /sdcard/screen.png
In recovery, you can take a screenshot with the following command:
Adb pull /dev/graphics/fb0
Then you need to convert the fb0 file into a normal image using FFmpeg, which you need to download and put in the adb folder. The extension must be installed on your device:
Ffmpeg -f rawvideo -pix_fmt rgb32 -s 1080x1920 -i fb0 fb0.png
Record video happening on the device screen
adb shell screenrecord --size 1280x720 --bit-rate 6000000 --time-limit 20 --verbose /sdcard/video.mp4This command will start recording video with a resolution of 1280 x 720 (if not specified, the native screen resolution of the device will be used), with a bitrate of 6 Mbit/s, length 20 s (if not specified, the maximum value will be set to 180 s), with display logs in the console. The recorded video will be located in /sdcard (video.mp4 file).
INFO
All launched from the console and in adb shell processes that take some time to complete can be interrupted using the combination Ctrl + C. Exit the shell and return to executing normal adb commands - Ctrl + D.Application management
Two commands are used to manage applications: pm(package manager) - package manager and am(activity manager) - activity manager. These teams have many keys, which can be viewed on the developers portal. Let's look at a few.
To begin with, we will get a list of applications installed on the device in the form of package names that will be useful later:
Continuation is available only to subscribers
Option 1. Subscribe to Hacker to read all materials on the site
Subscription will allow you to read ALL paid materials on the site within the specified period. We accept payment bank cards
, electronic money and transfers from mobile operator accounts. ADB and Fastboot utilities are included in the kit SDK (do not confuse it with Android Studio, much less download its cumbersome installation file, unless, of course, you are going to develop for Android). ADB is a debugging tool that allows you to access the Android console from a computer (by connecting the gadget to a PC via USB. At the same time there should be . Fastboot is designed to work with the device when it is loaded in the mode of the same name (if your device has one).
Using ADB, you can control your smartphone/tablet from your computer: make a backup of applications, record a screencast, transfer your smartphone to Recovery mode and much more. In addition, you can work with ADB via Wi-Fi. To do this, your device must have root rights, and you will also need a special application that connects to your computer over the network. For example, ADB Wireless or WiFi ADB. But this is material for a separate article.
Using Fastboot you can, custom recovery( or ), unlock Bootloader (on HTC, Motorola, Sony, Nexus, Huawei, and the latest LG devices it is blocked), clean up system partitions.
How to install ADB and Fastboot: instructions
1. Go to the official website where you can download the Android SDK: https://developer.android.com/studio/index.html. Scroll down to the “Command line tools only” section and select the archive for Windows.

2. Check the “I have read and agree with the above terms and conditions” checkbox and click the “Download Android Command Line” button Tools for Windows". The archive will begin downloading.

3. Download it and unzip it to the root of Drive “C:”.
4. You also need to download the Java Development Kit from the official page. Go to the website, agree to the terms of the license agreement by checking the “Accept License Agreement” box, and download the JDK version that matches the bit size of your system.

First way
Go back to the Android SDK folder, open “tools” and run “android”.

Check "Android SDK Platform-tools" (and also "Google USB driver" if you have Nexus device) and click "Install Packages".

Read below about installing drivers for other devices.
Select "Accept License" and click "Install".

My log showed that there was an error. But in the end everything ended successfully.
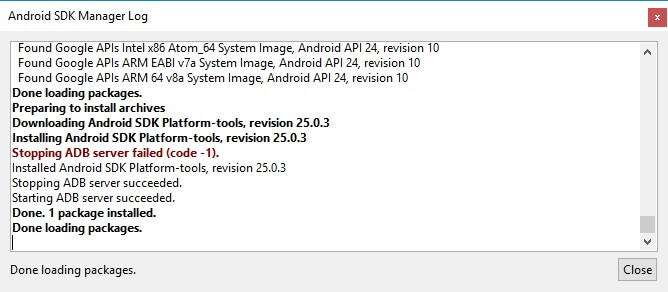
After completing the above steps, in the “sdk-tools-windows-” folder version“platform-tools” will appear, and it will contain the “ADB” and “Fastboot” that we are interested in.


Second way
Go to the folder "sdk-tools-windows- version» → “tools” → “bin” and, holding down the “Shift” key, right-click on an empty area. Select "Open a command window" or "Open a PowerShell window here" if you have one of the latest builds of Windows 10 installed on your PC or laptop.

Paste the command into PowerShell or Command Prompt (in PowerShell add ./ at the beginning):

Click "Enter" to execute the command. The files will download and you will be asked to install:

To enable, type y, that is, “yes”, and press “Enter”, after which the installation of “platform-tools” will begin.

At the end, a message will be displayed on the command line that the procedure completed successfully. And the “platform-tools” folder with ADB and Fastboot inside will appear in “sdk-tools-windows- version».
(!) If for some reason you cannot install ADB and Fastboot using the previous methods, use the third option - simply download the “platform-tools” archive and unzip it to the “C:” drive.
Installing ADB and Fastboot drivers for Windows
For a computer, smartphone or tablet, you need to download the USB driver:
- Samsung - the driver is included in the Kies utility: http://www.samsung.com/ru/support/usefulsoftware/KIES/ or you can download it separately by selecting the desired model: http://www.samsung.com/us/ support/downloads
- HTC – as part of HTC Sync Manager: http://www.htc.com/ru/software/htc-sync-manager/
- Nexus - Android driver is installed along with the Android SDK, as described above.
- Huawei - together with the HiSuite utility: http://consumer.huawei.com/minisite/HiSuite_en/index.html
- LG – install LG PC Suite: http://www.lg.com/ru/support/software-firmware
- Motorola - see this page: https://motorola-global-portal.custhelp.com/app/answers/detail/a_id/88481
- Sony Xperia FastBoot drivers for all models are here: http://developer.sonymobile.com/downloads/drivers/
- Xiaomi – Mi PC Suite: http://pcsuite.mi.com
- MTK – for Chinese devices on MediaTek chips: http://online.mediatek.com/Public%20Documents/MTK_Android_USB_Driver.zip
- Lenovo - select your smartphone or tablet model and download the ADB driver: http://support.lenovo.com/us/en/GlobalProductSelector
- Look for solutions for devices from other manufacturers on their official websites.
There are various universal installers adb drivers(for example, this one: http://adbdriver.com/downloads/) - they can also be used, for example, when for some reason the official solution could not be installed.
If your model comes with a driver without an installer, you will have to do the following:
1. Go to “Control Panel” → “Device Manager”. In Windows 10, just right-click on the Start menu and select Device Manager.

2. Find in the list the device for which you need to install drivers. Right-click and click Update Drivers.

As you can see, the computer correctly recognizes my Nexus 7 tablet. If your PC detects the smartphone incorrectly or there is a yellow triangle next to the device with exclamation point inside, manual installation Android drivers is required for you.
3. Select “Browse this computer for driver software.”

4. Specify the path to the driver folder on your PC.

Wait until the installation is complete and then reconnect the gadget to your computer via USB.
How to get started with Fastboot and ADB
Working with ADB or Fastboot is done from the command line; the utilities are launched in two ways:
1: Right-click on “Start” and select “Command Prompt (Admin)” or “Windows PowerShell (Admin)”. Next, using the commands, specify the path to the folder with ADB and Fastboot (after entering each, press “Enter”).
To return to the root of the "C:\" drive, use:
Thanks to this command we open the desired folder:
In my case it turned out like this:
cd\tools_ version-windows\platform-tools

You will succeed ( Google developers changed the name of the archive after the original version of this instruction was written):
cd\sdk-tools-windows- version\platform-tools
The path to Fastboot and ADB is indicated, now we work with them from the console.
To avoid having to do this every time, add the path to "platform-tools" to the "Path" variable. First, go to the folder, in the navigation bar, right-click on “platform-tools” and select “Copy Address”.

Go to "Control Panel". To do this, press “Win” + “R” and in the “Open:” field, paste control . Click OK.

Select System → Advanced System Settings → Environment Variables....


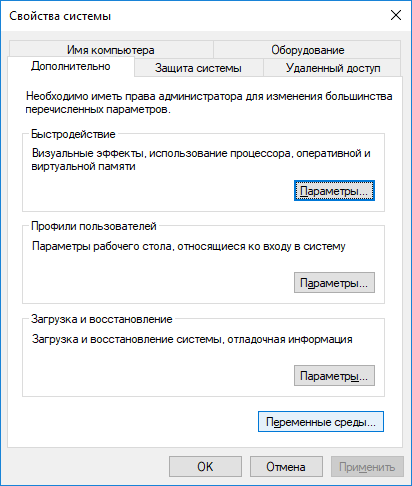
Find the "Path" variable, highlight it and select "Edit...".

Click New, paste the path to the "platform-tools" folder and click OK.

Many of us are already familiar with ADB (Android Debug Bridge), since, as the owner of an Android device, quite often we have to perform such simple actions as adb push And pull, or adb reboot etc. But for many novice users, just the sight of the command line is already scary, and it seems prohibitively possible. Although in fact everything is quite simple, experienced users will not let me lie, and the biggest difficulty is to remember all these commands, although this is not necessary to do either, since the Internet is always at hand and finding the right command is not difficult.
Android Debug Bridge, which is part of Android emulator SDK allows you to communicate between your computer and an Android device connected to it. By the way, if you need some software, you can download the programs for your laptop for free here. What can I do with ADB? Its capabilities are quite wide, for example, the most popular actions: copy files from an Android device to a computer, upload files from a computer to Android, execute many Linux commands, receive error reports, etc.
So if you're new to this and want to learn a little more about ADB than just what it is, then I suggest you check out my little basic guide to learning ADB.
What you will need
1. Android Debug Bridge (ADB) for Windows 32bit - download
2. Android Debug Bridge (ADB) for Windows 64bit - download
3. Computer with installed Windows OS.
Now let's move on to the active phase:
1. Download the required zip archive and extract it wherever you want, for example, drive C.
2. Now go to the directory C:/adb/sdk/platform-tools. Here you will find a set of files as shown in the image below.
3. Hold down the Shift button + right-click and launch the command line Windows string from the current directory.
4. Enter the command adb start-server.
5. To make sure that your device is connected correctly and has been recognized by the computer, enter the command: adb devices. If all is well, you will see something similar to this:

Now that your device is connected and everything is working, let's play with it a little.
Reading LOGCAT via ADB
The easiest way is to run the command: adb logcat. As a result, the entire contents of the device log file will appear on the screen. To get logcat in a separate file run: adb logcat > logcat.txt.
BUGREPORT
You can run the command: adb bugreport, but you will receive a notification that the generated report will not be readable, so it is better to use: adb bugreport >result.txt.

ADB together with ROOT access rights
To work from ADB with full access rights, you need to root the device. If the device is already manual, then run the command: adb root and we see what is shown in the picture below (reboot ADB with root rights).

Installing applications via ADB
To install the application, make sure that in the title apk file there were no spaces and you need to know exactly the correct path to it. Well, then we run the command: adb install+ name of the installation file. In my example, I installed the papertoss game, so if everything goes well, you will get this picture on the screen:


