How to print documents on a printer. How to print texts from a computer to a printer. Advanced Printing Options
Printing has become a paradoxical technology. On the one hand, it has never been so easy not to print: most paper documents in everyday life, at school and in the office can be used directly from the screen of a computer, smartphone, tablet or e-book. On the other hand, it is also not going to die completely: while almost all companies and organizations still print something every day - and although the volume of paper pulp is decreasing every year, according to experts, it will take another quarter of a century for the office to become completely paperless.
Until then, agreements, contracts, emails, various everyday obligatory and optional little things will be written down on paper. And that means it’s time to learn how to type.
No, I’m not joking about “learning” at all. Ten years ago there was no problem: everything was printed from a computer. But since then, something has changed fundamentally. There are more smartphones and tablets than personal computers, and a significant part of document flow now passes through mobile devices. Therefore, why not print directly from them?
Is this even possible, you ask? Maybe. However, the task is still non-standard and it is useful to know the details so as not to hesitate at the right moment, but to confidently use the available functions. So here are four of the most advanced ways to print documents with mobile device- sorted in order of increasing difficulty. I recommend applying them in the same order: move on to the next one only if the previous one did not work!
The most versatile. Most likely, your smartphone (at least its software, which is regularly updated) and printer are modern, that is, they were released three or less years ago. In this case, they support one of the two most common universal printing technologies: Google Cloud Print (for Android devices) or Apple AirPrint (for iOS).
Both are good because there is no need to think about drivers: you just need to tell your smartphone which printer to use, and you can print. But first, make sure that the printer has the appropriate logo (indicating support for the technology you need) and the printer is connected to the same Wi-Fi networks, the same as the smartphone or tablet from which you are going to print. Your further actions depend on what mobile device you have.
On Android, open Settings -> System -> Printing -> Virtual printer" There, look at “Settings -> Add a printer”, where your printing device should appear. If you have multiple printers on your network, select the one you need. By the way, if there is only one printer, you may not have to configure anything, it will connect itself. But on older Androids there was no built-in support for Google Cloud Print, so if this is your case, you will have to install it additionally using the official application from Google.
On Apple devices You can skip this step; everything will happen, as the IT people say, “automagically.”
Next, simply open the application from which you want to see the document on paper, look for “Print” in its functions, set the desired size and other properties, and print! Everything is the same as on a computer, with the only difference being that not all mobile applications can print yet. Office documents, web pages, photographs can be printed, but, for example, correspondence from social networks is problematic.
This method is also good because there is nothing to repair in it. If the printer is not detected, wait a few minutes. That's all you can fix here.
Through a proprietary application. You can always try to find a “native” mobile application written by the printer manufacturer. Here are Epson iPrint, Canon Print, HP ePrint, Brother iPrint and so on, and all of them are usually available in versions for both Android and iOS.
The printer must again be connected to the same wireless network, as a smartphone/tablet. But printing here is performed only from the proprietary application itself, which means that the range of documents that can be printed in this way is limited to only a few popular formats. But such applications often allow you to use the printer’s functionality one hundred percent: for example, they can check the ink level or scan if the printer is combined with a scanner.

If the printer is very old, does not support universal printing and does not have a proprietary application, you can try to revive it using mobile applications direct printing. In this option, a program is installed on the smartphone that can access printers directly via Wi-Fi, Bluetooth, USB cable, or see it on the network if it is displayed in “ general access" on the computer. These are, in particular, PrinterShare and Printer Pro.
Since Android and iOS do not do this themselves, these applications are usually paid. Worse, they only understand a limited range of formats and do not know about all printer models. Therefore, it is worth checking whether they are compatible specifically with your printing device: you can do this by printing a test page in free versions programs.

Print to file. This method allows you to receive, instead of a paper copy, electronic document(in PDF format), which will look the same on any device and operating system. Perhaps this is even better than the paper version, because such a document can be sent over the network and printed on the spot. The settings are made in exactly the same way as the first method, only a printer is not needed here: when selecting, simply select the “Save as PDF” option.
Quality printing to you!
If you liked the article, recommend it to your friends, acquaintances or colleagues related to municipal or public service. It seems to us that it will be both useful and pleasant for them.
When reprinting materials, reference to the original source is required.
Modern users store documents and photographs electronically on their computers and laptops, but sometimes there is a need to print information. Nowadays there are many photo studios or retail departments everywhere that will provide you with such a service. But when the need to print documents or images arises constantly, it is better to get your own printer. The variety of types and models is endless, but they all perform the main action - they output information from the computer to paper.
Before you print to a printer from a computer, you need to make sure that the device is detected by the system. When you connect the printer for the first time, drivers are installed to synchronize the device with your computer or laptop. It is also necessary to configure the parameters for correct operation.
Regardless of the model of the connected printer and its set of functions, the connection principle will be the same for wired devices.

Installing drivers
When you connect new equipment to a PC or laptop, the system begins scanning and searching for the necessary drivers. Windows will likely find the right software for your printer, but it's still best to install drivers designed for your printer. specific model. They come on a disk along with the device, and can also be found and downloaded on the manufacturer’s website. Let's look at installing drivers from disk:

Setting up the printer for printing
Immediately before printing, the necessary parameters are indicated that can be set in the program that opens the document. But the printer properties include functions such as improving print quality, which will increase the clarity of text or images if the ink is no longer fresh, shades of gray, color, selecting an operating mode, checking the printing nozzles, and cleaning.

Printing a document
The Microsoft Office package contains programs that require a printing function. The most popular editor for working with text Microsoft Office with a wide range of tools. Let's look at his example of how to print to a printer from a computer. You can start printing from the File button, from the printer icon at the top of the toolbar, or by pressing the hot keys Ctrl+P (in this way, printing will start without additional settings).
When you go to the print settings menu, you can set the necessary parameters. Determine which pages to print, if necessary, change the position of the text in relation to the paper size, etc. You can preview the print on the screen.
How to print on both sides of a sheet
Not every printer supports automatic double-sided printing, but some models offer this service. If your device has this capability, then simply check the box next to the Duplex option before printing.

If the printer does not print on both sides, you have to turn the sheets over by hand. Here it is important not to make a mistake and position the paper correctly so as not to apply the text on top of the side where it already exists.
If you need to print a large number of pages on both sides, turning each sheet will be problematic. Then use the print settings, where you specify to print the odd pages first, then turn the stack of sheets over and print the even ones. It is better to first check by printing a couple of pages whether you are inserting the paper correctly, because it will be sad to see how the printer began not to print on both sides, but to overlay text on top of the previous one. On the monitor screen you will see instructions on which paper position will be correct.
Printing the image
In any graphic editor It is possible to print photographs or pictures. You need to follow the same principle as when printing text. Customization involves editing the size, the ability to multiply the image to the desired quantity, or printing several different pictures on one sheet.
In the same way, you can print Microsoft Excel tables and website text. The browser's File menu also assumes the presence of a printing service.
As you can see, there is nothing complicated about working with the printer. The most important thing is to configure everything correctly for correct operation and timely service the device.
Few people nowadays do not know how to print, photocopy or even scan. In the century modern technologies, when in every home almost everyone in the family has their own personal laptop, there is hardly a person who cannot print a sheet of paper. But still, let's talk about how to print texts on a printer. It is quite possible that you do not know all the secrets of printing or that you simply have not had to print certain documents before.
Preparation
Before you start printing, you need to make sure that the printer is turned on and connected to your computer or laptop. Yes, it may sound funny, but sometimes people forget this. You also need to make sure that there is enough ink in the printer (check the ID) or refill the device and count the sheets of paper. It's best to put in a few more sheets, as sometimes the printer can feed several sheets at the same time, and if you don't notice it in time, the printing may be interrupted, and you will have to add paper and do additional steps to resume it.
Be sure to check the print quality by printing one test sheet from this or any other document. It is possible that you will have to clean the printer (done using the "Maintenance" tab in the print window). We'll tell you how to do all this a little later.
Calling the print window

So, we checked the functionality of the printer and its connection to the computer. Now let's move directly to how to print on a printer Word document. First you need to open the print window. This can be done in several ways.
1. Find the print icon on the panel. This option is usually available in more earlier versions. For example, in the 2003 Office suite, the print icon is located at the top of the panel and is quite noticeable.
2. Click “File” and select “Print” from the drop-down menu. This is a fairly well-known method that most users use personal computers. But it takes a lot of time.
3. Press the key combination Ctrl+P. Oddly enough, it is not known to everyone, although it is the fastest and simplest.
Setting the basic parameters
If you do not know how to print texts on a printer, then you should also remember what mandatory parameters should be specified when printing ordinary documents.
1. Number of copies, if you need more than one copy of a document or sheet.
2. The pages you plan to print.
3. What kind of printing do you need - single-sided or double-sided.
4. Page orientation - portrait or landscape.
5. Sheet size - A4, A5, other.
6. Size and parameters of fields.
7. Number of pages per sheet.
By default, it occurs on the page in one copy on one side. Orientation - portrait, A4 format. There is one sheet per page, and the document itself is printed from the first to the last page.
Printer properties

For those who are learning how to print texts on a printer, it will be useful to know that when printing text, you can additionally set the printer properties. This is not necessary to know, but is useful in some situations.
The main properties of the printer include:
1. Print quality. The default is standard, but if the printer is old and does not print clearly, it is recommended to set the quality to high.
2. Shades of gray. This property also increases the clarity of the print, especially if you are not printing text, but not very successfully scanned material.
These two parameters are set in the "home" tab. Another useful thing is the "Maintenance" tab. Here you can clean and check the printing nozzles, clean the rollers and tray, and also select the silent mode of the printer. We advise you to pay attention to these properties, as they will be quite useful at the print preparation stage. Having set all the parameters, click the “Print” button directly in the main settings window, and the device will start working.
Two-sided printing

How to print texts and documents on a sheet of paper on both sides? A function such as this has been created specifically for this. You can select it in the main print properties. All odd-numbered pages are printed first. The printer then asks you to turn the sheets over and insert them into the printer (usually the sheets are placed so that the beginning of the printed page is at the bottom). The program on your computer gives you hints on how to properly turn the paper over and insert it into the machine. After this, click the “Print” (“Ok”) button in the dialog box, and the printer will print all the even sheets. This way you get a finished printed document on both sides of the sheet.
How long does it take to print?
The time it takes to print the text will depend on your printer. Each device has its own. Usually it is about 10 pages per minute, there are printers that work much faster. Again, it all depends on the manufacturer, model and year of manufacture. So, home and office devices print at different speeds.

The older the model, the longer the printing takes. We also note that various system breakdowns also affect the speed and quality of this process. Therefore, if your printer was purchased a long time ago and begins to fail, we recommend replacing it with a more reliable one. new model. Otherwise, be prepared for not only slow, but also rather poor-quality printing, errors such as jamming of sheets, printing with stripes, and the like. For example, the printer may ask you to insert paper into the feeder even though it is still there). Other minor annoying mistakes are also possible, which almost double the printing time.
Finally
So, we figured out how to print texts on a printer, what parameters need to be set when printing and where to find them, and how to start printing text. We also found out that speed, as well as print quality, directly depends on the printer: its type and release date. Determined what older device, the lower the speed and quality of printing and the higher the likelihood of various errors occurring. We hope this information will be useful to you.
Let's look at how documents are printed from 1C applications running in service mode (via the Internet).
Both in the local version of the application and in the service, the same document can be printed in different versions. For example, an invoice can be printed, both in the form of a regulated invoice (TORG-12), and, in fact, in the form of an invoice (for the internal needs of the organization). Therefore, before you start printing a document, you should select the desired type of printing in the document form. This can be done from the drop down menu Seal(as shown in Fig. 1 using an example application "1C: Managing our company").
Rice. 1.
Start printing
In some applications (for example, "1C: Accounting 8"), if only one printing form is provided for a document, then you can start printing in one click (in this case, instead of the menu Seal a button with the name of a single printable form is displayed).

Rice. 2. Printing documents from a single printed form
Since document printing in service mode starts in a browser window, you should pay attention to following features print.
- Print confirmation usually needs to be done two times: first in the 1C:Enterprise print form, and then in the corresponding browser form (Fig. 3).
- The user's ability to edit printed form layouts in service mode is limited. If you want to use your own printed form (for example, with your company logo placed on it), you can do this by downloading a standard printed form from the service, editing it in the local version of the application and uploading it back to the service (more detailed information You will find information about using custom printables).

Rice. 3.
Printed form of the document
The interface of document printing forms is different in different browsers. Therefore, if you use more than one browser to work in the service, be prepared for the fact that the usual printing procedure will vary slightly, depending on the browser used and its version. For example, browser Google Chrome offers in an additional dialog box, displayed immediately before printing, to preview and set print settings (Fig. 4).

Rice. 4. Print a document in Google browser Chrome
If you want to use your own printed form (for example, with a logo placed on it), you can do this by downloading a standard printing form from the service, editing it in the local version of the application and uploading it back to the service (for more detailed information on using custom printed forms, see you will find).
Printing order
We present the general sequence of actions when printing documents (Fig. 5).
- Start printing by clicking the corresponding button on the document toolbar and selecting the desired printing form from the menu (see Fig. 1).
- In the printed form that opens, determine the available parameters (for example, the number of copies).

Rice. 5. Sequence of actions when printing
- If necessary, edit the text in printed form. To do this, double-click on the desired cell of the form and change the text in it (Fig. 6).

Rice. 6.
Editing a Printable Form
- If you want to save the finished printed form of a document to a file on local computer, press the button Save in printed form (see Fig. 3), select in the dialog box that opens Saving a Printable Form desired file format by checking the box next to it and click the button Save c (Fig. 7).
Note: You can specify several formats at the same time - in this case, several files with the corresponding extensions will be created.
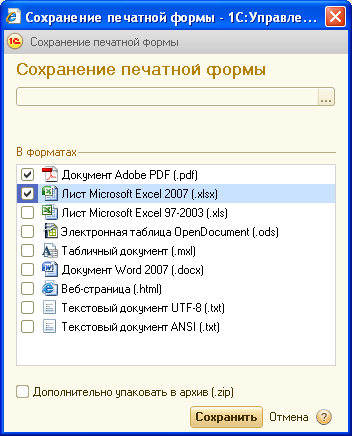
Rice. 7.
If desired, save the file in the desired format
- Click the button Seal in the printing form window (see Fig. 3).
- In the browser print window that opens, if necessary, select print options (printer, etc.) and click the button Seal again (Fig. 8).
As a result, the document will be printed on the printer.

Rice. 8.
Start printing using the browser system dialog (use Internet Explorer)
Answers to frequently asked questions
1. What is the printing method? Which printing method is better to choose?
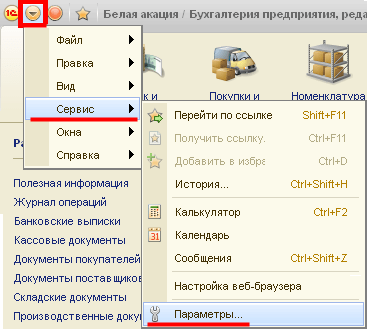
The printing method is selected in the 1C:Enterprise settings, available by command Main menu / Tools / Options(Fig. 9).
Rice. 9. Main menu 1C
Parameter Printing method(Fig. 10) determines the degree of user influence on the document layout:
- PDF- printing without changing margins and scale;
- HTML- When printing, margins and scale may be changed.
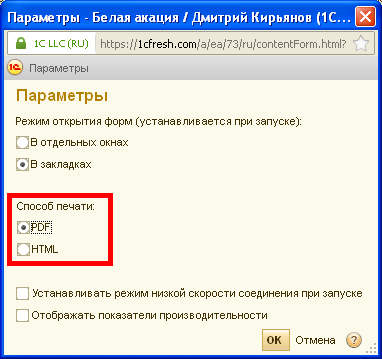
Rice. 10. Selecting a printing method (recommended PDF )
2. How do I configure print settings?
Settings for 1C:Enterprise printing parameters are available in document form using the command (Fig. 11).
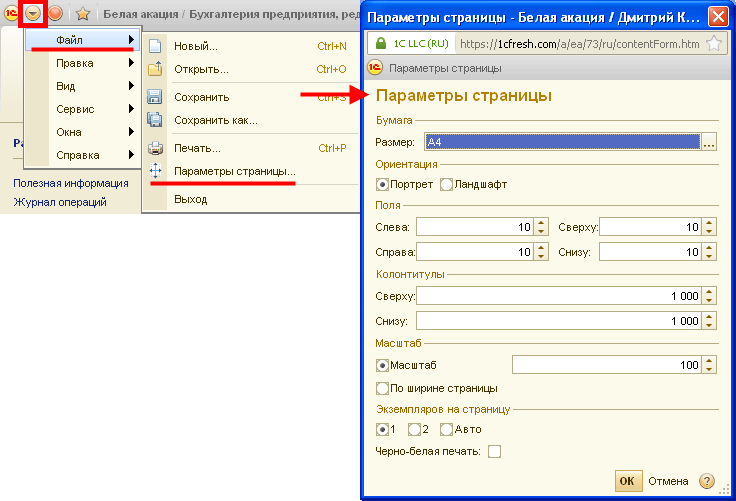
Rice. eleven. Selecting Page Options
Since web browsers have their own print settings, it is necessary that they match the mentioned layout page settings spreadsheet document. Browser print page settings can be edited in the dialog Page settings(Fig. 12), which in Microsoft Internet Explorer, Mozilla Firefox and Apple Safari is called by the browser menu command: File/Page Settings...(File/Page Setup...). This setting is not provided for the Google Chrome web browser.

Rice. 12. Selecting page options in the browser
3. Is it possible to preview a document before printing?
To ensure that your spreadsheet document will print correctly, you can use the print preview.
- When using the web browsers Microsoft Internet Explorer, Apple Safari and Mozilla Firefox (in most versions), the preview is opened with the browser menu command: File/Preview(File/Print Preview).
- For the Google Chrome web browser, preview is performed by default immediately before printing (see Figure 4 above).
Typical printing errors
1. What should I do if, when printing, a page appears on the printer with errors?
Check what quality Printing method(Main menu / Tools / Page options) option selected PDF. Then, if the errors are not resolved, check that the 1C:Enterprise print settings are selected correctly ( Main Menu / File / Page Setup- these settings must be called from the window with the printed form of the document, as shown in Fig. 11) and browser print settings (Fig. 12), which are available when you select the command File/Page Settings.
2. What should I do if, instead of printing on a printer, I am offered to save to a PDF file?
In some browsers, if there are no connected printers, the default print mode is set to file PDF format. If this happens, check that the printer is connected and installed correctly in the operating system.
You will find additional information about printing in the article on the ITS website.
We wish you pleasant work!
In addition to the computer itself, there are many peripheral devices, useful to the user. At home, there is no flow of printed documentation, but sometimes it is very convenient, without leaving home, to fill out an application, print out a coursework or a photo from vacation. It is not enough to buy a printer and connect it to the computer correctly. In order to use all its functions 100%, you need to configure it, install drivers and software from the disk.
Turn on your computer and wait until it boots completely. Connect the printer to the power supply, connect the printer to the computer via a USB cable, and turn it on. operating system will respond immediately and begin scanning the new device. The process will end with a message indicating that the device is ready for use. Maybe the printer driver will be found by the system automatically, but for high-quality operation of the printer it is better to install “native” drivers from the disk supplied with it. The disk is missing or damaged - look for drivers on the manufacturer’s website or on a trusted website. Place the driver disc in your CD drive. Autorun will begin software. The Installation Wizard window will open. If the autorun file does not work, run the “Setup Wizard” manually. Open the “My Computer” folder, right-click on the “CD|DVD” drive name, and select “Open” from the list of commands. Find and run the “AutoRun.exe” file. The Installation Wizard will definitely work. Usually the program interface is designed so that regular user could easily understand and perform all the printer settings. Follow the instructions on the screen. After installing the driver, try printing a test page. Open any Text Document, in the “File” menu, click the “Print” command. The document will not print immediately. First, make additional print settings - specify the parameters: range of pages or all pages, number of copies, color print or b/w and so on. If you decide to print photos, then buy a set of photo paper. The paper can be matte or glossy, of different densities. To ensure high-quality photos, click on the “Properties” button in the printer settings window and change the parameter values as desired. Set the print quality, the required paper size, if it is different from “A4”, and the paper type (plain paper, photo paper, glossy photo paper, ...), sheet orientation (portrait, landscape). It is very important to set the Print Quality setting correctly. If this is a trial option, then choose fast printing and only black ink. After reviewing the “draft”, make the necessary adjustments and then print the document, setting the quality to “Best” or “High”. To use ink more economically, just set the print quality to “Normal”. For printing photographs, the most practical option is semi-gloss photo paper. When finished setting up printing, click “OK”.Without additional settings, you can send an open document for printing using the key combination “Ctrl+P”. In the same way, you can print a web page on the Internet: “Ctrl+P”, select “Print…” from the “File” menu, select a fragment of the page, copy the contents to the memory buffer - “Ctrl+C”, paste it onto a sheet in a text editor - "Ctrl+V". Print as a regular document.


