Installing kali linux with windows 10. How to install Kali Linux as the main or second operating system. Installing Kali Linux with Windows
Installing Kali in addition to Windows can be quite useful. However, you need to exercise extreme caution during the installation procedure. First, make sure you back up your important data and your Windows versions. Since you will be working with a hard drive, it is better to save backups to external device storage After the backup is complete, we recommend that you read the “” article, which describes the procedure for a normal Kali installation.
In our example, we will install Kali Linux in addition to Windows 7, which takes up 100% of the computer's disk space. We'll start by resizing the current Windows partition to free up free space, and then install Kali Linux on a new empty partition.
Download Kali Linux and burn the system image to DVD or as installation media. If your computer does not have an optical drive or USB ports, please refer to the publication. Make sure you have:
- At least 8 GB of free space on Windows
- Support boot from CD-DVD/USB
Preparing for installation
- Download Kali Linux.
- Write it down ISO image Kali Linux on DVD or copy Kali Linux Live to USB.
- Open the BIOS and make sure your computer is set to boot from CD/USB.
Installation procedure as a second operating system
Kali Linux Installation Procedure

How to install Kali Linux on a laptop?
Hello everyone, in this article from Computer76 I will show with my example how to install Kali Linux on a laptop. Installing the Linux operating system implies, I think, first of all, the fact that Windows is preinstalled in the laptop. Our task is to install Kali Linux on a laptop as a second system so that both OSes do not interfere with each other.
A few nuances. But they exist. What do you need to know to install Kali Linux on a laptop?
There won't be many difficulties. The installer of Kali, downloaded from the official website, knows Russian perfectly, and writes correctly and logically. Our task is to carefully read the manager’s advice. Installing Kali Linux on a laptop will not be more difficult than Windows.
So, I have a laptop with pre-installed Windows XP, Windows 7 and Windows 10 operating systems (you don't need to have that much). I'll put Kali Linux on the fourth one.
The first thing you need to do is prepare a place for Kali Linux. To do this, use free program to work with AOMEI sections(or from offsite). Immediate advice from the bottom of my heart: a single-core Kali processor will not cope, and if there are 2 or more “stones” on board, then there are no options - download ONLY 64 bit version of Kali Linux. You will still remember this advice...
Read: 373
Let's say you read several articles on the Internet and became interested in free operating system Linux. Perhaps you even installed it on your virtual machine or booted into Live mode and tried out how everything looks and works. You liked it, and now you want to install it on your computer and start using it. But at the same time, you don’t want to lose the already installed Windows so that in case of an unforeseen situation you can return to a fully working system, and even your favorite games and necessary programs will always be at hand. It is possible to install Linux and Windows 10 on one computer. At one time, for me, as for many other users, this was the ideal option.
In this guide, we'll look at how to install Linux alongside Windows 10. I say Windows 10 because it's Microsoft's newest operating system, but these instructions will also work for more earlier versions, such as Windwos 7, 8 and 8.1.
I'm guessing you already have installed Windows, you have found and decided from which disk to allocate some space for Linux, but you don’t know how to do it correctly. Here you will get a detailed answer to this question. Let's touch on another important topic - UEFI. This technology is used on all new Windows laptops, and many users are interested in how to install Linux on UEFI and what problems may arise.
To install the Linux operating system next to Windows 10, you will need to create several additional disk partitions. The minimum number is three sections. It is not customary to install Linux on one partition like Windows, although this option is possible. Linux is so flexible that it allows you to place the system, user files and settings on different partitions. This is very beneficial during reinstallation. You reinstall the system in the system partition, and all your files on the desktop and work environment settings will remain in place.
These are the three sections:
- Systemic;
- Home;
- Swap partition.
The minimum volume requirements for a system partition in different distributions vary from seven to twenty Gigabytes. But this is enough to install the system itself and several additional programs. If you are going to use a lot of programs and games, especially if they take up a lot of space, you need to take a couple of tens of Gigabytes in reserve. I recommend using 30-40 Gigabytes for the Linux system partition in the same way as for the Windows C drive.
The swap partition is used when the system is running low random access memory. At a certain percentage of fullness, Linux gradually begins to dump unused data into this file. Therefore, for this section, a volume half as large as the size of your RAM is suitable. But if you plan to use sleep mode or hibernation, then you need to allocate an amount of disk space equal to the size of the RAM for the swap partition, because in these modes the entire contents of the computer's RAM are transferred to disk. The home section is the section with your files, movies, music, downloads. Estimate how much you need.
Preparing a Disk in Windows
To install Linux next to Windows 10 already in use, you will need to “cut off” space from the system disk. Therefore, before taking decisive action, it is important to create a backup copy of the system or at least important files. If everything goes well, nothing bad will happen to either the files or the system, but due to some failure, such as a power outage, the file system may be damaged. You yourself, through inattention, can do something wrong and delete something that is not necessary.
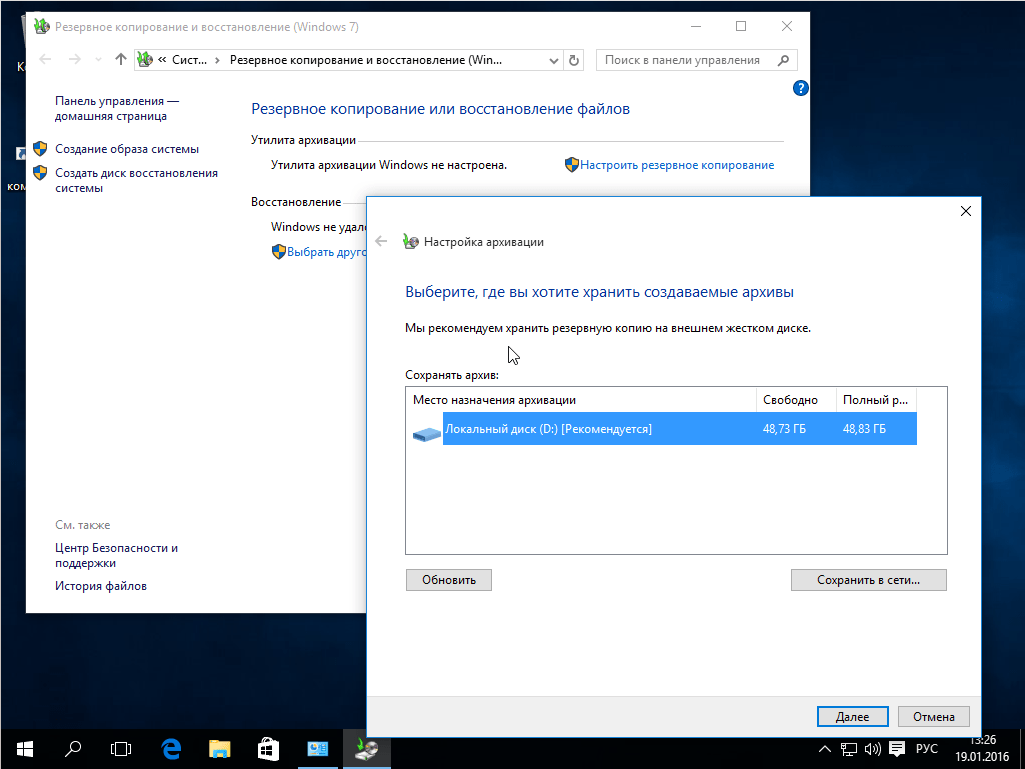
Therefore, if you work with the system disk, copy important files to external media, and, if possible, create a backup copy of the operating system using the appropriate control panel item:
When working with a non-system partition, for example, D, E, F etc., just copy the files from there.
Now we proceed directly to preparing the disk for installing Windows 10 and Linux. The easiest way to do this is using the standard Windows Disk Management utility. Right-click on the " This computer"on the desktop and open the item" Control":


Here at the bottom of the window we see two drives: C (system) and D (regular). I will give an example of how to resize drive D. For drive C, all steps are similar.
Right-click on the desired drive and select the option Shrink Volume:

A window like this will open in which you need to enter the size of the volume to be created in the field size of compressible space:

Please note that you cannot specify a size greater than the amount of free disk space. So make room first if you haven't already. Click on the button compress. After this, unallocated space will appear, from which you can create the necessary partitions:

That's all. Now you have a place to install Linux next to Windows 10. I see no point in further partitioning the disk in the Windows utility, since we have already done all the dangerous operations that could damage the system, and it is best to configure partitions for Linux using Linux tools.
Preparing a Disk in Linux
This is not the next step in installing Linux along with Windows 10. It is Alternative option disk partitioning without using Windows. If for some reason you do not want to use the standard Windows utility to allocate the required space, this can also be done using any LiveCD Linux distribution with preinstalled program to manage Gparted disks. For example, the same Ubuntu.

Boot from the Ubuntu disk, in the Dash search type Gparted:

The following program window for disk management in Linux will open:

It is important to note here that disk partitions in Linux are named differently than in Windows. Here, drives are simply addresses of files in the dev virtual filesystem. Later you will understand what this is, but for now the only important thing is that the name of each partition begins with /dev/sd. Next comes the letter indicating the physical disk (sda, sdb, sdc, sdd, and so on). Behind it is a number that indicates the partition number on the disk, for example: sda1, sda2.
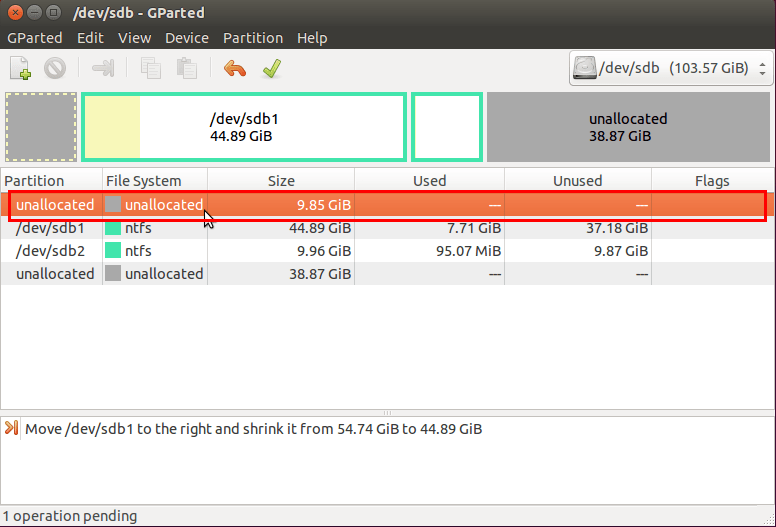
In the utility window, in addition to the disk partition name, we can see file system, size and free place on disk. Now, based on the size and file system, we can understand which disk our system is located on.
In my example, /dev/sdb1 is the C drive in Windows, and /dev/sdb2 is the D drive. We will do the same as in the previous example. Let's reduce the size of the /dev/sdb2 (D) partition to 10 Gigabytes so that we can install Linux on Windows 10 using the freed up space. To do this, right-click on the partition and select Resize/Move:

In the window that opens, you can enter the desired size manually in the field New size or use the slider:

Then click the button Resize/Move.

As you can see, free space has appeared, but there are no real changes on the disk yet. In order to burn everything to disk, click the green checkmark, or in the menu Edit select item Apply All Operations:

The file system resizing process may take a little time:

Now you can see that the /dev/sdb2 partition has shrunk and there is free space:
For the system partition, the operations are the same, only there is one note: do not touch the beginning of the partition. You can safely reduce the size of a partition by adding free space after it, but don't try to do it before it, like this:
There is no need to do this, otherwise the Windows bootloader will be damaged; it is very easy to restore, but I think there is no need for you to solve these problems at the very beginning of your acquaintance with Linux.
We will not create partitions for Linux here either; it is better to do all this during installation, using a utility specially designed for this.
Installing Linux next to Windows 10
I will not consider in detail here how to install Linux; all this has already been discussed in detail in my articles separately for different distributions. Let's look at just a few aspects of disk layout. Let's take Ubuntu as the most popular OS for beginners, but in other distributions everything is almost the same.
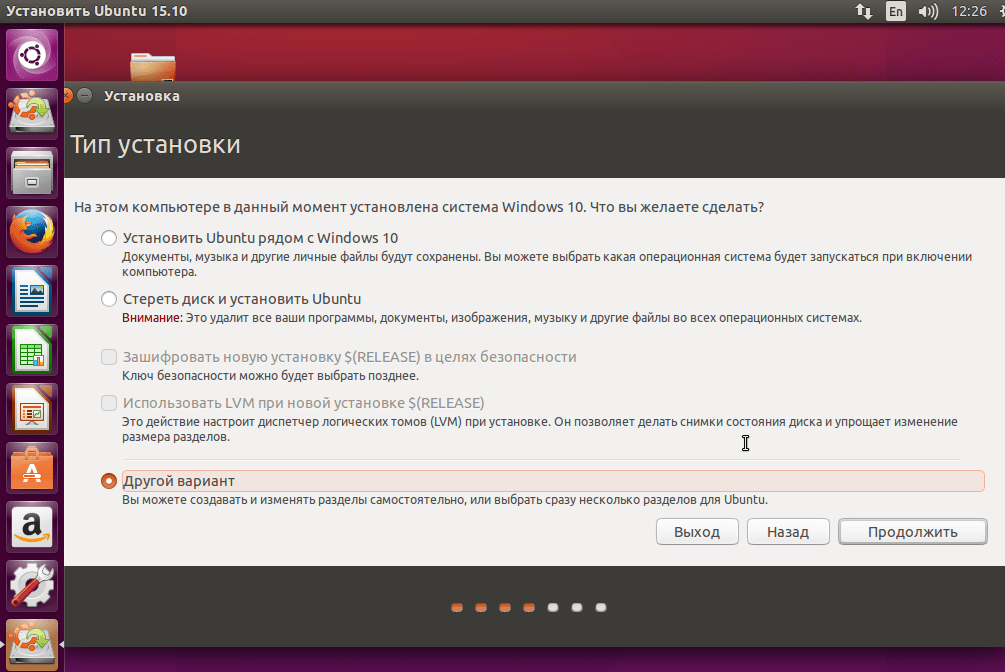
At the stage of choosing a marking method, I recommend choosing the manual option. Because this way you will better understand how to install the system:
Here, from the previously freed space, you create those sections that we talked about at the very beginning of the article. For the root partition the mount point must be /, for the home partition - /home, and for the swap partition the mount point must not be specified.
Installing Linux next to Windows 10 UEFI
All modern laptops released with Windows 8, 8.1, 10 use UEFI technology. This is a new progressive technology that has replaced outdated BIOS. The first important and most noticeable change is the use of a GPT partition table instead of the legacy MBR, as well as the creation of a separate disk partition for operating system bootloaders. Many users are afraid that UEFI will make it more difficult to install Linux with Windows 10 on their laptop. And in vain - in most cases there is nothing complicated. If you already have Windows installed, then most likely efi section has already been created, and during disk partitioning you just need to select it to install the bootloader. The efi partition is usually created with the fat32 file system and takes up about 30 Megabytes of memory:

If you have a clean hard drive, you need to create a GPT partition table. This can be done using the same Gparted by opening the menu Devices ->Create Partition Table:


Then we specify this partition during the installation of Linux along with windows 10; for it you need to specify the mount point /boot/EFI. That's all the difficulties with installation in UEFI. In general, installation in UEFI is supported by all distributions running in Grub2.
Completing the installation
Many new users are interested in: “How can I boot my Windows later?” Don't worry, Grub will automatically find the Windows boot loader and offer you a menu where you can select your operating system before starting your computer:

This way, dual booting Windows 10 and Linux will be set up automatically.
If something doesn't go according to plan, although it's unlikely to happen, everything is very easy to adjust. So, if done correctly, you will definitely have access to your Windows after installing Linux.
conclusions
Today we looked at how to install Linux on Windows 10. We figured out how to partition, how to select partitions, and what to do if your laptop uses UEFI. There is no point in talking about installing any specific Linux distribution along with Windows 10, since, firstly, all the steps are similar, and secondly, you can find detailed instructions in the relevant articles. I would also like to note: for a comfortable Windows operation 10 with Linux on the same computer, you need to disable Windows FastBoot, otherwise you won't be able to . If you have any questions, ask in the comments!
Many people are faced with the need to have two operating systems at once: Windows and Linux, and decide to install both OSes on their computer. However, when installing Linux next to Windows 10, you may encounter unexpected problems and conflicts. Let's see how to deal with them for versions of Ubuntu, Mint, Kali, Kubuntu, Rosa, Archlinux
Preparing for installation
Before installing Linux, you need to prepare for its installation. Allocate some unallocated disk space, prepare a boot disk (or flash drive) for installation, check if some features are disabled in the BIOS. Before proceeding with the actual installation, let's figure out what needs to be done first.
Allocating disk space
The first thing that is required before installing any alternative operating system is to allocate disk space for it. By default, all disk space is used by Windows and is not suitable for installing another OS (especially Linux, which generally uses a different file system). So, if you do not leave unallocated disk space for Linux, the system will not want to install.
This can be done either using Windows or through the Linux installer itself. Let's consider the first case for now, and return to the second at the moment of direct installation.
Before repartitioning the disk, you should create a system backup. This is done in paragraph “ Backup and restoration" panel Windows management. All you need is disk space where it will be stored. backup copy.
The item “System Backup and Restore” is located in the following path: “Start - Control Panel - System - Backup and Restore.”
Once the backup is created, you can get down to business.
- Go to the Disk Management Wizard. To do this, you need to either right-click on “Computer” and select “Manage” - “Disk Management”, or find the corresponding section in the control panel.
- To free up space for Linux, right-click on required disk and select the “Shrink volume” option.
- The window that appears will display the amount of space available for compression in megabytes and a field where you can specify the size of the new unallocated space. We focus on our needs: Linux system partition - at least 20 GB (the system as such takes up 7-20 GB, but you still need space for programs), best of all - 30-40; swap file partition - half as much as the amount of RAM in the computer (say, if you have 4 GB of RAM, then the swap partition will take 2 GB); a custom section where your files will be stored - based on your needs. Remember that 1 GB = 1024 MB. When calculating the freed up space, we proceed from this formula.
- After we click on the “Compress” button, the required number of unallocated gigabytes will “break off” from the disk. All. It is better to carry out further manipulations with disk space in the Linux installer. Close the wizard and move on to the next step.
Now you can proceed to creating boot disk or flash drives.
Media preparation
Traditionally, a CD is used to install the operating system, but recently it is often replaced with an installation flash drive (which is not surprising: a flash drive is much more convenient for further use). We will consider both options.
The first thing you need to do is download the image to install the OS. Linux - free system, and most of its distributions can be found in open access on the official website, for example, Ubuntu or Linux Mint (the most popular systems among beginners).
In the case of a disk, we just need to insert it into the drive and, when it appears in Windows, double-click on the disk icon to open the window for writing data to disk. Also, the “Burn disc” option may be present in the autorun of an empty disc. However, if you do not trust standard Windows tools, you can use third-party programs, for example, Nero or UltraISO.
In the case of a flash drive, everything is somewhat more complicated. Preparing the installation flash drive is carried out exclusively using third party programs. But in general there is nothing complicated either. Let's look at recording using the UltraISO program as an example.
- First, open (“File” - “Open”) the system image that we need.
- Now go to the “Boot” tab and select “Burn image” hard drive" In the window that opens, select our flash drive. The flash drive must be pre-formatted, otherwise nothing will work.
- Select the USB-HDD+ recording method and click “Burn”.
- After the recording is complete, the flash drive can be used as an installation drive.
Video: burning an image to a disk or flash drive
How to install Linux next to Windows 10 (Ubuntu, Mint and other distributions)
Now that the space has been allocated and the image has been recorded on a flash drive, you can proceed to the actual installation.
The installation process looks different for different versions of Linux, but in general the principles for clean install(without using encryption and other bells and whistles) “simple” (not requiring kernel compilation and other manipulations) distributions are similar. Especially in places that involve installing next to Windows.
The pitfalls of this stage are largely related to the BIOS, in particular, with its new incarnation - UEFI, which often conflicts with classic (Legacy) devices. Most often, UEFI is installed on new computers and laptops with Windows 8 or Windows 10 preinstalled. Before you begin, you should make sure that the Secure Boot option is disabled in the BIOS. In some cases this may not be necessary, but it's better to be safe than sorry.
- First we boot from a flash drive or disk. To do this, you can use the BIOS or the special boot options menu (hold Shift and press “Start” - “Shutdown”, the “Special boot options” item will appear in the shutdown menu), where you need to select “Use device”.
- In the list of devices that appear, select the desired flash drive or disk. If it is not there, pay attention to the line “View other devices”.
- The computer will now reboot from the specified drive. The live version of the Linux system will open. You can run around it and see how it works, but the most important thing we need is the “Install” button. We press it.
- Depending on the distribution (Ubuntu, Mint, Kali, Kubuntu, etc.) the interface may vary, but in general the general principles are similar. Let's look at the installation using Ubuntu as the example of the most popular Linux system.
- At the very beginning of the installation, everything is simple: we select the language, time zone and layout that will be used in the system. There is nothing complicated here. But then it gets more interesting: Linux will ask which installation option to choose. It is best to choose a manual one: this way you can be sure that the automation will not make mistakes anywhere, and you will also practice yourself. But, if you don’t want to bother, you can choose the first option - “Install next to Windows”.
- The most interesting point is the disk layout: here you need to layout three partitions, which are used by default in Linux. We proceed to this step only if we chose manual marking in the previous step. The root partition (the one in which the system is installed) corresponds to the / mount point, the user partition corresponds to the /home point, and you don’t need to specify anything for the swap partition. The file system used by Ubuntu is called ext4 (some other distributions may require a different one, such as xfs for archlinux). We select it for the root and home partitions. For the swap partition we use the swap item. Select sizes as indicated above.
The root and home partitions use / and /home mount points and an ext4 file system, while the swap partition uses a swap system without mount points
- If you have UEFI, then some manuals recommend specifying the efi partition for the bootloader (which is used by default in Windows to boot from UEFI). Finding it when partitioning is not difficult: this partition will take up little space and use the fat32 file system or efi type. Otherwise, you may later encounter problems booting the system. However, a significant part of users recommend installing the bootloader directly on the media and do not encounter these problems.
- On some versions of Linux, installing the boot loader is located in the Advanced tab in this or one of the following steps.
- The simplest thing remains: specify the username, password, login settings (with or without password) and computer name. The system may offer you to import users from Windows, but it does not do this in the best way, so you should not agree. Once everything is specified, Linux will check whether you really want to use this particular configuration and begin the installation. Once the installation has started, you will no longer be able to change its settings.
- Now all that remains is to wait for the OS to install. Some versions of Linux show short manuals to the user during installation, so if you are unsure, you can read them while the system is installed on your computer.
In general, there is nothing difficult to install. There are also alternative methods, but they are more complex to implement and require solid technical knowledge.
In the case of a virtual machine, the installation principle is the same, but compatibility problems with Windows practically disappear: the virtual system is isolated, it does not need to compete with Windows boot loader. To install the OS on a virtual machine, you do not need an installation flash drive or disk: only a system image and any software for virtual systems(For example, Oracle VirtualBox or VMware Workstation). To virtual machine worked, you definitely need to check that virtualization is enabled in the BIOS. Otherwise, working with the virtual OS will be impossible.
Video: Installing Linux with Windows 10 UEFI
How to go back to Windows 10 on boot
Many users have difficulty setting up the bootloader: how to make it so that they can select the system? The answer is simple: set the system boot priority in the BIOS. The Linux bootloader should be enabled by default. Why is that? Linux's built-in boot loader, called Grub, recognizes Windows system and can redirect the download to it, and in reverse side this does not work.
If everything went well, the next time you boot your computer, the Grub boot loader menu will appear, where you can select the system to boot: both Linux and Windows.
So, there is nothing particularly difficult about installing Linux OS next to Windows 10. The main thing is to be attentive and careful: the slightest mistakes will not lead to problems. Install systems properly and do not forget about backups.
Kali Linux is a distribution that is becoming more popular every day. In view of this, there are more and more users who want to install it, but not everyone knows how to do it. This article will outline step-by-step instruction on installing Kali Linux on PC.
To install the operating system, you will need a flash drive with a capacity of 4 GB or more. The Kali Linux image will be written to it, and as a result the computer will be launched from it. If you have a drive, then you can proceed to the step-by-step instructions.
First you need to download the operating system image. It is best to do this from the official website of the developer, since that is where the distribution of the latest version is located.
On the page that opens, you can determine not only the method of downloading the OS (Torrent or HTTP), but also its version. You have the choice of either a 32-bit or 64-bit system. Among other things, it is possible at this stage to select the desktop environment.

Once you have decided on all the variables, start downloading Kali Linux on your computer.
Step 2: Write the image to a USB flash drive
Installing Kali Linux is best done from a flash drive, so first you need to write a system image to it. On our website you can find out step by step guide on this topic.
Step 3: Start PC from USB flash drive
Once the flash drive with the system image is ready, do not rush to remove it from USB port, the next step is to boot the computer from it. This process will seem quite complicated for the average user, so it is recommended that you first familiarize yourself with the relevant material.
Step 4: Start installation
As soon as you boot from the flash drive, a menu will appear on the monitor. Here you need to select the installation method for Kali Linux. Below we will present the installation with GUI support, since this method will be the most understandable for most users.
- IN « Boot menu» installer select item "Graphical install" and press Enter.
- Select your language from the list that appears. It is recommended to select Russian, as this will affect not only the language of the installer itself, but also the localization of the system.
- Select your location to have the time zone determined automatically.

Note: if you do not find the desired country in the list, select the “other” line to display a complete list of countries in the world.
- Select a layout from the list that will be standard in the system.

Note: it is recommended to install the English layout; in some cases, due to the choice of Russian, it is impossible to fill in the required input fields. After complete installation system, you can add a new layout.
- Select hotkeys that will be used to switch between keyboard layouts.
- Wait until the system settings are completed.


Depending on the power of your computer, this process may take a long time. Once completed, you will need to create a user profile.
Step 5: Create a User Profile
A user profile is created as follows:

After entering all the data, the program for HDD or SSD partitioning will begin loading.
Step 6: Partitioning the Drives
Marking can be done in several ways: in automatic mode and manually. These options will now be discussed in detail.
Automatic marking method
The main thing you should know is that if you partition the disk automatically, you will lose all the data on the drive. Therefore, if there are important files on it, move them to another drive, such as Flash, or put them in cloud storage.
So, to mark up automatically, you need to do the following:
- Select the automatic method from the menu.
- After that, select the disk that you are going to partition. There is only one in the example.
- Next, determine the layout option.

By selecting “All files in one section (recommended for beginners)”, you will create only two partitions: the root and the swap partition. This method is recommended for those users who install the system for evaluation, since such an OS has a weak level of protection. You can also choose the second option − "Separate partition for /home". In this case, in addition to the two sections listed above, another section will be created "/home", where all user files will be stored. The level of protection with this marking is higher. But it still does not provide maximum security. If you choose "Separate partitions for /home, /var and /tmp", then two more partitions will be created for individual system files. This way, the markup structure will provide maximum protection.
- After the layout option is selected, the installer will show the structure itself. At this stage, you can make edits: change the size of the partition, add a new one, change its type and location. But you should not perform all of the above operations if you are unfamiliar with the process of performing them, otherwise you can only make things worse.
- Once you have reviewed the markup or made any necessary edits, select the last line and click "Continue".
- Now you will be provided with a report with all the changes made to the markup. If you don’t notice anything unnecessary, then click on the item "Yes" and press the button "Continue".


Manual marking method
The manual markup method differs favorably from the automatic one in that it allows you to create as many sections as you wish. It is also possible to save all information on the disk, leaving previously created partitions untouched. By the way, in this way you can install Kali Linux next to Windows, and when you start your computer, select the required operating system to boot.
First you need to go to the partition table.

Now you can move on to creating new sections, but first you need to decide on their number and type. There will now be three markup options:
Low security markup:
Medium security markings:
Marking with maximum security level:
All you have to do is choose the optimal markup for yourself and proceed directly to it. It is carried out as follows:
- Double click on a line "Free place".
- Select "Create a new section".
- Enter the amount of memory that will be allocated for the created partition. You can see the recommended volume in one of the tables above.
- Select the type of partition to be created.
- Specify the area of space in which the new partition will be located.

Note: if you previously selected the logical partition type, this step will be skipped.
- Now you need to set all the necessary parameters, referring to the above table.
- Double-click the left mouse button on the line “Setting up the partition is complete”.

![]()


Using these instructions, partition the disk with the appropriate security level, then click the button “Finish partitioning and write changes to disk”.

As a result, you will be provided with a report with all the previously made changes. If you do not see any differences with your actions, select "Yes". Next, the installation of the basic component will begin. future system. This process is quite long.

By the way, you can mark up a Flash drive in the same way; accordingly, in this case, Kali Linux will be installed on the USB flash drive.
Step 7: Complete installation
Once the base system is installed, you need to do some more settings:
- If your computer is connected to the Internet when installing the OS, select "Yes", otherwise - "No".
- Specify a proxy server if you have one. If not, skip this step by clicking "Continue".
- Wait while additional software downloads and installs.
- Install GRUB by selecting "Yes" and pressing "Continue".
- Select the drive where GRUB will be installed.

Important: the system boot loader must be installed on that HDD, where the operating system will be located. If there is only one disk, then it is designated as “/dev/sda”.
- Wait until all remaining packages are installed on the system.
- In the last window you will be notified that the system has been successfully installed. Remove the flash drive from the computer and press the button "Continue".


After all the steps have been completed, your computer will restart, then a menu will appear on the screen where you will need to enter your username and password. Please note that entry is under account superuser, that is, you need to use the name "root".

Finally, enter the password you created when installing the system. Here you can determine the desktop environment by clicking on the gear that is located next to the button "Entrance", and selecting the desired one from the list that appears.

Conclusion
After completing each step of the instructions, you will eventually be taken to the desktop of the Kali Linux operating system and can start working on your computer.


