Changing the Windows 10 PIN code. How to set a password on a SIM card and why it is needed. How to remove a PIN code from an MTS SIM card
As we all know, Microsoft has combined all its services into one single account, which has greatly simplified the work with applications, programs and services for many of us.
Today, in order to log into the system, read incoming letters, upload a file to the OneDrive cloud storage and even log into your Skype messenger account, you just need to remember one single login and password, with which the user has access to all the above and other proprietary “ Microsoft chips.
It would seem that all this is cool. In principle, this is how it is. However, there is one huge disadvantage, especially one that terribly infuriates those people who have a long and rather complex password for their Microsoft account.
And it really infuriates you when the computer/laptop/tablet turns on or comes out of sleep mode. After all, every time we turn on our workhorse, we have to enter a password.
There are two ways out of this situation. The first is to disable the password requirement. The second is based on entering a short PIN code consisting of numbers, instead of a long password.
But unfortunately, the first option is not suitable for everyone, and now I will try to briefly explain why. For example, I have a Surface RT tablet, a PC, and a netbook. They all work for G8. And when I leave home, I try not to leave the computer on, because someone else might be using it. There was once a case when my nephews came to me (and I didn’t have a password), then they clicked on me with anything, deleted information that was extremely important to me, and much more. I think many of you are familiar with this situation. About the same situation happened with the tablet. If you remove the password, then everyone can take and read, for example, my correspondence in various social networks. networks, because almost all the applications I use are on the start screen. Of course, I don’t want my correspondence to be read by third parties. Therefore, until now, all Windows devices used by many people had a password, which, frankly, I didn’t really want to enter every time, but I was forced to do it, just like you. But, a few days earlier, I learned that this could be avoided.
The second option is to replace the long password with a short PIN code. That is, if you set this PIN code, you will use it to log in to the system, and not your Microsoft account password. Now, I will try to explain and show in screenshots how to do this. The instructions are quite simple and will not take much of your time. It will take you literally a couple of minutes to do everything.
First of all, on the desktop of your device, call up the “Charm bar”, through which we will go to the parameters (you can do this differently).
Then, on the left we will see a small menu, here you need to select the item called “Accounts”.

In the next step, you will need to select the “Login Options” tab.


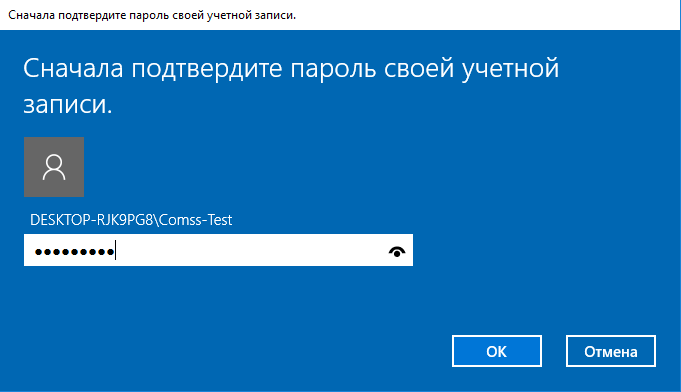
After this, a window will appear in which you will need to enter the existing password for your MS account in the appropriate line. Done? Great.

Once you have entered your password correctly, a window will appear asking you to enter your PIN. Enter the PIN twice and click the “Done” button. Just make sure you don't forget it.

Great, as we can see, the PIN code for logging into the system has been set successfully (this is evidenced by the buttons: Change and Delete).

Now let's check if it works. To do this, go to the start screen, you know how to do this without me. In the upper right corner we find our nickname/name, which is located next to the avatar, click and see a small drop-down menu. Click the "Exit" button, but before you do this, you will need to close and also save everything open documents. So, click “Logout”, you log out of the system as usual.

Now, we will need to log in again (most likely, after logging out you will see a background image, as well as the time and date), press any button, after which your avatar should appear, as well as the line in which you previously entered the password, but Now instead of a password you are asked to enter a PIN code. Enter the pin you set and return to the system.

As you can see, everything is very simple. I hope mine brief instructions on how to set a PIN code in Windows 8.x will be useful to you.
In progress Windows installations 10 on the computer you are voluntarily/forced to come up with a PIN code to log into your account. You won't be able to skip or ignore this setup step, but luckily, you can remove that annoying pin code later. Although I would not recommend leaving your computer unprotected if you have any important data stored there. But this is a completely separate topic, and today we will find out how to remove PIN and password in Windows 10.
How to remove PIN code in Windows 10
You can, of course, remove the PIN code in Windows 10 different ways(although not a fact, I just don’t rule it out). But I'll show you how I did it. You should like this method because it is simple and straightforward.
However, it is worth reminding you once again that by removing the PIN code from your computer, you leave it practically defenseless. On the other hand, if you are sure that no one else except you will have access to it, then why not? But you can save a little time by not entering your PIN code every time you turn it on.
Step-by-step instructions on how to remove a PIN code inWindows 10:
We figured out the PIN code, but there is one more small nuance. Now Windows 10 will ask you for your account password at startup. And a password, by the way, is even less pleasant and time-consuming to enter than a PIN code. Therefore, next we will show you how to disable the password when logging in in Windows 10.
How to disable password in Windows 10
Before you disable your password in Windows 10, make sure you have it written down somewhere or remember it well. Because if you rarely use a password, you can easily forget it. And then, when you need it to confirm some settings changes in your Microsoft account, you will not be able to remember the password. Of course, it can be restored, but this is an extra hassle that no one likes.
Disable passwordWindows 10 when logging in:
- To get started, press Windows + R. In this case, Windows is the key on your keyboard with the Windows logo on it.
- In the window that appears, enter the phrase netplwiz to bring up the account settings item we need.
- Directly in the “User Accounts” settings window, uncheck the “Require username and password” checkbox.

Next, click OK and restart your computer to make sure everything is applied. Oh yes, I almost forgot, to apply these settings, you will need to enter your password two more times to confirm that you are the one currently controlling the computer.
Personally, everything worked out for me. I'm almost sure you do too. Now Windows 10 will not ask you to enter your password or PIN when you turn on your computer. If something went wrong for you, write in the comments below, we’ll try to figure it out. If you managed to mess up very badly, then use it to return your operating system to its previous state.
Did you read to the very end?
Was this article helpful?
Not really
What exactly did you not like? Was the article incomplete or false?
Write in comments and we promise to improve!

Friends, I personally don’t use the PIN code of SIM cards, because I don’t see the need for it, for ten years now. Modern smartphones, including Xiaomi smartphones, have fairly good protection, of course the phone, not the SIM card. But you must admit, once in the past it was the PIN code that was used to protect phones. On the other hand, I agree with those users who will tell me: “What to do when it is a bank SIM card, that is, a SIM card whose number is linked to bank accounts?” Then yes, you need to set a PIN code on the SIM card. But let's return to our question.
Video instruction
Just recently one of my friends asked me: “Listen, Andrey, how can I set the SIM card PIN code on my Xiaomi?” Of course, I didn’t refuse him and decided to help him deal with this issue. To be honest, at first this seemed like a very simple question to me. But when I picked up his phone and started looking for the SIM card settings to set a PIN, I realized that it was not so simple. That's exactly why I decided to write a short article on the topic: How to quickly remove or set the PIN code of a SIM card on Xiaomi smartphones Miui 9.
When I picked up the phone and started looking for the SIM card settings to set a PIN, I realized that it was not so simple
At first I thought that I would find all these settings in the “Sim cards and mobile networks“- it’s not even worth going there (here I realized that I haven’t used the PIN code for a very long time). Then I thought that I would definitely find this in the “Blocking and Protection” section, because there are all the settings related to the security of the smartphone. By the way, in this section you can set up fingerprints, as this is described in detail in our other article here. But, unfortunately, I didn’t find the necessary SIM card settings here either.
Only after some time (maybe 5 minutes, or maybe all 10 minutes) I managed to resolve this issue. Well, in order to remove or set the SIM card PIN code on Xiaomi Miui 9 smartphones, follow the instructions below!
Instructions for setting a PIN on a SIM card:
Unlock your smartphone and go to the settings menu - to do this, you need to pull the curtain down and press the gear-shaped button;
Next, you need to go down a little in the menu and click on the Advanced settings field;

In advanced settings, find Privacy - click;
It is in the Privacy section that you will find the necessary SIM card settings and set or remove the PIN code - scroll down a little and find SIM card lock;

I’ll add on my own behalf - before you do these or other actions, think carefully about whether you need to do this at all, because the security of your phone number and bank account (if an account is linked to this number) depends on this. If you have any difficulties, do not hesitate - ask questions in the comments below, and together we will try to solve your problem.
Stay tuned, there is still a lot of interesting things to come!
Data protection is important point for any user, especially if it concerns an account. Of course, with each subsequent authorization, entering a password will become slightly boring. But you shouldn’t neglect protection. Especially for users who are tired of this procedure, Microsoft has introduced a new option that allows you to set up protection via a PIN code.
Fans operating systems from the Windows company rated "ten" for innovative security features. Actually, the PIN code option has become one of the innovations latest version OS.
Today we will tell you how to set a PIN code in Windows 10 during authorization.
Naturally, a PIN code in a security context is far from ideal and can hardly be compared with security methods such as a fingerprint or a retinal scan, which are available in the “top ten” thanks to the Windows Hello service. Despite this, this method also has some advantages.
Why set a PIN? Feature Benefits
In particular, entering a PIN code is distinguished by its speed, and if unexpected guests are able to find out the treasured combination, only a specific PC will become available to them, and not all available devices. Thus, this PIN will not help the attacker to authenticate on other devices that are associated with the account. It’s another matter when an ill-wisher manages to compromise the password - then there will be access to absolutely all platforms that are tied to the password.
Another significant advantage of a PIN code is the need for the user to be present near the PC, since only in this case can the code be entered, which cannot be said about a password. In addition, if your device is stolen, the attacker will not be able to log into the system in any way, since he does not know the PIN.
It is worth noting that activating the PIN code function is necessary for users who wish to “open the door” to advanced security features. In particular, this applies to modern methods of protection that are provided by Windows service Hello.
Another small bonus of using a PIN is its ease of entry in devices that operate on touch screens.
Activating the PIN entry option
In general, the use of this function can be considered one of the most basic procedures in the system. It’s also just an option and it’s turned on. To do this, open the main menu of the system and select the “Settings” section, then go to the “Accounts” subsection. On the left side of the list of options, click on “Login Options.” On the right side of the screen, find the “PIN code” item and click the “Add” button.
After this, the system will ask you to confirm your identity by entering a password, then you can add a PIN code.
 If the user uses a Microsoft account, you must enter the appropriate password and click the “Login” button. Then a dialog box will appear, in the center of which there will be 2 fields for entering the PIN and confirming it.
 The system requires the use of a code whose minimum duration is 4 characters. These characters can be numbers in the range from 0 to 9 (and nothing else). But the maximum has no restrictions, so feel free to use your imagination, because you are worried about the safety of your device.
To check the entered combination, click on the icon located at the end of the second field with the code. For the amendments to take effect, complete the procedure by clicking the “OK” button.
As soon as you add it, in all cases when the system requires authorization, you will be able to use the installed PIN. It is worth remembering that loading safe mode involves authorization only through a password - other methods are not considered by the system.
You should also remember some nuances when typing the code. As already mentioned, there is no limit on the number of characters in the PIN, and this allows you to create such a combination that it will simply “break the devil’s head.” At the same time, this combination should be quick to use, since the use of the code will not have serious differences from abstruse passwords.
Under no circumstances enter banal codes in the format 1111 or 1234, since in this situation it is completely unclear whether such a code makes sense when the level of protection is minimal.
You should also avoid using PINs that are used in your bank accounts or credit cards. Also, don't use the same combination on different platforms.
Changing your PIN in Windows 10
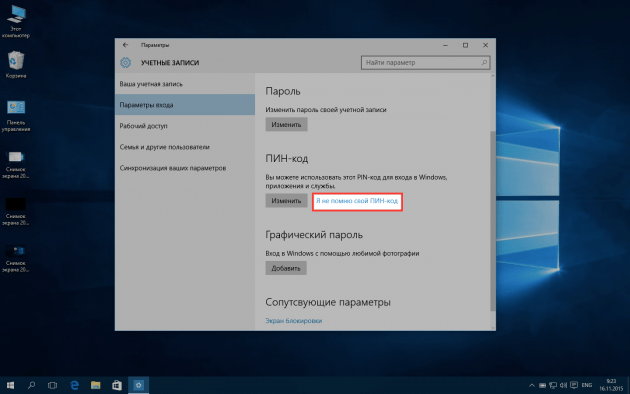
If you doubt the reliability of your combination, the code can be easily replaced. To do this, go to the same “Sign-in Options” section using the “Start” menu. Now you will see in front of you in the “PIN code” item, instead of the “Add” button, the “Change” button.
 Actually, after clicking it, you will be able to enter a more reliable combination in the “New PIN code” field and by typing it again in the “PIN code confirmation” field.
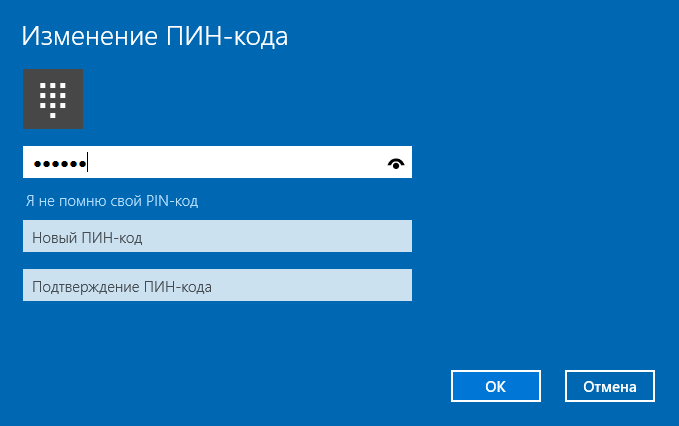 However, it often happens that the user has forgotten the code - and this happens. In such a situation, you need to reset the forgotten numbers. Fortunately, Microsoft employees foresaw this development of events. In general, it is easy to get out of this situation - log into your account using your password. Next, go to the mentioned “Login Options” section and in the “PIN code” item, next to the “Change” button, click on the link “I don’t remember my PIN code”.
 After this, you will need to enter the password again in order to confirm your identity and then the user can enter a new PIN.
 How to remove a PIN code on a computer?
In order to deactivate this function, You need to carry out the reset procedure. But in the window that appears to enter the code, instead of typing the PIN, just press the “Cancel” button.
As you can see, the PIN code in the “ten” represents a very strong and reliable protection, in addition, it is very convenient when typing. In principle, all the settings that concern the code are very simple and making changes requires only a few steps. In addition, our detailed instructions should not leave you with any questions on this topic.
If you have any questions about the topic "How to set a PIN code in Windows 10 during authorization?”, then you can ask them in the comments
1. To set a PIN code, you need to go to the panel and in the block Pin use the button Add.
2. Even before entering the PIN code, the user is asked to confirm his identity using a valid password.


3.1 If desired, you can use not only numbers, but also letters and symbols for the PIN code. To take advantage of this opportunity, just check the box next to the option Include letters and symbols.

3.2 There are some security rules in place for PIN codes that do not allow combinations to be set too simple. You can view their list by following this link PIN code requirements in the same window Setting up a PIN code. Organizations are given the opportunity to tighten these requirements at their discretion; in your case, they may differ.

Changing, deleting and resetting your PIN
1. If necessary, the PIN code can be changed or deleted at any time; the corresponding functions are available in the same panel Options → Accounts→ Login options → Pin, are called by buttons with self-explanatory names Change And Delete.

2. To change the PIN code, after pressing the button Change, you need to indicate the previous combination, enter and confirm the new one, and then apply the changes by clicking on the button OK.

2.1 You can change your PIN code without entering a previously used combination by using the reset function offered at the link I don't remember my PIN code in the panel Settings → Accounts → Sign-in options → Pin. In the window that opens, you just need to follow the instructions of the wizard. Resetting may result in loss of confidential data, after resetting you will need to re-enter games, applications, social media, access to which was limited by a PIN code.

3. To remove the PIN code after pressing the button Delete, you need to once again confirm your intention by clicking on the button of the same name again, and then enter a valid password confirming your identity.


