How to find out which driver is faulty. Using Driver Verifier to identify the problematic driver. Driver check and graphics drivers
The utility that we will describe today is called Driver Verifier and is included in all operating systems, including Windows XP. This program allows you to check and identify problematic ones that can greatly harm the system. The most famous problem is the blue screen of death.
Data about such drivers is recorded in a memory dump so that analyzes can be carried out later. So, the utility subjects drivers to so-called stress situations (tests), creating visual extreme conditions, for example, lack of memory, various locks, IRQL, IRP checks, DMA, etc., I/O control. In other words, extreme situations are simulated that should not occur during normal work with Windows, or they do not happen often. Thus, the utility allows you to identify drivers that can lead to a system crash.
As I already said, the utility is built into all versions of Windows and is located on the path %windir%\system32. The utility can also be used in two versions: command line and graphical interface.
So, in order to run the driver checker utility, you need to open the window "Run" type the following command:
| verifier |
A window opens with the necessary settings, in which we select the second item - "Create custom parameters" or "Create custom settings".
Now we need to sort the contents; to do this, click on the word at the top of the table Provider. Now you can select all drivers. By the way, you don’t have to choose drivers from Microsoft.
Now you can press the button Finish, after which you will be asked to reboot the system.
So, the reboot has completed, and now the system will boot in driver verification mode. The utility will run in the background, conducting various tests. You can calmly work at the computer until the utility finishes. After work, the information file will be saved in a memory dump. Such a file is usually located along the path: C:\Windows\Minidump\*.dmp. Now it can be analyzed, for example, using Windbg, or another similar program.
If within a few days it turns out that the problem has not recurred, then we can say that the problem is not in the drivers at all and you will have to look for the cause elsewhere. In the meantime, you can already disable driver verification mode. I want to say right away that this mode greatly slows down the system, therefore, it is not recommended to work with it often.
You can disable the utility like this: in the command line, enter the following command:
That's all. I hope this article helped you in solving your problems.
A faulty driver can cause many problems for your computer. The most common sign that drivers need updating is the Blue Screen of Death. Fortunately, this blue screen is shown to us by error codes and memory dumps, which allows us to identify the cause in a particular driver or device and update it or remove it. It becomes difficult when memory dumps and error codes do not help or the computer does not even show error codes but simply locks up the system. What to do in these cases?
Built into Windows system Driver Verifier designed to test drivers by placing additional stress on system drivers and stress tests to trigger a crash. This will help you identify bad drivers in Windows.
Preparing the system for checking Windows 10 drivers
Before turning on Driver Verifier, please note that drivers can lock you out of your own computer if you're not careful. Driver Verifier, when it detects a bad driver, will give you a blue screen; if there are several of them, then a load>load>crash cycle will form and you will not be able to start back into windows system to disable crash testing of system drivers. Therefore, we will be prepared for every firefighter, otherwise in our time the Russian “maybe it’ll give you a ride” is no longer working well. Before enabling driver verification, do one of the following:.
- Check that you can easily boot into Safe Mode without BIOS required. In ordinary words, the entrance to safe mode must be done using worker windows table. Hold Shift+reboot, press and hold the Shift button and click on reboot. Try another way, install the option through Windows.
- Create a system restore point while disabling antivirus products. Open Windows search and dial Creating a restore point, select from what is offered and follow the instructions given to you.
- Create for your computer to have command line access through options when using the recovery disk.
- You can or any other data that you are worried about.
- Be sure to read my crash test at the end of the article. He will help you in case of failure, which happened to me.
Activating the Windows Driver Verifier function
Before activating the drivers, make sure you read the section above on how to protect yourself from endless loading.
- Press Windows+R and type cmd to open Command Prompt.
Enter the following code into the command line:
- verifier

Specify the item (for program code).

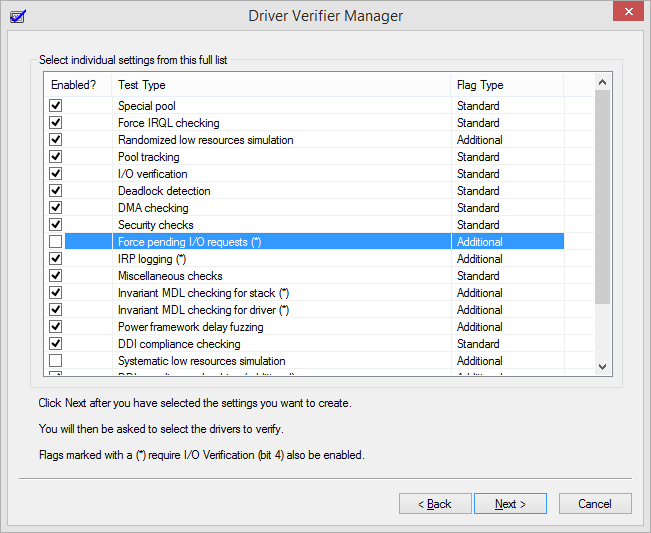
Select all options except "DDI compliance check" and "Random resource shortage emulation".


Click on the supplier column to sort. It is not necessary to select all drivers, only from other suppliers where there is no Microsoft Corporation inscription. If you are sure that the error is in any driver, then check all the boxes.

After all the settings, click Finish and you will be told that the check will be performed after the system reboots. If the checker gives you a blue screen, make a note of the error code, a memory dump, and restart your computer.
Once back in Windows, you can disable driver verification in one of the following ways:
- Log back in as you did through the command line and select remove existing settings.

Open a command prompt and enter the following code:

How to Fix Boot Loops with Blue Screen of Death
- I would like to note that I experienced a cyclic loading from faulty driver. There was no error or memory dump code listed, which is surprising to me.
- After 2-4 cyclic blue screen loading, the “system restore” option was automatically launched. In which I clicked "troubleshooting" > " Extra options" > "Boot Options" > "Restart". Once booted, select 4 or 5 to boot into Safe Mode. Disable Driver Verifier Manager as mentioned above.
- To avoid booting into Safe Mode, go to Troubleshooting > Advanced Options and COMMAND LINE. In which just enter the command verifier /bootmode resetonbootfail.
- Copy or take a photo to your mobile phone, before starting the driver check, all 3 above points. Don't forget to copy the link to the article just in case.
How to open a DMP file to view error analysis
- The test files are on the path C:\Windows\Minidump.
- You can open the DMP file format using
Indicates a system driver that is unlikely to be causing the problem (for example, win32k.sys). In this case, a serious analysis of the dump will be required, requiring very deep knowledge and experience in this area. However, you can check your drivers yourself using the operating system's built-in driver checker. Verifier.exe. Although it is covered in detail in the Microsoft knowledge base article Using the Driver Verifier to troubleshoot Windows driver problems, the material presented there is presented at a fairly advanced technical level. Below is short description actions that need to be taken to check drivers.
On this page
Getting started with the Driver Verifier
On the menu Start - Execute(or Start - Search) enter verifier and press Enter. The Driver Checker will launch. Select an item Create non-standard parameters (for program code) and press the button Further.
Select individual options from full list and press the button Further.

In the next step, check all the boxes except Simulating resource shortages and press the button Further.

In the next step, select Automatically select unsigned drivers and press the button Further. If no unsigned drivers are found, go to .
Unsigned drivers
If unsigned drivers are detected, you will see a list of them.

Drivers can belong to both devices and applications. Do not close the Driver Verifier window or click the Further Now.
Search for updated drivers
You need to check if there are updated drivers.
- If you see an application driver in the list, visit its manufacturer's website - the application may have been updated. If there is no updated version, you can try uninstalling the app (you can always reinstall it later). If critical errors stop, that was the cause.
- If you see a device driver in the list and are running Windows Vista, use the center Windows updates to search for new drivers. This method works well for Windows Vista because many device manufacturers partner with Microsoft to make their drivers available for download. using Windows Update. In Control Panel, select Windows Update and check for updates to your device driver. If the driver is found, install it.
- If Windows Update doesn't offer you new drivers, visit the device manufacturer's website. Perhaps new drivers are available there. If you are having problems finding drivers, please contact the forum on the site.
After updating an application or driver, close the Driver Verifier window. pressing a button Cancel(but not Further) . Restart your computer and continue using the operating system. If the critical error no longer occurs, you have resolved it by updating the driver.
Removing drivers
If new drivers cannot be found, try uninstalling the driver.
Attention! Removing drivers leads to device inoperability. After reboot at best operating system will install the appropriate driver from its own driver repository. If you are not sure whether to remove a particular driver, do not remove it.
In Device Manager ( Start - Search / Run - devmgmt.msc - OK) find the device, right-click on it and select from context menu paragraph Properties. Then go to the tab Driver and press the button Delete.
Checking for unsigned drivers
Attention! After checking unsigned drivers, the system may not boot (described below is how to act in such a situation).
If you do not want to remove the driver and/or want to check for unsigned drivers, in the Driver Verifier window, click Further. You will be prompted to select a physical disk.

Ready, then restart your computer. If after rebooting you see a blue screen with an error, the problematic driver has been identified - its name will be included in the error message. Restart your computer and enter safe mode by clicking F8 Start - Search / Run team verifier.exe /reset.
If the system boots in normal mode, the check for unsigned drivers is completed successfully - they are not the source of the problem. You can see a list of tested drivers by running verifier.exe .

Since unsigned drivers are not the cause of a fatal error, you need to check other drivers.
Custom driver check
If no unsigned drivers are found or checking them does not reveal any problems, you will have to perform a custom driver check. In this case, in the window shown below, select Select driver name from the list.

In the next step, you will be asked to select drivers to scan. Don't select all drivers at once, since checking them will take a lot of time and system resources.

Therefore, the verification may have to be carried out in several stages. The step-by-step sequence for selecting drivers could be as follows:
- Recently updated drivers or those that typically cause problems (drivers antivirus programs, firewalls, virtual disks).
- Drivers not supplied by Microsoft.
- Group of 10 - 15 drivers at a time.
Select the drive on which the operating system is installed and click Ready, then restart your computer.
Attention! After checking the drivers, the system may not boot (described below is how to act in such a situation).
If after rebooting you see a blue screen with an error, the problematic driver has been identified - its name will be included in the error message. Restart your computer and enter safe mode by clicking F8 while loading. After logging in, reset all driver verification settings by entering Start - Search / Run team verifier.exe /reset.
If the system boots in normal mode, the check of the selected drivers was completed successfully - they are not the source of the problem. You can see a list of tested drivers by running verifier.exe and selecting the item in the first step Display information about currently verified drivers.
Now select the next driver group and check again.
All drivers have been checked - what next?
If the check of all drivers was successful, I have to take my hat off to your patience and perseverance. Most likely, drivers are not the cause of the critical error occurring on your system. It is possible that the problem lies in the hardware of your computer - for example, a faulty hard drive or random access memory, or the power supply has insufficient power to ensure the operation of all devices. There may be other hardware problems that also cannot be identified by checking the drivers.
So, you have a recurring blue screen of death, and like many BSoDs, it's because a bad driver is to blame. However, the screen does not give you the correct information, either because it does not contain any driver at all, or because it lists a system driver that is acting as false.
Driver Verifier is a free utility included in all versions of Windows from Windows XP. It literally checks each of the drivers on your PC until it encounters the issue that is causing the problem, intentionally creating the same blue screen but then writing the information to a log file to help you identify the problem.
Launch Driver Driver
If you're experiencing the same blue screen frequently and you'd like to get proactive and fix it, here's how to use Driver Verifier.
- Click the button Start
- Click " Execute"...
- Enter CMD and press Enter.
- In the new window, enter verifier and press Enter.

On Windows Vista and 7:
- Click the button Start
- Enter CMD in the field and click Enter.
- In the new window, enter verifier and press Enter.

On Windows 8 and 8.1:
- Press the key Windows + X
- Click " Command line"("Administrator") (Windows PowerShell (Admin) in Windows 8.1)
- In the new window, enter verifier and press Enter.

All Windows versions:
- Make sure it's selected setting up user settings (for code developers) .
- Click " Further" .
- Select " Choose individual settings» from the full list .
- Click " Further" .
- Deselect low resource system modeling And standby I/O requests. (These two cause unnecessary workload on your PC.) Make sure everything else is selected.
- Double tap " Further" .
- Select " Select driver names" in the list .
- Click " Further" .
- Select all drivers on this screen except those that say Microsoft Corporation under Supplier. It is very unlikely that a Microsoft driver is causing this problem.
- Click " Ready" .
Note. If you can't complete the above steps because the blue screen keeps happening, try booting to .
At this point, you must restart your computer. Then try causing the BSoD again by doing what you did before. Windows adds extra workload to your drivers to help you. If you can't reproduce the BSoD, try running your computer overnight. Once the BSoD appears again, reboot your computer and read the Minidump file.

Reading a dump file
The Verifier driver will launch, blue screen, and write a log file. This log file is located in C:\Windows\Minidump\. Read it and you will see which driver is causing this problem. Try searching for the driver name to see what piece of hardware your PC uses.
So how do you read it? You need a debugging tool, which you can download from Microsoft.
A . Download the SDK, install it, select debugging tools, and deselect everything else.
Please note that debugging tools for previous Windows versions no longer available; you will have to send the dump file to a Microsoft technician for analysis.

After installing it, find it on the startup screen. It's called windbg (x64). Launch it.
- Click " File", then " Open failure" .
- Switch to C:\Windows\Minidump\ and open the .DMP file contained inside.
- Look at the bottom of the resulting file where the line says " Probably caused". This is a good indication of which driver is causing this problem.
Fix driver
Update the driver associated with this hardware:
- Click the button Start
- Click Control Panel
- Click " Switch to classic view"
- Double click system
- Go to "Hardware" tab
- Click device Manager
- Click " Update driver."
On Windows Vista and 7:
- Click the button Start
- Click Control Panel
- Double click device Manager
- Find the device causing the problem
- Right click on it
- Click " Update driver."

On Windows 8 and 8.1:
- Press the key Windows + X
- Click Control Panel
- Browse by small icons
- Click device Manager
- Find the device causing the problem
- Right click on it
- Click " Update driver."
Or use our application so as not to be confused with Driver Verifier. Driver Reviver automatically updates all existing drivers on your PC and is especially good at updating underperforming drivers like this one to the latest and greatest version.
After fixing the driver issue, you will want to disable Driver Verifier.
Disable driver verifier
Once you are done using Driver Verifier, you will want to disable it as it is quite hard on your PC while it is running.
On all versions of Windows:
- Re-run Driver Verifier using the steps above.
- Select " Delete existing settings" .
- Click " Ready" .
- Restart your computer again.

Bookmark this article for future reference so that whenever you have a blue screen, you can fix the problem. Also, check out our interactive and enter your bug name to get additional tips to solve your specific blue screen of death. Good luck!
8022One of the most likely causes of a blue screen of death is incorrect drivers. You can determine the exact cause of the failure by analyzing the dump file after BSOD, but this does not always happen. In some cases, it is not possible to determine the source of the problem even with the most thorough analysis of dumps. In such situations, it can help - standard Windows utility, designed for advanced driver testing.
Working in background, it not only monitors the operation of drivers, but also simulates various "stressful" situations, for example, lack of RAM. Information obtained during testing "is being added" to dump file DMP. Driver Verifier allows you to analyze I/O errors, monitor buffer overflows, and identify errors in the mechanism IRQL and so on. In short, the program allows you to identify situations in which the driver can cause the system to crash with BSOD.
The specificity of the utility does not at all preclude its use by ordinary users. Anyone can create a report with it, but deciphering it is a completely different matter. But no one demands this from ordinary users; as for the resulting dump, its analysis can be entrusted to the shoulders of professionals by turning to some well-known computer forum for help.
Important Note: It is strongly recommended before using the utility create a system restore point or full backup copy. In Windows 8 and 8.1 you will also need to activate the mode secure boot. This is necessary in case unexpected errors occur during the operation of Driver Verifier. This will allow you to boot, disable testing mode, and perform a system rollback.
You can run the utility with the command verifier.


In the next Manager window, select the parameters by which testing will be performed (for completeness, you can select all).

In the third window you don't have to change anything.

In the fourth window, the utility will prompt you to select a group of drivers for testing.

By default, all unsigned drivers are selected as being at risk, but you can also specify drivers yourself by checking them in the fifth window of the Scan Manager.


This is all. After restarting the computer, the driver verification mode will be activated. All this time, the computer can be used as usual, until the moment when BSOD. After that, copy the dump file from the directory C:/Windows/Minidump and send it for analysis. It may take a little longer to boot your PC with Driver Test Mode enabled, so don't be alarmed. This is normal. After receiving all the data, debugging mode must be disabled manually by selecting graphical interface utility item "Delete existing settings".


