How to change your desktop wallpaper in Windows. How to change desktop wallpaper in Windows Expanding desktop functionality
Hello!
Every computer user (especially the female half :)) tries to give their Windows originality and customize it for themselves. It's no secret that not everyone likes the basic settings, and besides, they can even slow down your PC if it is not particularly powerful (by the way, such effects include the same Aero).
Other users want to disable various graphical bells and whistles, because... we’re simply not used to them (after all, all this didn’t exist in Windows 2000 and XP before. I, for example, am generally quite ascetic about this, but I have to help other users...).
So, let's try to change the appearance of the seven a little...
How to change the theme?
Where can you find a lot of new topics? At the office Microsoft website has a sea of them: https://support.microsoft.com/ru-ru/help/13768/windows-desktop-themes
Theme - in Windows 7, the theme refers to everything that you see. For example, the picture on the desktop, window color, font size, mouse cursor, sounds, etc. In general, the entire display and sound accompaniment related to the chosen topic. A lot depends on it, which is why we’ll start setting up our OS with it.
In order to change the theme in Windows 7 you need to go to personalization settings. To do this, it is not necessary to go to the control panel; you can simply right-click anywhere on the desktop and select “personalization” from the menu (see Fig. 1).
There are quite a lot of other topics on the Internet, just above under the title of this subsection of the article I provided a link to the office. Microsoft website.
By the way, important point! Some themes may even cause your computer to slow down. For example, themes without the Aero effect (which I talked about here:) run faster (usually) and require lower computer performance.
How to change the background, wallpaper on your desktop?
Large selection of ready-made wallpapers: https://support.microsoft.com/en-us/help/17780/featured-wallpapers
The background (or wallpaper) is what you see on your desktop, i.e. background picture. This picture has a very big influence on the design. For example, even the taskbar bar changes its color depending on what picture was selected for the wallpaper.
To change the standard background, go to personalization (note: right click on the desktop, see above), then at the very bottom there will be a link “” - click it (see Fig. 3)!
By the way, the background on the desktop may be displayed differently, for example, there may be black stripes along the edges. This happens because your screen has a resolution (more about this here -). Those. roughly speaking, a certain size in pixels. When it doesn't match, then these black stripes are formed.
But Windows 7 may try to stretch the picture to fit your screen (see Fig. 4 - the lowest red arrow: “Fill”). True, in this case, the picture may lose its entertainment value...
How to change the size of icons on the Desktop?
Change icon size- very simple! To do this, right-click anywhere on the desktop, then select the “view” menu, then select from the list: large, medium, small (see Fig. 5).
How to change the sound design?
To do this you need to open in control panels Personalization tab, and then select Sounds.
Here you can change the usual soundtrack to various others: landscape, festival, heritage, or turn it off altogether.
How to change the screensaver?
We also go to the personalization tab (note: right-click anywhere on the desktop), select the screensaver item below.
How to change screen resolution?
Option #1
Sometimes you need to change screen resolutions, for example, if the game slows down and you need to launch it with lower parameters; or check the operation of a program, etc. To do this, right-click on the desktop, and then select screen resolution from the pop-up menu.
Option No. 2
Another way to change the screen resolution is to configure it in video drivers (AMD, Nvidia, IntelHD - all manufacturers support this option). Below, I will show how this is done in ItelHD drivers.
First you need to right-click on the desktop and select “Graphic characteristics” in the pop-up menu (see Fig. 12). You can also find the video driver icon and go to its settings in the tray, next to the clock.
Rice. 12. Graphic characteristics
Rice. 13. Resolution, display section
How to change and customize the START menu?
To customize the START menu and taskbar, right-click on the "START" button in the lower left corner of the screen, then select the properties tab. You will be taken to the settings: in the first tab you can configure the taskbar, in the second - START.
It probably doesn’t make much sense to describe every checkbox in the settings. It’s best to set it up experimentally: if you don’t know what the checkbox means, turn it on and see the result (then change again - look, at random you will find what you need :))..
Setting up showing hidden files and folders
Here, it is best to enable the display of hidden files and folders in Explorer (many beginners get lost and don’t know how to do this), as well as showing file extensions of any file types (this will help avoid some types of viruses that disguise themselves as other types of files).
This will also allow you to know for sure what kind of file you want to open, and also save time when searching for some folders (some of which are hidden).
To enable display, go to control Panel, then to the tab design and personalization. Next, look for the link “ Show hidden files and folders"(in the Explorer settings section) - open it (Fig. 17).
- uncheck the box next to “ hide extensions for registered file types«;
- move the slider to “show hidden files, folders and disks" (see Fig. 18).
Desktop gadgets
Gadgets are small information windows on the desktop. They can notify you about the weather, about incoming email messages, show the time/date, exchange rates, various puzzles, slides, CPU load indicators, etc.
You can use the gadgets installed in the system: go to control Panel, enter “gadgets” into the search, then you just have to choose the one you like.
By the way, if the presented gadgets are not enough, then you can additionally download them on the Internet - there is even a special link for this under the list of gadgets (see Fig. 19).
Important note! A large number of active gadgets in the system can cause a decrease in computer performance, slowdowns and other delights. Remember that everything is good in moderation and do not clutter your desktop with unnecessary and unnecessary gadgets.
That's all for me. Good luck to everyone and bye!
After you have updated your device to Windows 10, the Desktop will open in front of you.
Some users simply don't know what to do now. Just calm down and consider everything. In Windows 10, everything is done so that you can work on it from the very first second. Applications from Microsoft, which I have already written about, will allow you to work on a computer.
I’ll tell you how to configure your device more efficiently.
Desktop personalization

It is unlikely that there will be many Windows users who do not change the interface design in any way. operating system- at least everyone probably changes the wallpaper on their desktop. We all want to see an interface tailored specifically to us. Windows 10 makes it easy to customize the appearance of your desktop. To access personalization settings, right-click on any free space desktop, and select Personalize from context menu. The personalization settings screen will open. You can also open it by walking the path Options - Personalization.

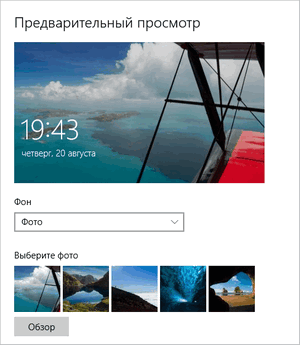
Clicking on the option Background, you will be able to change the desktop background. You can install standard Windows background 10 or select your own folder with images. I always choose my own photos, but sometimes I add extraneous images to them. If you have a large selection of desktop wallpapers, it is convenient to use them as a background in a slide show. To do this, you just need to select the “Slide Show” item in the “Background” drop-down list, and then specify the path to the folder with the image using the “Browse” button. You can also select a suitable position for images in a slide show, and of course set the frequency of their change.
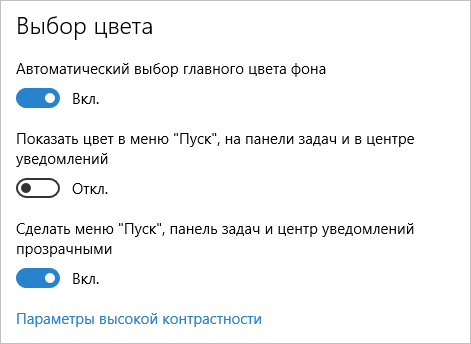
In chapter Colors you can easily change the background color. The Windows 10 interface is multi-colored, the background colors are rich, warm and with a varied palette. By changing the background color, you can automatically change the color of the Start menu and Action Center.

Chapter Lock screen will allow you to set a background screen that will greet you when you turn on your device. You can also set your own image here. To do this, just click on Review and any of your photos will be displayed on the Lock Screen.

Recently, there have been reports on the Internet that Microsoft has begun placing various types of advertising on the Lock Screen. It’s easy to disable it if you turn off the “ Display fun facts, jokes, tips, and more on your lock screen." Then advertising will no longer bother you. Below you can select the list of applications that will be displayed on the Lock Screen. For some, this is very convenient after using smartphones.
Chapter Themes will allow you to install, as you can probably guess, various themes on your Desktop.  Pressing Theme options you find yourself in Personalization, which you saw in Windows 7/8.1. Here Windows 10 themes are at your service, and you can also add your own. You will also find related settings options here.

How to find a cool theme for your desktop and lock screen?

If you want to find cool themes and backgrounds for your Desktop and Lock Screen, then it’s very easy to do if you click on Other topics on the Internet. You find yourself in Gallery personalization, where you will find a theme or background image for every taste and theme. They can be easily and without restrictions downloaded and installed on your device. For those who want to download without delving into the settings, here is a direct link: http://windows.microsoft.com/ru-ru/windows/themes?ocid=w8_client_themes. Let your device delight you with a beautiful theme.
How to customize the Start menu?
In Windows 10, the Start menu has reappeared, this time representing a mixture of the Start menu that was in Windows 7 and the Start screen in Windows 8. However, the absence of such a menu in previous version The OS was probably the most frequently cited flaw among users.
The new Start menu is very easy to understand. By default, the Start menu is a panel divided into two parts, where a list of frequently used applications is displayed on the left (by right-clicking on them you can prevent them from showing in this list).
There is also an item for accessing the “All applications” list, displaying all your programs, sorted alphabetically, items for opening Explorer (or, if you click on the arrow next to this item, for quick access to frequently used folders), settings, shutting down or restarting the computer.

In the upper right corner you will see your username, by clicking on which you can configure account, log out or block the computer.

On the right side there are active application tiles and shortcuts for launching programs, organized by groups. By right-clicking, you can change sizes, disable tile updates (that is, they will become static rather than active), remove them from the Start menu (the “Unpin from Start Screen” item), or delete the program itself that corresponds to the tile. By simply dragging the mouse, you can change the relative position of the tiles. You can also create application groups.

You can find the basic Start menu settings if you follow the path Settings-Personalization-Start or the old fashioned way, by right-clicking on the Desktop, in the section Personalization.
Here you can turn off the display of frequently used and recently used installed programs, as well as a list of transitions to them (opens by clicking on the arrow to the right of the program name in the list of frequently used ones). If you have a touch screen, you can enable the “ Open elementary screen V full screen mode", and the Start menu will look almost like the Start menu Windows screen 8.1, which can be convenient for touch screens.

You can also choose what you want to display in the Start menu. To do this, open the option “ Select, which folders will be displayed V menu Start" This will help you use the Start menu more efficiently. 
Don't forget to also choose the Start Menu display color to make it more consistent with your vision and make it more enjoyable to use. I personally am already tired of the dullness.

The Start button has also retained one feature from Windows 8.1. When you right-click on it, a menu familiar to users from the previous version of the operating system appears. I use it often because access to some settings through it is very accessible.

By the way, for those who did not like the new Start menu in Windows 10, it is possible to use free program Classic Shell, StartIsBack and other similar utilities to return exactly the same Start as it was in Windows 7.
Why the button “Search on the Internet and in Windows"?

The search field will be one of the first innovations you'll notice when you start using Windows 10. It lets you search both online and on your computer, and is located in the taskbar next to the Start menu, where we usually place shortcuts for quick access to folders, programs or disks.

I use this button often. Knowing the name of the program I need, I can easily find it without rummaging through the laptop settings.
I don’t deny the fact that some people don’t like this button. Either they don’t have enough space on the taskbar, or it annoys them, or their knees shake in front of Cortana, or their religion doesn’t allow them to use it? There is a way for them to hide this interesting button.

To do this, right-click on Taskbars, find Search and press Is hidden. The hated search button will disappear from the taskbar. If you want to return it, you will have to go the same way, but instead of the option Is hidden click on Show search icon or Show search field.
Why virtual desks in Windows 10?

The Windows 10 operating system is equipped by default with one very useful feature - the ability to support multiple virtual desktops. This function has been used for several years in Mac OS X, Linux and has proven itself very well.
What are virtual desktops for? To optimize the user experience or, more simply, for convenience and comfort. For example, when there is dense and intense work on a PC, many applications are often open: a calculator, a browser, Word document, media files, etc. In such cases, when several windows are open, it is easy to get confused when switching from one object to another.
With the help of virtual desktops, work can be organized more conveniently and productively. It's the same as if you had several computers and monitors at hand. One would have a browser and a Word document open, another would have a calculator and organizer, a third would have a media player, etc. By the way, an additional desktop is useful at work - to hide the contents from the authorities.
How to create them and how to use them? To organize your work with programs and windows according to certain areas and preferences, click on a special button in the “Taskbar”, which turns on the “Task View” mode.

Thumbnails of everyone will appear running applications, where you can select the required this moment program. In the lower right corner there is a “Create desktop” icon, clicking on which will create a new virtual desktop.

If you go into it, there will be no open applications there - as if you had just turned on the computer. Now you need to go to the first desktop, and drag from the shown thumbnails the necessary program to the second desktop. An option is when in the newly created desktop open the right application. Those. complete freedom of creativity. The number of desktops is unlimited. When you close each desktop, applications open on them are automatically moved to the adjacent desktop. The only thing missing is the ability to set a password on each desktop.
You can also configure what to show on the taskbar when opening virtual desks. To do this, open Settings-System-Multitasking.

Hotkeys for virtual tables
For those who want to switch between virtual tables more effectively and quickly, there is a set of hotkeys.
- Win+Tab– opens access to all working folders and applications
- Win+Ctrl+D– a new Windows desktop is created
- Win+Ctrl+F4– closes the current Windows desktop
- Win+Ctrl+left or right arrow– switching between Windows desktops
Using virtual desktops makes the user's work much easier. Perhaps not everything will be clear the first time, but once you understand the principle of operation, things will run ahead of you.
How to set up Action Center in Windows 10
In the new operating system from Microsoft, for the first time, a Notification Center appeared, familiar to everyone who has used modern smartphones for at least one day.
Using the Action Center in Windows 10, many system applications, as well as many other programs installed from the Windows Store, have the ability to display various notifications on the screen. Such information is distributed by display time, as well as by degree of importance, and is displayed in the lower right corner of the screen.

If you expand the Notification Center, then at the bottom you can see buttons for quickly enabling different modes and performing necessary actions. These panels can be edited and you can choose what you want to display. For this we will go the way Settings-System-Notifications and Actions and we choose what and where we will receive from the Notification Center.

If you still don’t need it or are simply tired of it, then you can turn it off. Ibid in Notifications and Actions There is an option “Turn system characters on and off”. Open it and simply turn off this function. You can completely disable the Notification Center, but this is done using the registry. In inexperienced hands, it may harm the operation of the device.

In conclusion, I would like to wish you pleasant work with your device. Customize it to your taste and preferences. Let working on your computer on Windows 10 bring you joy and a lot of positive emotions.
In the most popular operating systems - Windows 7 and Windows 10. The desktop background, or desktop wallpaper as it is also called, is an integral part of the operating system interface, determining its appearance and customizable by the user according to his preferences.
Initially, Windows 7 already has a small set of background images, from which you can select the one you need and set it as wallpaper on your desktop. If the standard images are not satisfactory, then the background can easily be changed to any other picture taken from the Internet or to your own own photo. So, change the wallpaper on your desktop Windows desktop 7.
The easiest way to change the wallpaper on your desktop is to open it in Explorer Windows folder, in which images and photographs are stored, right-click on the desired picture to bring up the context menu in which you need to select the “”.
Another method involves going to the Windows 7 personalization settings.

When selecting multiple images for the desktop background, they will change at a frequency set by the user.

In Windows 10, changing the wallpaper is also easy. It is also possible to set the background by right-clicking on the image and selecting “ ».
To change the wallpaper through the personalization settings, you need to right-click on any free space on the desktop, select the required context menu item (as described above for Windows 7) and select the “ section in the left panel Background»

Windows 10 makes it easy to customize the appearance of your desktop. To access personalization settings, right-click anywhere on your desktop and select Personalization from the context menu. The personalization settings screen will open.
Below are the elements of the personalization screen, and just below the image are their descriptions.

1. Background
Here you can select and customize your desktop background.
2. Colors
Here you can change the color of places like the taskbar and Start menu. By default, Windows 10 will use a color based on the background image. However, you can disable this feature if you prefer to use a different color.
3. Lock screen
Here you can customize the appearance of your lock screen. Just like the desktop background, you can use default images or set a custom image.
4. Themes
If you used themes on earlier Windows versions, you can view and select them here. However, Microsoft currently has no plans to release new themes for Windows 10.
5. Start
Here you can configure some settings for the Start menu.

6. Review
Click Browse to choose a background image from your computer for your desktop.
To change the font size:
If you have trouble seeing text on your screen, you can increase the font size. Increasing the font size will also increase the size of icons and other elements on your desktop.

To configure ClearType settings:
ClearType technology allows you to customize the display of text on the screen, which will help improve readability.


