Datatraveler 111 disk is write protected. Removing write protection from a flash drive. Protecting information on flash drives
I apologize for the title, but this is exactly how the question is asked when operating with a USB flash drive or SD card Windows memory reports the error “The disk is write-protected. Remove protection or use another disk" (The disk is write-protected). In this instruction, I will show you several ways to remove protection from a flash drive or memory card and tell you where it comes from.
I note that in different cases a message stating that the disk is write-protected may appear various reasons- often for a reason Windows settings, but sometimes - due to a damaged flash drive. I will touch on all the options and the corresponding methods for removing protection in Windows 10, 8.1 or Windows 7. If something is not entirely clear, then at the bottom of the article there is a video that demonstrates almost all the ways to fix the error.
Another way that can help remove a USB disk error that suddenly shows a writing error is to remove protection on the command line.
To do this, do the following:
- (In Windows 10, this is easiest to do through search in the taskbar, in Windows 8.1 - using the right-click menu on the Start button, in Windows 7 - through right-clicking on the command line in the Start menu).
- At the command prompt, enter diskpart and press Enter. Then enter the command list disk and find your flash drive in the list of disks, you will need its number. Enter the following commands in order, pressing Enter after each one.
- select disk N(where N is the number of the flash drive from the previous step)
- attributes disk clear readonly
- exit
Close command line, disconnect and reconnect the flash drive, then try to do something with the flash drive, for example, format it or write down some information to check if the error disappears.
The disk is write protected - a solution for flash drives Transcend, Kingston, Silicon Power and others
Video instruction
Below is a video on this error, which shows all the methods described above. Perhaps she can help you figure out the problem.
I hope one of the approaches helped you solve the problem. If not, I also recommend checking your flash drive on another computer or laptop: this will allow you to determine whether the write protection is a consequence of the system parameters or whether the drive itself is to blame.
Question from a user
Hello. I'm trying to write one to a flash drive Word document With hard drive, but an error appears that the disk is write protected. This has never happened before, I didn’t hit the flash drive, didn’t drop it, didn’t do anything with it...
Interestingly, I tried to delete some file from the flash drive - exactly the same error appeared, no access. Those. in fact, I can only copy previously recorded data from a flash drive. Tell me how to remove this error?
PS Windows 7, 8 GB Kingston USB flash drive (the most common)
Hello.
Such an error can be caused by several reasons: a hardware malfunction of the flash drive (for example, if you accidentally dropped it before), a virus infection, “manual” installation of write protection, etc.
In this article, I will look sequentially at all the popular causes (causing this error) and ways to eliminate them. I think that by presenting the article in a similar format, it will be simpler and easier for you and other users with the same error to solve the problem.

Typical error when deleting a folder from an SD card // example
Reasons blocking writing to a flash drive
Let's eliminate it consistently!
1) Check if there is a hardware write lock
Experienced users probably remember that floppy disks used to have a small lever, thanks to which it was possible to protect the information on it from unwanted deletion (or modification). And in my opinion, the thing was extremely useful!
Nowadays, most USB flash drives do not have such protection; some manufacturers (mostly Chinese) produce such flash drives. Therefore, some users do not attach much importance to some “locks” on the flash drive body. Meanwhile, if the protection is turned on, then you will not write anything to such a flash drive (see photo below).
Well, SD cards (used in cameras, for example) have a small switch on the side. If you move it to the Lock position, the flash drive becomes read-only.
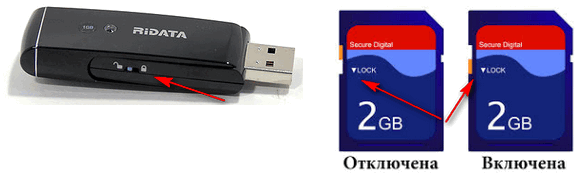
The moral of the last sentences: first of all, check whether there is mechanical write protection, whether the lever is positioned correctly (and in general, whether your device has one).
2) Is the flash drive (computer) infected with a virus?
I remember my student days... When it was necessary quite often to bring and connect a flash drive to computers “infected” with viruses (and knowingly and knowing about it in advance) - otherwise it would be problematic (if not impossible) to print materials. After such a connection, I had to check the flash drive for viruses and clean the “infection”.

If you do not have an antivirus on your computer, I recommend choosing one from the list:
3) Is there room on the flash drive?
Understand, what this question somewhat banal, but still. If the size of the recorded file is larger than the remaining free space on the flash drive, you may receive a recording error.
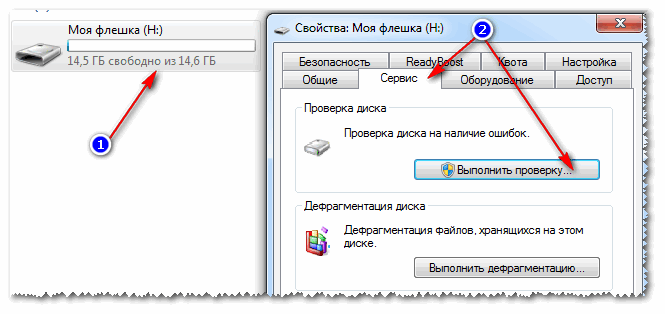
To find out how much is left free space on a flash drive: open "My Computer", then right-click on the flash drive and open it properties. In the tab are common- it will be indicated how much space is occupied and how much is free.

4) Isn't it worth writing protection in the registry?
First you need to open the Registry Editor as an administrator. This can be done, for example, through the task manager: to launch it, press the keyboard shortcut Ctrl+Shift+Esc(or Ctrl+Alt+Del ).
Next click file/new task and to the line open enter the command regedit(note that the task will be performed as an administrator).

By the way, you might find the article on how to open the Registry Editor useful.-
(for Windows XP branch: HKEY_LOCAL_MACHINE\System\CurrentControlSet\Services\USBSTOR )
Important! If the branches StorageDevicePolicies will not be in the registry - it means you do not have a blocking entry in the registry. Just in case, you can create a branch (a branch in the registry is analogous to a folder in Explorer) and then the Write Protect string parameter with the value "0". Creating branches and parameters is reminiscent of working in a regular Explorer, the same as creating a simple folder.


5) Check file system flash drives for errors
A similar error can also appear due to errors in the file system of the flash drive. For example, in the process of copying a file, you removed the flash drive from the USB port or simply turned off the light - errors could well appear on it (by the way, the file system may be marked in such cases as RAW).
To check the flash drive for errors, open "My computer", then open properties flash drives, and in the section service click the button (check the disk for errors, see screenshot below).

6) Is there a Read-Only attribute on the flash drive?
Another reason why Windows may give an error when writing a file to a USB flash drive is read-only attribute (if it is installed on a flash drive). There is nothing wrong with this attribute, it only tells the system that this disk is read-only, so it does not write data to it.
By the way, this happens quite often if you have picked up certain types of viruses, or, for example, downloaded something from torrents (the uTorrent program often creates files with a read-only attribute).
And so, let's remove this attribute.

7) Check if there is any protection in the Group Policy Editor
Writing to a flash drive can be disabled through the Group Policy Editor. Therefore, I also recommend checking if the treasured parameter is there...
Note: users of Windows entry-level and home versions will not be able to open the Group Policy Editor.
To open the Group Policy Editor:
- press a combination of buttons Win+R;
- enter the command gpedit.msc;
- click Enter .

It should have the option "Removable drives: disable writing". Open it and see if it's turned on...

By default, the parameter should be set to “Not set” (see screenshot below). If this is not the case for you, switch it to this position, save the settings and restart the computer.

Parameter responsible for prohibiting recording
8) Formatting a flash drive
Perhaps this is the last thing you can do if all other advice has been in vain and led nowhere. Formatting the media helps in many cases, including with our error, discussed in this article.
Note: copy all the necessary data from the flash drive; when formatting, everything will be deleted from the flash drive (just in case, I warn you ☺)!
In most cases, to format a flash drive, just go to "My computer", select the flash drive among the disks, right-click on it and select the command in the context menu "Format" .

If you can’t format the media: errors appear, the computer freezes, etc., then you need to use special utilities. One of these that I recommend is HDD LLF Low Level Format Tool.
HDD LLF Low Level Format Tool
A small utility used to low level formatting disks, flash drives. Helps in the most difficult situations when it is impossible to format the media through Windows. Interfaces supported: S-ATA (SATA), IDE (E-IDE), SCSI, USB, Firewire.
The utility is distributed in several versions: there is also a portable version that does not require installation.
Because There is no Russian in the program, I will show with an example how the media is formatted.
After starting the utility, click the button "Continue for Free".


When it ends, Windows will prompt you to format the flash drive (you can format it in the usual way through “My Computer”). As a rule, after low-level formatting, a flash drive can be formatted easily and without errors in Windows.
By the way, if your flash drive still doesn’t work, I recommend trying to restore it. Here is another way described in this article:
That's all I wanted to say! I would be grateful for any additions on the topic.
Hello everyone friends. Today, I want to tell you about how to remove write protection from a flash drive in the shortest possible time and without much difficulty. The thing is that the other day, as usual, I wanted to copy a certain file to a flash drive, but in response I saw a message of a similar nature: “The disk is write-protected. Remove protection or use another disk." What kind of things are these? After all, such cases had never happened before and everything worked perfectly. As a result, I began to look for ways to solve this problem, which I will discuss in this article.
First, let's look at the main reasons why write protection may appear:
— The integrity of the file system was violated, for example, due to improper use of the flash drive (for example, after finishing work with the flash drive, the function of safely removing the device is not used)
— The flash drive was attacked and infected with viruses. The most common reason.
— Trivial damage to the flash drive itself. She fell somewhere or was subject to a strong blow.
— A special switch is installed on the flash drive, which prevents infection by viruses and puts write protection on the flash drive.
We have figured out the reasons, now I will tell you how to remove write protection from a flash drive using software and mechanical means.
Mechanical method of removing protection from a flash drive
As for the mechanics, everything is very simple here. Carefully inspect your flash drive for the presence of a so-called switch, which mechanically installs protection on the flash drive. Below, I have given several examples of flash drives with such a switch. If yours has such a switch, just move it to the other side and everything will work.


If the situation with the switch has not solved anything, we move on to software methods for removing protection from a flash drive.
Removing protection using the OS registry
1) In order to remove protection from a flash drive using the registry operating system we need to click the Start button and enter regedit (command for editing the registry) in the search field. After that, right-click (right-click) on the icon that appears and select the item – Run as administrator.

2) Now we need to find special section called – StorageDevicePolicies, which is responsible for prohibiting writing to the flash drive.
It should be located in the following path:
HKEY_LOCAL_MACHINE\SYSTEM\CurrentControlSet\Control\StorageDevicePolicies
Important! If you do not find this partition at the specified path, you must create it manually. To do this, go to the parent section Control, right-click on it and select – Create – Section. Give it a name – StorageDevicePolicies.


3) Go to the StorageDevicePolicies section we created and right-click in the right area of the registry. Select the menu item - New - DWORD value (32 bits). We call it an arbitrary name, for example, WriteProtect.

4) Now we just have to make sure that the value of the WriteProtect parameter is 0. To do this, double-click on this parameter with the mouse or right-click on WriteProtect and select the menu item - Change.
Important! If the value in this parameter is set to 1, then change it to 0 and click OK.

5) Close the registry editor window, remove our flash drive from the device, and reboot it. After the reboot, insert the flash drive and check whether files can be written to it.
Removing protection from a flash drive via Diskpart
If the option of removing protection using the registry did not work, let's try this operation through the command line interface.
For this:
1) Press the Start button, enter the command diskpart, then right-click on the icon that appears and select the item – Run as administrator.

2) In the window that appears, enter the command – list disk and press the Enter key. A list of drives will appear in front of us, in which we need to determine the serial number of your flash drive.
This is easy to do using the size of your flash drive. For example, my flash drive is 8 GB in size, so I can easily identify it in the list of media. If you don’t know the size of your flash drive, then double-click on the My Computer icon (usually located on the desktop) and see what size your flash drive is (RMB - Properties).
After you have selected the desired media, enter the command select disk your media number(I have this 1). Press Enter and a message with the selected disk should appear.

3) Enter the command - attributes disk clear readonly, which clears the read-only attributes for the flash drive and removes write protection from it.
Press Enter and if everything is done correctly, the message “Disk attributes successfully cleared” will appear in front of you.

Close the diskpart utility window.
Removing protection using the Local Group Policy Editor
Sometimes there are cases where the write ban is enabled through the Group Policy Editor in the OS itself. Let's check it out:
1) Click the Start button and enter the command gpedit.msc in the search bar, then press the Enter button.

2) In the window that appears, follow the path: Computer Configuration - Administrative Templates - System - Access to removable storage devices and in the right area of the window select the item - Removable drives: Deny writing.

At this point, we pay attention to the condition that appears next to the inscription. If the status is set to Enabled, then double-click on it and select Disable in the new window. Click Apply and OK.

List of programs for removing protection from a flash drive
HP USB Disk Storage Format Tool – universal program, which fits almost any flash drive and allows you to quickly remove protection. program, run the exe file (installation this program does not require) which is in the archive and the program itself will detect your flash drive. After which, you need to select the type of file system into which the program will format and click the Start button.

JetFlash Recovery Tool - this program is only suitable for flash drives from the following manufacturers: JetFlash, A-DATA and Transcend. program, carry out a simple installation, and after launching it, press the Start button.

Apacer Repair – this program only works with Apacer flash drives. If you have just such a flash drive, then in order to remove the program from the flash drive, simply launch it and follow the instructions on the screen.
AlcorMP is one of best programs to carry out such actions. It works with AlcorMP controllers. archive, unpack it and run the file AlcorMP.exe from the folder itself. If your flash drive works on an AlcorMP controller, then the inscription in line G will be black and this means that everything is in order and you can work. If the inscription is red, then working with this flash drive is impossible. In order to remove write protection from a flash drive, simply press the Start button (A) after setting the switch to Russian.

An important nuance. All programs for working with flash drives must be run with administrator rights. To do this, right-click on the program launch shortcut or on the program itself and with context menu select – Run as administrator.

A couple of points. Before using the above programs, I recommend carrying out preliminary steps and if they do not help, only then resort to the help of software. What is this connected with? If you use software, then all your files will be deleted as the flash drive is formatted. To prevent this from happening, use the methods below, and if they do not help, then you can already start working with the programs.
1) If your flash drive is infected with viruses (suspicious files on it), then scan it and remove all viruses found.
2) There are times when it is enough to change the USB port and the data from the flash drive can be read perfectly.
3) Be sure to check for a security switch on the flash drive. If it is in “Lock” mode, then move it to the other side.
That's all the advice that I wanted to give you on the topic of how to remove write protection from a flash drive. I hope this article will help you in solving this problem.
That's all for me. See you again!!!
Hello dear readers! Quite recently I encountered one problem, I wanted to reinstall Windows, I found a sandisk cruzer 8gb flash drive, recorded the image and just took it out of the computer, everything was as usual, I reinstalled Windows and decided to format the flash drive, but when I tried to format it, I got the error “the disk is protected from records. Remove the protection and try again.”, when copying files from a computer to a USB flash drive, I got the error “the disk is write-protected.”
I started looking for the cause of this problem, searching on the Internet what could be the problem with this error, I came to the conclusion that the reasons for the “write protection” error could be the following:
- The file system of the usb drive was broken - this is precisely due to the fact that we ignore the message about “safely removing the device” (because of this, my flash drive broke down, sandisk usb drives become unusable because of this). – In my opinion, this is the most common reason.
- The flash drive was infected with viruses.
- Damage to the USB drive itself. It fell somewhere, got wet and shorted out, or you hit it hard, etc.
- Also, the most common reason is a special switch on the flash card, which protects against unauthorized writing to your USB drive.
So, we have figured out the reasons, now I will describe methods that will help you remove write protection. Before you begin, inspect your flash drive for a switch. If you find such a switch, then move it up or down depending on the model of the flash drive; on usb flash drives there is usually an open lock, if it is not drawn, then logically, just move it in the opposite direction. On flash cards that use adapters, this is usually micro-SD, then move the slider to the very top of the adapter or in the opposite direction from the “Lock” inscription.

How to remove write protection from a SanDisk flash drive
 Let me repeat a little, if you have a Sandisk flash drive, and especially a Cruiser model, then you will not be able to restore your flash drive using any method. Unless, of course, it is not a 2016 model, and then it will not be possible to restore it unless you find specialized software on the official website: https://ru.sandisk.com. You will be lucky if your flash drive is still under warranty; if the warranty is over, then feel free to throw it in the trash, like I did.
 is a universal utility that fits almost any USB drive and microSD flash cards using adapters. Download the program and run the exe file (the program does not require installation). After launch, the program itself will detect your device. Then simply select the file system type and click the “Start” button. (downloads: 8887)
Advice! If the flash drive is up to 4GB, then select the “FAT32” file system; in other cases, select “NTFS”.

How to remove write protection from Transcend, JetFlash and A-DATA flash drives
– a program for removing protection from flash drives from the following manufacturers Transcend, JetFlash and A-DATA. Download the archive with the program, after a simple installation, the program will detect the flash drive itself and press the “Start” button (downloads: 6979)
– this set of programs is specially created for restoring JetFlash usb Transcend. These are online tools from Transcend itself. You can download from the blog or go to the official website of the program download page: http://ru.transcend-info.com/Support/Software-3. (downloads: 1997)

How to remove write protection from an Apacer flash drive and a Phison controller
Apacer Repair – this program is only suitable for flash drives from Apacer. Download the program and to remove write protection, simply run it and follow the instructions. (downloads: 2791)Apacer 8 Repair Utility - A set of eight programs for formatting Apacer Handy Steno flash drive and other models. (downloads: 2459)
AH320_Utility_LFormat
Handy Steno AH320
HS2.0_Utility_FDU1.20
Handy Steno AH123
HS20_LFormat
HS20_RepairTool
Repair_V2.8.1.1
Repair_v2.9.0.4
Handy Steno AH161 plus, Handy Steno AH221
Handy Steno AH222, Handy Steno AH223
Handy Steno AH225, Handy Steno AH321
Handy Steno AH322, Handy Steno AH323
Handy Steno AH326
Repair_v2.9.1.1
Handy Steno AH123, Handy Steno AH124
Handy Steno AH125, Handy Steno AH160
Handy Steno AH220, Handy Steno AH320
Handy Steno HC202, Handy Steno HC212
Handy Steno HA202, Handy Steno HN202
Handy Steno HN212, Handy Steno HT202
Handy Steno HT203 200X, Handy Steno HS120
Repair_v2.9.1.8A
Handy Steno AH522 200X
These flash drives mainly use Phison controllers. Some utilities do not work under Windows 7.
– another program for working with Transcend JetFlash V33, V60 and other flash drives running on the AlcorMP controller. Download the archive, after unpacking, run the file AlcorMP.exe. If your flash drive is based on an AlcorMp controller, then a black inscription will appear in the line under the letter “G”. If the inscription is red or the inscription does not appear at all, then working with this flash drive is impossible. To remove the protection, simply press the “Start (A)” button. After successful completion, the inscription will be displayed in green. (downloads: 2916)


How to recover a flash drive and remove protection from Silicon Power
On this moment I use a flash drive from this company, I have a “Silicon Power Blaze B10 32GB 3.0”, I am very pleased with this flash drive and the speed of its operation. Just like with other flash drives, I had an incident with it: when formatting the flash drive, the light was turned off, after that the computer saw the flash drive and at the same time did not, the flash drive was identified as drive “G”, but when I tried to enter the flash drive, the computer gave the following message “Disk G absent. Insert the disk and try again,” the same thing happened during formatting. How scared I was . But the following program came to my rescue; I found it on the company’s website.This program is specially created for usb recovery Silicon drives Power, it works great with interfaces 2.0 and 3.0, suitable for any flash drive silicon power. (downloads: 4480)

Important point: All programs must be run as an administrator; this is done for the correct operation of utilities for working with flash drives.

A couple of nuances: Before you start using the programs described above, I recommend doing the following with the flash drive, but if they don’t help, only then start working with the programs. When using the programs, all data from the flash drive will be deleted.
- Check your USB drive for viruses with various antivirus programs.
- Change the USB port, it happens that the port may be damaged and not enough energy is supplied to the flash drive from the computer.
- Check your USB drive for security switches.
Well, that seems to be all the advice that will help you remove protection from a flash drive or restore its functionality.
I hope these tips help you. Thank you for your attention!
Best regards, Dmitry Arsenyev
Most users have flash drives (usb sd, transcend, microsd, kingston, sandisk, cd, flash, qumo, microsd, apacer, verbatim, sdhc, psp), HDD d (hdd), dvd or any other removable or local storage device.
You probably use them with great regularity. They allow you to copy your media, photos and important documents.
Despite their high resistance to mechanical damage and the ability to store data for many years, like all other gadgets, they deteriorate.
One of the most common mistakes that can affect USB flash eks, memory cards or disks an annoying message: “The disk is write protected” error.
Those who have ever had a similar problem know exactly what I mean.
Inability to copy/add/delete any files - this can lead to frenzy.
After trying hard to repair, most end up giving up on the fixes and buying new ones.
What should I do if the system writes the disk is write protected? How to remove this notorious protection?
Here are some simple but effective solutions to restore a disk or flash drive to a working state.
Use these simple tips and simply forget about the message: “the disk is write-protected,” although there is one point here that I had to encounter more than once.
Sometimes the system displays damaged media (flash drive, disk) as write-protected. How to revive drives
It's a microprocessor issue. If it fails, even partially - you can read it - you can copy or format it - no), then only a utility from the drive manufacturer can fix it, and even then not always.
Let's start unlocking disks and flash drives
You have a USB flash drive connected to your computer and you want to copy some files.
Here you are in for a surprise: “The disc is write protected. Please remove write protection or use another drive."
Then you say, "...fuck, how did this happen"? Don't panic - take a deep breath and remain calm.
This is just an error message. Now we will go through a few simple steps together to remove write protection on a USB flash drive. It's just technology and we can fix a lot of things.
Step 1 - Check your USB drive for viruses
Every time you connect a USB drive to your computer, you should automatically scan for viruses - especially if you used it on computers that you don't own.
Viruses often fill USB drives with their files - this can cause a message: write protected.
Depending on the antivirus software, it can be configured to automatically scan USB drives when they are connected.
If you don’t have such a tool, you’ll have to do the scanning manually, it’s not difficult.

If you find a virus, eliminate it using antivirus programs.
Most likely, where there is one virus, there are two or more. For this kind of work good recommendations have free utilities Doctor Web and AVG.
Step 2 – Check the enclosure of the USB flash drive
Some USB flash drives are equipped with a mechanical switch that allows you to set them to the write-protected position.
This can be a very small slider switch that can switch on its own in a pocket or computer case (if it is an adapter).
If this is your situation, then simply move the switch to the open position and try copying the files again.

Today there are not many USB drives with such locks. So there's a good chance that this isn't your problem.
On the other hand, if this is not the question, then the following fixes are a little more complicated.
Step 3 - Make sure the disk is not full
If your USB drive is full, you may also receive a writing error message.
So find yours USB drive, right-click on it and select Properties.
This will give you a nice pie chart of how much is being used and how much free space is available on your drive.

Step 4 – File System
Make sure you are not using a file that is write-protected. Yes, you will receive a different error message, but perhaps you jumped to conclusions and thought that it was the entire USB flash drive that was blocked. This happens.

Right click on the file you are trying to burn and then on "properties" and the "security" tab.
You will now see several options at the bottom of this window, and one of them is read-only.
Make sure that the checkbox is unchecked or unchecked, and then click on the Apply button. You should now be able to write to this file.
Step 5 - Diskpart Command Line Utility
Have you ever worked in a team Windows line? This is not as scary as one might think, and as such it is the next logical step to remove protection.
Click on and enter the word CMD in the field: search for programs and files.
Now, click on the top (black icon). You will see the following window:

Enter the command “DiskPart” into it and press Enter. Diskpart is a tool that is built into Windows and is accessible through a command line utility. With it we can change the values associated with your USB drive.

Make sure this is really your USB drive. Now enter Select command Disk 3, assuming your USB is number 3, and hit Enter.
Now paste another command there - disk clear ReadOnly - and then click on Enter.
This way you have cleared any read-only attributes that might be on it USB drive.
Now close the command prompt and try writing to the USB drive again. If the protection continues to block access, move on.
Step 6 - to the registry
If none of the previous steps worked for you, then you should do something a little dangerous - enter the registry.
If you are not satisfied with the registry, you can proceed to step 7, to format the USB drive.
Or maybe you have a friend who computer technician and will check the registry for you.
Try it yourself - it's a fairly simple registry change and you can do it.
Click on the Start menu and enter the command – regedit – in the Search programs and files field. You will see something like the picture in the box below.

Click on the icon at the top and the Registry Editor window will open. By clicking on the arrows next to the menu items, navigate to the branch
HKEY_LOCAL_MACHINE\SYSTEM\CurrentControlSet\Control\StorageDevicePolicies
and find the key named - WriteProtect.

If such an entry exists, right-click on it and click on "Edit".

Now, you will probably find that this parameter is set to 1. 1 means yes and 0 means no. Now change the value to 0 and click on the OK button.

Close Registry Editor, remove the USB device, and then connect it again. You should now be able to record to your USB drive. If not, then the disk will have to be formatted.
Step 7 - Format the USB Drive
WARNING: Make sure you do backup all files and information from your USB drive. All data will be lost after formatting.
Formatting your hard drive is a last resort. However, it should make your USB capable of reading and writing.
Before formatting a USB drive, determine which file system it already has - NTFS or FAT32.
Usually the file system he already has will be best suited for him.
Now right-click on the selected USB drive and select “Properties” - there you will see the file system.
Close the Properties window, right-click on the USB drive again and select format.
This describes the built-in Windows tool, but sometimes it is advisable, especially if the integrated functions did not bring the desired result.

In the Formatting window, you have several options. You have already determined which file system you will format into.
I suggest unchecking the “Quick Format” checkbox. This will do more than just erase files.
If there are bad sectors on this USB drive, full formatting will throw an error.
Formatting shouldn't take much time. Of course, the larger the volume, the longer it will take.
Assuming you don't have a physical problem with the drive, it will be formatted and ready to read and write.
Conclusion
Sometimes the problem is simple and can be treated simply. Try the methods above as they are most often correct.
If the problem is deep and requires drastic action, make sure that this is true.
Now you have a lot of troubleshooting tools in your arsenal, you should be able to get your flash drives and drives back up and running, potentially saving you a pretty penny.
Of course, if you have any additional tips, we'd like to read them too. Good luck.
Keywords: usb sd, transcend, microsd, kingston, sandisk, cd, flash, qumo, microsd, apacer, verbatim, sdhc, psp, external, flash drive, dvd.


