Windows 10 photo viewer. Features of free applications
We switched to the new Windows 10 OS, and viewing photos via new program didn't like it? Then let's bring back the good old standard “viewer” like in Windows 7 or 8.1.
Download standard program viewing photos in Windows 10 from previous versions It won’t work, and why should it, because it’s already in the system. You just need to activate it.
The standard photo viewer on Windows 10 is already installed on the system, you just need to use it!
Where is it located - the Windows 10 photo viewer? And how can I set it as the main one for viewing photos? Go!
How to open pictures in Windows 10 through browsing
We make changes to the registry.
1) Start - Windows System Tools - Run (or by holding down the Win + R keys). We write regedit - call Windows registry.
Attention! The registry is an important element of Windows. Don't change anything unnecessary here. Just in case, as a fireman, we recommend making a point Windows recovery(backup copy).
2) Once in the registry window, go to the folder:
HKEY_LOCAL_MACHINE/SOFTWARE/Microsoft/Windows Photo Viewer/Capabilities/FileAssociations

Only 2 image formats have been added for the photo viewer: tiff and tif.
3) Right-click on free space and select New - String parameter. Sign the name.jpeg

4) Left-click twice on the created name and enter in the Value field: PhotoViewer.FileAssoc.Tiff
Next OK.

5) Create names as in point 3 for other file types, namely: .jpg, .png, .gif and any others, for example .ico and .bmp. The value is the same for everyone: PhotoViewer.FileAssoc.Tiff
As a result, you will get this picture:

Setting up Photo Viewer in Windows 10
6) Start - Settings (or Win+i) - System - Default Applications - Set default values for the application (link below).
If there is no Default Applications item in the list, then write Applications in the search box at the top left (Find parameter) and the desired item will appear in the drop-down list.

7) On the left in the list of programs, select Windows Photo Viewer and click Select default values for this program.
If you have a slightly different window (the usual list of programs), then find Photo Viewer in it, click once and select Manage. Then select the desired program for all file formats.


9) Now right-click on any image in .jpg, .png, .gif or .jpeg format - Open with - Select another application (or select an application).
Select Windows Photo Viewer from the list and check the box Always use this application.

Bottom line. Like this in a simple way in 5-10 minutes you can install it forever standard remedy photo viewer for Windows 10, which was in Windows 7 and 8.1.
In Windows 10, by default, it opens images using the Photos app. However, you can also continue to use the old photo viewer, which has not disappeared under Windows 10, but is only used for special image files.
Activating the old photo viewer
Note. Currently, not all functions of the old photo viewer are available. You can view your photos as you are used to, but printing directly from the viewer is no longer possible.
To activate the old viewer, you will need to make some changes to the Windows registry. To do this, you need to open the Registry Editor: press the key combination to open the “Run” command.
Enter the command "regedit" and confirm with "OK". Confirm UAC request. The Registry Editor will open. On the left, navigate to the path:
"HKEY_LOCAL_MACHINE\SOFTWARE\Microsoft\Windows Photo Viewer\Capabilities\FileAssociations."
Windows 10: Use the old image viewer
Right-click the empty area on the right side, and under New, select String Parameter.
 Name the string ".jpg" and double-click it to open it.
Then set the “Value” field to the name of the parameter “PhotoViewer.FileAssoc.Tiff” without quotes and confirm with “OK”.
 Repeat for all other desired image formats such as PNG, JPEG, GIF or BMP. The value always remains the same.
Set the old viewer as default in Windows 10
Close Registry Editor and open any image file.
Now you have a choice between several viewing programs. Click on any image, for example, with a JPG extension, and select “Windows Photo Viewer” as the viewer.
Then enable the "Always use this app to open files" option.
 Windows 10: Use the old image viewer
 If the dialog box does not appear, right-click the image and select "Select another application" under "Open With."
The "OK" button saves your settings. You must do these steps once for each file type, such as PNG and JPG.
IN new system from Microsoft You can do so much more with your images. In the next article, we will show you how to login using image code in Windows 10.
Windows 10 has a new Photos app that can do more than just display photos in a slide show. This new app organizes your photos by the date they were taken by default (and even creates albums for you), has some nice editing tools to enhance the quality of your images, and lets you share photos via social media And email. While it's not going to replace Photoshop anytime soon, it's an app worth taking a closer look at.
Collections and albums.

The new Photos app has two main sections: Collection and Albums. In the "Collection" section, you will see a collection of all your photos, grouped by date taken (in reverse chronological order). If you want to quickly find photos from a specific time period without scrolling through all the photos in the collection, click on a date to zoom out and get a list of the most recent months.

The Albums section is a little different. Here you'll find photo albums that the app creates for you automatically, based on the date it was taken, the location, and, if possible, recognizing people's faces (in the photos). On this moment, it doesn't look like you can manually create albums, so this section is useless in my opinion.
Add a folder.
First, the Photos app will only show photos that are stored in your Pictures folder, and possibly those stored in your OneDrive account. To add another folder to the Photos app, open the app, go to Settings (gear button) and in the Sources section, click Add Folder. Find the folder you want to add, select it, and click the "Add Folder to Pictures Library" button.If you don't want to include your OneDrive photos in the Photos app, go to Settings and turn off the "Show my photos and videos from OneDrive" toggle.

Editing and improvement.
The new Photos app has some editing features, including filters and an Enhance button that does some basic enhancements.
To edit a photo in the Photos app, tap the photo to open it and tap the pencil icon to open the editing panel. To the left of the photo, you'll see different categories: Basic Corrections, Filters, Highlights, Color, and Effects. Basic fixes include the Enhance button, as well as rotate, crop, straighten, red-eye, and retouch, which lets you press and smooth out imperfections.
In the "Light" section, you can adjust brightness, contrast, highlights and shadows. Brightness and contrast are pretty self-explanatory, but the dark and highlight controls are useful for fixing photos that have different levels of lighting (for example, very bright spots that need to be shaded or very dark spots that need to be highlighted). In the "Color" menu, you can adjust temperature, hue and saturation; There's also a feature called Color Boost, which allows you to select one color and make it more or less noticeable.
In the "Filters" and "Effects" menus, you can make Instagram-style edits. The Filters menu offers six filters, including black and white, while the Effects menu lets you add a vignette effect (Blurres the corners of an image with black or white) or focus shifting.
While editing an image, you can compare it with the original by pressing and holding the compare button at the top of the screen. The main menu also has undo/redo buttons, as well as options to keep the original image or save a copy of the image.
Share your photos.
Sharing photos is easy with the Photos app. You can share individual photos or several at once. To share multiple photos, go to the Collections section and click the Select button at the top of the screen. Select the photos you want to share and a Share button will appear at the top of the screen.Click this button or use a keyboard shortcut Windows + H to open a toolbar with ways to share your photos (this will vary depending on what apps you have installed, but Facebook, Twitter and Mail should be there).
The new Photos app has a nice interface and decent image filtering options. With this application you can easily and quickly. However, the photography app tends to sometimes not work or function properly, such as not opening photos. Before you start fixing the error, you need to do this. Open simply command line as administrator and run the command sfc /scannow. Wait for the process to complete and check whether the Photos app is working in Windows 10 or not. If scanning does not help, then move below and solve the problem.
Reset the Photos app
Resetting the Photos app will clear the cache and reset all its options to their default settings. These methods will not delete your photos from your computer or laptop.
- Go to " Options" > "Applications" > "Applications and features", on the right, find Photos and click on them. Next, " Extra options".

- In the new window you will see a button " Reset". Tap it to reset and restore the default photography app.

Uninstall and install the Photos app
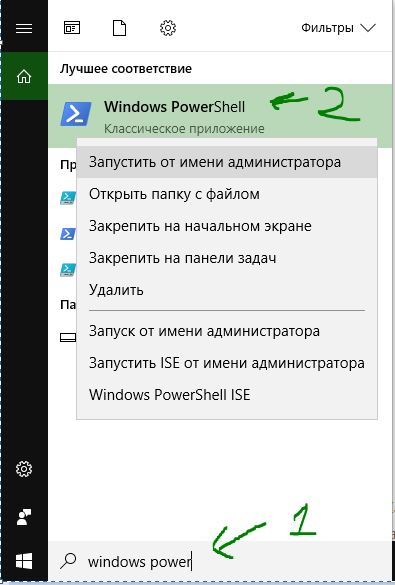
A more drastic option is to manually uninstall the Photos app and then reinstall it. To do this, we will use the PowerShell function.
- Run PowerShell as administrator. Type in start search powershell, then right-click on it and run as administrator.
- Next, enter the command below into the PoweShell window:
get-appxpackage *Microsoft.Windows.Photos* | remove-appxpackage
- Once you press Enter, the Photos app will disappear from your PC.
- To reinstall it, go to the Microsoft Store app (windows 10 store), search for Photos, then select and install it.

Perform a system restore
If you know more or less when problems with the application began, then you can perform a system rollback to a previous working time.
Have you opened the images on your PC? For this you need special program viewer. What software should I use to make my work convenient? Is it possible to get by? regular means Windows. Let's look at the best photo viewer for Windows 10.
It turns out that in latest versions Windows has a Photos application. It opens photos, creates albums, edits pictures.
Older versions of the OS used the Image Viewer app. Install it in addition to the existing Photos utility. Let's look at how to activate a classic application.
How to enable the standard photo viewer in Windows 10
This is done in two ways:
- Using "Registry Editor";
- Alternative way.
Method No. 1
In Windows 10, the standard photo viewer is activated using registry settings. Press “Win + R”, then enter the command “regedit”.
Find the _LOCAL-MACHINE branch. Further, as in the screenshot.
Here are the formats that will open by default. For me it is “TIF” and “TIFF”. How to add other extensions so that all open by default graphic formats?
Right-click on an empty space in the right window, create a string parameter.
Next we write the name and value. As in the screenshot.
We perform similar actions for other formats.
Another way
If you are not very versed in OS settings, use the WinAero Tweaker application. Download the archive at: https://winaero.com/request.php?1796. Installation is simple and will not cause any difficulties even for novice users.
After opening, on the left we find the item “Classic Apps”. Select “Photo Viewer”, click “Activate”.
The result will be the same as in the method discussed above.
Free photo viewer for Windows 10
In addition to Microsoft developments, use third-party software. Let's look at the TOP 5 best free applications. Use them as an alternative to the standard viewer. In addition to viewing, they have functions: rotation, red-eye removal, resizing, converting, printing.
FastStone
Free program with a clear interface. The developers have added built-in tools that allow you to: remove red eyes, edit size and color, convert files.
The developers suggest using the regular or portable (no installation required) version. Program characteristics:
- View photos;
- Digital photo editing;
- Batch processing;
- Slideshow creation;
XnView
Use XnView for free for non-commercial use. Supports 500 formats, allows you to convert files. Allows you to watch videos and listen to music. The interface is simple. There are many built-in tools.
Peculiarities:
- Supports 500 formats;
- Built-in editing functions;
- Using filters and effects;
- Screen capture function;
- Convert file to 70 different formats;
- Working with plugins.
IrfanView
Fast photo viewer for Windows 10. Consumes minimal OS resources. The developers suggest installing the regular or portable version.
For Russification, install additional languages. Go to: http://www.irfanview.net/lang/irfanview_lang_russian.exe to download the installer. Next, run it and select the program folder during installation. Then the installer will do everything himself.
The Russified version will launch.
What the program can do:
- Play video and audio;
- Working with text formats;
- Batch renaming of files;
- Sideshow creation;
- Working with plugins to help expand functionality.
Ashampoo Photo
This handy Windows 10 photo viewer allows you to view, edit and convert files.
IN free version To use the program without restrictions, enter your email address when you first start it. To confirm your registration, follow the link that will be sent to your email.
Possibilities:
- Creation of virtual albums;
- Write to disk;
- Creation of postcards;
- Built-in player.
Honeyview
Photo viewer for Windows 10, you can download it for free at: https://www.bandisoft.com/honeyview. Possesses simple interface. His main feature- high speed.
Peculiarities:
- View photos in archives;
- Slideshow mode;
- Bookmarks for photos;
- GPS support in the photo.
Conclusion
The TOP 5 viewers reviewed are the best programs in this class. Which one to work with depends on your personal preferences. Use the software described above if the standard photo viewer in Windows 10 does not suit you.


