The beget file manager does not work. Save file. Parallel text search in files taking into account file encoding
Hi all! in this article I will tell how to use file manager on Beget hosting. I wrote about this hosting in .
After registration, you will need to log into your account by entering your username and password. Find yourself in the main hosting menu, in which we click on the “File Manager” tab:
The top menu of the file manager looks like this:

Below will be a list of file folders with your sites. Clicking on the site folder will open a list of site files. The name, type, size, owner, attribute, and date the file or folder was modified will be displayed:

By right-clicking on a folder or file, a menu will appear with the option to do this or that action:

For example, we need to change the attributes on a folder, so we select the “Change Attributes” item and set the desired value:

A file manager is a very convenient tool for webmasters that saves time.
For example, to install a website for us on hosting through the file manager Runs enough in file manager In the top menu, click “Download Files”, then select the archive with the site on your computer and click “Download”. The archive with the site will instantly appear on the hosting, then right-click on it and select the “Unpack Archive” item. It also unpacks instantly in seconds. The site is installed, I think it's very cool. Through an FTP client this procedure would take much longer.
If you have not yet registered with Beget hosting, then do it right now by clicking on the button below, I also remind you that this hosting has a trial period of 1 month.
Register for hosting
That's all! Good luck and good earnings!
To transfer a website running on a CMS to another hosting or local server, it is not enough to simply copy its files from one place to another; for the site to work, you also need to transfer all the data from the database.
Before you start migrating your site, be sure to create text file and write down all the data there - address, login and password to log into your hosting account, database name, username, database password, other necessary data
Regardless of which CMS you use, the migration process will consist of the following steps:
Actions on a local server (or old hosting)
1. Archiving site files archived in the format .zip
2. Export data from the database or, in other words, create a backup copy of the database. Simplified, this is all the data in our database, which is written in a text file with the extension .sql
Actions on a remote server (local server on another computer or hosting)
1. Copy the archive with the site files to the remote server and deploy it maintaining the folder structure
2. Check access rights to folders and files and, if necessary, change them.
3. Creating a new database. Remember (write down) the database name, username, password to the database
4. Import a backup copy of the database into the created database. (from a file with the extension .sql)
5. In the configuration file site change the old database name, username and password to the database for new ones
6. In the site configuration section change the paths to the files and temporary folders of the site to new ones(if it is needed)
Creation backup copy MODX site on a local server
We will create an archive RAR archiver, if it is not installed on your computer, download it from here and install it.
Creating an archive of site files
Open the folder with our site files Z:/home/okarina.loc/www, select all files and folders and click right click on any file. In the menu that opens, select the item Add to archive...
Creating an archive with site files
In the archiver window that opens, select Archive Format - ZIP and press the button OK

Selecting an archive type
The archive will begin to be created and upon completion we will see the archive file in the root folder of our site www.zip

Site archive
The archive can be moved to another folder so that it does not hang out on our local site. For example, make a folder somewhere on your disk called Site Transfer and transfer it to it.
Creating a Database Backup
In the browser, go to the site admin panel, Tools -> Backup, click the checkbox in front of the item Table name to select all tables in the database and press the button create and load a backup copy of selected tables

Backing up the site database
In the open file window that appears, check that it is selected Save file and press OK

Saving the database to a file
To find the saved file, click on the icon in the browser panel, as shown in the picture below (for Firefox browser)

Open the folder with the saved copy of the database
Or open in Explorer Downloads folder

Downloads folder with a copy of the database
The file you are looking for must have the extension .sql and its name must contain The current date
Move this file to the folder Site transfer

The site is ready for migration
This is the preparatory part for local computer finished. In folder Site transfer lies the archive of our website and database.
Using this link you can download the contents of my folder Site Transfer
Register an account on hosting BEGET.RU
We can register a full-fledged account on beget hosting and within 30 days it will work in test mode for free.
We go to the website at beget.ru and select one of the tariffs, for example, Start. This tariff includes the possibility register a free domain in the RU zone

Choose a tariff
Carefully fill out the fields indicated telephone a confirmation code will be sent by e-mail- account login information.

Hosting registration in BEGET
After registration, you will receive a message on your phone SMS with confirmation code, which will need to be entered in the window as shown below

Enter the confirmation code to register an account in BEGET
After confirmation, the system will show you an animation of the process of creating your hosting

Creating a BEGET account
Be sure to save data highlighted with a red frame in the picture below into a text file! A letter with this information will also be sent to the email address specified during registration.

Hostnig BEGET. Completing the new account registration process
To log into the beget.ru hosting control panel for the first time, you can click on the link Go to Control Panel

BEGET hosting account control panel
Registration is now complete. Congratulations, you have your own hosting!
Transferring site files to BEGET hosting and setting access rights
Log in to your hosting control panel and click on the icon File manager

BEGET hosting file manager
When you first log in, you will see a folder whose name will correspond to the site address, in other words, this is your test domain.

Test domain hosted by BEGET
To upload the archive of our site to hosting, go to the folder [your account].bget/public_html and delete everything from this directory. For this select all files and folders, click right click and select the item Delete. Then press the button (blue up arrow) download files as shown in the picture below

In the window that appears, click Choose... and select the archive of our site www.zip which is in the folder Site transfer

Uploading the site archive to BEGET hosting
Right click on archive file, select from the drop-down menu Unpack archive

Unpacking an archive with site files on BEGET hosting
After unpacking the archive, you can delete the archive file so that it does not take up space on the hosting, right-click on it and select Delete

Deleting an archive file from BEGET hosting
We go higher in the directory tree, right-click on the folder public_html and select Change attributes

Changing the attributes of files and folders on BEGET hosting
In the window that appears, enter in the field Code value - 755, click the checkbox Apply recursively and choose only to folders. With this operation we will set necessary rights access to all folders on our site

Setting permissions for site folders on BEGET hosting
Right-click on the folder again public_html, select Change attributes, enter code value 644, apply recursively, only to files

We set rights to site files on BEGET hosting
As a result, all folders on our site should have rights 755 , and the files 644

Rights to files and folders on BEGET hosting
Creating a database on BEGET hosting and importing data
In the control panel, click on the icon MySQL

Database management on BEGET hosting
Enter the name of the database and generate a password
Be sure to write down the database name and password in a text file!

Creation new base data on BEGET hosting
After creating the database, click on the inscription phpMyAdmin

Login to the database via phpMyAdmin on BEGET hosting
Press the button Import

Importing data into a database hosted by BEGET
Press the button Review..., from folder Site transfer select the file with the database (extension sql), then press the button Forward

Importing data from a backup into a database hosted by BEGET
As a result, a message about successful import will be displayed and database tables will appear in the left column
Sometimes the browser does not display a message, or you may not see tables in the left column. It's okay, it's just wait 20-30 seconds and reload the page. If tables appear in the left column, then everything is in order

Imported site data into the database on BEGET hosting
Great! We deployed our website files on the hosting, configured access rights to them, created a database and imported our website data into it. Left just a little bit.
MODX Configuration File and Latest Settings
In the file manager on the hosting, go to the folder public_html/manager/includes, right-click on the file config.inc.php and select from the drop-down menu editing

MODX configuration file on BEGET hosting
We change database username, password and database name to those used on our hosting. You should have written them to a text file.
On BEGET hosting, the database name and user have the same name

Editing the site configuration file on MODX on BEGET hosting
After saving the configuration file, to enhance the security of the site, you need to disable the ability to edit the configuration file, to do this, click on the file config.inc.php right-click and select from the drop-down menu Attributes. In the window that appears, in the field Code value enter 600 and press the button Change

Closing access to the MODX configuration file on BEGET hosting
In the browser, go to the admin panel of our website on remote hosting, and type in the address bar [account name].bget.ru/manager, enter the login and password for access to the admin panel (login: admin, password: 1 ), select Tools -> Configuration, go to the tab File manager and in the field Path for file manager press the button Reset

Resetting the path for the file manager in the MODX admin panel
Go to the tab File browser and in the field Path to files also press the button Reset, then save configuration changes

Resetting the path for the file browser in the MODX admin
Go to the tab Website, to clear old data from the site cache, click Clear cache and open our website on the hosting by clicking the menu item View

Clearing cache in MODX

Our site on MODX hosted by BEGET
To gain access, click on the "Get Demo Account" button, access will be sent by email.
How is he better than the rest?
Two-pane GUI
The file manager interface is made in the form familiar to the user: two areas for convenient work with files.
In each of them you can open files on a server, remote FTP or on your computer.
When displaying files in a table, you can easily sort files and directories by type, size, creation date, etc. by clicking on the header of any of the columns.
Drag&Drop function
You can work with files and folders using the mouse, dragging files and folders to the server or remote FTP and back, to do this, select the desired files and folders, grab them and drag them to the desired location.

Working with remote FTP
Click on the " Remote FTP" in order to connect to remote server from the file manager. You can save connections and edit them if necessary in the future.

You can open external FTP in both the left and right panels, and you can even do this simultaneously to work through a file manager with two completely third-party FTPs. In order to open the FTP of your hosting account, just click the button " Home FTP".
Tab interface
The tabbed interface allows you to open multiple files at once and manipulate them in the file manager area, similar to how you do it in the operating system.
This interface will make it convenient for you to work with several files at once, make it easy to copy code from one file to another, etc.
You can collapse or expand open files. You can also change the size open window as you wish. The files you have open are displayed at the bottom of the file manager in the tab bar.

You can manipulate windows as you wish, changing their size and arranging them on the screen in the desired order.

Basic functions for working with files
The file manager will allow you to perform all the basic functions for working with files and directories, such as: copying, moving, renaming, changing attributes, etc. Moreover, you can perform all these actions in a large number of ways.
1. Copy
In order to copy a group of files, you can select them with the mouse while holding down the button Ctrl. Then simply drag them to the desired location. As soon as you release the mouse button over the selected location, the file manager will display a dialog box asking whether you want to copy the files or not; if files with the same names exist, you will be prompted to overwrite the files.

You can also copy files or folders by selecting them and pressing the right button to bring up the context menu. Then you need to click the “Copy” button.

A few more ways to copy are to use the button in the menu " File" or the button at the bottom of the File Manager.
There is also a hotkey combination for quick access to the copy function - Ctrl + 5.
2. Moving
To move, you can use all the same methods as for copying, with the exception of " drag and drop". Hotkey combination for moving Shift + 5.
3. Renaming
To rename a file or directory, you can also use context menu, menu item in the drop-down menu " File"or a hotkey combination - Ctrl + 6.
Unlike copy and move this function is not group and can only be applied to one element.
After clicking the " Rename" You will see a dialog box to enter a change to the item name. Enter the new name and click " OK".

4. Changing attributes
To change the attributes of a file or directory, you can use the context menu or the menu item in the drop-down menu " File".
You can set file rights either in numerical format or by setting rights using the appropriate checkboxes for the user, the group to which he belongs, and for everyone.
In short, rights can be set separately for user- directly the owner of the file, for the group ( group), for all ( All).
You can get the digital designation of rights by adding, where:
1
- execution rights;
2
- write rights;
4
- read rights.
For example, we want to set read and write permissions: 6 = 4(read) + 2(write).
There are 8 possible options in total:
7
= read, write & execute (read, write, execute);
6
= read & write (read and write);
5
= read & execute (read and execute);
4
= read(read);
3
= write & execute (record and execution);
2
= write(record);
1
= execute(execute);
0
= no rights.
On our servers, files are executed as a user, so the last two digits in the permissions must be 0.
For example, if you need to set permissions to everything for a file, you need to set the value: 700.
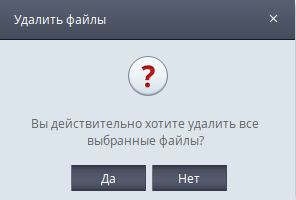
5. Removal
You can delete files using the context menu, the button in the drop-down menu " File", using a hotkey combination - Ctrl + 8 or button "Del".
Before deleting files File manager will display a dialog box asking whether you really want to delete the selected files.
Working with archives
File manager allows you to work with archives. You can create or unpack archive, as well as immediately download the necessary files/directories as an archive.
1. Create an archive
In order to create an archive from selected files or folders, select the desired files and/or folders and press the " button Create archive" on the quick access panel. In the dialog box that appears, you can change the archive name and archive type.

2. Unpacking the archive
To unpack the archive, click the " Unpack archive" on the quick access panel. In the modal window that appears, select the path where you want to unpack the archive and click " Unpack archive".

3. Download archive
You can download files and folders as an archive with one click by clicking the " Download archive" on the Quick Access Toolbar. You can also use the drop-down menu: tab " File", Further " Download" and select the type of archive in which you want to download the selected files/folders.
Multiple loading
The most convenient way to work and upload files from your computer to the server is to open your local file system, this is described above. However, if for some reason you are unable to use Java, then you can upload files by clicking on the icon " download files".
A window will appear for you to upload files to the server. Select files from your computer and click the "Upload" button. Maximum size one file should not exceed 1.5 GB. The file manager will begin to sequentially download the selected files, the process of downloading each file to the server will be displayed in the browser as a percentage.

Text editor
File manager contains convenient text editor to work with the code of your sites.
By pressing the " Settings" in the upper right corner of the editor, you can configure appearance text editor to your liking, change the font size and other parameters.

The text editor has a syntax highlighting function and can recognize which file you have opened, be it php script, bash script or other programming language. You can also choose your own code highlighting using the drop-down menu in the text editor.

A text editor will allow you to change the file encoding and resave the file in a different encoding.

Viewing graphic files
To view graphic files The file manager contains a built-in image viewer. You can flip the image, resize it, and move on to the next image.

Search by files and folders
If you need to find a file or folder, you can use the search in the file manager. Advanced mode allows you to search only files or only folders, and also search by file or folder size.

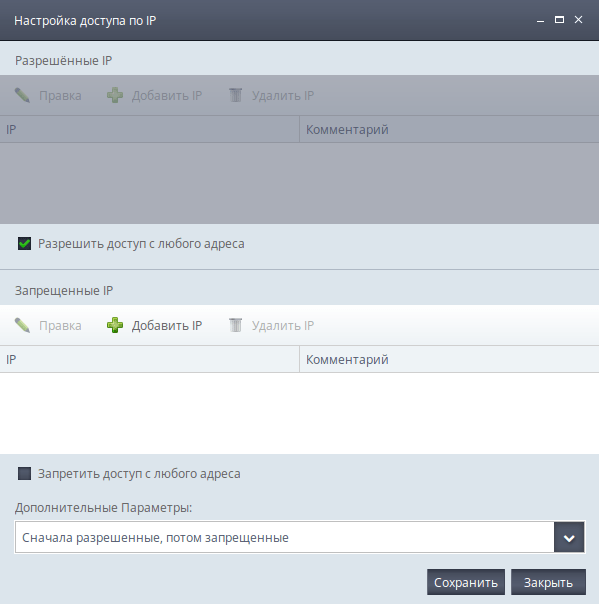
Access Control
Using the file manager, you can set a password for a folder and block access to the folder from specified IP addresses. In order to set a password for a folder, select it, in the top drop-down menu select the "tab" Tools" and then click " Set a password for the current directory". In the dialog box that appears, enter the password for the directory and click the button " Set password".

Similarly, you can block access to the folder from individual IPs. From the drop-down menu, select the " tab Tools", and then " Set blocking by IP address". In the dialog box that appears, enter a list of IPs in the format: xxx.xxx.xxx.xxx from which you want to open access and from which you want to block.
Functions for working with Home FTP
The file manager has a number of functions that are only available to Home FTP.
1. List of sites
You can easily navigate between sites in your hosting account by using the button on the quick access panel or selecting a site from the drop-down menu on the " tab Transition". By double-clicking the left mouse button on the selected site, you will be redirected to the root directory of the site.
2. Folder size
On Home FTP you can easily get the size of your directories by clicking on the " Size Analysis" on the Quick Access Toolbar.

You can also always see the total size of occupied disk space on the server at the bottom of the file manager.
Working with backups
Also, right in the file manager, you can view the list of available backups created for your account automatically by our backup system (by date). By clicking on the appropriate backup, you can view its contents and, if necessary, copy the necessary files from it.

Hotkeys
Like most desktops FTP clients our File manager contains a number of hotkeys, which speeds up work with the most common actions.
Below is a list of hotkeys:
Ctrl + 3- View;
Ctrl + 4- Editing;
Ctrl + 5- Copying;
Shift + 5- Moving;
Ctrl + 6- Renaming;
Ctrl + 7- Creating a new folder;
Ctrl + 8 or Del- Removal.
If you have any questions about work File manager, You can always contact our service.
So, why did I personally like hosting from Beget? I have already talked about many positive qualities of this hoster. It wouldn’t hurt to mention a few more important technical features.
![]()
Site load monitoring
File manager
Beget is available in the control panel, very convenient file manager proprietary, often allowing you to do without using FTP clients. In 2015, Beget made this editor an open source project. source code and posted it on the Internet under the name SPRUT.io on the website of the same name.

The file manager has 2 panels that make it easy to copy or move files from one directory to another. In addition, there is, of course, the ability to upload and download files, create and unpack archives, install necessary rights to folders and files.
The file manager also has a built-in online text editor with syntax highlighting, similar to the beloved Notepad++ editor, a very convenient thing.

It's even capable of highlighting syntax errors, which is also useful.
MySQL Databases
From the control panel it is possible to enable access to the desired databases (DBs) from outside. This can be useful when the database size becomes too large and phpMyAdmin can no longer cope (for example, one of our sites has already reached 1.5GB in database size):

However, in the control panel it is possible to create backups separately for both website scripts and databases, saving them as archives on the site.
Terminal in control panel
Surprisingly, but true: for advanced web developers, Beget gives the opportunity to work in the console directly from the control panel, without authorization and installation of additional programs(for Linux and Mac – open a terminal). As reported in the manual, for convenience, the window with the terminal can be expanded to the entire screen, to part of the screen, or moved to a place convenient for work. When switching pages, you can continue working with the terminal without breaking the session.

additional services
In addition to the usual features for virtual hosting, Beget offers many additional services, which usually have to be either purchased separately or deployed independently, but on a VPS/VDS, which is much more difficult. For example, using a caching system Memcached can help to significantly increase the performance of a site and reduce its load on the hosting platform. Below in the screenshot you can see a list of additional features:

In a word, there are quite a lot of advantages, so I have been using this hosting since 2010 and recommend it to my clients.


