Screenshot of a Mac keyboard shortcut. How to take a screenshot on a Windows Mac. How to take a screenshot on MAC? — Complete guide. How to Find a Screenshot File on Mac
The PC keyboard has a separate Print Screen button, by clicking on which the screen image is copied to the buffer. On Mac keyboard There is no such key, but there are several shortcuts that allow you to take not only a screenshot of the entire screen, but also individual areas of it. In addition, you can either send the picture to the clipboard or simply save it to your desktop.
So, let's remember:
- Command + Shift + 3 - screenshot, the file is placed on the desktop
- Command + Shift + 4— screenshot of the selected area, the file is placed on the desktop
- Command + Shift + 4 + Space— Save a snapshot of the current window to the Desktop
- Command + Control + Shift + 3 - screenshot, placed on the clipboard (analogous to the Print Screen buttons in Windows)
- Command + Control + Shift + 4 - screenshot of the selected window, placed on the clipboard
- Command + Control + Shift + 4 ... Space - Save a snapshot of the current window to the clipboard
To capture a snapshot of a window, you need to press the spacebar after releasing the other keys. The mouse cursor will change from a cross to a camera, and you can select the desired window. The window image is captured along with its shadow. Moreover, the shadow is translucent, so the picture can then be placed on any background without additional processing.
Method 2. Screenshot program.
If you don't want to worry about keyboard shortcuts or prefer to work with a mouse, Apple has created for you special program. It is called “Screenshot” (Grab.app in the English version), and is located in the “Applications/Utilities” folder.
Launch the program and select the desired action (Selected, Window, Screen...) in the Snapshot menu.
While exploring the vast expanses of the Internet or spending time watching a movie on a computer running Mac OS, you often feel the urge to take a screenshot. But, I’m not afraid of this word, the happy owner of a Macintosh may not even suspect that this task, like everyone else, is subject to one movement.
You can forget about special PrtScreen buttons, like on a Windows PC keyboard, and the need to use a graphic editor at a time, everything is much simpler.
The most in a simple way take a screenshot on Mac OS (Print Screen) is several keyboard shortcuts that allow you to take various kinds of print screens.
To save the entire screen, you need to simultaneously press and hold Shift + Cmd ( + ) then 3 ().
If you want to take a picture of a selected part of the screen of any size, you need to simultaneously press and hold Shift + Cmd ( + ) then 4 (), as a result of which the cursor turns into a sight, with which you need to select the required area of the screen with the mouse or trackpad and take a picture.
A feature that Windows can only dream of is a snapshot of the active (top) window of any program with a Mac OS shadow effect. To do this, you need to press and hold the already familiar combination Shift + Cmd ( + ) then 4 () and spacebar. After releasing all the keys, use the camera cursor to select the desired window and take a photo.

The resulting images from all the methods described above are saved on the desktop with the name Screenshot and a sequential number.
To save a picture to the clipboard, similar to Windows PC, for further pasting (Cmd + V) into graphics editor or any other place, you need to add the Ctrl () key to the Shift + Cmd ( + ) key combination, that is, Shift + Cmd + Ctrl ( + +) and then all the methods described above.
An alternative way to take a screenshot on Mac OS is to use the built-in Screenshot program, located on the C drive in the Programs - Utilities folder.
Having launched the application, go to the Snapshot drop-down tab at the top of the screen and select the required action.

There are 4 options to choose from with descriptions of key combinations.
Selected - allows you to take a snapshot of a specific part of the screen.
Window - will offer to make a print screen of anyone open window on the desktop.
Screen - take a screenshot of the entire screen.
Screen with delay - allows you to take a photo from the screen with a 10 second delay.
News feed
If not all, then many Russian owners iPhone and iPad will breathe a sigh of relief. This is truly a great joy. Now you can buy games and programs from App Store paying with Yandex Money through a new convenient service from the Yandex Money team. There is no need to link a plastic card to your Apple ID or run to a mobile phone store to get a plastic card...
05/27/13 Release of iPhone 5S and iPad 5. Date of appearance of new products in 2013.
The previously announced release date of the new iPhone 5S and the fifth generation iPad is again postponed, this time to the fall of 2013. According to Japanese news blog Macotakara, the new generation tablet computers The iPad will be released only after the release of the iPhone 5S. Thus, the release of the new iPad 5 is scheduled for the end of 2013, almost immediately...
05/25/13 WWDC International Conference in the summer of 2013. What's new from Apple?
This coming summer international conference WWDC 2013 will be mainly devoted to operating systems from Apple, that is, a completely redesigned iOS7 will be presented and Mac OS updates will be highlighted. Chief designer Apple company - Jonathan Ive, has invested a lot of effort in modernizing the mobile operating system. It is noteworthy that the main...
04/13/13 Lightweight (budget) iPhone Air or mini, already in the summer of 2013
A lightweight version of the most anticipated smartphone may go on sale before this fall (source Neil Hughes, analyst). Apple's partners in the supply of hardware for phones and tablets believe that the company plans to simultaneously announce two modifications of new budget devices along with new iPhone 5S is already in June, thereby preparing...
Game Plague inc. Kill all people by developing your own virus or terrible disease
Many people will like the rather original idea of this game for iPhone. Fans of strategies and puzzles will find the plot more than exciting, and the gameplay itself will take away an hour from their lives. The task is to kill all people, that is, the entire population of all countries. Absolutely all people, even in the most remote snow-covered corners of the planet, should...
Yandex Taxi for iPhone, an indispensable assistant for city dwellers.
Yandex mobile services are increasingly appearing in the Russian AppStore top. Their applications are reliable and easy to use, and sometimes even necessary. This time let's consider new version Yandex taxi for iPhone3, 3Gs, 4, 4S, 5. Let's start with the fact that this application absolutely free and at the same time quite functional and useful....
Russian version of the portal and AppleInsider application for iPhone 5, 4S, 3GS, 3G
If you want to always keep abreast of the latest news and developments from Apple, then the Appleinsider iPhone application is 100 percent suitable for this. It's no secret that Apple company is a world leader in the field of mobile solutions and innovative developments, and all major foreign companies are trying to imitate it and...
How to Download (Save) Videos from Safari to iPhone Without Using a Computer or iTunes
Big and bright iPhone display 5, 4S, 4, 3GS, 3G are definitely suitable for watching videos. But just upload the video in a standard way via iTunes is not always convenient or possible. Below is a working method on how to download or save videos from boarding school (Safari, Firefox, Opera, iCab) to iPhone memory. In the AppStore...
Almost every modern person has heard about the Apple brand. This company produces smartphones, tablets, computers and other gadgets with a unique operating system. It's about about iOS and MacOS. The first one is used for mobile devices, the second is for computers and laptops. Today we will find out how to take a screenshot on a Mac. Such an operation can be useful to every user. And not everyone knows how to bring it to life.
What is a screenshot
A few words about what we have to deal with next. What is a screenshot?
This term comes from the English screen shot, which literally means “screenshot”.
A screenshot (or screenshot) is a photograph of a process occurring on a PC desktop. In fact, it is capturing an image from a computer at the right moment. But how to take a screenshot on a Mac? This problem has several possible solutions. Don’t worry, even a novice user can cope with the task.
The current state of the desktop - step one
How to take a screenshot on a Mac? The first option is to capture an image from the entire desktop. This creates a snapshot of all applications, programs, and other items currently displayed on your computer.
To cope with the task, the user will need:
- Bring the necessary elements to the desktop.
- Press the key combination Shift + Command + 3.
- Release the pressed buttons.
That's all. If the sound is turned on on the computer, the user will hear a characteristic click. After this, a file with the corresponding image will appear on the desktop. This is the fastest and easiest way to capture screen images.
Taking a snapshot of the active window - second technique
How to take a screenshot on a Mac? We got acquainted with one of the options for the development of events. But that is not all.
Sometimes a user only needs to capture an open application. MacOS has a feature that allows you to capture an image from an active program. This technique will relieve the user of the need additional editing screenshot.

The instructions for bringing the idea to life look like this:
- Open the application you want to capture.
- Press the combination Shift + Command + 4 + “space” on the keyboard at the right moment.
- Release the pressed elements after a characteristic click. This usually only requires a 1 second wait. Sound is only heard when the volume of the operating system is adjusted.
It is done. After following the instructions, the user will capture an image from the active window. No other elements will be used. The picture will be saved to your desktop automatically and given a name with the date and time it was created.
Selecting an area - third technique
How to take a screenshot on a Mac computer? There is another interesting method for solving the problem. It involves capturing an image of a selected area. Very convenient if you need to photograph a small element of your desktop.
The guidelines for bringing the idea under study to life are as follows:
- Prepare the desktop for image capture.
- Press Shift + Command + 4 on your keyboard.
- Select the desired area and confirm the actions.
Just a few seconds - and it's done. The studied algorithm of actions will help to capture an image of any part of the desktop selected by the user. Fast, simple and convenient. No skills or abilities are required to use the method.

Copying an image to the PC buffer
We figured out how to take a screenshot on a Mac. Sometimes there is a need to quickly copy a snapshot to the operating system's clipboard. This technique is extremely useful if you want to save a photo in a letter or document.
In order to copy a screenshot on a Mac to the clipboard and at the same time capture the image and then automatically save it, you need to use the previously suggested instructions. But you will additionally have to press the Ctrl button. In MacOS, it is responsible for copying the screen to the clipboard.
Third party programs
How to take a screenshot on a Mac? The last way is to work with specialized programs. This technique is actively used in Windows, since there are not many commands for capturing an image on the desktop.

When choosing a method for taking a screenshot on a Mac computer, the user can:
- Install a specialized program. For example, Lightshot.
- Launch the initialized image capture application.
- Open the programs and elements that you want to photograph on your desktop.
- Click on the button in the image capture application that is responsible for taking pictures.
Fast, simple, but not always convenient. We figured out how to take a screenshot on a Mac. Then everyone chooses for themselves how to act.
Literally, a screenshot is a screenshot. For example, in Windows, for this purpose, you need to press the "PrintScreen" key, after which a copy of the contents will be copied to the clipboard; in order to get an image, you need to open an editor (for example, paint) and paste the contents of the buffer and save the image. Since there is no "PrintScreen" button on the Mac, a reasonable question arises - How to take a screenshot/print screen on a Mac? In Mac OS X everything is simpler; a keyboard shortcut is used for this.
For beginners, I’ll tell you a little about how to correctly press a key combination; if several buttons are specified, then the first button is not just pressed, but held, for example, a key combination
So, in order to take a screenshot in Mac OS, use the following keyboard shortcut:


If we add to any of this combination
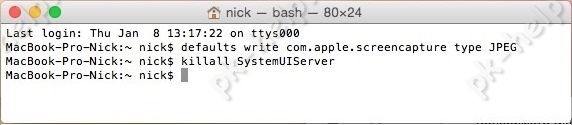
Change the extension/format of screenshots on Mac.
By default, all screenshots will be saved with the extension .PNG, if you want to change the extension to any of these: JPEG, TIFF, PDF GIF, BMP, PNG, you must launch Terminal and execute the commands (note that the terminal is case sensitive, if the command uses a capital letter, then the terminal must also use a capital letter):
defaults write com.apple.screencapture type format<указать расширение PNG, JPEG, TIFF, PDF GIF или BMP>
killall SystemUIServer
For example, below is the command that changes the printscreen extension to JPEG
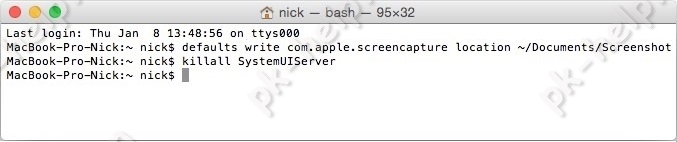
Change where print screens are saved on Mac.
By default, all screenshots are saved to the desktop, which is not very convenient, since it becomes cluttered. It will be more convenient to specify a different folder for saving screenshots. To do this, run the commands in the terminal:
defaults write com.apple.screencapture location<путь к папке>
killall SystemUIServer
For example, in the Documents folder I made a Screeshot folder and executed the commands, after which all print screens are saved to the Screeshot folder in the Documents directory:
defaults write com.apple.screencapture location ~/Documents/Screeshot
killall SystemUIServer
One of the advantages of MacOS over Windows is the presence of a large number of hot commands (keyboard shortcuts). Today we’ll talk about how to take a screenshot on a MacBook.
Types of skinshots
MacOS has a very convenient built-in service for taking screenshots. Using key combinations you can make a screenshot:
How to do
Let's move on to the process of creating a screen capture. IN operating system from Apple, interacting with this function is much easier than in Windows.
Whole screen
A screenshot of the entire screen is made using the hot command “⌘ (Command) + ⇧ (Shift) + 3”.

Separate window
You can take a screenshot of a specific application window using the combination “⌘ (Command) + ⇧ (Shift) + 4 + Space”.

Screen fragment
The creation process is no different in complexity from the previous one. To save a separate piece, use the hot command “⌘ (Command) + ⇧ (Shift) + 4”.

Keyboard shortcuts
Below is a table with hotkeys for creating screenshots.


