Android device monitor does not see adb. What are the Adb and Adb run programs - the main commands and how to use them. Flashing your phone using ADB run
A fairly common problem in Android is the waiting for device error when working with ADB or Fastboot, in this article we will learn how to fix it!
What is this waiting for device?
This error is not really an error, if we literally translate this phrase - waiting for the device to connect. That is, when you try to do something in ADB or FASTBOT and you get the message waiting for device on the command line, it means that your Android smartphone or the tablet is not visible!
Message - adb or fastboot does not see the connected Android device!
To make it clear what this article is about and to understand what we're talking about, it is advisable to read the following articles:
- Otladka via USB
Although almost all the reasons for the message are solved in the same way, for convenience, the article will be divided into the solution “waiting for device in adb” and “waiting for device in fastboot”.
Solution waiting for device in ADB
1. The first thing you should pay attention to is whether you have the driver installed?
You can download the driver here page how to install find out on this link. If the driver is unsigned, then Windows must be restarted by disabling verification. Certain devices require a special ADB driver.
Have you installed the driver? Restart your computer!
2. Make sure that the device is in bootloader mode, otherwise fastboot will not see your Android!
3. Use an original and undamaged microUSB cable! Everything should be clear here, if the cable is damaged, hence the visibility problem, perhaps you can transfer or receive files from this cable, but you won’t be able to work with Fastboot! Also, do not use a damaged USB port on your computer!
4.Use only USB port 2.0! Despite the fact that the USB 3.0 standard has already existed for several years, it is still too early to talk about large-scale implementation. Fastboot working with USB 3.0, although possible, is still not desirable!
5. Do not use USB hubs! Never, under any circumstances, use USB hubs; working with Fastbot becomes like luck - you'll be lucky or unlucky.
7. Try connecting Android to a different USB port.
9. Open a command prompt as “administrator”.
If you once had a similar problem “waiting for device” and solved it in your own way, not from the methods listed, then do not hesitate to write in the comments!
That's all! Read more articles and instructions in the section. Stay with the site, it will be even more interesting!
Question: ADB does not see the device
Hello. So I decided to test the application on a real device. But as in most cases, ADB does not see the device. The computer sees the device, developer mode is turned on. In all connection instructions it says that Manage should have Android Composite ADB Interface, I don’t see it in mine. What am I doing wrong? I am attaching a photo of Manage
Answer: Thanks for the answer, I already figured it out. I turned off the device, turned off debugging and turned it on again. Then I connected the device again and everything worked
Question: Genymotion: When launching an application from AS, virtual devices are not displayed
Hello,
Android Studio does not see the Genymotion device((The plugin is installed in the Studio. Through Genymotion the device starts, but when you start the application only the built-in device appears, and I don’t see the Genymotion device(In the Geny settings I set the path to the sdk folder, and that didn’t help(What can be a reason?
Answer:
Message from Pablito
literally
- launch the device in gemymotion
- we look in the studio - you can see him
- start the application
I'll check it and report back!
Question: Android SDK does not recognize the device
I'm trying to run a project on my Chinese tablet (Go clever insigma 800m), is it possible that this is due to the fact that the compile SDK in the project is installed 5.0 and on the tablet 4.2 but the min and target SDK are installed as 4.2. Developer mode is enabled, USB debugging is enabled. When I try to reduce complie sdk, a compilation error occurs "R" -cannot resolve symbol, after build\\clean it points to system file with errors around the material, please help
Answer: Are all devices detected normally in Device Manager? If not, install for yours Android tablet Composite ADB Interface
Question: Resetting the device descriptor request in fastboot mode
Here's the thing. One day my Google nexus 7 2013 wifi froze and did not freeze. I, of course, held the shutdown button for about ten seconds until he finally died. When I tried to turn it on, I was surprised to find that it was stuck on the screensaver, and the Android system itself did not load (the screensaver with the inscription Google and the icon of the unlocked bootloader). I switched to fastboot and decided to go into the recovery menu, but that didn’t help either. Same problem. Hangs on the screen saver. Okay, I decided to just flash it through fastboot. But here's the problem - windows 8.1 x64 defines the device as "Unknown device (reset device descriptor request)". Code 43. And then I grabbed my face, because I had a similar problem before, but it somehow resolved itself.
I scoured the Internet, rearranged the adb/fastboot drivers, unchecked the checkboxes in the menu with USB powered ports, rolled out the kb2967917 update, turned off the laptop so that the static electricity went away. Nothing helps. I have no idea what the problem is.
1) USB cable from Lenovo p780, which has a 2A/h power supply, maybe this is the problem?
2) Perhaps the adb/fastboot drivers are sloppy, how can I find out if this is the problem?
3) I connect the tablet in fastboot mode, because there is no other way. USB debugging seemed to be turned off before the incident, maybe that’s the problem?
I myself have very little understanding of this matter, so I ask you for advice.
Answer: No, the fastboot does not see it, nor does the computer itself.
The fact is that literally the day before yesterday I was already in despair, because many people promised me that my memory had died, and I decided to take it apart and see what happened inside.
He opened it, ran his finger along the trains to make them fit snugly, and OH MIRACLE! after that he turned on.
Apparently the cable has left the memory, I don’t know what or how it works inside.
It is noteworthy that a couple of years ago I encountered the problem of phantom clicks when the device heated up from heavy applications. I also took it apart, poked my finger at the cables and the phantoms disappeared.
Question: The tablet does not see usb drive via OTG
Lenovo tablet A5500-H. One day the tablet didn’t want to see the USB flash drive, although everything was fine before, and I decided to reboot it, but in the end it wouldn’t turn on. I did a hard reset and after that it turned on, but the USB drive still doesn’t see it at all. Tell me what to do?
Answer: I haven’t tried it on other devices, but I bought myself a flash drive with two usb and micro usb inputs and it doesn’t work either.
Added after 1 minute
Added after 27 seconds
I haven’t tried it on other devices, but I bought myself a flash drive with two usb and micro usb inputs and it doesn’t work either
Question: The studio does not see the phone
There is a device LG L90 Dual D410 and when it is connected, the studio does not see this device for debugging (It is not in the list of available devices). What should I do? How to install drivers for it and where to get it?
Answer: yura91, in the sense that “how many devices are supported by the same driver” is not a completely correct question for those who have been looking at this issue for a very long time)
Question: ADB does not see meizu m1 note
ADB does not see meizu m1 note, and this makes me very sad. The driver doesn't see it. What to do?
on ADB devices answer:
List of devices attached
Here is a screenshot of the device manager:
What did you do:
;M79
%CompositeAdbInterface% = USB_Install, USB\VID_2A45&PID_0C02&MI_01
%SingleAdbInterface% = USB_Install, USB\VID_2A45&PID_0C02
%CompositeAdbInterface% = USB_Install, USB\VID_2A45&PID_0C02&MI_01
Answer: Windows 8 doesn’t see my Chinese either. I use PdaNet.
Question: There is not enough space on the device
Can you tell me why, after the play store is automatically updated and I try to install the application through it, the error “There is not enough space on the device” appears, although there seems to be enough space judging by the memory indicators in the settings. And after I delete the play market updates, you can install the application. Why does this happen?
Answer: It could be whatever the phone developers came up with.
I've seen such models. but can you use music or photos from the map?
the same question again: if you remove the card, does Phone Storage and Internal Storage not turn off? Can you copy something on them and view the structure? Or does one of them stop working when you pull out the card?
Question: Organizing direct network interaction between devices
Hello.
Subject For example, for media communications.
Considering that the addresses of mobile devices are dynamic and change every session, it is clear that an intermediate server is needed. There are several questions:
1. Is it possible to use the server only for updating addresses (client applications connect when opening or changing network connection and tell the server their current IP address) and further data exchange occurs directly between clients?
2. In applications like Skype (or any other well-known product, such as whatsapp, viber, etc.), does streaming traffic go entirely through the server or between clients? Does anyone know how this is implemented?
3. Not good at socket communication, so the question is ip. If several devices are connected to one router, then their external address is the same (at least, various services for determining ip told me this). How then do the servers (google firebase or the same instant messengers for example) find the desired device?
I'm probably missing something in the routing.
Thank you.
Answer: GDjedi, the packet contains source and distantion, source is then returned back, and this changes from router to router and the final server does not actually know about your mac or ip or port, everything along the chain.
I can’t go into more detail, I’m afraid I’ll make a mistake and confuse you.
I have approximately the same task, to connect 2 devices with each other, I came to the conclusion that I need a VDS, through it I will connect 2 phones/tablets, the server is an intermediary between them.
Question: The application displays an error if GPS is disabled on the device
The application determines the coordinates, then determines the city using the coordinates. But, if you turn off the GPS on the device, the application crashes. How to correctly create a listing so that if the GPS on the device is turned off, the application will not crash, but the activity will simply start without identifying the city.
Here's the listing:
|
||
By the way, without the following section of code, the application does not crash, but, unfortunately, it does not detect the city.
| Code Java(TM) 2 Platform Standard Edition 5.0 | ||
|
||
Answer: How can I include this in the listing?
Added after 15 minutes
I did this check. When the coordinates on the device are determined only by GPS (without wi-fi and networks), the application receives coordinates 0.0. That's probably why it crashes. But how to fix this?
Here we will figure out how to install it correctly adb. If DDMS does not see adb devices in Eclipse ( if our device does not see in DDMS in eclipse). My texet 9750hd device (Android tablet) cannot be seen.
I couldn't install drivers for the 9750HD from the website. And adb didn’t see it, but only showed “9750hd” with exclamation mark in Device Manager.
You can also try installing drivers via Super One Click by going to advanced -> check driver. If nothing works then continue.
It constantly showed only List of attach devices and that's it, without a list, showing that there is no adb device. No matter how much I tried to follow other sites. Although the dispatcher showed that adb was installed, it still did not see the device in adb: 
Download “google usb driver” via “Android SDK manager” in the extras category (check the box and click install packages): 
After downloading, open our folder with installed drivers:
%android_sdk%\sdk\extras\google\usb_driver
We open and edit the file “android_winusb.inf”, depending on the architecture, let’s say you have x86 (add it to the desired block), add our device, this is what it was:
;Google Nexus One
Now we will add our device, copy the desired line from the device manager: 
Now let's copy ;Google Nexus One and replace it in CompositeAdbInterface USB\VID_18D1&PID_4E12&MI_01 and without the last parameter MI_01 in SingleAdbInterface:
;Google Nexus One
%SingleAdbInterface% = USB_Install, USB\VID_18D1&PID_0D02
%CompositeAdbInterface% = USB_Install, USB\VID_18D1&PID_0D02&MI_01
%SingleAdbInterface% = USB_Install, USB\VID_18D1&PID_4E11
%CompositeAdbInterface% = USB_Install, USB\VID_18D1&PID_4E12&MI_01
; texet 9750hd
%SingleAdbInterface% = USB_Install, USB\VID_2207&PID_0010
%CompositeAdbInterface% = USB_Install, USB\VID_2207&PID_0010&MI_01
Now let's edit one more file C:\Users\%user%\.android\. Let's add our VID to it, which we copied above with the prefix 0x**** (16-digit), and save:

Now we update our driver by pointing to our driver folder: 


Click install from disk, click browse, and select the directory with our file android_winusb.inf:

When updating, you may be asked whether to install it, but install it of course. After this, the system can see, and possibly our DDMS. In my case, this was also not enough, now let’s replace it adb.exe:
\%android_sdk%\sdk\platform-tools\ adb.exe.
We download a normally working file and replace it in our folder, after which it is directly in the folder ( platform-tools) and launch.
ADB stands for Android Debug Bridge, that is, a debug bridge for Android. The program is designed for the operating room Android systems and works in conjunction with a computer. It allows you to change files, use root rights ami, restore the system.
ADB run, in turn, is an application that allows the user flash a device running on Android. It includes ADB and Fastboot. These applications are familiar to everyone who has encountered flashing their gadget.
ADB, ADB run and Fastboot
Android Debug Bridge allows you to manage Android using a PC. This application is installed directly on a laptop or computer, which is connected to a mobile device via a USB cable in debugging mode. Then after launch It is possible to execute special commands that allow you to initiate any actions with the gadget.
The utility allows perform such actions, How:
Most often, the application is installed together with the Fastboot utility. This mode allows you to reset all settings to factory settings, which is why it is sometimes called Recovery - a recovery function. In addition to this, with using Fastboot You can install the firmware, but in this case only work via a PC is possible.
These two programs are better install together, allowing you to access more options.
In turn, ADB run simplifies work and automates common commands and actions most often used by users. Although it has a console, it has a visualized appearance and consists of 14 points.
This program is much simpler, it is suitable for those who find it difficult to understand the command line, who do not know how to work with it. It already provides a menu and items that you can select. She's different simple interface , greater functionality, without requiring additional installations programs.
All utilities can be downloaded, installed for operation and updates mobile device.
How to use ADB run
To understand how to use the utility, you need to become familiar with the installation and basic commands. Connection to the gadget is carried out using a computer and a USB cable or via a wireless network.
You can understand that the connection has taken place by entering adb devices. The message should then appear: " List of devices attached“, indicating that the connection has occurred. Connection via Wi-Fi occurs when adb help wireless. The mobile device must be rooted.
To work, you need to enable USB debugging on your gadget. Usually this item is located in the settings. If it is not there, you can look for it in the developer options. This menu is hidden; to enable it, you should find the line with the build number in the Android settings and click on it several times (5 to 10 times). After about half of the clicks, a notification will appear that you are doing everything correctly, and then you will be provided developer rights. Then you can return to the settings, where the “developer options” item will appear. This is where debugging is enabled.
The utility has a number of positive qualities:
- Easy to install.
- Simple controls.
- Easy check for updates.
Installation
Before installing ADB, you need to download it, this can be done for free. You can download ADB on the website 4pda. The official resource does not allow you to download the utility separately, but only with the entire Android SDK package. The program is installed using the standard installation wizard. 
The whole process is simple and intuitive. The installer himself offers hints, directing all actions.
After this, you need to install drivers for your mobile device, otherwise the application will not see the device. The easiest way is to use the utility for automatic installation adbdrivers. But you can also download drivers for Windows 7, 8 or 10 from the manufacturer’s official website.
If there is no installer or driver, you can install manually, for this:

Overview of the ADB run interface and command
Let's look at all the menu items offered by the program and how they work:
- Device attached? - responsible for connection between PC and smartphone, but you must enable USB debugging.

- Move – is responsible for moving files from a laptop to a smartphone. There is both automatic and manual movement available here.

- Install Android App to Device – allows you to install applications, with options for saving and moving to a memory card.

- Reboot Device – various reboot modes Android:

- Fastboot – firmware, system flashing. All settings are set automatically.

- Unlock Gesture Key – unlocker graphic key, also copes with PIN codes and face codes.

- Manual – allows you to enter commands manually.
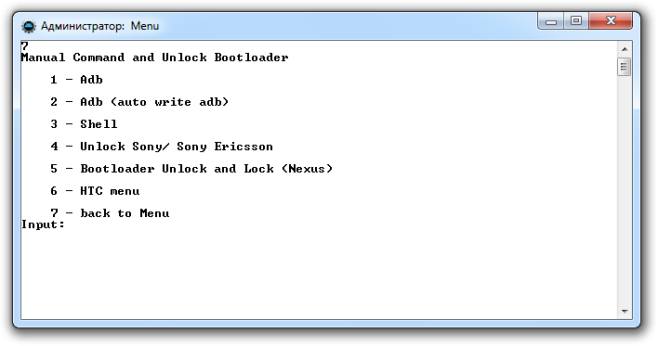
- Check Update - check new version programs.
- Intsall Bootanimation – installs and changes animation when turning on the device.

- Memory and Partitio – introduces blocks and sections Android.

- Run Script - working with scripts.
- Backup – create a backup copy.
- Odex – odex-ing of the firmware, taking into account various parameters.

- Screenshot/Record screenshots, video recording capability.

- Exit – accordingly exit from the program.
Flashing your phone using ADB run
The program allows you to change the gadget's firmware. To do this, just install it, connect to your PC and use the Fastboot utility. The files that need to be flashed must be in the same folder as the utility.
First you need translate device into bootloader mode using the menu. 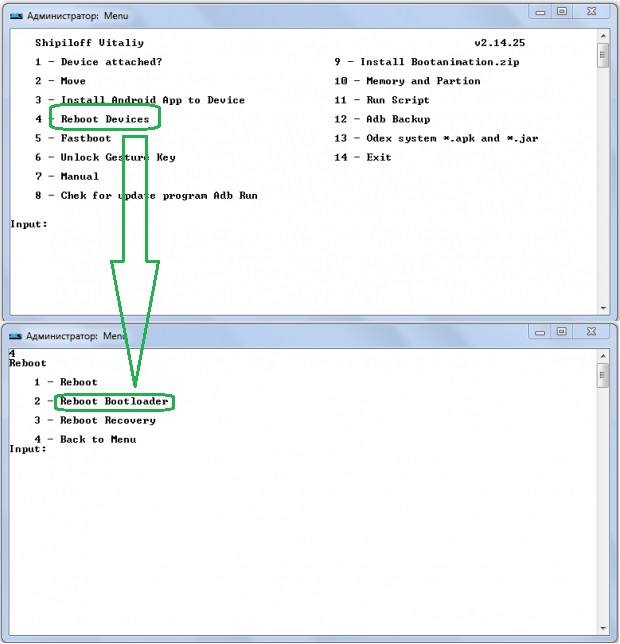
Then you need to unzip the pre-downloaded firmware files. After this, select the item Run SCRIPT and place the firmware files in the window that opens and close it. Click on Enter. The firmware has started. While the process is in progress, you cannot remove the cable from your phone or computer.
The program makes it possible to reflash all partitions step by step or only some:
- system;
- cache;
- data;
- recovery.
Using ADB
Using the utility allows you to:
- reboot gadget using various modes;
- carry files, folders from phone to PC or vice versa;
- work with applications by installing or removing them;
- work with firmware;
- perform various scripts;
- remove the lock graphic key.
The utility is usually installed and used together with the Fastboot application. 
Installation
You can install the application by visiting the official website. Necessary download archive SDK tools for Windows, having previously agreed to the terms of use.
After this it is required unpack the archive, go to the tools directory, select the bin folder there and access the sdkmanager. It just allows you to install the program. 
Next comes team work Windows line. Let's run it as administrator. After that, open the sdkmanager folder, prescribing the path to it C:\sdk-tools-windows-3859397\tools\bin. 
During installation, read license agreement, press the Y key. 
If the whole process went correctly, then the platform-tools directory with the files adb.exe and fastboot.exe will appear in the root folder. 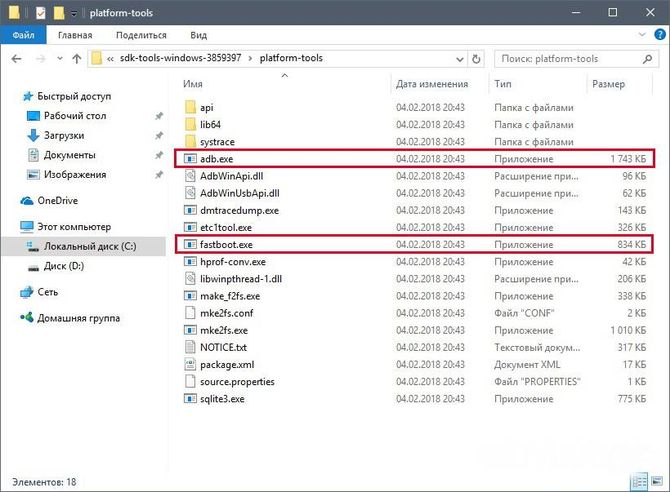
How does ADB work?
Once you install the program, you can work with it. To make sure that everything is functioning properly and correctly, you should use command line open the folder with the adb and fastboot files and run the adb.help program. What you get should look like the screenshot below: 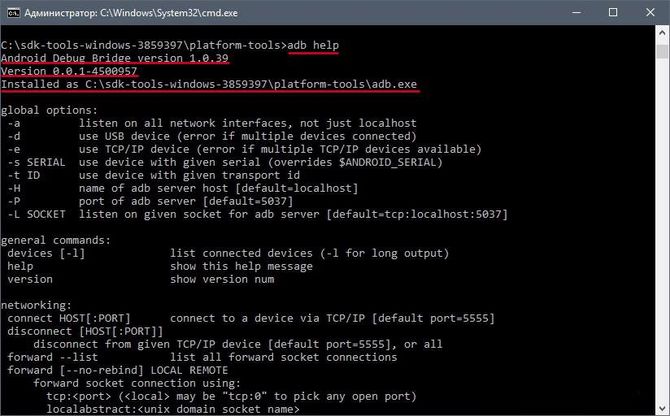
Now you need to connect the device to the PC and check whether the application can see it. Connection occurs when usb help cable. Should select mode MTP – file manager, and then the “for developers” option. If such an item does not appear, then you should go to the “ about the phone", click 7-10 times on the build number. After that, in the “for developers” item that appears, you need to select “usb debugging”.
Then enter adb devices in the system command line. This will allow you to see information about the device. It looks like the screenshot. 
Afterwards, the fastboot program is checked, the fastboot reboot task is written in the console, and press enter.
After checking the functioning of the task, you can safely work with the program.
ADB Commands
The utility involves working with a smartphone and performing various actions. There are only 10 basic ADB commands:

It is enough to specify the path to the folder from which the information is copied and into which it is copied. 

It is also possible to access the “recovery” menu.

But it is worth remembering that after running this program, all data on the phone is deleted. 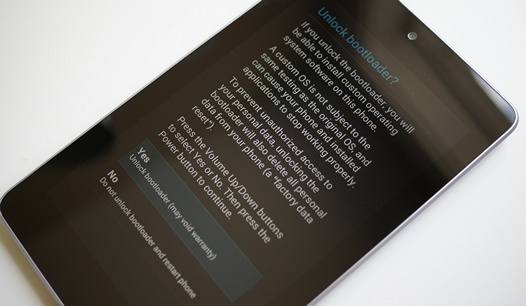
- Shell – it can be used in two ways. The first is to enter it into the command line, followed by typing. This will allow you to enter terminal mode, where it is possible to execute any Android shell commands. But you should use it carefully, as the device can be seriously damaged.
Second option - single input actions. Thus, you can, for example, change the access rights to some folders.

Bonus utility – Sideload. It suits owners Nexus devices, allowing you to update official firmware on all company devices.
FAQ
What to do if ADB does not see the device
If suddenly ADB does not see the smartphone, then you need to check first USB debugging or check availability adb drivers on your PC.
It is also worth paying attention to other reasons:
- check the usb cable, it performance;
- check installation Android SDK, availability of its latest version;
- costs try switching mode from MTP to camera and back;
- Can try reconnecting device or restart the computer.
After all these steps, the program should work and the device should be detected. This problem often happens with unknown Chinese brands that are not familiar to the program.
ADB or fastboot is not an internal or external command
Sometimes when you enter a number of commands in the console, you may encounter a system refusal to perform the entered action. A message appears that this command is not internal or external. This is often due to the fact that the path to the file is not specified, who serves the team.
The reason for this message may be that the system does not have information about the location of the files. It is possible that the required component is not in the system, then it needs to be installed.
In order to get rid of this error, you need to give the program the path to the required files. You should copy it to the clipboard.
- On the desktop you need to select " My computer", click on the right mouse button, select the column " properties»;
- now select " Extra options systems" and then "environment variables";
- there you need to find " system variables"and the Path parameter, to which you need to add the copied path and confirm the changes;
- then we open the console and enter the required action, after which the error disappears.
Alternatively, after all the manipulations it’s worth to restart a computer.
Experienced owners of Android devices quite often use the ADB and Fastboot programs included in the Android SDK to unlock the bootloader of their tablets and smartphones, install custom firmware, getting root rights and much, much more.
However, one fine day you may find that after you have connected your Android device to the PC and typed the usual “adb devices” command in the command line window; the list of devices connected to the computer that this program should display is empty. What to do in such cases to correct the situation?
If this happens to you, then first of all you need to check the following:
1. Check if it is enabled in your tablet's settings
2. Check that the USB cable you are using to connect to your computer is working and connected correctly
3. Check if you have the Android SDK installed and updated to the latest version to date
4. Try switching the connection mode of your tablet or smartphone from a media device (MTP) to a camera (PTP) or vice versa.

You may ask - why do all this if the device worked fine before? There can be many reasons for such a situation. For example, you updated operating system on your PC and forgot to install the Android SDK, or you haven’t updated the SDK for a long time, or you connected your tablet or smartphone not with the original cable that came with it, but with a longer one purchased later, in order to make it convenient to use the device while charging, or – USB drivers your device is not installed correctly.
Speaking of drivers. If you checked all of the above, but it did not help you and the ADB program still does not see your device, try removing it from the system and reinstalling it again.
To do this, on a computer with a tablet or smartphone connected to it, open the device manager and find the device with “Composite ADB Interface” in the name. For example: "Android Composite ADB Interface" or "Google NexusADB Interface"

Then right-click on the device and select the “Delete” option in the menu that opens.

Disconnect your tablet or smartphone from your computer, confirm the removal by clicking on the “OK” button and after completing the device removal process, reconnect it and wait until Windows installs it again. After this, your tablet or smartphone should appear in the list of devices connected to the computer in the ADB program.


