List of standard windows 7 programs. List of standard windows programs. B. Handout: INS program
To view the list of standard programs you need to enter the menu "Start", select item "All programs", and find the group in it "Standard". If you have just installed on your computer operating system, but no programs have been installed yet, then standard programs can help the user out for the first time, because they are always present in the system from the moment Windows is installed. Standard text editors.
Windows has two standard text editors: Notepad and WordPad. In a programme "Notebook" simple text files are created. The text is typed in the workspace of the program, and then saved to any desired address on the hard drive with the command File->Save.
Picture 1.
Notepad files have the extension .txt. In addition to simple text files Notepad can be used to view and edit configuration files various programs (.ini, .inf), and also to view the code of web pages ( .html). To open a file "Notepad" V context menu file you need to select “Open with”. If the submenu that opens contains an item "Notebook", then just specify it. If this item is not present, then you should indicate the item "Select program". Next, in the window that appears, you need to open the drop-down list "Other programs" and choose "Notebook".
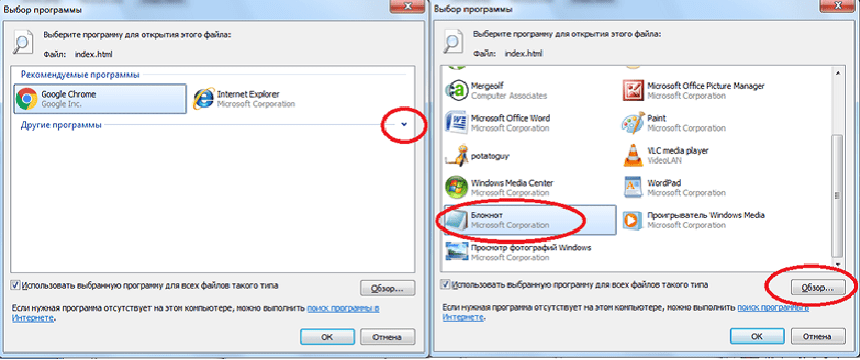
Figure 2.
If Notepad is not in this list, then you need to click the button "Review". In order to select a program using a review, you need to know exactly where the file with the file is located on your hard drive. the desired program. All standard programs are located at the same address: C:\Windows. Program file "Notebook" called notepad.exe. After these steps, the desired file will open in the workspace "Notepad".

Figure 3.
Despite the simplicity, "Notebook" has a number of useful functions. For example, the text search function. To find the desired word or part of a word in a large array of text, you must select it from the menu "Edit" team "Find". In the window that opens, enter the search word or part of a word and click the button "Find Next". "Notebook" will find in turn all cases of matches with the search pattern in the text and highlight them with a blue background. You can search in a case-sensitive manner (that is, distinguishing between large and small letters) and in a case-insensitive manner.
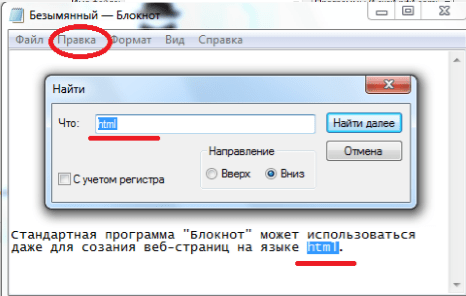
Figure 4.
The WordPad text editor has more options. It allows you to use different fonts and insert pictures. WordPad can work with the following types of files:
- .txt - simple Text Document;
- .rtf – a universal text format for exchanging data between various text editors;
- .docx – MS Office document;
- .odt is a text document from Open Office or Libre Office (often used under Linux).
To change the file format you need to specify the command File->Save As and in the window that opens, select the desired file type in the combo box "File type".
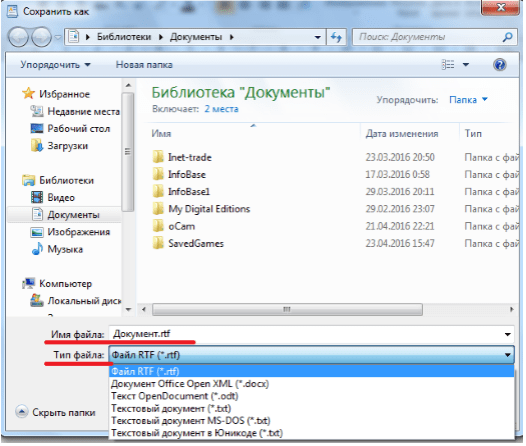
Figure 5.
Graphic editor Paint
Graphics editor Paint allows you to easily edit existing graphic images and create new drawings. Paint has a modest set of tools that cannot be compared with the tool sets in such professional design programs as Phptoshop, InkScape, CorelDraw. However, it quite allows you to draw quite complex objects. Paint supports several different graphics extensions:
- .png – graphic format that supports lossless compression;
- .jpeg is a graphic format that supports lossy compression. When we repeatedly save files in this format, we inevitably degrade their quality;
- .tiff – graphic format for storing images with high color depth;
- .gif is a graphic format that supports compression without loss of quality and a palette of no more than $256$ colors.
If you have a scanner connected to your computer, Paint can be used to obtain a scanned image.

Figure 6.
Other standard programs
In addition to the editors listed above, there are many more useful applications among the standard programs.


Figure 8.
- Connecting to a projector and a remote projector will allow you to display your computer screen on a wall screen for a large audience.
- Connecting to a remote desktop allows you to control a computer, which can be located any distance from the user, without leaving your seat. For example, you can control your computer at work from home. This is possible provided that connection access is allowed on the remote computer and the computer is turned on.
Standard Windows programs 7
Along with the Windows 7 operating system, you get a set of applications that are useful for everyday work. Although their capabilities are weaker than specialized software packages, they will most likely be sufficient for most cases.
At your disposal there is a graphic editor Paint, a text editor WordPad, an editor for working with simple text files Notepad, a Calculator, a program for recording sound from a microphone and some others (see Fig. 2.54).
Rice. 2.54. Group of programs Standard All of them are located in the Standard folder. To get to it, you need to enter the Main
menu (click the Start button), click All Programs, and then find the folder named Standard among the folders that appear and click on it.

A. N. Lebedev. “Windows 7 and Office 2010. Computer for beginners. I have to go to work tomorrow"
Graphic editor Paint
The Paint graphic editor allows you to create simple color and black and white drawings, as well as perform some image processing operations. Compared with previous versions Windows, which also included Paint, its appearance changed a lot. In Fig. Figure 2.55 shows the view of the Paint graphic editor window.
Rice. 2.55. Paint window view
To launch it, you need to enter the Main Menu, find the Standard folder (see Fig. 2.54) and click on the Paint item in it.
There is a Paint icon at the top of the window
Next to it is a button to save the image to a file.
The moment you click on this button, the current state of the picture will be written to a file. If you finish drawing something else, and at this time the computer's power is turned off, all changes since the last write to the file will be lost. For this reason, do not forget to periodically click on the save button, even if you have not yet completed the drawing. When you first click on this button, Paint does not yet know in which folder and with what name you should save your drawing. For this reason, a standard file saving window will open, shown in Fig. 2.56.

A. N. Lebedev. “Windows 7 and Office 2010. Computer for beginners. I have to go to work tomorrow"
Rice. 2.56. Standard window for saving a file Find the folder in which you want to save the file with the picture, enter the File name in the field
name for the file (instead of the default name Untitled), select the format in which the image will be stored in the File type drop-down list, then click the Save button.
When you subsequently save changes to the image by clicking the button
the standard file saving window will not appear, since Paint already knows which file to save the image into.
Following the save button there are two buttons responsible for undoing and repeating actions -
What are we talking about? The fact is that in many programs, your last few actions can be undone. For example, you drew a beautiful image, and then added a detail that looks completely unnecessary. What to do? Redraw everything again? For such cases, there is a cancel button.
![]()
A. N. Lebedev. “Windows 7 and Office 2010. Computer for beginners. I have to go to work tomorrow"
Click on it with the mouse, and the last change you made will disappear as if it never happened. But what to do if you suddenly decide that you got carried away and canceled in vain? last changes? The redo button will help you
Click on it with the mouse and the undone changes will reappear.
Below the window title is the ribbon area. What is this? The ribbon is a strip made in the form of tabs with buttons and other control elements on them. At the top you can see tab shortcuts (Home, View), by clicking on which you can switch from one tab to another. The Home tab is initially visible. But you can click on the name of another tab, View, and you will see its elements. And then you can return to the Home tab again by clicking on the word Home.
At the bottom of the window there is a status bar. It displays various auxiliary information. To the right of the icon
shows the location of the mouse pointer in the picture. It is shown in dots, starting from the upper left corner of the image. The horizontal coordinate is shown first, and then the vertical coordinate. To the right of the icon
The total size of the image is displayed.
There is a scale in the lower right corner of the Paint window.
It is used to change the image scale. The current scale value itself is shown to the left of this scale. By default it is set to 100%. To change the scale, you can either drag the slider with the mouse
left (decrease) or right (increase), or click on the round buttons - (decrease) and + (increase). What does "drag and drop" mean? This means that you need to move the mouse pointer over the slider, click left button mouse and, without releasing it, move the mouse in the desired direction. When you move the slider to the desired value, release the mouse button.
It must be noted that, By changing the scale, you do not change the size of the image.
nia. It only seems to approach you or move away from you. Usually they change the scale when they want to examine or edit some small detail.
We all beat around the bush, but how do we start drawing? The Pencil tool is enabled by default. You can draw with your mouse the same way you would draw on a piece of paper with a pencil. To draw a line, place your mouse pointer

A. N. Lebedev. “Windows 7 and Office 2010. Computer for beginners. I have to go to work tomorrow"
to the desired place on the white sheet in the central part of the Paint window, press the left mouse button and, without releasing it, move the mouse pointer where the line should go.
Of course, you can choose the line color. To do this, there is a color palette on the right side of the Home tab. By left-clicking on the corresponding colored square, you can select the current line color. If the set of colors in the palette does not suit you, you can click on the Change colors button and in the dialog box that opens, add a color from a wider range to the palette.
In addition to color, we can also change the line thickness. To do this, click on the Size button. A list with example lines will open. Click on the desired sample.
You can set not only the width of the line, but also the way it is drawn. To do this, click on the Brushes button (on the word itself). A list of brush types will open (Fig. 2.57).
Rice. 2.57. Types of brushes The pictures show the principle of each brush, but it’s better to experiment
on one's own.
You can not only draw lines by hand, but also use ready-made shapes. To do this, click on the Shapes button. This will display a list of available shapes

A. N. Lebedev. “Windows 7 and Office 2010. Computer for beginners. I have to go to work tomorrow"
Rice. 2.58. List of available shapes Let's look at some shapes.
Line – draws a straight segment. To do this, place the mouse pointer at the place where the line should begin, press the left mouse button and move the mouse pointer to the place where the line should end, then release the mouse button.
You can choose the line thickness as we discussed earlier.
Drawing a line while holding down the Shift key creates vertical, horizontal, or 45° angled lines.
Drawing with the right mouse button colors the line with the background color.
Curve – designed for drawing curves with smooth bends. Drawing is done as follows:
A straight line is drawn.
An inflection point is selected on the straight line and “dragged” to the side. The straight line turns into a curve passing through the inflection point from the starting point to the ending point.
Another inflection point on the curve is selected and “dragged” to the side. The curve bends again.
Rectangle – draws a rectangle. To do this, place the mouse pointer in the place where the upper left corner of the rectangle should be, press the left mouse button and move the mouse pointer to the place where the lower right corner of the rectangle should be, then release the mouse button. The rectangle is painted in accordance with the selected scheme:
outline only;
contour and background;
only background.
Drawing a shape while holding down the Shift key results in a square appearing.

A. N. Lebedev. “Windows 7 and Office 2010. Computer for beginners. I have to go to work tomorrow"
Polygon - used to draw a sequence of line segments in which the beginning of the next segment is at the end of the previous one, and the end of the last one falls at the beginning of the first. This sequence forms a polygon, which, upon completion of construction, is painted over as a rectangle.
Ellipse – draws an ellipse. To draw, imagine that the future ellipse will be inscribed in a rectangle. Next, proceed as described for the Rectangle tool.
Drawing a shape while holding down the Shift key results in a circle appearing.
Rounded Rectangle – Draws a rectangle with rounded corners. Additional shapes can be seen by clicking on the button
In addition to the tools we mentioned, there are others. For example, you can fill a limited area of a drawing with the selected color.
Fill – paints a closed area with the line color when working with the left mouse button and the background color when working with the right mouse button. If the area is not closed, then all areas up to the closed boundary will be painted. If you see unexpected coloring of another area, cancel the action using the button
and find the boundary break. Zooming in (the scale in the lower right corner of the Paint window) can help with this.
If you need to erase some of the lines, you can use the Eraser tool.
Eraser – erases objects in the path of the mouse pointer, filling the trace with the current background color. The width of the trace is determined by the selection in the Size drop-down list. When working with the right mouse button, the eraser will replace the background color with the color of only those points for which it coincides with the current line color.
In addition to lines and shapes, the image can be decorated with text. To do this, click on the button
After selecting this tool, click the mouse in the place on the sheet where you want to place the text. A rectangular fragment will appear, defining the area where the text will be placed.

A. N. Lebedev. “Windows 7 and Office 2010. Computer for beginners. I have to go to work tomorrow"
This will open the text attributes panel (Font), in which you can select the font, size and style (change boldness, italic and underline).
Once you've set your text attributes, click inside your selection and type your text. As long as the text area selection frame exists, you can make any changes to the text: choose a different color, position, size, style and font.
Clicking outside the selection turns the text into part of the drawing.
In addition to choosing a color to draw from the palette, you can specify the desired color directly on the drawing. To do this, click on the button
and then move the mouse pointer to the element of the picture whose color you want to make the current color and left-click.
You can do some work on areas of the image. useful actions. To do this, the fragment must first be selected. To select a rectangular fragment of the image, click on the button
In the menu that appears, click on the Select item, and in the submenu that opens, click Rectangular Area. Then position the mouse pointer where you want the top left corner of the selection to be, press the left mouse button and move the mouse pointer to where you want the bottom right corner of the selection to be, then release the mouse button. In this case, a dotted frame appears, in the corners of which and in the middle of each side there are squares that allow you to change the size of the selection in the same way as resizing a window (by dragging the squares).
The selected fragment can be dragged to another place in the picture. In this case, the previous location of the fragment is filled with the background color. If you drag while pressing the Ctrl key on the keyboard, a copy of the fragment is created.
The selected fragment can be placed in the Clipboard using buttons, a list of which appears when you click on the Clipboard button (Fig. 2.59).

A. N. Lebedev. “Windows 7 and Office 2010. Computer for beginners. I have to go to work tomorrow"
Rice. 2.59. Buttons for working with the Clipboard Cut – moves the selected fragment of the picture to the Clipboard.
Copy – creates a copy of the selected fragment of the picture in the Clipboard. Paste – inserts a fragment located in the Clipboard into the picture. Fragment
appears in the drawing as if on top of it and must be moved to the right place. The fragment pasted from the Clipboard appears in the upper left corner of the picture and
remains selected, allowing you to drag it to the desired location in the drawing. Clicking outside the selection deselects it.
We mentioned the Clipboard. What is this? This is a “pocket” in Windows where you can temporarily put part of an image or text. This "pocket" is common to all applications. This way, you can put something in the Clipboard in one application and retrieve it in another. For example, you can put a fragment of an image that you drew in Paint on the Clipboard, and remove this fragment from the Clipboard when working with a word processor Microsoft Word(we'll talk about it later) and place it as an illustration to the text.
So, we can select a fragment. What additional actions can we do with it? For example, you can rotate a fragment by a certain angle. To do this, click on the Image button. In the menu that appears, select Rotate. A submenu will open where you can choose exactly how to rotate the selected fragment.
To create images more accurately and easily, you can enable some additional elements of the Paint window. To do this, go to the View tab. There are check boxes for Rulers and Grid Lines. When you enable the Rulers checkbox, horizontal and vertical rulers appear, along which you can precisely position the mouse pointer.
Turning on grid lines will help you draw fine designs. To do this, it is convenient to turn on the Grid lines checkbox and zoom in on the drawing using the scale in the lower right corner of the Paint window.
We've covered various tools for creating images. We also know how to save a drawn picture in a file. But how can you open a previously saved image?

A. N. Lebedev. “Windows 7 and Office 2010. Computer for beginners. I have to go to work tomorrow"
To open a file with a picture, click on the button
located to the left of the Home tab shortcut. This will open a menu. Select Open from this menu. A standard file opening window will appear, familiar to you from the section where we discussed setting background images for the Desktop. Find the folder where the file with your drawing is located, click on the file name, and then click on the Open button.
If you need to start the drawing over from scratch, click on the button
and in the menu that appears, select the Create command.
And the fact that the next time you click on this button, the file saving window will no longer appear, but what if you needed to save the image with some changes in a file with a different name? To do this, click on the button
And In the menu that appears, select Save As. The standard save file window will appear again, where you can specify a different name for the image file.
The commands responsible for setting up image printing are collected in a submenu that appears when you click on the button
And selecting Print (Fig. 2.60).

A. N. Lebedev. “Windows 7 and Office 2010. Computer for beginners. I have to go to work tomorrow"
Rice. 2.60. Commands for printing an image When you select the Page Setup command, a dialog box appears where you can
adjust print settings such as the size of the paper used, its orientation, and the margins from the edges of the sheet to the drawing. When you select portrait orientation, the sheet is positioned vertically, and when you select landscape orientation, it is horizontal.
The Centering group checkboxes allow you to automatically align the image to the center of the sheet.
When all parameters are set, click OK.
Before printing a drawing on a printer, you can see on the screen how it will look on a sheet of paper. To do this, click on the button
and select Print, and in the submenu that appears, the Preview command. Your drawing will be displayed in the main part of the window as it will then be printed. You can zoom in or out by clicking on the buttons

A. N. Lebedev. “Windows 7 and Office 2010. Computer for beginners. I have to go to work tomorrow"
When you need to exit the preview mode, click the Close Preview Window button.
When you decide to print the image on the printer, click on the button
In the menu that appears, select Print, and in the submenu that opens, select Print. A window similar to the one shown in Fig. will open. 2.61.
Rice. 2.61. Print pattern window
IN In the Select a printer list, you need to click on the name of the printer on which you want to print your picture.
IN The Page Range group lets you choose which pages to print if your image is too large to fit on one sheet of paper. If you want to print not the entire image, but only part of it, you must first select a fragment and select Select in the print window.
To start the printing process, click on the Print button.
To finish working with the Paint graphic editor, you need to click on the standard window close button
In this chapter, we will look at standard Windows 7 programs that always receive little attention, although the programs are quite useful. Standard programs are placed in the program group All programs => Standard. You've probably already worked with previous versions of Windows and used some programs. So, in Windows 7, many standard programs have been improved, and you will be pleased to notice the changes that are in this Windows versions"on the face". Descriptions of standard programs are given in the table.
Notepad and WordPad. Text editors
Windows 7 has two text editors, but neither is suitable for editing complex documents. In other words, you can't do without an office suite. The Notepad text editor remains unchanged, but the WordPad word processor has been slightly modified. However, the changes mainly affected GUI. Now WordPad looks like MS Office 2007, but in terms of functionality it is very far from MS Word. Although WordPad can format text and insert pictures (which is why it is called a word processor and not a text editor), it still cannot work with tables.
Graphic editor Paint
But the graphic editor Paint not only gained new interface user (in the style of MS Office 2007), but has also become much more convenient to use. It has new tools (quite useful tool Cropping), and the behavior of the program itself has also changed: now graphic files are saved by default in the PNG (Portable Network Graphic) format. The PNG format provides lossless image compression: combined high quality images and small file size. Previously, the graphics editor used the BMP format - the quality was high, but the file size was the same. In Vista, for reasons unknown to me, Paint saved pictures in JPEG format- The file size was small, but the image quality was low. Now everything has fallen into place - high image quality and low file size. If you wish, you can still save the file in another format: BMP, JPEG, TIFF or GIF.
Calculator in Windows 7
Even the Calculator program in Windows 7 has been redesigned! Of course, they didn’t “screw on” an interface in the style of MS Office 2007. The new calculator has a new mode. Before this mode there were two: Engineering and Normal, in new version Programmer and Statistics modes appeared. There will probably be users who will appreciate these modes.
Notes, scraps. Electronic sticky notes in Windows 7
Yellow sticky notes are still popular in offices. Users glue them everywhere, including on monitors, and then they have to clean the monitor from glue residue and dust.
Various developers offered their programs - electronic analogues of stickers. With the advent of Windows 7, electronic sticky notes appeared as part of the operating system - this is the Notes program.
Scissors in Windows 7
If you are going to write an article about Windows setup or other program, you will need a screenshot tool. The Scissors program can cut out an arbitrary section of the desktop and save it as a graphic file. But if you need to take a screenshot (window snapshot) of a program, then it’s easier to use the key combination
To take a screenshot of your entire desktop, press the (without) key and then paste the image into Paint or any other graphics editor.
Remote computer access
Remote access is a godsend for the administrator. Once you set up remote access, you can manage the remote computer in the same way as a local one. If you have colleagues who are not very good at setting up their computer, you can connect to their computer and help them - you won't even have to go near their computer, which is very convenient.
- To allow a remote computer to connect to your computer, you need to follow these steps:
- Select Start => Computer;
- Click on the System Properties button;
- Click on the button (on the left) Setting up remote access;
- Enable the Allow connections only from computers running Remote Desktop with network level authentication option;
- Click on the Select users button;
- Select users who can connect to your system;
- You can turn off the Allow Remote Assistance connections to this computer option—in most cases, you don't need Remote Assistance.
Windows 7 Utilities
The program group Standard => Utilities contains utility programs that can be used to maintain the system. Descriptions of utility programs are given in the table.
| Program | Description |
| System Restore | Allows you to restore the system after a failure, for example, after incorrect installation of a driver or program. The recovery service is described in detail in the chapter Windows 7 Recovery System |
| Disk Defragmenter | Why you need to defragment a disk and how to use a defragmentation program is described in the article Disk Defragmentation |
| Computer | Brings up an Explorer window. I don’t even know why this program was placed in the System group, the same window opens when you select Start => Computer |
| Resource Monitor | A useful information program that provides information about system resources. It will be discussed in detail in the article System Monitor |
| Internet Explorer(no add-ons) | Internet Browser Explorer will start without add-ons, which is useful if some add-ons are buggy |
| Transfer Tool Windows data | Used to transfer data from one computer to another |
| Windows Easy Transfer reports | Allows you to view Migration Tool reports |
| Personal Sign Editor | With this editor you can create and save your own symbols, which you can later use in your documents |
| Disk Cleanup | spring-cleaning disk: temporary files, temporary IE files are deleted from the disk, the Recycle Bin is emptied, etc. You can run the same program by clicking on the Disk Cleanup button in the disk properties window |
| Control Panel | Windows Control Panel is the control center of Windows |
| Task Scheduler | Allows you to run programs, display messages or send emails on a schedule. This program will be discussed in the article Task Scheduler |
| System Information | Information program that allows you to obtain information about the hardware of your laptop |
| symbol table | With this program you can view the available symbols and copy them to the clipboard. This program is convenient to use to enter special characters, for example,® |
How to start Task Manager in Windows 7
Sometimes you need to crash a process that doesn't respond to user input. To do this, press the keys
Ural State Economic University
Abstract on the topic
Standard programs Windows
Completed by: ANTONiO
Ekaterinburg 2008
1. Introduction
2. Task Manager
3. Disk check
4. Disk Cleanup
5. Disk defragmentation
6. Disk archiving
7. System Restore
8. Symbol table
9. Calculator
10. Notepad
13. Clipboard
Literature
Introduction
operating room Windows system has a whole arsenal of simple and not only built-in programs, which are not a sin to use in the absence of more professional analogues, and for novice PC users who have just begun their journey in the world of high computer technology, they will be a good platform for starting and learning. Using standard programs, you can draw, type text documents, communicate via e-mail, watch movies and listen to music.
1. Task Manager
The task manager is used to display key performance indicators of your computer. It displays information about programs and processes running on your computer. For running programs, you can view their status and terminate programs that have stopped responding. Additionally, if your computer is connected to a network, you can view the network status and operating parameters.
In order to launch the Windows Task Manager, you need to simultaneously press three buttons - Ctrl+Alt+Del. A program window will appear.
2. Disk check
During PC operation, malfunctions may sometimes occur, such as software(including the operating system) and equipment (for example, during a simple power outage). As a result, errors may occur in file system– this is when information about a particular file or directory ceases to correspond to reality.
3. Disk Cleanup
Free space tends to shrink even on the most capacious hard drives. Therefore, you should ensure that there is always enough free space. This problem is partly solved by the Disk Cleanup program, which quite successfully deals with the obviously unnecessary contents of your hard drive.
A number of programs, in particular Microsoft Internet Explorer, waste a lot of disk space storing various temporary files. Temporary files are created when installing new programs, as well as when running already installed ones. As a rule, such files are written to a folder specially designated for this purpose - TEMP, located in the Windows directory. Theoretically, a program that places files there should delete them, but in practice this does not always happen.
You can call the disk cleanup program from the main Windows menu(All programs->Accessories->Utilities), or, like checking, from the disk context menu. In the first case, you will first be asked to select the disk that you plan to clean. Then the cleaning program window itself will open.
4. Disk defragmentation
Another way to improve computer performance is to defragment the disk. Since the file subsystem divides the disk into clusters into which files are stored, it is quite reasonable to assume that as the file size grows, it will occupy more and more clusters. It's good if there is one nearby free place, but often this is not the case. As a result, different parts of the file end up scattered across the entire surface of the disk. Such files are called fragmented. In principle, there is nothing wrong with this, since the system has information about the location of all parts of the file, but the time required to read a fragmented file requires significantly more.
The defragmentation program is designed to collect files into a single whole. If you launch it from the main menu, you will first have to select a disk from the list to defragment. If you use the context menu of the disk and call the defragmentation program from the Tools tab, the disk will already be selected. Then you can immediately begin defragmentation, or analyze its need using analysis (it allows you to find out the degree of fragmentation of files).
5. Archiving a disk
One of the ways to protect important information to protect against loss is its regular archiving, or, as it is more often called, backup. For this purpose, Windows provides special program– Data archiving. Like the two previous utilities, it can be called from the Tools tab of disk properties or found in the main menu among utilities.
The Windows archiving program is designed as a wizard. After the welcome screen, the user will be asked to select an action - archiving or restoring from an archive. Leaving archiving selected, click next to select archiving objects. Since copying the entire contents of a disk, as a rule, is not practical, you should select specific files and directories to carry out this important procedure. Most often the main candidates for Reserve copy are the My Documents folder and perhaps some others where the user saves his work. It is precisely this option - archiving a folder with documents, a desktop and files related to working on the Internet - that is offered by the Archiving Wizard.
6. System Restore
Another utility for recovering lost information is the System Restore service. Its fundamental difference from archiving is that it “protects” the settings of the OS itself, including installed drivers devices, hardware profiles, etc. To provide this functionality, Windows regularly creates restore checkpoints, starting from the first time the system is started after it is installed on the computer. In addition, you can create a checkpoint yourself using the same recovery wizard.
To restore your computer to an earlier state, by running the Restore Wizard, you should make sure that the desired item is selected. Then you need to click next. After this, select in the calendar the day on which the system was fully operational (days with restore points are marked in bold) and click next. Now the recovery point has been selected, but the recovery process itself has not yet begun: before starting the recovery, you must close all files and programs! After making sure that all programs and files are closed and the desired restore point is selected, click Next. After some time, the computer will restart with the settings that existed at the time the checkpoint was created. In this case, all documents created by the user, of course, will remain in their place.
7. Symbol table
Sometimes there is a need to enter into a text document a character that is not on the keyboard itself. In this case, a special program – Symbol Table – will come in handy. With its help, you can select any character from those available in the font. To do this, you should either specify desired symbol and press Enter, or double-click on it with the mouse. If you click only once or move around the table using the arrows, the currently selected symbol will be displayed enlarged in its own window.
8. Calculator
The program emulates a real calculator. It has 2 operating modes - normal and engineering. The first provides the simplest set of operations on numbers. The second one has various mathematical functions. Calculations can be carried out in binary, octal, decimal and hexadecimal number systems. In the decimal number system it works with degrees, radians and gradients. The calculator can calculate trigonometric functions, natural and decimal logarithms, factorial, and any powers. There is statistics (Sta) of calculations, which can sometimes be very useful. Of course, there is also ordinary memory (M+, MR, etc.). Can display the exact value of Pi (Pi) on the screen. There are built-in tools for increasing accuracy. Thus, if you divide 1 by 3, and then multiply the resulting number by 3, you will get exactly one, and not 0.99999... In addition, you can enter 32-digit numbers into the calculator! This is not your ordinary calculator with 10 - 18 digits.
9. Notepad
Much has already been written about this program. They said that it does not have many necessary functions, such as syntax highlighting for programming languages, encoding translation, etc. However, so far many users have not made a replacement for Notepad. Unfortunately, the program has very limited functions, such as word wrapping, inserting operating time (to do this, you need to have a .LOG entry in the first line of the file or press F5) and... that's all. The program can work with files no larger than 64 KB (in Windows, starting with XP, you can work with files of any size). However, it loads almost instantly even on the weakest machines and does not require installation.
10. Paint
A small graphics package included in Windows for processing raster graphics. The program is created for beginners. It has the following tools: eraser, fill, pencil, brush, spray, inscription, line, curve, rectangle, polygon, ellipse, rounded rectangle. There are no filters. Can do minimal technical actions - stretching, scaling, flipping, inverting colors. At a scale greater than 400%, it can display a pixel-by-pixel grid. Can apply captions without any special effects. The program is not suitable for professional work. CorelDRAW or AdobeIllustrator is usually used to create graphics, and AdobePhotoshop is used for processing.
11. WordPad
WordPad is a small editor that, unlike Notepad, is capable of minor text formatting, for example, you can make text italic and bold, create lists, and set alignment. It is possible to insert objects using other programs (drawings, sound recordings, etc.) Can process files larger than 64 KB. The main big disadvantage of this program is the lack of tables. With Microsoft Word, users rarely use WordPad.
To view the list of standard programs you need to enter the menu "Start", select item "All programs", and find the group in it "Standard". If the operating system has just been installed on the computer, but no programs have been installed yet, then standard programs can help the user out for the first time, because they are always present in the system from the moment Windows is installed. Standard text editors.
Windows has two standard text editors: Notepad and WordPad. In a programme "Notebook" simple text files are created. The text is typed in the workspace of the program, and then saved to any desired address on the hard drive with the command File->Save.
Picture 1.
Notepad files have the extension .txt. In addition to simple text files, Notepad can be used to view and edit configuration files of various programs ( .ini, .inf), and also to view the code of web pages ( .html). To open a file "Notepad" In the file’s context menu, select “Open with”. If the submenu that opens contains an item "Notebook", then just specify it. If this item is not present, then you should indicate the item "Select program". Next, in the window that appears, you need to open the drop-down list "Other programs" and choose "Notebook".

Figure 2.
If Notepad is not in this list, then you need to click the button "Review". In order to select a program using a review, you need to know exactly where the file with the desired program is located on your hard drive. All standard programs are located at the same address: C:\Windows. Program file "Notebook" called notepad.exe. After these steps, the desired file will open in the workspace "Notepad".
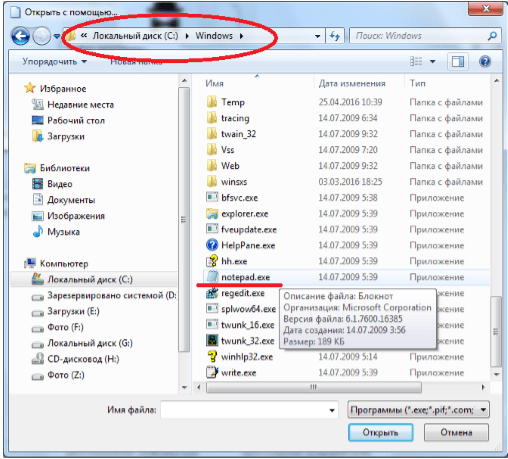
Figure 3.
Despite the simplicity, "Notebook" has a number of useful functions. For example, the text search function. To find the desired word or part of a word in a large array of text, you must select it from the menu "Edit" team "Find". In the window that opens, enter the search word or part of a word and click the button "Find Next". "Notebook" will find in turn all cases of matches with the search pattern in the text and highlight them with a blue background. You can search in a case-sensitive manner (that is, distinguishing between large and small letters) and in a case-insensitive manner.

Figure 4.
The WordPad text editor has more options. It allows you to use different fonts and insert pictures. WordPad can work with the following types of files:
- .txt - a simple text document;
- .rtf – a universal text format for exchanging data between various text editors;
- .docx – MS Office document;
- .odt is a text document from Open Office or Libre Office (often used under Linux).
To change the file format you need to specify the command File->Save As and in the window that opens, select the desired file type in the combo box "File type".

Figure 5.
Graphic editor Paint
The Paint graphic editor allows you to easily edit existing graphic images and create new drawings. Paint has a modest set of tools that cannot be compared with the tool sets in such professional design programs as Phptoshop, InkScape, CorelDraw. However, it quite allows you to draw quite complex objects. Paint supports several different graphics extensions:
- .png – graphic format that supports lossless compression;
- .jpeg is a graphic format that supports lossy compression. When we repeatedly save files in this format, we inevitably degrade their quality;
- .tiff – graphic format for storing images with high color depth;
- .gif is a graphic format that supports compression without loss of quality and a palette of no more than $256$ colors.
If you have a scanner connected to your computer, Paint can be used to obtain a scanned image.

Figure 6.
Other standard programs
In addition to the editors listed above, there are many more useful applications among the standard programs.

Figure 8.
- Connecting to a projector and a remote projector will allow you to display your computer screen on a wall screen for a large audience.
- Connecting to a remote desktop allows you to control a computer, which can be located any distance from the user, without leaving your seat. For example, you can control your computer at work from home. This is possible provided that connection access is allowed on the remote computer and the computer is turned on.


