Why don't you turn on Wi-Fi on your phone? Wi-Fi does not turn on on an Android tablet. Testing and Troubleshooting Steps
Doesn't detect, turns off, doesn't pick up wi-fi.
Many users encounter a problem when phone or tablet on Android based starts to be capricious. It seems that it didn’t fall anywhere and wasn’t “watered” with anything, but it doesn’t work as it should.
For example, the device has problems with reception with wi-fi. The reason for this may be:
1st: Software glitch - i.e. the problem is the crash software
2nd: Hardware failure- i.e. the problem is in the hardware (i.e., replacement or restoration of spare parts for the gadget is required)
However, do not rush to get upset - in 90% of cases there are problems wi-fi smartphone or Android tablet is to blame software glitch which you can easily fix on your own.
Fixing a software glitch:
Method 1. Quite simple - go to "settings", find there « backup and reset", in which you choose full reset settings with deletion of all data. Be careful, using this method is often effective, but it entails deleting all photos, contacts, passwords, music, games, videos and, in general, all information stored on your smartphone e or tablet e. Therefore, first save everything you need by connecting the gadget to your computer. If this method does not suit you, or if even after this the problem is not resolved, see Method 2.
Method 2.
Based on solving problems with communication and network reception phone number and tablet based Android method implementation of additional software. Utilities that control all processes inside gadgets. Today, there are quite a lot of them, however, the fewer functions an application contains, the more effective it is, as a rule. The best way to control system functions is a small, easy-to-use, free utility for Android devices. Download the app from Google Play and you can see its additional options in the description. After installing the application, all that remains is to launch it. Further, in principle, nothing more is required from you. The application will take full control of the device's functions. (By the way, among other things, the gadget will begin to charge 20% faster, and its performance will also increase significantly, which will affect the loading speed and operation of all applications, games, and the system as a whole. On average, after scanning, the system runs at 50% faster.)
- Also, to achieve maximum data exchange speed over the Internet, it is recommended to install on your Android device high speed browser Yandex Browser You can download it from Google Play.
Method 3.
Changing the device software, or as it is also called "re firmware ".This method, as a rule, requires certain skills and can be resolved by contacting the Service Center. To carry out this task yourself, you need to contact the website of the manufacturer of your device, download the utilities necessary for flashing the firmware and the firmware itself, and then reinstall it on your gadget.
If none of the methods brings results, unfortunately, you will have to contact the Service Center for repairing your tablet a or smartphone a.
Problems with WI-FI on your smartphone or Android tablet./ The phone or tablet does not detect, turns off, does not pick up wi-fi.
Very often I have to answer questions related to various problems that can be observed while connecting to wireless networks. When Wi-Fi does not work on a laptop. It is during the connection process that users encounter many problems. It turns out that the driver Wi-Fi adapter is not installed on the laptop, the question arises how to turn it on, or how to fix the error that appears during the connection process. But even if everything is connected successfully, troubles may await us there too in the form of lack of access to the Internet.
I decided to write one big article in which I will collect solutions to all the most popular problems and errors. The main task is to describe everything in simple language, and analyze all the options point by point, and of course write about solutions. This instruction is suitable for Windows 10, Windows 8, and Windows 7. As a rule, most solutions are no different in different versions of Windows. As for the laptop itself, there is also not much difference. The tips are suitable for models from ASUS, HP, Lenovo, DEL, DNS, and even for ordinary desktop computers with Wi-Fi adapters.
Based personal experience, comments on other articles, and features of the operating room Windows systems, I have identified 4 main problems that you may encounter when connecting to Wi-Fi on a laptop. I think the problem that brought you to this page fits exactly one of 4 points:
- First of all, we will figure out what to do if the laptop Wi-Fi does not work due to the complete absence of any wireless network settings when there is no "Wireless" connection in network connections network connection", or "Wireless network" (Windows 10). Also, when there is no Wi-Fi adapter in the device manager.
- Let's find out why next The laptop does not see the Wi-Fi network. There may be a problem when the connection icon is crossed out with a red cross, the message “No connections available”. Let's consider different ways, which you can use to enable the wireless network.
- There are often times when The laptop sees the network, but does not connect to Wi-Fi. An error appears when connecting. Also, here I will include the problem when neighboring networks are displayed, but the laptop does not see home Wi-Fi net.
- Well, let’s not ignore the problem when Wi-Fi is connected, but the internet does not work, but the sites do not open. Typically, a wireless network icon with a yellow exclamation mark and a status of “no Internet access” or “restricted”. True, there are times when there are no errors and everything seems to be fine, but there is still no access to the Internet.
Having described the solution to all these problems, I hope to answer the question in as much detail as possible: “why Wi-Fi doesn’t work on a laptop.” We will consider almost all cases and problems that you may encounter while connecting to wireless networks. To solve various problems and errors about which we'll talk in this article, I have already written separate, more detailed instructions. I will provide links to them as I write the article.
Before you go through any settings, I advise you to look at the instructions for connecting to wireless networks: We have, and a separate one. Especially if you are doing this for the first time. Perhaps they just didn’t understand all the nuances.
If you can’t connect, we’ll figure it out.
Checking the presence of a Wi-Fi adapter and driver
The first thing I advise you to do is check the operation of the Wi-Fi adapter. Make sure it works and the driver is installed. At this stage there may be two problems:
- The adapter itself is simply broken (hardware failure). This happens very rarely.
- And a very popular problem - Wi-Fi adapter driver not installed. Or installed driver not working correctly. This happens very often on new laptops, or immediately after installation, or Windows reinstallation . If Windows 10 almost always automatically installs the driver on the wireless adapter (though not always working), then in the previous Windows versions this must be done manually. In one of the articles I already wrote,
To check this, just go to the device manager. It can be found through search. Or press the keyboard shortcut Win+R, enter the command (can be copied) devmgmt.msc, and click Ok.
Immediately open the “Network Adapters” tab. There should be an adapter with "Wireless" or "Wi-Fi" in its name. This is the adapter through which the laptop connects to Wi-Fi. If you have it, then pay attention to the icon next to the name. It should be the same as mine in the screenshot below.
If wireless adapter No:
- If you only have one adapter there, LAN card(LAN), and there is no wireless adapter, then most likely this means that you need to install a driver.
You need to go to the website of your laptop manufacturer and find your model there (most often through search), go to the driver download section and download the driver for the Wireless (WLAN) adapter. Then, run its installation. In this case, the article will be useful to you. And separate.
If you have a wireless adapter, but Wi-Fi does not work:
- Right-click on it and select "Properties". Pay attention to what will be written in the "Device Status" window. There should be an inscription "The device is working normally."
- Again, right-click on the adapter and see if there is an "Enable" option there. If there is, select it. After this everything should work.
- Try following the steps I wrote about in the article about. You can also try.
- Try reinstalling the driver (I provided links to instructions above).
- See other solutions from this article, which I will write about below.
It all starts with the adapter in the device manager. If it is not there, then there will not be a “Wireless Network” adapter in network connections. Also, in Windows 10 and Windows 8 there will be no buttons or sections for Wi-Fi settings.
Turn on Wi-Fi on a laptop
In most cases, all solutions to this problem come down to a simple turning on Wi-Fi module. Because it can simply be disabled. Turn on wireless connection possible in several ways. By activating the wireless module with a key combination, or a separate switch on the laptop case, or check and enable Wi-Fi in the Windows settings. Now we will look at all this in detail.
If the wireless network on your laptop is disabled, then most likely the connection icon will look like this (depending on how and where the module is disabled):

In Windows 7 the icon will look a little different, but the meaning is the same.
And first of all, I would probably advise you to try turning on Wi-Fi programmatically. In settings operating system.
How to do this in Windows 7
In Windows 7, as well as in the “eight” and “ten”, this can be done in network connections. Go to "Network and Sharing Center" shared access". From there, go to "Change adapter settings." Do not pay attention that the screenshots were taken in Windows 10. In all cases, the actions will be the same.

In the new window, you need to right-click on the “Wireless Network Connection” or “Wireless Network” adapter and select “Enable”.

After that, look at the connection icon (on the notification panel). If a yellow asterisk appears next to it, this means that the laptop sees available networks and can connect to them.
If in the window " Network connections“You don’t have a wireless adapter, then most likely the necessary driver is not installed. You need to install it. You can check this in the device manager. I wrote about this above.
If Wi-Fi does not work on a laptop with Windows 10
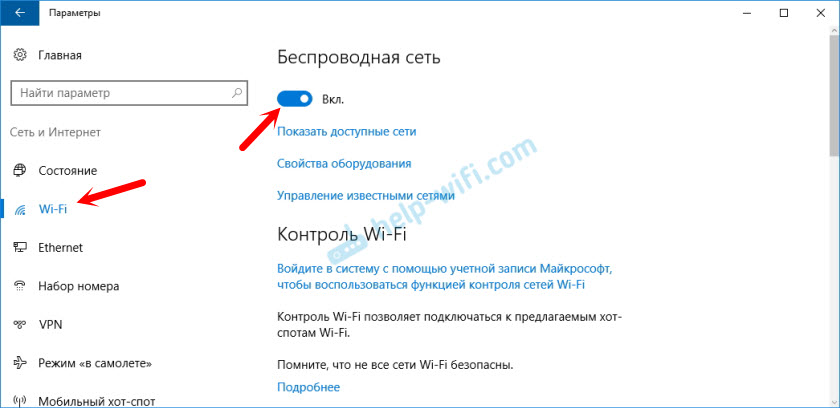
A few specific tips for Windows 10: If the Wireless LAN adapter is turned on (see screenshot above), and the laptop still doesn’t see any available networks, then perhaps Wi-Fi is turned off with a button, or in the parameters. Let's check. Just click on the icon in the notification panel and the "Wi-Fi" button (if it's there).

Or in the parameters. In the "Network and Internet" section.
Well, if you have there are no these buttons and tabs in the settings, then see the first section of this article, or separate instructions: .
On Windows 8
First of all, check whether the adapter is enabled in the "Network Connections" window (shown above).
Open Settings. In the "Change computer settings" section, you need to select the " tab Wireless connection". Then turn on the wireless network.

We look at the icon with the connection status. The laptop may have already seen available networks.
Turn on the wireless network using the buttons on the laptop
If the methods described above failed to enable the wireless network, then you may be able to do it using hardware. Everything is very simple here. On almost every laptop, to enable and disable the Wi-Fi module, there is a key combination on the keyboard, or a separate switch on the case (rarely, but it happens).
Let's take an example right away. On my ASUS laptop To turn on Wi-Fi you need to press the key combination Fn+F2. Look like this:
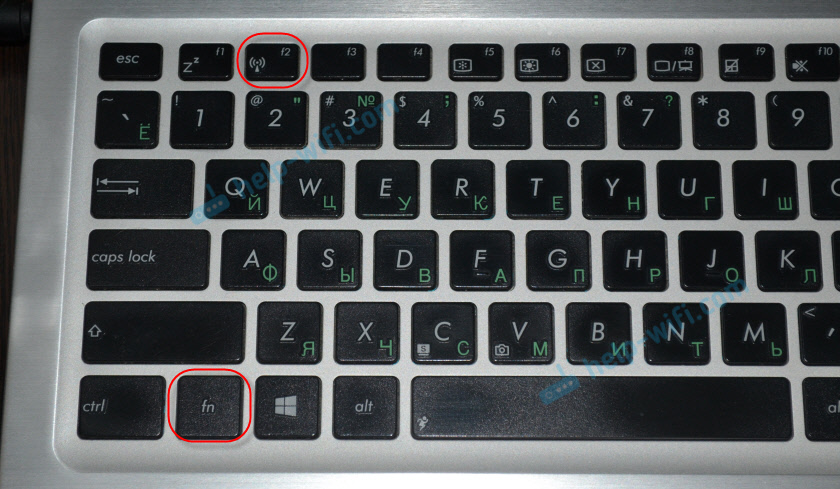
This will always be the Fn key + a key from the F1 - F12 row. Here are the combinations for other laptops:
Dell: Fn + F2, Gigabyte: Fn + F2, HP: Fn + F12, Fujitsu: Fn + F5, Acer: Fn+F3
In some cases, this may be a special switch on the laptop case, which looks something like this:

Important point: function keys may not work properly (or not work at all) due to the fact that the corresponding driver is not installed, which is responsible for the operation of these keys.
Here's an example: in Windows 7 I have all the drivers installed from the official ASUS website, and the Fn + F2 key combination actually controls wireless networks. And in Windows 10, I did not install drivers. And when you press Fn + F2, airplane mode is turned on and off.
It is not even the driver, but the utility that is responsible for the operation of the frequency function keys. You can download the utilities in the same section as the drivers. Download strictly for your laptop model and installed Windows. For ASUS laptops, the utility is called "ATKACPI driver and hotkey-related utilities".
I hope that Wi-Fi on your laptop still works and you managed to connect to the required network. And now we will look at the problems that you may encounter during the connection process.
Solving Wi-Fi connection problems
There are several most popular mistakes, which I will discuss below. We will not consider solutions to each problem, since I have already written about them in separate articles. I'll just give you the links.

If the laptop does not see the home Wi-Fi network
Provided that it sees neighboring networks, and other devices see your home Wi-Fi network. In this case, I advise you to first restart your laptop and Wi-Fi router. Then, you can try in your router settings. Set the static channel, but not higher than 10. You can also change the name of your wireless network in the router settings.
If you have any other problem during the connection process, write about it in the comments. I'll try to suggest something.
If everything is connected, but the Internet does not work
Another trouble that you may encounter after the laptop has successfully connected to the wireless network. Most likely, there will be a yellow exclamation mark next to the connection icon.

Well, and accordingly the connection status is “Limited” or “Without access to the Internet”. There can be a lot of reasons, as well as solutions. I have prepared two separate articles on this issue. The first is for Windows 7, the second is for Windows 10:
- And a separate article about the problem
In addition, there may be a case when there is no exclamation mark next to the icon, but the sites still do not open in the browser. DNS error. I also wrote about the solution to this problem in the article. At the same time, the Internet may work in some programs. For example, in Skype.
Try running troubleshooting.

Most often, the following error messages appear in diagnostic results:
These errors are relevant for all versions of Windows.
Afterword
The situation itself when Wi-Fi does not work on a laptop is very ambiguous. It is very difficult to collect all the information on such a popular issue in one article. And when the article is very large, it is difficult to understand it. I tried to sort everything out and consider all the most popular cases. I hope you found a solution to your problem.
If nothing works, you can describe your case in the comments. I will try to help with advice. Well, share your solutions and useful information! Best wishes!
Hello! I decided to make this problem a separate article in order to try together to figure out these strange problems with Wi-Fi in Android OS.
Moreover, one device (for example smartphone) which runs on the Android operating system can access the Internet, and the other (for example tablet), also connects to Android, but does not connect to the Internet.
I have seen this problem many times in the comments, they describe it something like this:
 Or like this:

I think that the problem is more than clear, we can move on to solving it. Which, unfortunately, is not as clear as the problem itself :)
Solving the problem with Wi-Fi on Android
Well, or at least let’s try to solve it :)
When I answered questions that were asked to me in the comments to other articles (mainly to the article on), then basically advised experiment with the wireless network operating mode or channel. In some cases, it helped (very few people write about the results).
Well, I only have these two options. So, if your smartphone or tablet connects to your router, but the Internet still doesn’t work on it, then do this:
- First of all, we try to change the channel on which our network operates. Try, for example, instead Auto, put static 6th channel. Try several options. More details in the article -. After each change, save the settings and reboot the router.
- We are trying to change the operating mode of the wireless network. For example, the default is most likely 11bg mixed, you try it 11n only. I will not write about this, see a separate article for more details -.
- In the router settings, on the tab where you configure Wi-Fi (most likely the Wireless tab), set the correct region.
Update: checking if the proxy server is disabled
In the comments, Alexander suggested another way that helped him get rid of this problem. And yet, Albert wrote that this method also helped the emu. So, I decided to add this information to the article.
According to Alexander, the problem was that in the smartphone settings (more precisely a specific network), was turned on manual setting proxy servers. As soon as he disabled the proxy server, everything worked immediately. Type programs Play Market, started going online. Here's the comment itself:

I'll show you how to disable the proxy server on your HTC. On other devices, this process will be, if not exactly the same, then similar.
So let's go to Settings, then select WiFi. Click on our network there (with which there are problems), and hold your finger a little. A menu should appear. In it we select Change network. Next, check the box next to Advanced options. We are looking for an item Proxy settings and select the status No (if you had it installed Manually).
I hid the screenshots under a spoiler:
Show (hide) instructions in pictures for disabling the proxy server

One of the most popular questions asked by wireless Internet users is: “Why doesn’t a laptop running Windows 7 or 10 connect via wifi to the Internet?” Indeed, it often happens that you bought a router and made all the necessary settings. But in the end it turned out that the computer connected to it via cable has a connection and goes online, but the laptop does not see the WiFi network. Or he catches it and even connects, but the Internet on the laptop still doesn’t work. At the same time, Windows writes that there is no access, or the connection is limited or protected. What exactly is the matter and how to fix it? Let's figure it out together!
The Internet via WiFi does not work on the laptop - what is the reason?
First of all, you need to determine the cause of such difficulties. I clarify that the problem is specific to the laptop, since the usual desktop computer Most often, it connects to the router via cable, or generally gains access to the Internet through a direct connection to the provider. But all the instructions below are also suitable for solving issues with a large PC, if it has a wireless module installed and the problem being considered today is also present.
It should also be borne in mind that it is not so important what version of the operating system is installed on it - Windows 10, 8 or 7 - the guide applies to all. Also, it doesn’t matter what brand the laptop is - most often, Lenovo, HP, Samsung or Asus users present with similar symptoms, but the solution is the same for everyone.
So, all the reasons can be divided into 2 groups:
- Errors on the PC itself, when the laptop does not see wifi initially or just one “fine” day it stopped working
- Reasons related to the wireless network configuration - incorrect settings or the wifi router does not work at all
In order to 90% understand what type of problem you have, one simple step is enough - try connecting from the same laptop to a different network. If everything is OK, then the problem is with the router. If wifi still does not work, the reason should be looked for in the adapter or the settings of Windows installed on it.
Windows 10 on a laptop does not connect to WiFi due to problems with the adapter
The first group of reasons when a laptop does not see wifi is incorrect configuration of parameters on the computer itself, so let’s try to do something directly in Windows.
Let us note the three most common situations, depending on which the solution to the issue will differ.
- When the laptop does not pick up the wifi network at all,
- when Windows sees the network, but the laptop cannot connect to wifi
- when it connects to a wireless signal, but cannot open pages and says that there is no Internet connection or it is limited
A laptop on Windows 10 says that there is no Internet connection or it is limited
Basically, this set actions should be enough. But if after that it’s still on your Windows laptop 10 does not connect to wifi and writes that there is no access to the Internet or the connection is limited, that is, you can go into the system’s network settings and try to manually set the necessary parameters.
- First, let's try to register a static IP address.
To do this, go to the “Network and Sharing Center” (to get there, click on “Start - Control Panel - Network and Internet”), where we find the link on the left side “Change adapter settings”


Here we are interested in the line “Default gateway” - this is the IP address of the router, and we will proceed from it when setting the IP address for the laptop. Close the “Information” window and click on the “Properties” button

Here we double-click with the left button on the item “IP version 4”

A window will open for entering settings for connecting the laptop to the WiFi network.
- IP for a laptop from the range of addresses specified in the router and available for use. If the router address (the same “Silent Gateway”) is 192.168.1.1, then for the computer you can assign 192.168.1.45, for example.
- Subnet mask - 255.255.255.0
- The router is the IP of the router. On most models, the default address is either 192.168.1.1 or 192.168.0.1 - try them, if that doesn't work, contact your network administrator.
- DNS is also the router’s IP, or you can use one of Google’s public addresses - 8.8.8.8 or 8.8.4.4.

Save with the “OK” button.
- The next step is to also manually register the DNS servers. This is done in the TCP/IP settings (Control Panel > Network and Internet > Network and Sharing Center > Change adapter settings > Right-click on Wireless connection > Properties > Internet Protocol version 4 (TCP/IPv4))

- Another setting that can help overcome the problem is to go to the “Networks and Internet > Manage Wireless Networks” section in the “Control Panel” on your computer. Here, find the desired wireless connection, right-click on it and go to “Properties”.

Here open the “Security” tab and click on “ Extra options" Try checking the box next to "Enable Federal Information Processing Standard (FIPS) compliance mode for this network." Then save the settings.

This concludes my story about a group of problems, causing errors in the operation of wifi on a laptop related to the network configuration Windows settings 7.
WiFi Internet does not work on laptop due to router
Now let's look at cases when a computer or laptop does not connect to wifi due to incorrect network settings on the signal source itself - the router.
The main things you need to pay attention to in the router admin panel are:
- DHCP server
- DNS servers
- WiFi mode
- Geography and date
If WiFi is not working well on your router, first of all try to solve the problem by simply rebooting the router - most issues resolve themselves after this simple action.
If this does not help, the first step is to determine how the network is configured. It often happens that the laptop does not connect to wifi due to the fact that by default it receives network parameters is set to auto mode. That is, it is assumed that the router has a DHCP server enabled, which itself distributes individual IP addresses to connected devices.
But for security purposes, it can be configured in such a way that all addresses are assigned manually - either on the laptop itself, or even registered in the network settings in the admin panel of the router itself. A symptom of this problem will be that when the computer connects to the wifi network, the screen will constantly display a message about “obtaining an IP address” without any result.
If you have access to the router, then go to its control panel () and activate the “DHCP Server” in the settings.
Another way is to try manually setting the DNS settings on the router. This is done in the admin panel, in the settings section for connecting to an Internet provider.
This is what it looks like in Asus routers new firmware— “Internet” section, “Connection” tab. Check the box to deactivate automatic selection of DNS servers and indicate the data:
- Or from Google: DNS1 - 8.8.8.8, DNS2 - 8.8.4.4
- Or: DNS1 - 77.88.8.8, DNS2 - leave empty.

In TP-Link routers this setting in the “Network > WAN” section, click the “Advanced” button at the bottom of the page, check the “Use the following DNS servers” checkbox and enter the same values.

Likewise, if WiFi does not work on a laptop connected to D-Link router(“Basic settings - WAN”)

If after applying these settings and rebooting the router, your WiFi still does not work or your laptop does not connect to it, then let’s pay attention to two more parameters.
- Wireless network operating mode. There are several common WiFi standards that differ in data transfer speed - B (up to 11 Mb/s), G (up to 56 Mb/s) and N (up to 150 Mb/s). If your router is set to the modern “N” standard, and the adapter of the connected device does not support it, then you will not be able to connect to your WiFi. If you are not sure which one is right for you, use “Mixed Mode”
- Another parameter is MTU. It is responsible for the size of a data packet transmitted over the network in one block without dividing it into smaller parts.
In the above screenshot from the TP-Link router, you can clearly see the default value - 1480. On Asus, you need to scroll down the page in the “Internet” (or WAN) section - we will see the value 1492, which was also the default.

The funny thing is that I took these pictures from routers that were alternately connected to my provider with a PPPoE connection type, that is, for the same different models chose a different value. Moreover, for each connection type (Dynamic or static IP, L2TP) different values are entered into their firmware. Therefore, to be sure, I would simply recommend calling your provider and finding out what specific MTU values are optimal for your Internet.
And one more setting on the router that may interfere with the adequate operation of Wi-Fi - country, time and date. It would seem like a small thing, but under certain conditions it may also cause wifi to not work on a laptop.
Here are all the methods that I could remember. If you have other solutions to the problem when the laptop does not see WiFi and, as a result, cannot connect to the Internet, share them in the comments!
If the article helped, then in gratitude I ask you to do 3 simple things:
- Subscribe to our YouTube channel
- Send a link to the publication to your wall on a social network using the button above
Tablets have long entered our lives, becoming an integral part of it. Although they have more and more functions, most owners still use their devices mainly for Internet surfing. Of course, it's very convenient. You can go to sites of interest or social media from anywhere using Wi-Fi.
However, it is with a connection to Wi-Fi on tablets running operating Android systems and problems arise, for example, Wi-Fi on an Android tablet does not turn on. This article describes the main difficulties when connecting your tablet to wireless networks and how to solve these problems.
If Wi-Fi does not turn on on your Android tablet, then first you need the correct one. Wi-Fi setup on Android tablet:
1.First you need to activate Wi-Fi through the menu interface or using the quick access buttons.
2.After switching on Wi-Fi module a list of available ones will appear in the notification panel wireless networks without a password.
3.If the required network is locked with a password, you need to go to the network settings and enter the required data. After this, the network will appear in the list of active ones.
4.When you select an open network, the connection occurs automatically, when you select a password-protected network, after entering the desired combination with a symbol in the window that appears.
5. If the password is entered correctly and the access point is configured correctly, then there should be no problems with the connection.

If Wi-Fi turns on on an Android tablet, but the tablet itself does not want to connect to Wi-Fi, then the problem is quite common. To solve it, you must follow the following recommendations:
1.Check if it is turned on.
2.Check whether the transmission is active. You also need to make sure that the router does not filter connected devices by MAC address
3.Try to disable protected networks and try to connect to open networks.
If you have problems connecting your tablet and home network WiFi
1.Check if it is possible to connect to another network. If possible, how stable is the connection?
2.If the connection to another network is active and stable, then the problem has arisen with your home access point.
3.Change home network security settings.
4.The solution may be to update the tablet firmware.
5.Try to connect to another Wi-Fi network.
6.If you accessed the Internet via Wi-Fi with the power connected, you need to turn off the power and try connecting to Wi-Fi again.
If the above tips did not help and Wi-Fi does not turn on on your Android tablet, then it is better to contact a PC repair specialist.


