The process of creating a mobile application using an example. Stages of mobile application development. Stages of mobile application design
In this article we will try to reveal the main stages of developing a program written in any programming language.
Specification (definition of program requirements):
At this stage there is detailed description source data, requirements for the resulting result are formulated, all possible program behaviors are considered when special cases arise (for example, if incorrect data is entered), development takes place dialog boxes, which will ensure interaction between the user and the program itself.
Algorithm development:
At this stage, the programmer determines the sequence necessary actions, which must subsequently be performed to obtain the desired result.
If a situation arises when a given problem can be solved in several ways, then, of course, many different options for the solution algorithm are possible. Then the program developer, based on some important criterion (for example, the speed of solving the algorithm), makes the choice of a more suitable solution.
The result of this stage of program development is a detailed verbal description of the program algorithm, or a block diagram of the algorithm. You can learn in detail about how to develop an algorithm for any program by studying this article.
Coding:
After specifying and drawing up a solution algorithm, the algorithm used will ultimately be written in the required programming language (Pascal, Delphi, C++, etc.). The result of the coding stage is a finished program.
Stages of program development. Debugging:
At this stage, the programmer is debugging the program, that is, finding and eliminating errors. The latter are divided into two groups: algorithmic and syntactic (errors in the text of the source program). Of these two groups of errors, syntax errors are the easiest to eliminate, while algorithmic errors are quite difficult to identify.
The debugging stage is considered complete only when original program works correctly and correctly with one or two sets of primary data. You can find out what compilation of any program is and what main tasks it performs by reading this article.
Testing:
Testing a program is very important because in most cases programmers create programs not for personal use, but so that others can use their program. At the testing stage, the developer checks the behavior of the program under a large number of sets of input data, both correct and specially selected incorrect ones.
Creating a help system:
If a programmer develops a program so that others can subsequently use it, then the programmer needs to develop a help system and install an easy fast access refer to this help system when working with the program. Modern programs have help information in the form of CHM or HLP files.
In addition to help information, the help system contains the necessary instructions for installing the program. They are usually presented in the form of a Readme file in different formats: *.doc, *.txt, *.htm. The considered stage of program development will be described in more detail later.
Creating an installation disk (CD-ROM):
Developers create an installation disk (CD-ROM) so that users can independently, without the help of a programmer, install this program to your PC.
Typically, in addition to the program itself, the installation CD-ROM contains help files and instructions for installing the program. It should be noted that most modern programs, including programs developed in the Delphi environment, in many cases, even by simply copying files cannot be installed on the user’s computer, since for the correct operation of these programs the presence of special libraries is required, as well as components that can not exist on a specific user’s PC.
With the availability of the Internet and smartphones, interest in mobile applications is growing every year. The themes and functionality of the developments never cease to amaze. Large enterprises and organizations are resorting to mobile applications to expand their business.
From idea to implementation, a mobile application is separated by several important stages of preparation:
- identifying the target market
- design
- drawing up detailed technical specifications (TOR)
- prototyping
- design
- development
- testing
- after testing and modifications we post the working one mobile version applications in App Store, Google Play and so on. and follow reviews and statistics
At , there is a turning point when you need to decide what functionality will make up the MVP (minimum viable product), how to think through the architecture for future expansion, what technologies to choose, and, in addition, decide on the labor costs and timing of the project. To optimize this process, it is recommended to make a design. Below we will explain why this stage is important, and when creating which applications you can skip it, and when creating which it will be a mistake that will cost the customer additional investments.
Mobile application design
Not every application needs design. A simple application does not require any design work. Design requires applications with unique, obviously new functionality, integrating many functions and systems, implying ambiguity possible solutions. In some, particularly complex cases, the design service is included in a separate contract.
The task of this stage is to understand and record:
1. How will the interaction of teams on the project take place on both sides?
2. What resources will be involved in the development (primarily the labor of specialists from the customer and developer)
3. What is the realistic time frame for launching the MVP and its functionality?
4. How the project will develop after the release of MVP (long-term project development plan)
Stages of mobile application design
1. Marketing
1) Goals of creating the application
Before creating an application, you should pay utmost attention to the goals of its development. The most common questions might be: “Who is this app for?”, “Why will people use it?” During the design process, these moments are worked out deeply and in as much detail as possible - without this information, development loses its meaning.
2) Custom scripts
The application will be used by specific people with specific tasks, so for each of them we must work out the most convenient way to solve these problems. To pass this stage, it is important that the customer has complete information about his target audience and knows thoroughly about the behavioral characteristics of representatives of one or another of its segments.
3) Promotion
The application will only live if it is downloaded and used. Developing a product promotion strategy after release will allow you to navigate the volume of future investments.
2. Architecture, structure and interfaces
1) Architecture
Server Database Design
2) Structure
Based on the results of the previous stage, we create the structure of the application, leaving what is necessary and discarding what is unnecessary.
3) Interface prototypes
Again relying on user scenarios, we create prototypes of all application interfaces (screens)

3. Technology
The choice of technologies determines the entire future of the application. Will it be native, hybrid or cross-platform. What loads should the server withstand? What integration capabilities should be included. These and many other non-obvious issues are resolved at this stage.
4. Selecting an MVP
Launching the minimum functionality allows you to start testing the application in a short time - within 2-3 months. This will allow you to stay in touch with your audience, gain downloads, confirm/refute hypotheses made in the process of writing user scripts, and receive first feedback on interfaces and usability.
MVP is a product that is clear in functionality and design, with clearly defined deadlines and a fixed cost of creation. Based on how the team worked during the MVP development period, you can make a decision on further cooperation on Time&Material terms (based on the standard hours actually spent)
5. Create a long-term development plan
Expansion of functionality and promotion of the application is described in terms of milestones, preliminary deadlines and labor costs. A long-term strategy will help plan the total investment required.
Once again about the benefits of designing before creating a mobile application
Creating a complex project “on a whim”, as a rule, turns it into an endless long-term construction with unpredictable departures into unnecessary iterations, unnecessary actions, and misunderstandings between the customer and developer teams.
On the contrary, a competently carried out design stage will allow you to see a transparent picture of the upcoming work in its entirety and not go in blind, but with a mutual clear understanding of what, why and for whom it is being done, as well as how long it will take and what the volume of investment required.

Dmitry Dementiy
![]()
Do you doubt whether it is worth investing in mobile application development? You can do it yourself and absolutely free. You may end up with a test version that can be used to conveniently evaluate the effectiveness of your mobile strategy. And if you try, you will make a decent mobile application that will become the main tool for online interaction with owners of smartphones and tablets.
Just keep in mind that even the coolest mobile application cannot be the only promotion tool. Only comprehensive Internet marketing gives maximum results in terms of traffic and sales.
Is it worth making your own mobile app?
Costs. If you don't take my word for it, here are some facts:
- According to Flurry Analytics and comScore, owners of smartphones and tablets use the browser only 14% of the total time spent working with the device. And they spend 86% of their time on different applications.
- Installed application- your direct channel of communication with the consumer. Just think: you don’t need to spend money on advertising or wait for a person to find you using Yandex. All that remains is to support the functionality the user needs and provide him with relevant content.
- The number of purchases made using tablets and smartphones is growing both on the Internet in general and in RuNet. According to marketing agency Criteo, already in 2016, more than half of online transactions in RuNet will be made using mobile devices.

If you want, the application is mobile browser, in which only your site opens. In what case would a user install such an Internet browser? Only if he is interested in your product or information. Therefore, remember: the client who installed the application is a loyal and ready-to-buy representative of the target audience.
In this case, is it worth taking the risk and offering DIY applications to loyal customers rather than custom programs made by professionals for Android and iOS? Let's figure it out.
When can you create an application yourself?
Do you remember what website visitors need? They come because of the content or functionality of the resource. People want to get information, buy something, look at and comment on friends' photos, and so on. Mobile app users need the same. They are looking for information or making some kind of transaction.
Do you remember when a business could make a website on its own? It’s right when you don’t yet have money to collaborate with professionals, but you still have the time and desire to figure out WordPress or Joomla. The same situation is with applications. Self-created programs for iOS and Android can be roughly compared to websites built on open source engines.
You don't have to register to start working. Click the Create Now button on home page or select the Create App menu in the upper right corner on any page of the service.

Select the appropriate application template. If we are talking about a content project, you may be interested in the following options:
- Manual. This template allows you to create a guide program.
- Blog. The application will help your blog audience read new notes from the screen of a smartphone or tablet.
- Website. The template converts a website into an application.
- Pages. With this template you can convert any content into an application with simple functionality.
- News. The template allows you to create an application that is an aggregator of industry or regional news.
- Page. The template converts offline content, such as an e-book, into the application.
- VK Page and Facebook Page. Create an application that allows you to monitor updates of open groups on VKontakte and Facebook.
- YouTube. Use the template to promote your YouTube channel.
How to Create a Blog App
Use the Blog template. In the appropriate field, enter the URL of your blog or RSS feed. Select a note title color.

Enter the name of the application.

Add a description.

Choose a standard one or add a custom icon. The appropriate image size is 512 by 512 pixels.

To create a download file, click the Create App button. After this, you need to register in the system. Confirm your registration and go to your personal account. Here you can install the application on your mobile device, publish it on Google Play and Amazon App Store. The system also offers a monetization option. If you use this feature, advertisements will be displayed in the application.

Check how the application works on your mobile device. On a tablet, the program should display a list of blog posts in title and announcement format.


IN personal account With AppsGeyser you can monitor the number of installations, create push notifications, publish the application in stores, monetize the program with advertising, and also edit the application.

Want more apps? Then create a guide app using the Manual template.

After editing the content, specify the name of the application, add a description and an icon. Click the Create App button. After creating the download file, install it on your mobile device and check its functionality.

Please note that most mobile devices By default, it blocks the installation of applications from unknown sources. If a user downloads a program from your site or an app builder site, they will see a security warning when they try to install it. Some clients will probably refuse to install the program.

8 constructors similar to AppsGeyser
If the universal AppsGeyser constructor is not suitable for you, pay attention to similar services:
- AppsMakerStore. Using the service you can create applications different types: from programs for Ecommerce to solutions for content projects. The designer makes applications for iOS and Android. The service interface is Russified. For beginners, there is an informative guide to using the constructor. The service is paid.
- Mobincube. A tool for creating and monetizing iOS and Android applications. The basic functionality of the service is available for free. The designer allows you to create applications of different types.
- Good Barber. Using this service you can develop Android and iOS applications. The constructor is paid, the cost of use is 16 USD per month.
Most of the services offered have an English-language interface. If you are uncomfortable working with constructors on English language, choose platforms with Russified content.
Application designers: a stone ax or a thin modern tool?
Don't go from one extreme to another. With the help of the proposed services you can really create workable functional applications. The resulting programs can be used to solve various problems: from facilitating online trading to distributing content and educating audiences. Applications created in the designer can be published on Google Play and the App Store, edited, and monetized using advertising or paid installations.
Do not overestimate the services offered. Their obvious drawback remains their stereotyped nature. It's about both about the design and functionality of programs. In addition, access to platforms with decent functionality is paid. What is better: to pay the developers for their work once or to pay the owners of the designer for many years? Do the math for yourself.
And one more thing: if you don’t have time to create your own mobile application, please contact our company. We develop mobile applications and .
Contact us Shall we discuss? Order a free consultation
I started studying graphic design, when I was 13 years old. I learned how to design websites through online courses and spent days playing around with Photoshop and Affinity Designer. This experience taught me to think like a designer.
I've been designing and developing applications for almost a year now. I took part in a program at MIT where I worked on the team developing the Universeaty app. Two months ago I started working on a new application, Crypto Price Tracker, which was released recently, on January 28th.
In this article, I will share the step-by-step design process that I follow when working on applications. This should help those who want to learn or improve their digital design skills. Design is not just about how to use design software, and this article will not teach you how to use it. There are hundreds of quality training programs online. Design is also about understanding the essence of your product, its functionality, and designing with the end users in mind. That's what this article will teach you.
Design Process:
- Create a user flow for each screen.
- Create/draw prototypes.
- Choose design templates and color palettes.
- Create a design.
- Create an animated prototype of the app and ask people to test it and provide feedback.
- Do final retouching of the layouts so that all final screens are ready for development.
Let's start!
User flow
The first step is to figure out what features you want in your app. Once you have ideas, create a user flow. This is a flowchart of how your application works.
Typically, a user flow consists of three types of figures.
- Rectangles are used to represent screens.
- Diamonds are used for conditions (eg login button click, swipe left, zoom).
- Arrows connect screens and conditions together.
User flows are very useful because they give a good logical understanding of how the application will function.
Here's a user flow diagram I drew when I started working on my app design.
User flow for the main interface.
Prototypes
Once you have completed creating user flows for each screen, you will begin working with prototypes for all screens. Prototypes are essentially low-detail sketches of your application. Essentially, a sketch or diagram of where images, labels, buttons, etc. will be located. A rough sketch of how your application will work.
I use printable templates from UI Stencils to draw wireframes. This saves time and provides a nice work area for drawing and taking notes.
Here is an example prototype.
 Mobile application interface prototype
 After creating your prototypes, you can use an app called Pop and take a snapshot of all your drawings using the app and get a clickable prototype by linking all the screens using buttons.
Design sketches and color palettes
This is my favorite part. It's like window shopping. Lots of design patterns and color palettes to choose from. I'll pick the ones I like and experiment with them.
The best platforms for finding patterns are Mobile Patterns and Pttrns. And to find good color palettes, check out Color Hunt.
Design
Finally you get to using software to create a design. It's like you logged into your app in the future and took some screenshots. It should look realistic and closely resemble the real thing.
Exist software development and tools for creating designs. I'm using Affinity Designer. The most commonly used iOS design tool is Sketch.
Here is an example of some early designs of my application.
 Transferring your drawing to pixels!
 I experimented more with different color palettes.

I shared the initial designs with friends to get their feedback. A lot of people seemed to like the gold and black gradient scheme.
Be open to getting feedback and experimenting with new suggestions! You'll get amazing feedback from your users when you talk to them, not when you're frantically browsing Dribbble or Behance.
So I redesigned the layout and removed the background graphics because generating them was a technically intensive process and they reduced readability. What ended up happening:
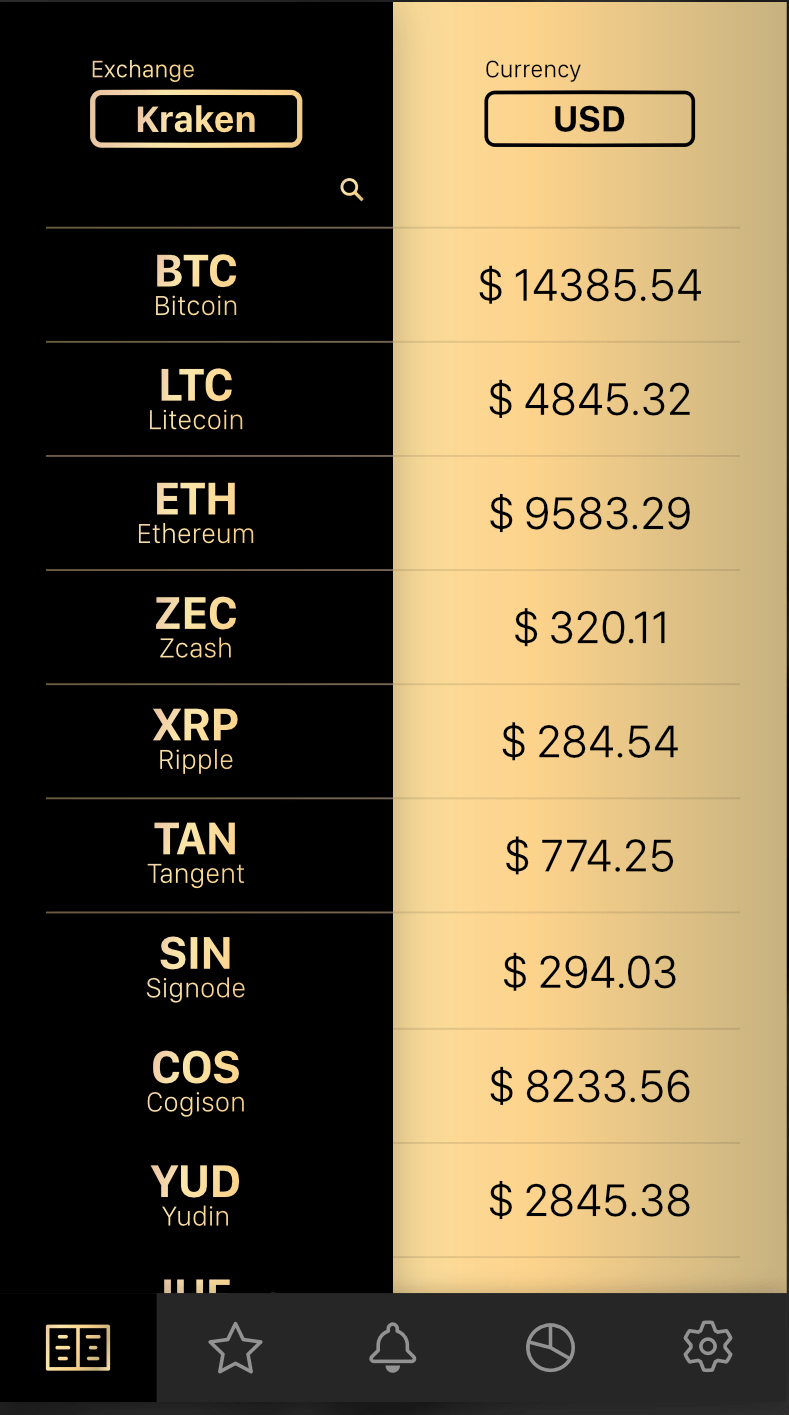 The gold and black gradient looks surprisingly good!
 I was happy with the color scheme, tab bar icons, and overall layout. I went ahead and designed the rest of the screens following the same design principles. It was a long but incredibly exciting process!
Once all my screens were ready, I put together a prototype in Adobe XD and asked a few friends to play around and give me their feedback.
After finishing touches this is what the final version of my design looks like.
 Final version design
 After all the screens were completed, I imported them into Xcode and began developing the application.
That's all! I hope this article helps you get started with your app design or helps you become best designer. And if you like my application, you can download it.
I end this article with one of my favorite design quotes.
“Design is not just about how something looks and feels. Design is how it works."
- Steve Jobs
Mobile application development is a complex and very labor-intensive process, which is a full-fledged software development. To make it easier for you to understand how we create mobile applications, we will briefly talk about each stage of our work.
People come to our company to bring their idea of a mobile application, web resource or automate business processes to life. We conduct a free business examination, advise the client and finalize the ideological component of the project, taking into account the needs of users.
Conducting interviews. The purpose and value of the application? The target audience? Basic functionality? Platforms? Requirements for the application development process? Criteria for selecting a contractor? Review of similar solutions: functionality, number of users, ratings, reviews, monetization. User analysis.
Additional questions. Connecting technical specialists. Approval of requirements for implementation of the application.
The project is assessed by the development team. After which the client receives a preliminary commercial proposal for application development: stages of application development; timing and cost; specialists; guarantees.
We conclude an agreement in which we describe in detail the stages of work and our obligations. You will be legally protected. Each stage of the work is absolutely transparent, all the main points are discussed with you in as much detail as possible.
Understanding what users expect from the application, we begin the prototyping process. A well-designed interface is the key to ensuring that the user quickly understands how the application will help solve his problem. You get the opportunity to see the functionality of the future application without the software part.
We draw the design of all screens and states of elements. We use Google and Apple recommendations for application design. We make sure that graphic solutions are clear and convenient. You get a design that will set you apart from your competitors.
Terms of reference - a document developed on the basis of an approved interactive prototype and product design, necessary for developers and testing engineers to develop and test the project.
Programming of a web resource or mobile application is carried out using the SCRUM methodology - step-by-step planning of tasks and dividing their implementation into sprints.
Demonstration of results to the customer in 2 weeks. The team analyzes risks and problems, completes the sprint, and optimizes the further application development process.
The difference between our work is that we not only develop applications, but also take them for promotion. Our clients receive a company that is responsible for all stages of work: from the first button to downloading the application and grateful user reviews.
Interview
We conduct interviews in person or via Skype. The interview may last several hours. This stage of application development is important. How accurately and completely the client answers the questions determines how the product will turn out.
The main questions we ask are: project objectives, existing business process, target audience, competitors. At this stage, future functionality is discussed.

MindMap
We create a MindMap - an intellectual map that allows you to structure all the information received from the client. This is a visual diagram of the project, thanks to which all application data is in one place.

Analysis


Sketching by hand
We study competitors' applications. We analyze where users may be uncomfortable or where they stumble while completing their tasks. We do this to determine how the new application will differ from existing analogues.

Prototype development
Based on the sketches, we create wireframes - a structural diagram of the application pages. This is the skeleton of the design, where every detail of the future product is depicted.
A UX specialist works on page layouts. The process of creating wireframes is discussed with the art director.


After its approval, a clickable prototype is made, which is sent for approval to the technical department.

User interviews
We test the finished prototype on users - employees of our office or groups of volunteers. We show the prototype and ask questions: “What do you think this button is?”, “How would you add a product to the cart?” and so on.
This helps to detect points that are unclear to users and correct errors at this stage of mobile application development.

Presentation of the prototype to the client
We make a presentation: we show the prototype to the client, explain what and how it will work. If necessary, we make changes and refine it. We agree on all the details and approve.

Design concept development
At this stage of mobile application development, we make several design concepts. The concept that the customer chooses will form the basis for the design of the entire application.

Design of all screens and states
At this stage, all screens and element states are drawn. On average there are 120-150 screens. This helps to take into account all scenarios and not increase the programming time.


Technical specifications and client-server architecture
When we have a design ready, we begin development Technical specifications. It describes all scenarios, screen transitions and screen states. At this stage, the specialist is working on the hi-level architecture of the project and the data storage model.

This is an important stage. It determines how the software part will be built, the speed of the application, and the configuration of “client-server” requests. Where do we get data from, where do we record it, how do we record it, etc. The technical specification includes all systems with which it is necessary to synchronize.

Programming and Testing
The work goes into the hands of programmers. The development process is based on the methodology agile development Scrum. Formed full list tasks (the so-called “back-log”) and is divided into small sections (called “sprints”).

We program it step by step and demonstrate the result after each sprint. When the software part is ready, we send the application for testing. Testing specialists check the product for possible errors. If necessary, the application is returned to the programmers for improvement.

Publishing an application
The main stages of mobile application development have been completed, all that remains is to prepare the application for publication. To do this, we create a product description and graphics that comply with the rules of the Google Play and AppStore stores. If you do not comply with them, the application will not pass moderation.


In stores, the first thing a user sees is the app icon, so it’s important to make it attractive.

When creating graphics for app descriptions, we check whether the authors have permission to use certain images, whether there are celebrity faces in the photos, and whether other store requirements are met.


Product technical support
Once completed, projects move to the technical support stage.


