192.168 0.1 login to personal. How to log into the admin panel of a Rostelecom router. Problems logging into your router personal account
Select product 7200-1200AC 7200-1200DC 7200-2000AC 7200-2000DC 7200-24 7200-24G 7200-24G2XG 7200-24GE 7200-2XG 7200-48 7200-48P 7200-4XG 7200 -512RAM 7200-ASE3 7200-CM1 7200-CM2 7200-CM3 7200-CM4 ACS-WPCASE ANT24-0800 ANT24-0801 ANT24-0802 ANT24-0802C ANT24-1200 ANT24-1201 ANT24-2100 ANT24-CB01N ANT24-CB03N ANT24-CB06N ANT24-CB09N ANT 24-ODU03M ANT24-ODU1M ANT24- ODU3M ANT70-0800 ANT70-1000 ANT70-1400N ANT70-1800 ANT70-CB1N ANT70-CB1RN ANT-SP CWM-100 DAP-1325 DAP-1360U DAP-1420 DAP-1513 DAP-1520 DAP-1610 DAP-1620 DAP-223 0 DAP -2310 DAP-2330 DAP-2360 DAP-2660 DAP-2680 DAP-2695 DAP-3310 DAP-3320 DAP-3410 DAP-3662 DAP-3760 DAP-3860 DAS-3216/RU DAS-3248/EA DAS-3626 DAS- 4192-20 DAS-4192-30 DAS-4192-40 DAS-4192-50 DAS-4192-60 DAS-4672 DAS-4672-10 DAS-4672-20 DAS-4672-30 DAS-4672-40 DAS-4672- 50 DAS-CB1 DCH-M225 DCM-202/RU/C DCS-100 DCS-210 DCS-3010 DCS-3511 DCS-4602EV DCS-4603 DCS-4622 DCS-4701E DCS-4703E DCS-4705E DCS-4802E DCS-6510 DCS-6513 DCS-6517 DCS-6616 DCS-6915 DCS-700L DCS-7110 DCS-7413 DCS-7513 DCS-7517 DCS-8000LH DCS-8100LH DCS-825L DCS-8515LH DCS-8600LH DEM-210 DEM-211 DEM- 220R DEM-220T DEM-302S-BXD DEM-302S-BXU DEM-302S-LX DEM-310GM2 DEM-310GT DEM-311GT DEM-312GT2 DEM-314GT DEM-315GT DEM-330R DEM-330T DEM-331R DEM-331T DEM -410CX DEM-410X DEM-412CX DEM-421XT DEM-422XT DEM-423XT DEM-424XT DEM-431XT DEM-432XT DEM-433XT DEM-434XT DEM-435XT DEM-436XT-BXD DEM-436XT-BXU DEM-CB100 DEM- CB100QXS-4XS DEM-CB100S DEM-CB300 DEM-CB300CX DEM-CB300QXS DEM-CB300S DEM-CB50 DEM-CB50CXP DEM-CB50ICX DEM-CB700S DEM-PB1S-OLT DEM-QX01Q-SR4 DEM-QX10Q-LR4 DEM-X10CX -1271 DEM-X10CX-1291 DEM-X10CX-1311 DEM-X10CX-1331 DEM-X40CX-1471 DEM-X40CX-1491 DEM-X40CX-1511 DEM-X40CX-1531 DEM-X40CX-1551 DEM-X40CX-1571 DEM-X40C X-1591 DEM-X40CX-1611 DEM-X70CX-1471 DEM-X70CX-1491 DEM-X70CX-1511 DEM-X70CX-1531 DEM-X70CX-1551 DEM-X70CX-1571 DEM-X70CX-1591 DEM-X70CX-1611 DES-1005 CDES- 1005D DES-1005P DES-1008C DES-1008D DES-1008P DES-1008P+ DES-1016A DES-1016D DES-1018MP DES-1018P DES-1024A DES-1024D DES-1026G DES-1050G DES-1100-16 DES- 1100-24 DES-1210-08P DES-1210-28 DES-1210-28/ME DES-1210-28P DES-1210-52 DES-1210-52/ME DES-1228/ME DES-3026 DES-3028G DES-3028P DES- 3200-10 DES-3200-26 DES-3200-28 DES-3526 DES-3528 DES-7206-Base DES-7210-Base DFE-520TX DFE-551FX DFE-560FX DFL-870 DGE-528T DGE-530T DGE-550SX DGE-560SX DGE-560T DGS-1005A DGS-1005D DGS-1005P DGS-1008A DGS-1008D DGS-1008MP DGS-1008P DGS-1010MP DGS-1016C DGS-1024C DGS-1026MP DGS-1026X DGS-1052X DGS-110 0-05 DGS-1100-05PD DGS-1100-06/ME DGS-1100-08 DGS-1100-08P DGS-1100-08PD DGS-1100-10/ME DGS-1100-10MP DGS-1100-10MPP DGS-1100-16 DGS -1100-16/ME DGS-1100-24 DGS-1100-24/ME DGS-1100-24P DGS-1100-24P/ME DGS-1100-26MP DGS-1100-26MPP DGS-1210-10 DGS-1210-10 /FL DGS-1210-10/ME DGS-1210-10MP DGS-1210-10MP/FL DGS-1210-10P DGS-1210-10P/FL DGS-1210-10P/ME DGS-1210-12TS/ME DGS-1210 -20 DGS-1210-20/FL DGS-1210-20/ME DGS-1210-26 DGS-1210-26/FL DGS-1210-28 DGS-1210-28/FL DGS-1210-28/ME DGS-1210 -28MP DGS-1210-28MP/FL DGS-1210-28MP/ME DGS-1210-28P DGS-1210-28P/FL DGS-1210-28P/ME DGS-1210-28X/ME DGS-1210-28XS/ME DGS -1210-52 DGS-1210-52/FL DGS-1210-52/ME DGS-1210-52MP DGS-1210-52MP/FL DGS-1210-52MP/ME DGS-1210-52MPP DGS-1210-52MPP/ME DGS -1210-52P/ME DGS-1250-28X DGS-1250-28XMP DGS-1250-52X DGS-1250-52XMP DGS-1510-20 DGS-1510-28L/ME DGS-1510-28P DGS-1510-28X DGS- 1510-28XMP DGS-1510-28XMP/ME DGS-1510-52X DGS-1510-52XMP DGS-3000-10L DGS-3000-10TC DGS-3000-20L DGS-3000-26TC DGS-3000-28L DGS-3000-28LP DGS-3000-28SC DGS-3000-28X DGS-3000-28XMP DGS-3000-28XS DGS-3000-52L DGS-3000-52X DGS-3120-24PC/*RI DGS-3120-24SC/*EI DGS-3120- 24SC/*RI DGS-3120-24TC/*RI DGS-3120-48PC/*RI DGS-3120-48TC/*RI DGS-3130-30PS DGS-3130-30S DGS-3130-30TS DGS-3130-54PS DGS- 3130-54S DGS-3130-54TS DGS-3200-10 DGS-3420-26SC DGS-3420-28PC DGS-3420-28SC DGS-3420-28TC DGS-3420-52P DGS-3420-52T DGS-3427 DGS-3610- 50P DGS-3612G DGS-3620-28SC DGS-3620-52P DGS-3620-52T DGS-3627 DGS-3630-28PC DGS-3630-28SC DGS-3630-28TC DGS-3630-52PC DGS-3630-52TC DGS-6600 -24SC2XS DGS-6600-24SC2XS-C DGS-6600-48S DGS-6600-48S-C DGS-6600-48T DGS-6600-48TS DGS-6600-8XG DGS-6600-CM DGS-6600-CM-II DGS- 6600-FAN DGS-6600-FAN-II DGS-6600-PWR DGS-6600-PWRDC DGS-6604 DGS-6608 DGS-703 DGS-707 DGS-711 DGS-712 DHP-1220AV DHP-1565 DHP-208AV DHP-209AV DHP-309AV DHP-329AV DHP-346AV DHP-P308AV DHP-P309AV DHP-W310AV DIB-110 DIB-200 DIB-360 DIR-615 DIR-615/GF DIR-620S DIR-640L DIR-806A DIR-806A/R DIR -815 DIR-815/AC DIR-822 DIR-825 DIR-825/ACF DIR-841 DIR-842 DIR-853 DIR-878 DIR-879 DIR-882 DIS-100E-5W DIS-100E-8W DIS-100G- 5PSW DIS-100G-5SW DIS-100G-5W DIS-200G-12PS DIS-200G-12S DIS-PWR180AC DIS-PWR40AC DIS-RK200G DIS-S301SX DIS-S302SX DIS-S310LX DIS-S310R DIS-S310T DIS-S330LH DIS- S330R DIS-S330T DIS-S350LHX DIS-S380ZX DKVM-4K DKVM-4U DKVM-CB DKVM-CB/1.2M DKVM-CB3 DKVM-CB5 DKVM-CU DKVM-CU3 DKVM-CU5 DKVM-IP1 DKVM-IP16 DKVM-IP16LCD DKVM -IP8 DKVM-IPCB DKVM-IPCB5 DKVM-IPVUCB DMC-1000 DMC-1001 DMC-1001/DC DMC-1002 DMC-1910R DMC-1910T DMC-300SC DMC-515SC DMC-530SC DMC-700SC DMC-
see also
Question: Setting up wireless D-Link router DI-824VUP+ for working in the Netbynet network
Answer:
1. Connect the device to the computer’s network card via a cable.
Connect to the port marked 1.
2. Connect the network cable from our equipment to the port on the “WAN” router ![]()
3. Turn on the device’s power supply to electrical network(~220 Volts).
4. Turn on the computer.
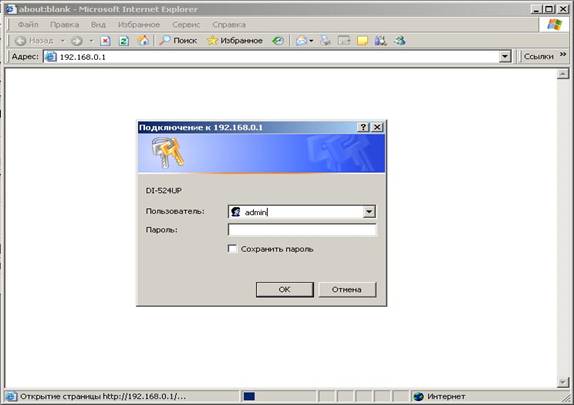
5. After booting the computer, run Internet Explorer
6. In the address bar Internet Explorer dial address http://192.168.0.1
User: admin
No need to enter a password!
7. Select a section Home.
Let's go to the subsection LAN. 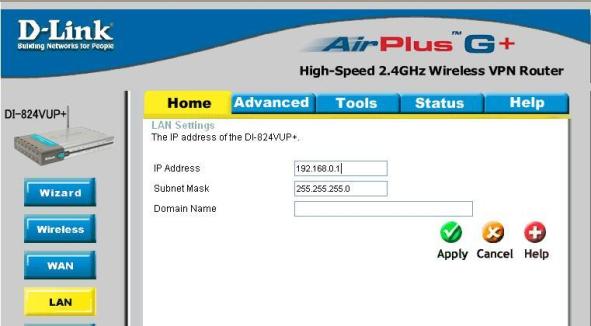
To line IP Address enter the new internal IP address of the device
IP Address - 192.168.0.1
Subnet Mask - 255.255.255.0
Click on the button Apply
.
After clicking, it is advisable to perform the following operation:
Go to - Start
- Control Panel
- Network connections
- Double-click with the left mouse button on the icon
"Connect via local network"
- in the window that opens, select a tab "Support"
and press the button "To correct"
.
8. Open Internet Explorer
Enter in the address bar http://192.168.0.1
User: admin
No need to enter a password!
Go to the section Status.
We look at the device firmware version
Version number Firmware Version must be no lower v1.06b07
if the firmware number is lower, the device must be flashed to the latest version in accordance with the documentation. (firmware address) 
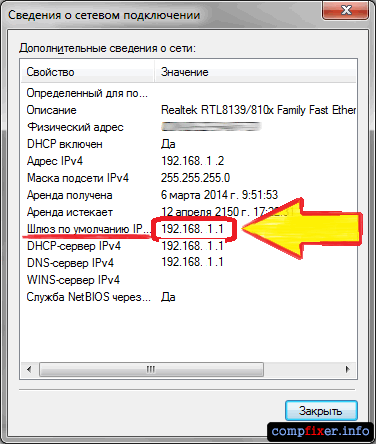
You should also write down the following parameter on a separate sheet of paper - Gateway.
You will need it for further settings.
9. Select a subsection WAN
We register DNS servers 
Primary DNS Address -> 212.1.224.34
Secondary DNS Address -> 212.1.230.111
Apply.
10. Setting connection parameters to the VPN server
WAN Settings-> Others -> PPTP
PPTP Client->Dynamic IP
Server IP/Name-> ppp.lan
Account enter the username in accordance with the agreement (vpp_*****)
Password enter the user password
Retype Password repeat password entry
Connect Mode Select the connection mode to the VPN server
-> Always-on(Always on)
-> Manual(Connect manually from the browser by going to 192.168.0.1)
-> Connect-on-demand(Turns on whenever you try to access the Internet) 
We fix the selected settings with the key Apply.
11. Wireless Settings- configured in case of connection
laptop or other device via IEE802 standard radio channel to the router D-Link.
Wireless Radio-> On
Network ID(SSID)-> (radio network name - select any network name, for example homenet)
Channel -> 6
Security-> WPA-PSK
Preshare Key-> (for example - 45612232) 
We fix the selected settings with the key Apply.
12. Checking the connection of the D-Link router to the VPN or manually connecting to the VPN is done on this page: 
13. Checking the operation of the computer on the Internet
14. Set a password for the D-Link DI-824VUP+ router

15. We fix the selected settings with the key Apply
16. We check the login to the device with the password at http://192.168.0.1/ from the browser.
17. Setting up Routing.
To access local resources, you must configure a routing table (routing)
Go to the section Advanced
Next to the subsection Routing 
Enter the values in the table fields in accordance with the figure. In field "Gateway" you should enter the local network gateway that we saved a little earlier (see Item Settings No. 8)
| Destination | Subnet Mask | Gateway | ||
| 10.0.0.0 | 255.0.0.0 | |||
| 212.1.224.0 | 255.255.255.0 | |||
| 212.1.255.0 | 255.255.255.0 | |||
| 89.20.128.0 | 255.255.255.0 | |||
| 213.141.128.0 | 255.255.255.0 | |||
| 192.168.0.0 | 255.255.0.0 |
Setup complete
When setting up a D-Link, TP-Link or Tenda modem or router, you may encounter that when you try to log into the web interface via the browser using the IP address 192.168.0.1 , instead of the authorization window you will receive the error “Cannot access the site”:
The second version of the error that may appear when trying to log into Personal Area via 192.168 0.1 - This is "Web page not found":

This immediately leads a novice or inexperienced user to a dead end. Attempts to contact technical support provider usually ends in one of two endings. The technical support operator either completely rejects the client on the basis that this is his equipment and he must deal with it himself (which, in principle, is logical), or a specialist is sent to the subscriber who, for a certain amount, carries out the necessary settings of the router. But what to do when you don’t have money for an adjuster, but you can’t log into the router yourself via 192.168.0.1?
In this article I will try to talk in detail about what ways there are to solve this problem, which are quite accessible to everyone. Here are eight main reasons why the personal account of a D-Link, TP-Link or Tenda router may be unavailable:
1.
Spelling error when writing the address.
2.
The IP on the network card is incorrectly registered.
3.
The router has a different address on the network (i.e. it is not 192.168.0.1).
4.
The proxy server is specified in the browser properties.
5.
Problems with network adapter drivers.
6.
Damage to the LAN cable that connects the computer to the router.
7.
Router malfunction.
8
. Viruses on the computer.
Let's look at each of them in more detail.
IP input error
The first, and also the simplest reason, is a spelling error when entering. Users manage to enter all sorts of crap instead of an IP address. One has to wonder how such a thing even came to mind.
Firstly, instead of the number “0” (Zero) they write the letter “O”. Like this: 192.168.O.1
Secondly, instead of one, indicate the capital Latin “El” - “l”, or the capital Latin “I” - “I”. It turns out something like this: 192.168.0.I.
One has to wonder - how is this possible? How can you read the letters in a number line?!
Thirdly, users skip periods between octets of the address. That is, like this: 192.168 0.1
or like this: 192.168 0 1
.
It is clear that the browser will not understand what the person needs and will send it to a search engine.
And further. There is no need to write prefixes like http:// or www. Don’t think that the system is stupid and won’t figure it out without it. And even more so there is no need to indicate domain zone like .ru, .com or .net at the end. Is not Domain name, and the IP address.
Correctly it looks like this:

The router has a different address on the network
If you cannot log in to 192.168.0.1 in your router’s personal account, then turn it over and see what address is indicated on the sticker and whether it matches what you enter.
If there is a hostname written there like tplinkwifi.net or tplinklogin.net, then try logging in through it.

The fact is that with the same TP-Link it often happens that the same model, but different hardware versions of IP addresses may differ. And if this is a Rostelecom router, then you shouldn’t be surprised - it says one thing, but in fact it may be completely different.
Checking what is written in the parameters network protocol IP of your computer or laptop. To do this, open the "Toolbar" - "Network and Sharing Center" shared access".

Here you need to select “Change adapter settings” in the menu on the right.

IN Windows 10 the list of network connections opens slightly differently. There you need to open the Start menu, select "Settings". Then find the "Network and Internet" icon:

In the window that opens, find the menu item "Wired Ethernet" - "Configure adapter parameters":

In the list of network adapters that appears, select the one through which you are connected to the modem or router and right-click on it.

IN context menu select "Properties". The following window will appear:

In the list of components we find “Internet Protocol IP version 4 TCP/IPv4”, mark it and click on the “Properties” button. This will open another window. Let's see what addresses are listed here. Ideally, everything should work in automatic mode, that is, like this:

If D-Link router or TP-Link 192.168 0.1 is not available, then we try to register the IP statically. Like this:

The computer address should be taken 1 more than that of the router, that is, 192.168.0.2. If Windows suddenly shows an IP conflict, then add another one - 192.168.0.3.

Proxy settings
Another common culprit of problems with logging into the router is the proxy server configured in the browser. This special computer through which access to the Internet is provided. This often occurs at home and corporate networks. Sometimes the virus can play around like this. What to do? I'll show you with an example Google Chrome. In other browsers, everything is done by analogy.
Open the application settings:

We are looking for the "Network" section. There will be a button “Change proxy server settings”.

Click on it and get into the Windows 10 Internet Explorer Properties. We need the “Connections” tab:

Click the "Network Settings" button. In the next window you will need to find the checkbox “Use a proxy server for local connections”:

If it is standing, feel free to remove it and click on the “OK” button. We try to log into the web interface of the modem or router again.
Network card driver
We should not forget about such cases when the user cannot open the web interface of the modem or Wi-Fi router after Windows reinstallation. This usually happens due to the fact that the user, out of ignorance or absentmindedness, did not install the network card driver, and the OS did not find a suitable one in its existing database. It's easy to check. Open the Start menu and write “Device Manager”.
In the Manager window and see if there are any lines with a yellow or red exclamation mark.

If there is such a thing and it’s called Network Controller or Ethernet controller, then this is the required network card. An exclamation mark next to it means that the device does not work due to the lack of an up-to-date driver. There is only one way out - go to friends, go online, find required driver and slip it into your Windows 10.
Damaged LAN cable or faulty router
I combined these two reasons due to the fact that they are both hardware and in both cases it will not be possible to access TP-Link or D-Link via http://192.168.0.1. But in the first case, when the cable is damaged, you can get away with minor expenses. A two- to three-meter patch cord is not expensive and can be made at any store that sells components.

There are also ready-made, branded patch cords on sale, which are sold in M-Video, Yulmart and similar consumer electronics stores. But they cost significantly more. If the modem or router is faulty, you most often have to prepare for significant financial costs.

But before you rush out for a new router, try the following. Open command line Windows and run the command ping 192.168.0.1. Because network device is not available, the response will be “Timeout interval exceeded.” Now, one by one, plug the patch cord into each of the four LAN ports of the modem or router and start ping.

If none of the ports has positive result, then it makes sense to try resetting to the factory configuration. To do this, find a paper clip, toothpick or pen refill. then pick up the router and find the small button on it Reset. It usually looks like a small hole on the body.

You have to press it with a paper clip. Do not try to break the body; the pressure is quite noticeable. You need to hold the button pressed for 5-10 seconds and then release it. The indicators on the device should blink, after which it will reboot.
After they light up again, repeat the ping on all ports. The result is the same? Go get a new one =(.
Viruses and malware
Recently, there have been more and more cases of computers and laptops being infected with cunning viruses that, at best, change the DNS settings on the computer, and at worst, change network settings router (in particular Trojan RBrute). The fight against this virtual infection must begin with checking your computer. Therefore, if you have suspicions that a virus has taken over Windows 10, then download the free Drweb CureIT anti-virus scanner and use it to check the system partition of your hard drive.
In some cases, such as the Trojan RBrute mentioned above, you will also have to reset the current configuration to remove all the changes that it may have made. Then re-configure the connection with the provider.
Does not allow access to 192.168.0.1 using admin/admin (login/password)
This case is generally worth a separate discussion. This usually happens if the user has changed the factory password for logging into the router via http://192.168.0.1 with admin, which by default is set to something of their own. And then I forgot it. Another scenario is when a friend, acquaintance or paid computer technician came to you and set up your router. For example, DIR-300. At the same time, he changed the password for his personal account. Rostelecom installers especially like to do this. And now, of course, it won’t let me through admin/admin. What to do?

The simplest, and probably the only correct way out is, again, to reset the settings of your D-Link or TP-Link by pressing the "Reset" button. After this, the entire configuration should be reset, and the password will be reset accordingly. After this, login via 192.168 0.1 via admin/admin to the router should become available again. But here you must understand that you will have to make all the network settings again. Of course, you will not have Internet access at this time. Therefore, if you do not have experience in this matter, invite a knowledgeable person or specialist. Just now watch what and how he will change.
Frequently asked user question: why can't I go into settings Wi-Fi router at 192.168.1.1 or 192.168.0.1? Indeed, quite often the user cannot enter the router settings because an error is displayed:
Http://192.168.1.1 Web page unavailable
Address to enter settings
Actually, the address of your router's web interface does not necessarily have to be or . These are just the most common variations of the IP address, and only if no one has changed it. In this article we will talk about various reasons for the problem of logging into settings and ways to solve it.
What is a router?
First, let's figure out what a router is. If anyone still doesn’t know, a router (also known as a router) is a device that is used to connect several devices to the Internet at the same time. If you connect your provider's cable directly to your computer (without a router), then the Internet will only work on this PC and you will have to configure it to connect all other devices to the network. And if you have a router in the room, then the provider’s cable is connected to its WAN port, and all other client devices are already connected to the router - some using Ethernet cables, others via Wi-Fi. To put it simply, a router is a kind of “Internet connection splitter,” just like an extension filter in the case of electricity.
To enter the router settings, use any browser - Chrome, Opera, Firefox. In order to enter the settings, you need to enter a special IP address into the address bar of your browser. Most often these addresses are 192.168.1.1 and 192.168.0.1, but there may be others.
Unfortunately, people often have problems logging into their router settings at these addresses. And if you can't get into the web settings panel, you won't be able to access the web. There are many reasons for the problem. And in this article we have collected all the reasons and their solutions known to us.
Today we will answer the following questions:
- How to setup network card to log into the web interface on 192.168.1.1 (192.168.0.1)?
- Why can’t I access the settings of my router, modem or access point?
- In what cases, when trying to open the settings page of the 192.168.1.1 router, does the “page unavailable” error appear?
- Why, when trying to enter the settings of a router (modem, access point), does it redirect to Google search or Yandex?
What is 192.168.1.1 and 192.168.0.1
192.168.1.1 and 192.168.0.1 are IP addresses through which you can access the settings of your Wi-Fi router. Inexperienced users often call the router settings a website and say “I can’t go to the settings site.” This is not entirely true. Indeed, the router settings are a web page, but it is not located on the Internet, but is hardwired into the router itself. Therefore, instead of saying “site with settings”, it is better to express it correctly and the phrase “router web interface” or simply “router settings”.
What is the default IP address of the router settings?
The factory address of the router settings can be found:
- in the instructions
The instructions always come with the device either in paper form or as a PDF document on disk, and very often both. In addition, setup instructions can always be downloaded from the official website of the router (access point, modem) manufacturer.
- on the sticker
Typically, it is located on the bottom of the case or on the back of it. Here is an example from the D-Link DIR-300 router:
 And this is what the TP-Link TL-WR841ND sticker looks like:
What IP should I register on my computer to access http://192.168.1.1
For initial setup The router needs to be connected to any of its LAN ports with the computer’s network card:

And to enter the settings interface, you need the IP address of the network adapter to be in the same subnet as the router address. Most routers have a DHCP server enabled by default. This means that in the settings of your computer’s network adapter you just need to specify receiving IP automatically.
To do this, right-click on the network icon near the clock and select Network and Sharing Center:

- Click on the link with the name of your network connection.
- Select Properties.
- Highlight Internet Protocol Version 4.
- Click the button Properties.
- Set both switches to Automatically.
- Click OK:

But when setting up access points, repeaters (repeaters) or other network equipment, you need to assign an IP address to your computer manually, which in system administrator jargon is called “setting the IP address in the first place.” Go to settings and manually assign an address to the network card. For example, if the default IP of the router is 192.168.1.1, assign the network adapter any address from the 192.168.1 range. 2-254 with subnet mask 255.255.255.0 :

Accordingly, in order to access http://192.168.0.1, you need to enter (for example) 192.168.0.24
Login to router settings

Why doesn’t the address 192.168.1.1 (192.168.0.1) open and an error appears?
So, first we will analyze the situation when, instead of the router settings page, an error like Web-page is unavailable:

1. You are entering an incorrect IP address.
Your router has a different default address (for example, 192.168.0.1 rather than 192.168.1.1) or the address has been changed to something else in the settings (for example, 192.168.0.254).
Solution
Find out the current IP of your router. This can be done both with and on iOS or Android:
Enter the correct settings address in the address bar in the format http://192.168.1.1
2. The router’s IP address is in a different subnet
This often happens after changing the IP router or if the computer address is configured manually.
Solutions
Option 1. If you know the router's IP, assign an address from the same range to your computer's network card.
Option 2: If you don't know, follow these steps:
- Make sure your computer is connected to the router's LAN port.
- Install automatic receipt network settings.

- View network connection information. The gateway address will be the router address.

- Enter the correct IP into the browser line.
3. The browser has a proxy server enabled
This also includes the enabled Turbo mode in Opera or Yandex Browser, as well as various applications and extensions that change IP - for example, . In addition, the browser may be infected with malware. Under all these circumstances, attempts to log into the control panel at addresses 192.168.1.1, 192.168.0.1 or any others may result in an error.
Solutions to the problem
- Disable Turbo
- Disable the proxy server. You can also try checking the box Don't use proxies for local addresses or add the router address to the exceptions.
- Scan your computer for viruses using and.
4. Network interface is disabled
- Enable the network interface.
To do this, log in Control Panel - Network and Internet - Network Connections - Changing adapter settings, right-click on the desired interface and select Turn on:

- Switch the patch cord to another network card if you have several of them.
- Install latest version drivers for the network adapter.
5. The power to the router is turned off or there is a problem with the network cable
Check the power supply and integrity of the patch cord. Try replacing the cable:

6. A non-standard port is used to enter the router settings
In the settings of many routers (for example, the popular manufacturer TP-Link), you can specify not only the address, but also the port through which the web configuration interface will be available. If the port specified is not standard (that is, not 80), then to enter the settings you will need to specify its number separated by a colon after the address. For example:
Http://192.168.1.1:43011

Therefore, in this case you have three options:
- find out the port number from the person who configured the router;
- try to enter the settings using the host name, for example tplinkwifi.net(naturally, if you have a TP-Link router). You will be redirected to the correct IP address and port (usually 192.168.0.1);
7. Router malfunction or failure
Perform a factory reset

Signs that the router is faulty:
- no internet or network;
- no indicator lights up;
- I can't enter settings.
Can't access 192.168.1.1 (192.168.0.1) from iPhone and Android
A very common mistake when trying to access the router settings from a phone: when entering a username on iPhone and Android, the first letter is entered as a capital letter. This leads to the error " The username or password you entered is incorrect“, and you can’t understand what’s the matter. To enter your login correctly:

Why does it redirect me to Google or Yandex when I try to access the settings web interface?
1. You enter 192.168.1.1 without http://
Some browsers, instead of going to http://, will redirect you to a search by numbers:
Type the URL in the address bar, starting with 'http':
http://192.168.1.1
2. Commas instead of periods
If you type in the Russian keyboard, then commas may appear instead of periods:
192,168,1,1
In this case, you will also be redirected to the search engine.
 Enter the correct URL in your browser starting with http:// and click Enter:

3. Letters instead of numbers in the IP address
Sometimes, for some unknown reason (most likely, of course, out of ignorance), people enter the letters “i” instead of units. As a result, instead of an IP address you get the awkward 192.168.I.I or 192.168.l.l and after that you end up in the search instead of the router settings page.
The most common addresses, logins and passwords
For novice users: if you don’t have a sticker on your router, don’t have instructions, the Internet doesn’t work, etc., here are the most common default details.
The Rostelecom company provides its subscribers with various equipment for rent, including routers. The company is not involved in the production of equipment, but in world practice a scheme is widely used in which the manufacturer supplies the provider with equipment without a logo, and the provider already applies his own. Rostelecom does the same (it cooperates with the companies huawei, zte, eltex, sagemcom, etc.), which means that clients may have different models. In this article we will look at universal ways to access your router settings.
How to enter the router settings
So, you rented or bought a router, came home and want to set up the Internet or make some other settings (for example). To do this, you need to open the package, connect power and a cable to the router, but not the one that comes into your apartment from the entrance, but the one that will connect the router to a computer or laptop. Connect the other end of the cable to your turned on computer. For most router models, the admin panel is available at 192.168.1.1 or 192.168.0.1 . Type one of them into the address bar of your browser and press enter.

After this, a window for entering your login and password should appear in front of you.

The username and password for logging in are indicated in the operating instructions for the router, but if you could not find such information there, then try the following combinations:
- login - admin, password - empty
- login - admin, password - admin
- login - admin, password - password
- login - admin, password - 1234
If one of the combinations is correct, then a page with available router settings will open in front of you.

If these options do not work, then you need to reset the settings to factory settings. To do this, find the Reset button on the back wall and press it for a few seconds while the router is turned on.

Basic settings of the Rostelecom router
The first tab of the router settings displays summary information about the current state of the device. We don't make any settings here.

The second tab is where you configure your Internet connection. Select the interface you need (in our case PPPoE/VPN) and click on the “add connection” button.

In the window that opens, you need to select a protocol, come up with a name for the connection, enter a username and password to access the Internet ( this information must be in your contract), as well as the server address. Leave the remaining items in the "auto" state.

If you have several computers at home, then on the next tab you can assign each device its own IP address on your home network.

The next tab is responsible for Wi-Fi setup. Here you need to set the name of your network, select the encryption type and come up with a password.

The manufacturer regularly releases firmware updates that correct errors found by users and add new functionality to the device. That's why it's worth checking regularly for available updates. Go to the settings tab and find the “update” item there. The screen will display the current firmware version and the version available for update. All you have to do is click on the “install” button.

As you can see, with minimal knowledge you can produce self-configuration router without calling a company specialist to your home. Ask questions in the comments and we will help you, but in the meantime we recommend watching a video on this topic.


