Virtualbox won't install. Step-by-step installation and configuration of the Virtualbox virtual machine. Creating a virtual machine
I started talking about what a virtual machine is and what it is needed for.
And now I will tell you about the program for working with virtual machines, how to install and configure it.
There are many options for working with virtual machines. various programs, the most common: Oracle VirtualBox, VMWare Player, VirtualPC.
Each option has features, advantages and disadvantages, but VirtualBox absorbs all the advantages of other options, is free and has very flexible configuration and support for many operating systems for virtualization. Of course, there are also disadvantages, but they will be noticed only by professionals who do this and use virtual machines for special needs, using different technologies.
And so in this article I decided to show how to work specifically with VirtualBox, and if someone is interested, you can figure out other options without any problems.
So let's begin...
First of all, download the program Oracle VirtualBox. Go to the website: virtualbox
If you are using a Windows operating system, click on the “x86/amd64” link next to the line “VirtualBox 4.3.12 for Windows hosts".
If your browser is configured to always prompt you before saving a file, you will receive a window where you need to specify the location where the file will be downloaded. Select a convenient folder for downloading on your computer and click “Save”:
If the browser has a setting that files will be downloaded without a request to the specified folder, then such a window as above will not appear and the file will be downloaded to the folder specified in the settings itself.
The file size is about 100 Megabytes.
Run the downloaded file and the installation of the program will begin. In the first window, click “Next”:
In the next window you can disable some options and functions that you think will not be used in the program and this will reduce the size installed program. For all beginners and those who are not particularly computer savvy, I recommend leaving all options enabled and simply clicking “Next”:
Upon completion of the installation, they offer 3 options: place the icon for launching the program on the desktop; add icon to panel quick launch(for Windows Vista, 7, 8 operating systems), associate virtual machine files with the VirtualBox program. Enable or disable the first 2 options at your discretion, and I highly recommend enabling the last “Register file association”:
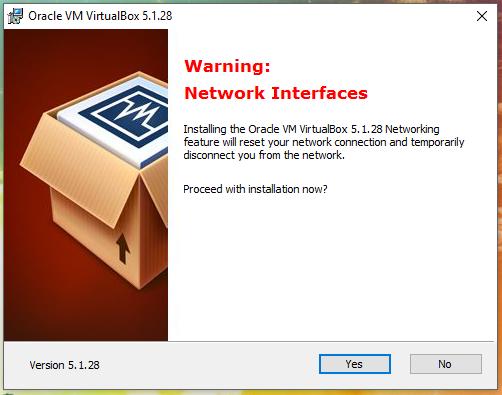
Click “Yes” in the next window. Here we are warned that additional ones will be installed network connections For virtual machine and the actual connection may be interrupted. Nothing bad will happen and you most likely won’t even notice anything:
In the last window before installation, click the “Install” button:
The installation process will begin and approximately towards the end a window will appear where you need to confirm the installation software for USB (so that real USBs work in the Virtual Machine):
You just need to check the box “Always trust Oracle Corporation software” and click the “Install” button.
After installing the program, there will be a checkmark in the window, which means that the program will launch itself after clicking the “Finish” button. We recommend leaving this checkbox and clicking “Finish”:
In any case, you can launch the program from the desktop icon or from the Start menu > All Programs.
After installing and launching the program, it will look like the image below:
Let's immediately make some program settings. To do this, go to the menu “File” > “Settings”:
The first thing we will do is set a folder for storing virtual machine files. These will be full-fledged systems and will take up enough space. For example, I use a virtual machine with Windows XP for my purposes; it is the fastest of the entire Windows line. So I have all the updates installed in this virtual machine, Microsoft Office 2010, programs for autosurfing SafeSerf and 2 browsers ( Mozilla FireFox And Google Chrome) and the folder with the virtual machine already has a size of 8.74 GB. So when choosing a folder to store virtual machines, keep this in mind.
You can set the folder for storing virtual machines on the first “General” tab. There you need to open the list next to the words “Folder for cars” and select “Other”. Next, specify a convenient folder for storing virtual machines. You can, of course, leave the one that is set by default, but it is best to store virtual machines on a disk that is not a system one (the one on which Windows is installed) and on which there is a lot of free space, because the size of virtual machines can be 15 GB or more:
In the settings on the “Updates” tab, make sure that the “Check for updates” checkbox is checked and I advise you to set the check period to “1 month” so that reminders do not come too often. “Stable release versions” should also be marked:
We finish with the settings here, everything else does not require any changes for normal operation. And if there is any need to change something, you can always turn to the settings.
Now our task is to install and run the virtual machine itself in VirtualBox. Let's get started.
Creating a new virtual hard disk for installing the operating system and configuring it.
Let's look at working with a virtual machine using Windows XP as an example. In most cases, I use this particular system as a virtual one, since it is the most productive, unlike its successors (Windows Vista, 7, 8), and also requires the least resources and takes up the least space on the hard drive. I use Windows 7 as a virtual one only for special purposes, when I need to try something on it.
Of course, to install the system on a virtual machine, you will need the disk itself with the required operating system or an ISO image. You can find them on the Internet in free access on torrent trackers (for example http://pirat.ca/) and others, and can also be found on simple sites / blogs.
So, let's begin the process of preparing a virtual machine for operation using Windows XP as an example:
We find a disk or image with the desired system.
Password for unpacking the archive: 123
Disable your antivirus programs before unpacking, because most of them consider the “help_3.4.exe” file, intended to activate the system, to be a virus. This is not a virus, and antiviruses react this way because it is a hacking program, because it activates the system. And antiviruses consider all hacking programs to be “dangerous”.
To begin installation in VirtualBox, select the “Machine” > “Create” menu:
A window will appear in which you need to specify the name (in the “Name” field) of the virtual machine to be created. Just specify it so that you yourself understand what kind of virtual machine it is (if there are several of them). In the “System Type” list, you can select the type of operating system to be installed accordingly. Since we are installing Windows XP in the example, we leave everything by default. In the “Version” list, select the desired version. In our example, this will again be “Windows XP”. Click “Next”:
The next step is to select the quantity random access memory, which will be allocated for the operation of the virtual machine. For simple tasks and Windows testing XP is suitable; the recommended volume (default) is 192 MB. For newer systems, the recommended volume will be different. But it’s better not to set it less than recommended; the virtual machine will slow down. If you plan to use a virtual machine to work in a box and run many accounts at the same time, then you should allocate a lot of memory, and at least 2 GB. (2048 MB.). But here it’s worth starting from how much real RAM is installed in your computer. I recommend setting the amount of memory to run the virtual machine equal to half of the real one. For example, if your computer has 8192 MB of RAM (8 GB), you can allocate 4096 MB (4 GB) for the virtual machine. You can do even more, but then monitor the performance of the real operating system in which it works. If it slows down, then reduce the amount of allocated memory. I will show you how to change the volume in the future in subsequent steps.
So, you have selected the required amount of memory. Click the “Next” button:
5. At the next stage, you must select “Create a new virtual hard disk”. Please note the recommended volume hard drive for a given system (you will need to choose later). Click the “Create” button:
Now we will be asked to select the virtual disk format. This choice will determine what other programs you can use the created virtual hard disk with to create and run virtual machines. The easiest way is to leave the default selection “VDI” (VirtualBox Disk Format), since there are no plans to use the created virtual machine with other programs. Click “Next”:
7. At the next stage, you need to select the type of virtual disk to be created: physical or dynamic. I recommend choosing a dynamic one, since it is often necessary to expand its volume for certain needs, but the physical one does not allow this. So, select “Dynamic virtual hard disk” and click “Next”:
8. Now you need to set the size of the virtual hard disk that will be used to run the virtual machine. Whatever volume you specify, that’s what you’ll see in the virtual machine. As you remember, the recommended volume for our system is 10 GB. When this window appears, this optimal volume will already be set here. If no particularly large programs and files will be used in the system, then 10 GB is quite enough (I work with exactly this volume). Calculate what you will use the system for, what size programs you will install on it, and roughly estimate how much space all this will take up. It’s better to never choose less than 10 GB; it may simply end up not being enough for the system itself for updates and other things.
In the top field you can also specify the name of the virtual disk to be created. By default, it is the same as the name of the virtual machine and I recommend not changing anything. After selecting the disk size, click the “Create” button:
After this virtual HDD will be created, and the virtual machine as a whole will also be created, but without the operating system installed on it. You will be returned to the main window of the VirtualBox program. Now let’s immediately go through the settings of the created virtual machine.
9. So, your created virtual machine, without a system yet, will appear in the main window. Select it with the mouse and click the “Settings” button and consider the main useful and necessary settings:
In the first tab “General”, and then on the right in the “Advanced” tab there is a useful option “Remember changes while the VM is running”. If this option is enabled, then after each shutdown of the virtual machine, all changes on it will be saved. If you uncheck this box, then any changes made in the system will not be remembered. Those. you will turn on the virtual machine and each time you will see it in the same state as you launched the previous time. This allows you to 100% protect the system from viruses, and also simply keep the virtual system clean.
I recommend leaving this checkbox in place at the beginning (i.e. so that all changes are saved), performing all the necessary system settings, installing and configuring everything necessary programs in this system, and only then uncheck this box and not be afraid that your virtual machine will become clogged with something.
11. Switch to the “System” tab > “ Motherboard" Here you can change the amount of RAM allocated to your virtual machine. If you remember, it was asked at the beginning of the process of creating a virtual machine. I had the volume set to 192 MB and in my example I will not change it.
Now let’s switch to “Processor” in the same window. Set the “CPU Load Limit” to 90%. If you leave it at 100%, the virtual machine will sometimes give an error when starting and will not start.
14. Now let’s look at the last and very important function in the settings of the created virtual machine – “Shared Folders”.
While working with a virtual machine, you will probably need some files from the real system. For example, in both systems I use a file with data about accounts on boxes and their wallets. Simply opening a file in a real system and, if necessary, rewriting logins and passwords manually into a virtual machine when logging into a site takes a very long time, and the clipboard does not work. Those. you can't just copy text from some file on the real system and paste it into the virtual system. It's there for everything special functions"Shared Folders". We need to add a folder from the real system in which we work, and it will be available in our virtual machine.
So, in the virtual machine settings, open the “Shared Folders” tab and then add a new folder by clicking the button on the right (it’s the only one available) with the image of a folder with a plus sign:
In the window that opens, in the “Folder Path” field, click the drop-down list button:
Now the window will display the folder we have selected and its name. Be sure to check the “Auto-connect” checkbox so that the folder is always immediately available when the virtual machine boots. Check the “Read Only” checkbox based on your own needs. If you check this box, you will not be able to write or copy anything from the virtual machine to the added shared folder.
I do not check this box so that I can copy any necessary file from the virtual machine to the real system, or change something from the virtual machine in the file of the real system. After making the settings, click “OK”:
Of course, you can add as many folders as you like to suit your needs and for your convenience. At this stage, the shared folders are configured, but in order for them to work later, it will be necessary to installed system install the special “Guest Edition” add-on. It's quick and easy, and we'll return to this after installing the Windows XP virtual operating system.
This is where we looked at the basic and necessary settings. Click “OK” in the main settings window:
Now the most important thing remains - install the operating system on the created virtual hard disk. And that is all. Although installing the operating system is a completely separate issue, I will still show this process using the example of Windows XP. Still, this is part of the topic at hand.
VirtualBox is an intuitive program to use. If you are not interested in theory and want to start practicing right away, then refer to the instructions for using VirtualBox to install and run operating systems in a virtual computer:
- Installing Linux on a virtual computer (using Linux Mint as an example)
This series of articles discusses in detail the capabilities of VirtualBox, and also gives detailed description its options. This material is recommended for you if you want to thoroughly understand VirtualBox, and also if you have any problems or questions that you cannot solve on your own.
What is virtualization and its usefulness
VirtualBox is a program that allows you to run multiple operating systems simultaneously on one computer. These operating systems may include Linux, Windows, Mac and others. VirtualBox itself also works on various systems (it is cross-platform).
This means that with the help of VirtualBox, being, for example, in Windows, you can, without rebooting the computer or even installing another OS on a real computer, boot into Linux and work with any Linux applications as if you had a Linux operating system installed. You can, for example, run other Windows versions to check settings and programs that you do not want to run in your main operating system.
Virtualization (running operating systems inside virtual computers using VirtualBox) has a number of useful features:
- simultaneous launch of several operating systems - you can get acquainted with new operating systems without turning off your main system;
- separation of real and virtual computers - when working in a virtual OS, there is no need to be afraid of erasing the bootloader, losing files, or in any way harming your main operating system, since the virtual system is completely separated from your main system. No matter what mistakes you make in the virtual computer, your main OS will always remain intact. For this reason, a virtual computer is suitable for conducting various tests, including those that can harm the OS; for example, in a virtual computer you can analyze malware (viruses) without fear for the main system;
- ease of software installation - if you are on Windows and need to work with a program that only runs on Linux, then instead of the tedious task of trying to run the program on someone else's OS, you can very easily deploy a Linux virtual machine and work with the desired program from there. Or vice versa, if you are on Linux you can create a Windows virtual machine to work with Windows programs without having to try to run them on Linux;
- the ability to roll back changes made - you don’t need to be afraid of doing anything wrong in a virtual computer, since you can take any number of “snapshots” of the system at any time and, if desired, return to any of them;
- infrastructure consolidation - virtualization can significantly reduce hardware and electricity costs; Today, most of the time, computers use only a fraction of their potential during operation, and on average, system resource utilization is low. A large amount of hardware resources as well as electricity is wasted. So instead of running a large number of physical computers that are only partially used, you can pack many virtual machines onto several powerful hosts and balance the loads between them.
VirtualBox Concepts
When we're talking about about virtualization (as well as to understand further information), it is useful to become familiar with the terminology; we will especially often encounter the following terms:
Host operating system (host system).
This is the operating system of the physical computer on which VirtualBox was installed. There are versions of VirtualBox for Windows, Mac OS X, Linux and Solaris.
Guest operating system (guest OS).
This is an operating system that runs inside a virtual machine. In theory, VirtualBox can run any x86 operating system (DOS, Windows, OS/2, FreeBSD, OpenBSD).
Virtual machine (VM).
This is a special environment that VirtualBox creates for your guest operating system while it is running. In other words, you run the guest operating system "in" a virtual machine. Typically the VM will appear as a window on your computer's desktop, but depending on which of the various VirtualBox interfaces you use, it may appear in full screen or remotely on another computer.
In a more abstract way, VirtualBox internally thinks of the VM as a set of parameters that determine its behavior. These include hardware settings (how much memory the virtual machine should have, what hard disks VirtualBox must virtualize through which container files, which disks are mounted, etc.), as well as state information (this could include: the virtual machine is currently running, saved, its snapshots, etc.). These settings are reflected in the VirtualBox Manager window, as well as in the VBoxManage command line program. In other words, the virtual machine is also what you can see in the settings dialog.
Guest Additions.
This refers to special software packages that come with VirtualBox, but are designed to be installed inside a virtual machine to improve the performance of the guest OS and add additional features.
Installing VirtualBox on Windows
To download VirtualBox, go to the official website https://www.virtualbox.org/wiki/Downloads. Click the link " Windows hosts" to start downloading the installation file. Run the file by double-clicking - the installation process is similar to any other programs in Windows.
You can choose which components to install, it is recommended to install all VirtualBox components for full support all options:
Installation messages may appear unsigned drivers- agree to their installation. For the program to work correctly, agree to all requests from the installer.
The following warning informs you that a short time will be reset network connections, i.e. you will be temporarily disconnected from the network. We agree, the Internet connection will automatically resume in just a second.
Installing VirtualBox on Linux
On Linux, VirtualBox can be installed in several ways:
- from the standard repository
- binary file downloaded from the official website
- from the VirtualBox repository added to application sources (Debian-based distributions only)
Installing VirtualBox on Debian and derivatives (Ubuntu, Linux Mint, Kali Linux)
For Debian and derivatives (Ubuntu, Linux Mint, Kali Linux), you can install VirtualBox from the standard repositories:
Sudo apt install virtualbox virtualbox-qt linux-headers-"$(uname -r)" dkms vde2 virtualbox-guest-additions-iso vde2-cryptcab
Installing VirtualBox on Arch Linux and derivatives (BlackArch and others)
For Arch Linux and derivatives (BlackArch and others), you can install VirtualBox from the standard repositories:
Sudo pacman -S virtualbox linux-headers virtualbox-host-dkms virtualbox-guest-iso
Information on installation in other distributions, as well as additional details, can be found on the corresponding page: https://www.virtualbox.org/wiki/Linux_Downloads
Installing the VirtualBox extension packs
To expand the functionality of the basic VirtualBox package, additional extension packages can be downloaded. Oracle currently provides one extension package.
The VirtualBox Extension Pack adds the following features
- USB 2.0 virtual device (EHCI)
- USB 3.0 Virtual Device (xHCI)
- VirtualBox Remote Desktop Protocol (VRDP) support
- Host webcam transfer
- Intel PXE boot ROM
- Experimental support for PCI transfer on Linux hosts
- Encrypting a disk image using the AES algorithm
VirtualBox extension packs have the extension in their file name .vbox-extpack. To install an extension, simply double-click on the package file and an assistant will appear that will guide you through the installation steps.
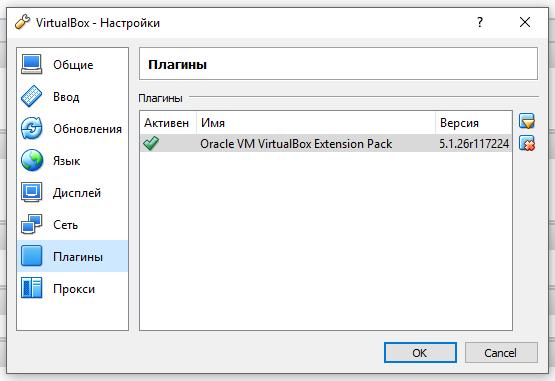
To view currently installed extension packs, open main VirtualBox Manager(main program window), in the menu " File» select « Settings" In the window that opens, go to the “ Plugins", there you will see the currently installed extensions and can remove the package or add a new one:
The extension pack for the latest version can be found on the download page.
If you are not using latest version VirtualBox, then you can find the extension package by - select the folder with your version number and download, then double-click the file with the extension .vbox-extpack.
Launching VirtualBox
On Windows, VirtualBox can be launched from the menu or from a desktop shortcut.

On Linux you will also find VirtualBox in the menu,

or you can type the command in the terminal:
Virtualbox
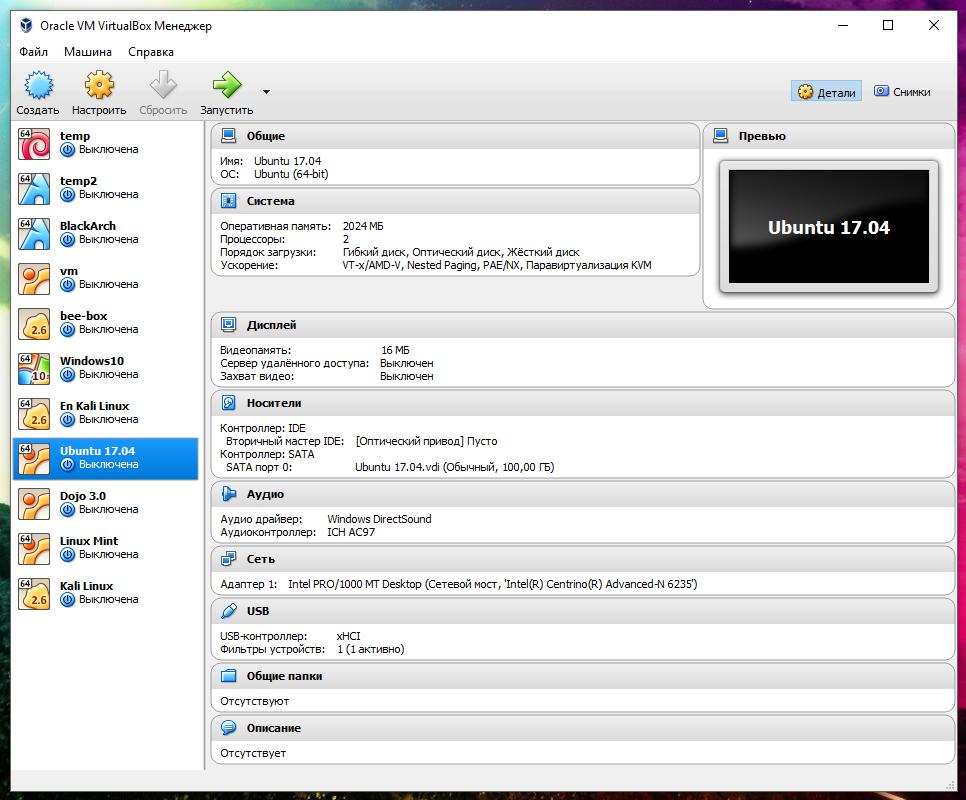
A window similar to the following will open:

Or, if you have already created virtual machines:
VirtualBox is an emulator of an operating system based on the host machine, or simply on our computer. Installing a program usually does not take much time and does not require any skills, and today we will look at this procedure in detail.
First you need to visit the official website and download the installer. You can do this using the link below. Next, we will take a detailed look at the installation process and analyze the main nuances of setting up the program.
Installation

Settings
So, we have installed the application, now let's look at setting it up. Usually, after installation, it starts automatically, unless the user has disabled this function, in which case you will have to launch it yourself. The first time this happens, a welcome window is displayed. As virtual machines are created, they will appear on the start screen along with their settings.

Before you create your first virtual machine, you must configure the application. You can open the settings window by following the path “File” – “Settings”. More quick way- pressing a combination Ctrl+G.

Tab "Are common" allows you to specify a folder for storing virtual machine images. They are quite voluminous, which should be taken into account when determining their location. The folder must be located on a disk with enough free space. In any case, the specified folder can be changed when creating the VM, so if you have not yet decided on a location, you can leave the default directory at this stage. Paragraph "VDRP Authentication Library" remains the default.

On the tab "Enter" You can set key combinations to control the application and the virtual machine. The settings will be displayed in the lower right corner of the VM window. It is recommended to remember the key Host(This Ctrl on the right), but there is no urgent need for this.

The user is given the opportunity to set the desired application interface language.

You can also enable or disable the option to check for updates.

Display settings must be configured separately for each virtual machine. Therefore, in this case, you can leave the default value in the settings window.

The same goes for network settings.

Installation of application add-ons is performed on the tab "Plugins". If you remember, add-ons were downloaded when installing the program. To install them, press the button "Add plugin" and select the desired add-on. Please note that the versions of the plugin and application must match. In more detail this procedure discussed in the articles linked below.
Virtualbox is an intuitive virtual machine, that is, a program with which you can run additional operating systems as part of the main one installed on your hard drive or SSD. Windows XP is an old, but time-tested and, in a sense, still relevant, lightweight and familiar operating system. By installing it on a virtual machine, you can solve a variety of problems.
What is it for
First, a little terminology. The operating system you are currently working on and reading this text is called the host. The OS installed and running within the host system is called a guest OS. Installing “ex-pi” on Virtualbox can serve different purposes. Even if your working Windows system XP, a guest “copy” can also be useful. Here are some popular uses for this feature:
- Installing and launching Windows programs in a different environment (Ubuntu, Debian, etc.).
- Using old applications and games that do not work on new systems (7, 8.1 or 10).
- Testing potentially dangerous applications (the guest OS is isolated from the host system unless shared folders are created).
Here are at least three reasons why Windows installation XP on a virtual machine is not a pointless idea. In the end, you can simply practice for the sake of self-education. Virtualbox is cross-platform and runs on most operating systems. The only rule for its correct operation is to have a good supply of system resources. That is for Windows startup XP as a guest system must have at least 500 MB of unused RAM and a more or less unloaded processor.
Step-by-step deployment of the guest OS
First of all, you need to download Virtualbox from the official website. Let's assume that your host system is one of the latest Microsoft operating systems, 8 or 10. Installing Virtualbox is no different from installing any other program, except that during the process it may display a message stating that the software has not been tested with this version of the operating system. Don't pay any attention to him. It may appear up to 3-5 times, just continue with the installation.
The program interface on different OSes is slightly different, but in general it looks something like this:
You must have a CD or image Windows disk XP in ISO format. But first you need to create the virtual machine itself. For this:
- Click the “Create” button.
- In the drop-down menus, select the OS type and version, and also give the machine a custom name (nothing depends on it except the name in the window title).

- Click the “Forward” button.
- Now specify the amount of RAM available to the guest system. The default value is enough to run Windows XP itself, but not enough to run programs. If your amount of RAM allows, move the slider to at least 512 MB, and preferably to 1024 (the green zone is the most comfortable value for collaboration host and guest systems).

- Click Forward.
- Create a virtual hard disk for the guest system. Everything is indicated in the screenshots.


Important to note: by choosing fixed hard disk, you will automatically create a file of the specified size on your real hard drive. The dynamic hard disk will grow in proportion to the Windows XP installed on it (with the installation of new programs and so on).


- After clicking on the “Create” button, the virtual machine will be ready.

You can look into the settings by clicking on the “Configure” button.

For example, in the Display section of the Display tab, you can add video memory to the virtual machine or enable 2D or 3D acceleration to improve video quality or use 3D applications. But usually the default settings are enough to run Windows XP.
Now make sure that the OS disk is in the drive or the disk image is in some folder. Click the “Run” button. The following windows will open:

If you are using a disc in your drive, just click Continue. If the image is in .iso format, then go to the folder icon and select your image and also click the “Continue” button. The installation of the operating system will begin. It is no different from what can be produced using real hardware. For those who have forgotten, here are the highlights.


Next, the virtual hard disk will begin formatting, installation files will be copied, and the reboot will begin, during which you DO NOT need to press any buttons. This is the only way to guarantee that the actual installation of the OS on Virtualbox will open, and the preparation for installation will not begin again, as in the screenshots. Ideally, after rebooting, you will see something like this:

Entering the key, computer owner name, time zone and other information varies depending on which Windows XP you have, so this question will not be considered.
There is only one point worth noting. The Virtualbox window may capture the mouse cursor (not always) and it becomes unavailable for other actions. To “return” it, hold down the right Ctrl on the keyboard and click the left mouse button.
After the installation of the system on Virtualbox is completed and you see the desktop, install guest OS additions for better screen resolution and full-fledged work“guest” operating systems.


Install and reboot.
Additionally, if you need shared folders between the host and guest, follow these steps.


Select the desired folder. For example, this is a folder called Downloads, located in Documents. Save the result and open command line in the guest system. Enter the command:
net use x:\\vboxsvr\Downloads
where x is the drive letter and Downloads is the name of the folder created in the previous step. Press Enter. If successful, the following will appear in the “My Computer” section. network drive X, through which files located in the Downloads folder of the host system will be available.

This completes the installation. You can use Windows XP in parallel with your main operating system.
(Visited 24,530 times, 2 visits today)
Installing software on a computer, especially little-known software, is always associated with a certain risk. The program may contain errors that affect the stability of the system, built-in advertising or tracking modules, and other unwanted elements. In addition, any software leaves traces on the system that may not have the best effect on its operation. As for experiments with Windows, everything is even more risky here, because sometimes even a seemingly insignificant change in registry data or modification system files can lead to the most unpleasant consequences.
Ask how to avoid them? Very simple, use virtualization systems, for example, the VirtualBox virtual machine - special program, which allows you to install, run and test different operating systems in an isolated environment. You can do anything with such virtual computers - install programs on them, configure them, modify system files, work with disks and partitions, in a word, perform any experiments. If the virtual OS is damaged, you can restore it from a snapshot or delete it altogether - this will not have any effect on the host system, that is, the main working system.
Installing VirtualBox for Windows
Perhaps all this may seem complicated to some, but in fact there is nothing in working with Virtualbox that a novice user cannot handle. So how to use VirtualBox? As usual, it all starts with installation. We go to the developer’s website www.oracle.com/virtualization/virtualbox/index.html and download the latest version of the program.
Installing VirtualBox on Windows 7/10 is almost no different from installing most other programs; you just need to follow the instructions of the wizard and do not change anything in its parameters. Upon completion of the procedure, you will receive a ready-made virtualization platform.


Creating and basic configuration of a virtual machine
Like installing VirtualBox, creating and configuring a virtual computer is not particularly difficult; the program automatically selects the best configuration depending on the operating system being installed. User control, however, will not hurt.
Let's create a virtual machine for Windows 10 32-bit as an example. Launch VirtualBox and click the “Create” button on the toolbar. In the window that opens, give the machine a name (can be arbitrary); in the drop-down lists, select the operating system and its version.

At the next stage, you will be asked to specify the amount of RAM allocated to the virtual machine. There are no strict rules regarding the allocated RAM; for 32-bit Windows it is advisable to reserve at least 1 GB of memory, for 64-bit Windows - at least 1.8-2 GB.

At the third stage, a virtual hard disk is created, here we leave everything by default. Click “Create”, select the disk type VDI or VHD.


As for the storage format, it is better to select “Dynamic”, this way you will save time and space on the physical disk, although losing a little in performance.

We set the size of the virtual disk as desired, but not less than specified in the operating system requirements. Click “Create”.

The virtual machine has been created and now you can quickly go through its settings. First of all, however, go to the settings of the VirtualBox program itself and on the “General” tab change the path to the virtual machine storage directory. It is best to allocate a folder for them on drive D, where there is the most space.

Now go to the settings of the created VM and check the following parameters:
- In the “General” section on the “Advanced” tab, change the path to the VM snapshot files if necessary (it is advisable to place them in the folder with the main VM container file). Here you can enable a shared clipboard for the host and virtual machines.
- If you want to install the system in EFI/GPT mode, in the “System” section, be sure to check the “Enable EFI (special OS only)” checkbox.
- To be able to run 3D applications on a virtual machine, in the “Display” section, check the “Enable 3D acceleration” checkbox.


Setting up the Internet and shared folders

If you plan to provide access to the VM to other users on the local physical network, in settings VirtualBox networks You should select the connection type “Network Bridge”. To ensure interaction between different virtual machines, the “Virtual Host Adapter” mode is used; to connect guest operating systems to a single internal network, the “Internal Network” mode is used. There is also a connection type " Universal driver", but it is used much less frequently.
Of particular interest are shared folders in VirtualBox, thanks to which the user can exchange between the host and virtual machines any files. You can connect such a directory in the “Shared Folders” section. To do this, click on the plus sign opposite the “Machine Folders” item, select a folder on your hard drive through the overview and connect it, not forgetting to check the “Auto-connect” checkbox.

Starting a VM and installing the operating system
Now you know how to configure VirtualBox and the created VM. Next, let's see how to install the operating system on it. The procedure for installing an OS on Virtualbox is practically no different from installing it on a physical computer, except that instead bootable flash drive or DVD, the installation installation is used here ISO image. Launch the created virtual machine and specify the path to the bootable ISO image with the system in the window that opens.

Will begin standard procedure installation, during which you will be asked to accept the license agreement, partition the disk, and upon completion of copying the system files, create account user.


The guest operating system is installed, but some functions, in particular, shared folders and the clipboard, will not work until you install a special plugin - guest OS additions. In addition, without these add-ons you will not be able to adjust the screen resolution, connect flash drives to the virtual machine, etc. Fortunately, you don’t need to download anything; guest OS add-ons are included with VirtualBox. All you need to do is select the option in the virtual operating system menu Devices – Mount the Guest Additions disk image.

Go to the “This PC” section in the virtual OS, open the disk drive VirtualBox Guest Additions and, if the system does not offer to do this itself, run the executable file VBoxWindowsAdditions.exe.


Install the add-ons as a regular program, accepting the security agreement, and restart the virtual computer.


The guest system is ready for use, all that remains is to check the network operation. We will not dwell in detail on how to set up the Internet in VirtualBox. If you selected NAT, the VM will connect to the Internet automatically. With other types of connections, you will most likely have to tinker a little. Remember the main thing: if the IP address for your main computer is automatically issued by the router, the same settings must be set in the parameters of the virtual system network adapter. If settings are assigned manually, then they must also be assigned manually in the guest system network adapter settings.

Main problems when working with VirtualBox
VirtualBox – stable and high quality software, and if users have to face problems during its operation, the causes of the latter are most often the errors of the users themselves. Thus, those who try to launch virtual machines on VirtualBox with Hyper-V active will encounter the error “Failed to open a session for the virtual machine” (code E_FAIL 0x80004005). The reason is the incompatibility of these virtualization platforms. If you are planning to use VirtualBox, please disable Hyper-V and vice versa.


However, the disabled virtualization function in the BIOS can lead to the same error. This will be indicated by the unavailability of hardware virtualization options in the virtual machine settings (VT-x/AMD-V and Nested Paging in the section System - Acceleration). By the way, these options must be enabled even with active virtualization in the BIOS, otherwise the VM will also not start.

A VM crashing into BSOD upon startup is a common problem caused by a lack of physical computer resources allocated to the guest operating system. When creating a virtual machine in VirtualBox, you need to ensure that the allocated resources meet the requirements of the operating system.

The Blue Screen of Death can also be caused by Hyper-V enabled on the host system and a controller type mismatch. If the virtual disk was previously connected to SATA, and then you connected it to IDE, the guest OS will fail with a critical error and crash into BSOD. The issue is resolved by creating a new compatible controller and connecting a container file with the guest system to it.
Accidental deletion of snapshot files by the user may result in the inability to start the VM. You need to delete snapshots correctly - through the “Snapshots” section, otherwise you will have to completely reinstall the guest system. If VirtualBox itself does not start or when you start it you get the error “Cannot access the kernel driver!”, most likely you will have to uninstall the program and then reinstall it.


