Configuring WI-FI routers Zyxel Keenetic of the second generation using the example of Giga II on L2TP with DHCP. ZyXEL Keenetic GIGA II - setting up and flashing the modem Connecting zyxel keenetic giga ii
The Zyxel Keenetic Internet Center model Giga II is a higher level product compared to its predecessors.
The router is designed for organizing local cable and wireless Wi-Fi networks, receiving Internet information from the provider both via cable and from mobile operators. IPTV support is provided. The Keenetic Giga 2 model is distinguished by high performance, as well as the speed of receiving and transmitting information.
The hardware of the model is designed for downloading information from file-sharing networks at speeds of up to 1 Gbit/s via Gigabit Ethernet lines. Speeds of up to 300 Mbps, according to the manual, are provided to wi-fi users.
The Zyxel Keenetic Giga 2 router has a high load capacity and is used as the main router wireless network, and also performs the functions of an amplifier, adapter, repeater (repeater) to expand the coverage area of w-ifi when working together routers.
 The presence of two USB ports allows you to connect various peripherals and external drives. As well as 3G/Internet operators of all types of connections.
The Internet center allows you to display individual settings for some built-in functions, such as a torrent client or media server.
Unfortunately, the model does not support the ability to change the assignment of function buttons.
Appearance
 The Keenetic “Giga” 2 front panel indicators, corresponding to the description, with conventional symbols printed on them, help the user monitor the status of the router, enabled modes, and the health of communication lines with devices local network. These include the following:
- “Status”: constant light indicates that the product is powered on and is functioning normally. Infrequent flashing indicates either startup or an internal fault.
- “0-4”: connection to the network connectors on the rear panel of Keenetic Giga. The glow matches established connection, blinking indicates the transfer of information.
- The wireless wifi symbol – constantly lit – informs about normal operation networks. The indicator flashes quickly while data is being transferred. Slow flashing indicates a quick setup session using WPS technology.
- “Internet globe”: a constant light indicates that a connection has been established and the Keenetic Giga II has received an IP address in the provider’s network.
- Symbol for connecting to USB connectors: a “light” corresponds to a connected and ready-to-use device; rapid blinking indicates preparation for safe removal of a USB drive from the connector. On the right side panel of the Keenetic Giga II there are two multi-functional USB connectors. Devices compatible with the Internet center are connected to them: 3G/4G modems of mobile Internet operators, external flash drives, HDD or SSD, printers. The rear panel of Keenetic Giga II is designed to accommodate various connectors and control buttons on its surface:
- « home network 1-4": RJ-45 network LAN connectors for wired local network subscribers, one of which is loaded by the switch.
- “Internet 0”: RJ-45 WAN connector of the Internet provider cable.
- Two high-frequency RP-SMA connectors, into which removable antennas for a wireless wi-fi network are screwed.
- “Power”: plug-type connector for connecting an AC power adapter with an autonomous on/off button.
- FN is a multifunctional button whose properties are assigned in the Keenetic Giga II web interface. By default, it performs the function of preparing to safely remove the USB device from the connector.
- "Reset": button to restore current user settings to factory defaults.
On top cover The Zixel Giga II case contains a wireless network control button. It is used in two modes depending on the time it is held pressed. A short press and release creates a quick router setup using WPS. Pressing and then holding for more than three seconds turns Wi-Fi on or off.
Connecting Giga and preparing for work
 If the provider has stored in its database the MAC address of the computer used before installing Keenetic Giga, you need to inform the service technical support new physical address. Information about it is on the product label in the form of a 12-digit set of letters and numbers. The address is assigned by the manufacturer and is a unique identifier.
 The provider's cable is connected via a dedicated Ethernet line to the RJ-45 connector of the router marked “0” on its rear panel. When connected to the Internet mobile operator A 3G/4G USB modem and one of the universal connectors are used. It is possible to connect the modem via an additional adapter cable and place it in an area with reliable radio signal reception.
To configure Keenetic Giga we use a computer (PC), connector network card which is connected with a “patch cord” (from the butt to the router) with any of the RJ-45 marked “1-4”. The manufacturer recommends "1". The power adapter must be plugged into the “Power” socket, and its plug must be inserted into a home AC outlet. The Power button is pressed last. Don’t forget to screw the removable antennas into the RF connectors of the Keenetic Giga. To improve the conditions for propagation of Wi-Fi radio waves, their vertical position is preferable.
Settings
After switching on mains power We wait until the “Status” and “1” indicators are constantly lit. Then we check the settings of the PC’s network card to ensure that it receives an IP address in automatic mode(properties of the TCP/IPv4 protocol).  For the Zyxel Keenetic Giga II router, we configure it via the web interface. To access it, you need to use the information on the Keenetic Giga-2 product label. We are interested in the IP address on the Internet. We enter the found value – 192.168.1.1 – into the address bar of any browser open on the PC, and press the Enter key.
If the actions are completed correctly, the authorization page opens. After entering standard default values: username and password – admin/1234 (admin), executing the login command, you are prompted to change standard password. The decision is made by the user. 
Automatic setup
On the main page of the Keenetic Giga interface, options for setting up the Internet center are provided. When connecting to the Internet via a dedicated line, you can use the services of the “Wizard” and carry out the work in interactive mode. To do this, press the key “ Quick setup».  In the window that opens, we decide whether to bind to the MAC address of the device. For Keenetic Giga II this will depend on the selected Internet provider.
After continuing, the next page opens, where the mode for obtaining an IP address is configured. Leave the default value “Automatic” or select the static IP mode, if used.  After executing the “Next” command, we get to the page for connecting Keenetic Giga to the Internet. Here you need to enter the login and password data from the contract concluded with the service provider in the appropriate fields or check the box where the latter are missing.
  After executing the “Next” command, a window will open with the final summary information and the result of connecting to the Internet.
  The “Wizard” has completed the automatic setup.
Connecting to the Internet manually using the example of some providers
Manual connection is provided from the start page by clicking on the “Web Configurator” stencil. First, you will receive an authorization proposal with standard values or indicating a new and confirmed user password. Click “Apply” and get to the start page of the Keenetic configurator with a horizontal row of tabs. For all providers, the user first configures a connection to the “global network”. To do this, in the “Internet” section, go to the “List” tab. 
"Home ru"
Select the Broadband Connection item and click on it with the cursor.  Next, select the port to connect to the provider, marking it with a checkmark. In Keenetic Giga II you can choose any of five possible ones. Then we assign a name to the new connection, mark the “Enable interface” item with a marker, and leave the IP configuration mode “Without IP address.” Write down the MAC address “Default” and press the “Apply” button.
In the next step, click on the “Authorization” tab and select “Add connection”.  This provider uses the PPPoE type. We indicate it in the appropriate field, check the boxes “Engage”, “Chap authentication”. We write down the name and password issued by the provider and execute the “Apply” command.
  There is a transition to a page with a list of created connections and YES marks in the last cell. On the front panel of Keenetic Giga II there is a constant glow of the indicator with the “Internet globe” symbol.
Rostelecom
In addition to the PPPoE connection, the operator provides subscribers with a dedicated static IP and a “Dynamic IP” connection, paid for under a contract. PPPoE was discussed above. A static IP address is allocated mainly to corporative clients companies at the request of organizations. In this case, information about the assigned address, provider subnet mask and default gateway is added to the settings.  In addition, uncheck the “Obtain an address via DHCP” checkbox.
“Dynamic IP” does not require information provided by the provider in the contract when setting up a connection, but the Zyxel Keenetic rule about binding to the MAC address of the router or cloning the address of the PC used on this leased line must be followed. At the last step, the “Apply” command is executed, the created connection is monitored in the interface and the indicator on the front panel of Keenetic Giga is checked.
"Beeline"
To work with an operator, in the “List” tab and then proceed to creating a Broadband Connection, we control the installation of markers in the following points:
After clicking on the “Authorization” tab, put a checkmark in the “Enable” item.” The protocol of the connection used will be L2TP. In the server address line we write tp.internet.beeline.ru. We fill in the following fields with data (login/password) from the agreement with the provider, and execute the “Apply” command.
The presence of a connection is controlled by receiving an IP address from the DHCP server. The “Globe” on the front panel of the Keenetic Giga will light up. 
NetByNet
PPPoE is the connection type used by this operator. After concluding an agreement with him, choosing tariff plan setup should not cause any difficulties for the average user of Keenetic Giga II devices. You must first inform your provider of the physical MAC address you are using.
Backup connection via 3G, 4G
First we use the USB port to connect the modem directly or through an adapter extension cable. The Internet connection is created using mobile operators. To do this on home page interface, select the tab labeled USB, when opened, you will be able to view information about the connected modem, its technical specifications and software versions. 
On the page in the upper right corner there is an additional tab “NetFriend Quick Setup”, when clicked, the program built into Keenetic Giga will set the necessary connection parameters for the selected model, taking into account the inserted SIM card of the mobile operator. The procedure ends by pressing the “Go online” button. 
Wireless network
The setup begins by selecting the section labeled Wi-Fi in the Keenetic Giga router interface. In it, click on the “Operation Mode” tab, check the “Access Point” checkbox to organize a local network based on the router you are using.  Execute the “Apply” command. After that, go to the “Access Point” tab.
On new page We assign the network a name by which it can be identified among the others. The 802.11n format is installed by default, leave the radio channel number in the “Auto” position, check the “Connection security” item and use its maximum level (WPA2). We write down the security key (password) in the appropriate field, to create which we use 12-15 characters. For reliability, it must be written down and saved. We complete the procedure by executing the “Apply” command. 
Don't forget about Keenetic Giga's support for quick setup mode using the WPS button. Pressing it quickly without holding it allows you to connect to any Wi-Fi network when using the router as a client, amplifier or repeater (repeater). A glowing indicator on the front panel with a Wi-Fi symbol indicates trouble-free operation.
Configuration in repeater (repeater), amplifier, adapter or access point mode
Support for specified Keenetic modes Giga II allows the router to expand the access area to an existing wireless network. The new "grid" will have the same name as the existing one. Subscribers within its boundaries can move, automatically selecting a source whose radio signal strength is greater. In this case, the condition for reliable operation is the coincidence of the working channels of the devices of the main router and the Keenetic Giga, which works as a repeater. The name and channel number on both routers are set in their settings based on the results of an analysis of the smallest number of available networks operating nearby.
You can switch Keenetic Giga II to wi-fi range extension mode from its interface by selecting the “System” section, and in it – the “Mode” tab. In the drop-down list, mark the “Amplifier” item with an asterisk. Click on the “Apply” stencil.  After this, a window appears asking you to reboot the Keenetic Giga router. Click on the “Now” button and get an expanded range of wireless wi-fi. To install a Zyxel router, the location is selected empirically.
IPTV
The main providers deliver television traffic in an “untagged” form. This makes setting up the connection easier. It comes down to selecting a LAN port (1-4), to which a TV set-top box will be connected using a cable with RJ-45 connectors at both ends. At the same time, the program built into Keenetic Giga will switch it to the mode of directly receiving IPTV traffic from the WAN port of the provider used (transparent “bridge”).
In the main menu of the interface, select the “Internet” icon (globe). In the menu that opens, click on the “Connection” tab, where we find the Broadband Connection item and click on it. On the new page, activate the “Use connector...” checkbox by checking the box and executing the “Enable” command. After saving the settings made with the “Apply” button, the port is used only for broadcasting the television signal transmitted to the user from the Internet provider for the operation of the set-top box. 
Keenetic Giga supports the DyDNS function. It was created for Internet users searching for the resource they need through search bar, entering into it Domain name. If the provider uses a dynamic IP connection, the new assigned address will no longer correspond to the previous “remembered” name, and this will cause difficulties for regular users of the site. Dynamic DNS keeps the domain name constant whenever the IP address changes.
You can enter the settings by expanding the “Internet” section and then clicking on the DyDNS tab. After concluding an agreement on the server website, the user fills out the appropriate fields on the page that opens. 
IPv6 protocol
The Internet Center supports IP version 6 only on firmware NDMS v2 and higher. It is recommended that you first go to the official website of the vendor and check for the latest versions of the router OS. How to update will be discussed below in a separate section of the article.
Security Settings
Any router that has an IP address on the Internet performs the function of protecting local network subscribers from various types of Internet attacks, being a kind of firewall. Keenetic Giga II is no exception. When setting it up, the user defines access rules for Internet users and their priority. This list contains both wired Keenetic Giga clients and mobile network members.
Certain hosts are assigned unfettered access, while others are assigned denied access. The rule creation page opens after selecting the “Security” section on the main page of the interface, and in it – the “Firewall” tab. A list of interfaces with IP addresses and an indication of actions when they are detected opens. The list can be expanded or shortened. The actions applied to each participant also change. Finally, execute the “Save” command. 
Parental control
This function, for the most part, is the boss’s control over his employees in local networks and the departments they manage to create a work schedule for its participants. In addition, there is a filter for devices allowed to connect. Configuring this parameter in Keenetic Giga is done in the “System” section of the main interface page and going to the “Schedule” tab. 
The new interface is presented in a visual form graphic image with the days of the week and the permitted work schedule indicating the time (hours, minutes). As well as devices operating according to a set schedule. After executing the “Apply” command on the “Schedule” page, Keenetic Giga will display a list of devices allowed to work on the network at a certain time. 
Setting up the printer
The Giga 2 model has two USB connectors; a printer is connected to them. Customization is also possible network printer using an internal DHCP server. We go into its configuration, select the section responsible for reserving IP addresses, and enter the printer address.
Setting up DLNA on the router
The Internet Center supports the media server option. To do this, you need to connect external media via the USB connector - a flash drive or external HDD, For example. Go to “Control Panel” network device. Go to the “Applications” section, item “ DLNA Server" Check the box next to “Enable”. Leave the “TCP port number” field blank. Select media file directory: specify the path to the USB drive. 
Media server support is provided only if the corresponding component is installed. Its availability is checked in the “System” section, “Components” item.
Setting up a torrent client on the router
The router supports the torrent client function built into the Keenetic Giga software. The user does not need to wait for the download to complete. He needs an external drive with a USB interface onto which the received information will be downloaded.
Before setting up the VPN server, you need to make sure that the component is installed. To do this, go to the “System” tab, “Components” item. We check the availability of the corresponding option. If it is present, there is a “bird” opposite it, which indicates its activation. 
Possible malfunctions and ways to eliminate them
Typically, Giga router malfunctions are divided into points:
- operator errors in the process of setting parameters;
- malfunctions in the hardware of the device;
- failures in the software either during configuration or as a result of external influences.
Most faulty cases are resolved by rebooting the network device or resetting the settings to factory settings. In the first situation, simply turn off the power, wait 2-3 minutes, and then turn it on again. The second option is described in more detail below.
Sometimes the “culprit” is the service provider and the incorrect operation of its equipment. An analysis of each of the reasons is the topic of a separate article. If a malfunction occurs during the warranty period, contact the technical support of your Internet provider to explain all actions taken.
Firmware update
Every router user knows about this operation. The firmware not only eliminates emerging failures, but also adds new functions to the device, introduced by the manufacturer as a result of analysis of operating statistics. When you go to the “System” section, select the “Firmware” item. If you need to update the software, look at the current version of the Keenetic Giga II software and check it with latest version for the current date on the website zyxel.ru.
Via web interface
To update, if required, download the .bin file from the Firmware section and save it to the PC. 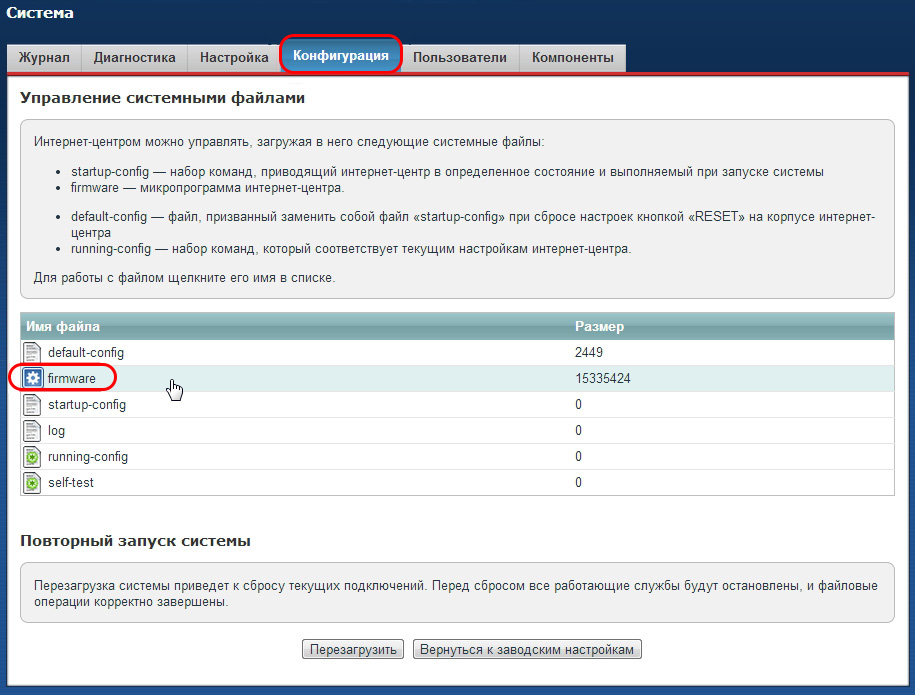 On the “Firmware” page, press the “Browse” button and find the path to the downloaded file.
  Execute the “Update” command. Once the process is complete, the system will reboot with the new software.
  The entire procedure must be carried out with the system powered from a UPS, or uninterruptible source nutrition. Check version new firmware Keenetic Giga is possible by returning to the “Firmware” item. After the procedure has been completed, the current settings of Keenetic Giga have to be carried out again.
Via mobile application
The vendor has released an application for mobile platforms supporting Android and iOS called My keenetic. Install the program on mobile device, let's launch it. Once connected to the router, an update message will appear. Click on it and wait for the process to complete. 
Via USB device
Download current version firmware from the official website, copy it to a flash drive. Next, connect it to the network device.
Go to the “Router Control Panel”, go to the “Updates” section. We indicate the path to the installed flash drive and start the update process. After it finishes, the Internet center will automatically reboot.
Resetting the router to factory settings
In all devices to factory values. They are used in cases of errors in settings, incorrect operation of the device, or loss of a previously changed password for entering the product interface. For the first method (hardware), there is a “Reset” button recessed into the case on the rear panel of the Keenetic Giga II. Press and hold it for 10-15 seconds. starts the update process. When the indicators stop flashing, the interrupted setting is carried out again. 
A soft reset is carried out from the “Control Panel”. In it you need to go to the “System” section, click the “Parameters” tab.  At the bottom of the page, click the “Return to factory settings” stencil. When you receive a subsequent warning about resetting the settings, click the “Yes” stencil, agreeing to this. After rebooting the router, you can continue working with Keenetic Giga.
Conclusion
When releasing a new model, the Taiwanese manufacturer Zyxel tried not to just assign a new name to the product, but expanded the lineup, but to make significant changes to the hardware and software. By using the latest components, Zyxel has achieved a significant increase in the performance of Keenetic Giga II, which especially pleased fans of downloading information from file-sharing sites.
External antennas in combination with a powerful amplification module provided high-quality wireless communication anywhere in the consumer’s living space. The addition of Giga (gigabit per second) in the name is fully justified.
pros
Users include the increased performance of Keenetic Giga II as a positive feature due to increased write and read speeds over the channel of external drives connected to any USB connector. If its predecessors had 4-5 MB/s, this model’s speed is limited to 15 MB/s. This allows you to “download” HD movies in no more than half an hour, using the BitTorrent client built into the software. The Intelliqos smart consumer traffic distribution function has been implemented.
The ability to use a mobile 3G/4G modem from any operator allows you to use Keenetic Giga II not only in urban environments, but also in country houses where the cable network is not developed. DLNA support gives you the chance to view and listen to video and audio content, as well as information from a connected external USB drive.
Minuses
Keenetic Giga-2 has few negative ratings. Those who have access to the Internet only via telephone line you won't have to take advantage of the speed due to your ISP's limited speed. It can be noted that there is only one Wi-Fi band (2.4 GHz), which in urban environments requires searching for the optimal channel and its bandwidth to ensure a minimum of interference. The remaining “cons” are related to the personal preferences and habits of users (color, shape of the case, and so on).
- Wireless antennasWiFi Two omnidirectional antennas. The recommended position of the supplied antennas is vertical.
- (Wireless Network Control) buttonWiFi) The button allows you to quickly and safely connect to a protected Wi-Fi networks router wireless devices Wi‑Fi 802.11g/n that supports the WPS standard, such as computers and laptops with an operating system Microsoft system Windows.
Short press Launches the quick connection feature (WPS)
Press for more than 3 seconds Turns the wireless network on or off
- Reset button (Reset user settings) Use this button if you need to configure your router again or if you have lost your password. To reset the settings, press the button with a pointed object and hold it pressed for about 10 seconds until all the router lights go off. The power indicator will start blinking, and after half a minute the Internet center will boot with default settings.
- FN Button (Flexible Button) In the router's web configurator, you can assign one or more functions to this button. By default, the button is designed to safely disconnect all USB drives connected to the router.
- Network connectors “0…4” Five network connectors for connecting home devices and the Internet. By default, the yellow connectors "1...4" refer to the home network, and the blue connector "0" refers to the Internet.
- Power switch and connector Power switch and connector for connecting the power adapter included in the package. The router is designed for continuous operation and does not require a daily power outage. If you need to turn off the router, for example during a long break in use, it is recommended that you also unplug the power adapter from the electrical outlet.
2
USB Multifunction Host Connector - Located on the side panel of the router. Connector for connecting compatible USB devices, such as USB modems mobile Internet 3G/4G, USB drives, USB printers. You can find the current list of compatible USB devices on the Keenetic Omni router page by visiting the ZyXEL website.
8. Power (Status) indicator
9. Indicators 0, 1, 2, 3, 4 (Connection to network connectors)
10. (Wireless Wi-Fi) indicator
12. Indicator (Connecting to the USB connector)
Connecting a router
- Choose a suitable location for the router. It is recommended to place the router in the center of the wireless network.
- Adjust the antenna position. Most often the vertical position is best.
- Connect your computer to your local network through the router's LAN (home network) ports (if you already have a wireless network adapter and want to use a wireless network connection, you can skip this step)
- Connect the incoming Ethernet cable to the INTERNET port of the router
- Connect the power adapter to the appropriate connector on the router, and plug the other end into a power outlet.
Setting up a computer to connect to the router:
- In your computer's TCP/IP protocol settings, select .
To configure the router, you will need a computer with an Ethernet or Wi-Fi network adapter configured to automatically obtain an IP address (in the TCP/IP protocol settings of your computer, select Obtain an IP address automatically).
1. Connect the router to the mains using the power adapter included in the package. Wait until the router's POWER light stops blinking and remains lit.
2. Connect the router to the computer from which the setup will be performed. To do this, connect connector “1” on the router to the computer’s Ethernet adapter using the included network cable. Turn on your computer and wait for it to load operating system. When properly connected to the computer, the “1” indicator on the router will light up.
To access the router settings, open a web browser and enter the default address http://192.168.1.1 in the address bar and then press ENTER. A window will open asking you to select the type of router setup. In this window you need to select the item Web Configurator.

Immediately after selecting a setup option, a window will appear in which you will be asked to create a password to log into the router to prevent unauthorized access to system settings.
You must enter the same password in both windows; if there is a mismatch, a password mismatch message will appear.
After this you will be taken to home page settings and diagnostics. This window displays general information about the connection status, as well as settings menu items. 
DHCP setup
To configure the router to automatically obtain an IP address (DHCP), you need to click on the button
Then you need to select the connection type Broadband connection which is to be configured (by double-clicking on it with the left mouse button):
After selecting the connection type, a new window will open in which you can configure automatic acquisition of an IP address.

Use connector: In this section, you can select the port that will be the main one for communication with your provider. When configuring, the default port “0” should be marked. Opposite other ports there should be empty cells.
Pass tagsVLAN ID: This field can be left blank.
Turn on:
Description: In this field you can set the name of the connection, and how it will be displayed in the router settings field. You can leave the default name in this field (broadband connection) or change it to DHCP.
Network ID(VLAN ID): Leave parameter 2 as default
SettingsIP: In this settings item you can select the type of IP receiving; it must be selected Automatic.
IPaddress:
Subnet mask: not available (if automatic configuration IP parameters)
Main gate: not available (with automatic configuration of IP parameters)
DNS 1,2,3: These fields must remain empty, because when automatic receipt IP addresses Your router will automatically receive this parameter.
MAC-address: In this section you can select how to use the MAC address (a unique identifier of a network device). The value should be Default.
Device name: At this point you can change the name of your router that will be displayed on the Internet.
SizeMTU: The value should be 1500
Do not reduceTTL: This menu item should be deselected.
After entering the settings, you must press Apply. Then you can proceed to setting up your Wi-Fi connection.
Setting up a PPOE connection
If you are using a connection via the PPPoE protocol, then you should select
then in the window that appears for settings, select the tab PPPOE/VPN and in this window click the button Add connection

After this, a new window will appear in which you need to configure a connection using the PPPOE protocol.

Turn on: This item must be selected (activates this type connections).
Use to access the Internet: This item must be selected. If the selection is removed, the router will not use the dedicated port to communicate with the provider, but will use this port as a local one (for interaction within the local network).
Description: In this field you can set the name of the connection, and how it will be displayed in the router settings field. It is recommended to specify PPPOE connection.
Type (protocol): At this point, you must select the type of tunneled connection PPPOE. (PPPTP and L2TP options are also available - not used in your network)
Connect via: At this point you need to select the network connection that will be used to establish the connection. Must select Broadband connection (ISP)
Service name:
Hub name: This field must be left blank. (not used)
Service address: This field is not available with this type of connection.
Username: Login connection provided to you by your provider.
Password: In this paragraph you must indicate Password connection provided to you by your provider.
Authentication method: This item should contain the value Auto .
Data encryption:
UseCCP: This point is not available with this connection.
SettingsIP: This item is responsible for the type of obtaining an IP address. There must be a value Auto .
IPaddress: This point is not available with this connection.
RemoteIPaddress: This point is not available with this connection.
DNS 1,2,3: These points are responsible for indicating specific DNS servers. But due to the fact that all settings are assigned automatically, there is no need to specify values in these fields.
Auto-tuningTCP-MSS: This item is responsible for automatically adjusting the size of data fragments. This item must be enabled.
After setting up the connection via PPPOE, you need to click the APPLY button, after which you can proceed to Wi-Fi settings networks.
Setting up a wireless connection
For settings wireless connection you need to click on the icon in the main menu
In the window that appears, the tab should be selected Access point.

Enable hotspot: This item is intended to enable/disable radio module broadcasting. This item must be enabled.
Network name(SSID): In this field you must enter the name of your network (your network name will be displayed in the list of available networks). By default, this field contains the name of the router model.
HideSSID: If this item is not highlighted, then the name of your network will be visible in the list of networks; if the item is highlighted (activated), then your network will be hidden, and connecting to it will only be possible by manually entering the network name. It is better to leave this item without highlighting.
Network protection: Here you can select the type of encryption to be used. It is advisable to use WPA2-PSK because this type of encryption is the most reliable and supports the 802.11n broadcasting standard (the fastest).
Network key: Here you can specify a password from 8 to 63 characters in length in ASCII encoding (that is, it is acceptable to use uppercase and lowercase letters and numbers of the Latin alphabet).
Key 1,2,3,4:
Default key: At this type encryption (WPA2-PSK) not available
Standard: Select mode 11bgn. This mode allows all wireless stations of the 802.11b, 802.11g and 802.11n standards to connect to the router.
Channel: This field sets the operating frequency that you are going to use. The default mode is Auto, thus, the access point will automatically select the most suitable channel . This parameter should be left in Auto mode.
Signal strength: In this item you can set the broadcast signal strength of the radio transmitter. You must put 100%.
After setting the settings, you must click the APPLY button. After this, your router is fully configured to work on our network.
The Zyxel Keenetic Giga II router is a successful model of a well-known brand of network equipment manufacturer. This is a powerful device with good set parameters and functions that will provide a fast and high-quality Internet connection.
Users are already accustomed to the wide functionality of routers
Let's find out what is remarkable about this router model, how to configure it yourself, and, if necessary, change the firmware on the device.
The Zyxel Keenetic Giga II model is average in terms of parameters between Keenetic II and Keenetic Ultra. The first model costs a little less, but has weaker characteristics, so the choice should be made in favor of the Giga II. The other model is stronger, but also more expensive, and is more likely designed for demanding users.
The filling of the Zyxel Keenetic Giga 2 is 256 MB random access memory, 16 MB of memory for installing firmware, the router has gigabit ports and operates at speeds of up to 300 Mbit/s. Such indicators are optimal for most users - they usually use the Internet at speeds of up to 100 Mbit, so the router will cope with it perfectly.
The model is equipped with 4 LAN ports and one WAN port, USB connectors for connecting various equipment, a power button - convenient so as not to turn off the router from the network every time and reset the settings.

The router is equipped with two external antennas, which has a positive effect on the quality and coverage area of the signal. It is worth noting the stylish appearance - it attracts attention and looks quite interesting.
It also has a separate WPS button on top for quickly turning Wi-Fi on or off - it’s up to you to decide whether it’s useful or not, but if so, it’s a pretty practical solution. In general, the Zyxel Keenetic Giga II is best suited for a home or small office - it is quite powerful and not too expensive.
Setting up the router
To enter the settings menu you need to enter the combination 192.168.1.1. In the address bar of the browser, then an authorization window will appear - by default, the values admin are entered in both lines or 1234 in the password line.

Then you can proceed to setting up the connection, Wi-Fi, IPTV and other functions.
To configure the network, select the Internet section at the bottom of the window, after which the parameters will differ depending on the type of connection.
To set up a connection via DHCP with an automatic IP address, follow these instructions:
- Select the Broadband connection (ISP) line in the table;

- You will see a form for filling out data, where, first of all, you need to mark the connector where the Internet cable is connected;
- Next, check the lines “Enable interface” and “Use to access the Internet”;
- When setting up IP parameters, you should select the option to automatically obtain an address from the list;
- Enter the number 1400 in the MTU line, save changes.

If the connection is made through a static IP address, then in this form you need to select the appropriate parameter for this setting and enter the address value, subnet mask and gateway in the fields below.
For connections whose setup requires entering more information, select the Internet section and open the Authorization tab, where in the window that appears you should do the following:
- For a PPTP connection, check the box next to Enable and select this protocol from the list. In the “Connect via” line, select Broadband connection (ISP), below enter all the data from the provider - server address, login and password, check the automatic authentication algorithm;

- To connect PPPOE, select the appropriate protocol in the “Type” line, enter the username and password specified in the agreement from the provider. In “Connect via” and in the verification algorithm, select the same options as before;

- Connecting via the L2TP protocol occurs in almost the same way. All you need to enter is a description (connection name), user name and password, server address, and select an automatic authentication algorithm.

Setting up a Wi-Fi connection
The router is primarily used to access the network via wireless connection, which is configured like this:
- Select the Wi-Fi section in the options menu on the bottom line;
- Turn on the access point by checking the corresponding line, enter the network name;
- The line for hiding the SSID, that is, the network name, was created in order to further protect it from hacking. When activated, the connection will be invisible when searching for points on other devices. To connect to the Internet, you will need to manually enter your name and password, that is, if they don’t know them, they will not try to use your Internet;
- In the WPA key line, come up with a key to connect to your network - try to create a more or less complex combination, again so that third parties do not use your Internet;
- Select the channel automatically - in this case, the router itself will determine which of the available channels is least loaded and will connect to it.

It is also worth changing the factory login and password to access the settings menu itself after the first authorization - this is done in the System section.

If in addition to the Internet you use IPTV through a router, then installing it on this router is quite simple. Select the Home Network section from below and the IGMP Proxy tab. Choose to activate this feature and save your changes.
Software Update
To update or replace the firmware on the Zixel Kinetic Giga, you need to download the current version of the firmware - please note that it is intended specifically for this router, after which we use the following instructions:
- Go to the settings menu through the browser, select the System section;
- Among the tabs, open the Files submenu, where there is a line to indicate the path to the firmware file;
- After specifying the location of the firmware, click on “Replace” and confirm your intentions, then the installation of the new software will begin.

As you can see, the Zyxel Keenetic Giga II is remarkable appearance, powerful stuffing, but also easy to set up - any user can create an Internet connection on the router. It is no less easy to change the firmware on the device, so it is not in vain that the model attracts attention among other competitors. It well combines simplicity, functionality and affordable price.
- Wireless antennasWiFi Two omnidirectional antennas. The recommended position of the supplied antennas is vertical.
- (Wireless Network Control) buttonWiFi) The button allows you to quickly and safely connect Wi-Fi 802.11g/n wireless devices that support the WPS standard, such as computers and laptops running the Microsoft Windows operating system, to the router’s secure Wi-Fi network.
Short press Launches the quick connection feature (WPS)
Press for more than 3 seconds Turns the wireless network on or off
- Reset button (Reset user settings) Use this button if you need to configure your router again or if you have lost your password. To reset the settings, press the button with a pointed object and hold it pressed for about 10 seconds until all the router lights go off. The power indicator will start blinking, and after half a minute the Internet center will boot with default settings.
- FN Button (Flexible Button) In the router's web configurator, you can assign one or more functions to this button. By default, the button is designed to safely disconnect all USB drives connected to the router.
- Network connectors “0…4” Five network connectors for connecting home devices and the Internet. By default, the yellow connectors "1...4" refer to the home network, and the blue connector "0" refers to the Internet.
- Power switch and connector Power switch and connector for connecting the power adapter included in the package. The router is designed for continuous operation and does not require a daily power outage. If you need to turn off the router, for example during a long break in use, it is recommended that you also unplug the power adapter from the electrical outlet.
(USB Multi-Host Connector) Located on the side panel of the router. A connector for connecting compatible USB devices, such as USB 3G/4G mobile Internet modems, USB flash drives, USB printers. You can find the current list of compatible USB devices on the Keenetic Omni router page by visiting the ZyXEL website.

8.Power (Status) indicator
9. Indicators 0, 1, 2, 3, 4 (Connection to network connectors)
10. (Wireless Wi-Fi) indicator
12. Indicator (Connecting to the USB connector)
Connecting a router
- Choose a suitable location for the router. It is recommended to place the router in the center of the wireless network.
- Adjust the antenna position. Most often the vertical position is best.
- Connect your computer to your local network through the router's LAN (home network) ports (if you already have a wireless network adapter and want to use a wireless network connection, you can skip this step)
- Connect the incoming Ethernet cable to the INTERNET port of the router
- Connect the power adapter to the appropriate connector on the router, and plug the other end into a power outlet.
Setting up a computer to connect to the router:
- In your computer's TCP/IP protocol settings, select .
To configure the router, you will need a computer with an Ethernet or Wi-Fi network adapter configured to automatically obtain an IP address (in the TCP/IP protocol settings of your computer, select Obtain an IP address automatically).
1. Connect the router to the mains using the power adapter included in the package. Wait until the router's POWER light stops blinking and remains lit.
2. Connect the router to the computer from which the setup will be performed. To do this, connect connector “1” on the router to the computer’s Ethernet adapter using the included network cable. Turn on your computer and wait for the operating system to load. When properly connected to the computer, the “1” indicator on the router will light up.
To access the router settings, open a web browser and enter the default address http://192.168.1.1 in the address bar and then press ENTER. A window will open asking you to select the type of router setup. In this window you need to select the item Web Configurator.
Immediately after selecting a setup option, a window will appear in which you will be asked to create a password to log into the router to prevent unauthorized access to system settings. 
You must enter the same password in both windows; if there is a mismatch, a password mismatch message will appear.
This will take you to the main Settings and Diagnostics page. This window displays general information about the connection status, as well as settings menu items. 
SettingsDHCP
To configure the router to automatically obtain an IP address (DHCP), you need to click on the button
Then you need to select the connection type Broadband connection which is to be configured (by double-clicking on it with the left mouse button):

After selecting the connection type, a new window will open in which you can configure automatic acquisition of an IP address. 
Use connector: In this section, you can select the port that will be the main one for communication with your provider. When configuring, the default port “0” should be marked. Opposite other ports there should be empty cells.
Pass tagsVLAN ID: This field can be left blank.
Turn on:
Description: In this field you can set the name of the connection, and how it will be displayed in the router settings field. You can leave the default name in this field (broadband connection) or change it to DHCP.
Network ID(VLAN ID): Leave parameter 2 as default
SettingsIP: In this settings item you can select the type of IP receiving; it must be selected Automatic.
IPaddress:
Subnet mask: not available (with automatic configuration of IP parameters)
Main gate: not available (with automatic configuration of IP parameters)
DNS 1,2,3: These fields must remain empty, because when automatically obtaining an IP address, your router will automatically receive this parameter.
MAC-address: In this section you can select how to use the MAC address (a unique identifier of a network device). The value should be Default.
Device name: At this point you can change the name of your router that will be displayed on the Internet.
SizeMTU: The value should be 1500
Do not reduceTTL: This menu item should be deselected.
After entering the settings, you must press Apply. Then you can proceed to setting up your Wi-Fi connection.
Setting up a PPOE connection
If you are using a connection via the PPPoE protocol, then you should select
then in the window that appears for settings, select the tab PPPOE/VPN and in this window click the button Add connection

After this, a new window will appear in which you need to configure a connection using the PPPOE protocol.

Turn on: This item must be selected (activates this type of connection).
Use to access the Internet: This item must be selected. If the selection is removed, the router will not use the dedicated port to communicate with the provider, but will use this port as a local one (for interaction within the local network).
Description: In this field you can set the name of the connection, and how it will be displayed in the router settings field. It is recommended to specify PPPOE connection.
Type (protocol): At this point, you must select the type of tunneled connection PPPOE. (PPPTP and L2TP options are also available - not used in your network)
Connect via: At this point you need to select the network connection that will be used to establish the connection. Must select Broadband connection (ISP)
Service name:
Hub name: This field must be left blank. (not used)
Service address: This field is not available with this type of connection.
Username: Login
connection provided to you by your provider.
Password: In this paragraph you must indicate Password
connection provided to you by your provider.
Authentication method: This item should contain the value Auto .
Data encryption:
UseCCP: This point is not available with this connection.
SettingsIP: This item is responsible for the type of obtaining an IP address. There must be a value Auto .
IPaddress: This point is not available with this connection.
RemoteIPaddress: This point is not available with this connection.
DNS 1,2,3: These items are responsible for specifying specific DNS servers. But due to the fact that all settings are assigned automatically, there is no need to specify values in these fields.
Auto-tuningTCP-MSS: This item is responsible for automatically adjusting the size of data fragments. This item must be enabled.
After setting up the connection via PPPOE, you need to click the APPLY button, after which you can proceed to the Wi-Fi network settings.
Setting up a wireless connection
To set up a wireless connection, you need to click the icon in the main menu
In the window that appears, the tab should be selected Access point.
Enable hotspot: This item is intended to enable/disable radio module broadcasting. This item must be enabled.
Network name(SSID): In this field you must enter the name of your network (your network name will be displayed in the list of available networks). By default, this field contains the name of the router model.
HideSSID: If this item is not highlighted, then the name of your network will be visible in the list of networks; if the item is highlighted (activated), then your network will be hidden, and connecting to it will only be possible by manually entering the network name. It is better to leave this item without highlighting.
Network protection: Here you can select the type of encryption to be used. It is advisable to use WPA2-PSK because this type of encryption is the most reliable and supports the 802.11n broadcasting standard (the fastest).
Network key: Here you can specify a password from 8 to 63 characters in length in ASCII encoding (that is, it is acceptable to use uppercase and lowercase letters and numbers of the Latin alphabet).
Key 1,2,3,4:
Default key: Not available with this encryption type (WPA2-PSK)
Standard: Select mode 11bgn. This mode allows all wireless stations of the 802.11b, 802.11g and 802.11n standards to connect to the router.
Channel: This field sets the operating frequency that you are going to use. The default mode is Auto, thus, the access point will automatically select the most suitable channel . This parameter should be left in Auto mode.
Signal strength: In this item you can set the broadcast signal strength of the radio transmitter. You must put 100%.
Turn onWMM: This item is needed for best distribution priorities in the composition of packets (QOS). This item must be enabled.
After setting the settings, you must click the APPLY button. After this, your router is fully configured to work on our network.
With its powerful hardware and ease of setup, the Zyxel Keenetic Giga 2 attracts many users. Below is a description of this router, instructions for connecting it, updating software and setting it up.
Description
In this compact device the manufacturer managed to combine simplicity, good performance and wide functionality.
However, the cost differs only slightly from the previous model.
Therefore, it is not surprising that this WiFi router has become very popular among users. Gigabit ports are responsible for a fast and reliable connection to the network. Their standard number will suit most owners of small apartments for creating a home network of several computers.
 The built-in amount of RAM is 256 Mb and allows it to function for a long time without failures or freezes, and the internal flash memory (16 Mb) is quite sufficient for software and its regular updates.
If it is necessary to cover a larger area with a wireless signal, it is possible to easily replace both antennas with elements with a higher gain. But even the power of the bundled translators is enough for a comfortable connection to Wi-Fi in a two- or three-room standard apartment. 
How to connect?
Experienced users know that it is more advisable to initially connect the device to a PC via a wired connection. The procedure is no different from previous models and is completely standard, but for people performing these steps for the first time, a description of each step is given below.
You need to do the following:
- The connector marked in blue and labeled “Internet” requires a cable from your communication service provider to be inserted;
- Install one patch cord plug into the first yellow socket marked “Home Network” (it comes with the Zyxel Keenetic Giga II). Connect the second plug of this cable to the PC network card socket;
- Using the supplied power supply, connect the device to the mains and press the “Power” button.
Reset settings to default
If your Kinetic has already been used before, then most likely you will need to reset its settings first. For a new device, you can skip this paragraph of the instructions and immediately proceed to the next one.
The algorithm of actions consists of just the following few steps:

Procedure for logging into the web interface
Manufacturers of “Giga” with the index “Two” have provided the possibility of simple setup, which will seem uncomplicated even to a novice user.
To open the parameter entry menu, you will need to do the following:
- Launch any Internet browser familiar to the computer owner and try to open one of the pages in global network, for example, from the “Favorites” folder. In this case, the Quick Settings menu is usually immediately displayed.
If the user is a beginner, then he can simply click “Quick setup” and the wizard will quickly guide him through all stages of entering the basic parameters that are copied from the contract with the provider.

Installing new firmware

Manual setting
To enter network parameters, you must perform the following steps:
- Open the “Internet” tab (entering parameters differs for different types of connections);
- If you use DHCP with IP assignment in automatic mode, then you must enter the following:


Entering WiFi parameters
The following steps must be followed:


