Methods for connecting a router to the Internet. How to install and configure a WiFi router - from A to Z. Step-by-step instructions. What to do if there are no provider settings
Nowadays there are a huge number of different Wi-Fi routers from different manufacturers on sale. And that’s good, there’s plenty to choose from. But immediately after purchasing a router, we need to install, connect and configure it. And if the connection process is practically the same depending on the model, then the setup process itself and the page with the router settings can be different even from the same manufacturer.
It is very difficult to give detailed and step-by-step instructions for setting up in one article different models. But I'll try. In this article I will describe in detail and show how to install and configure a Wi-Fi router. Regardless of what manufacturer and model you have. This universal instructions Suitable for both setting up a new router and re-configuring it. You can do everything yourself. And you don’t have to pay specialists for setup.
Login to the router settings. How to log into the web interface?
Each router has its own web interface (site with settings, control panel), which can be accessed through a browser by going to the appropriate address.
Important! To go into the router settings and configure it, your device (PC, laptop, smartphone, tablet) must be connected to the router via cable or Wi-Fi network. At the same time, there may be no access to the Internet on the computer. You don't need internet to log into the control panel!
If you have a high-speed connection on your computer (maybe with your provider's name), then after connecting through the router there is no need to start it!
To enter the settings we need find out the address our router and factory username and password for authorization. This information is located on the body of the device itself. It looks something like this:

On a computer or mobile device that is connected to the router, open a browser (Opera, Chrome, Yandex.Browser, etc.) and go to the address indicated on the case. Or try 192.168.1.1 and 192.168.0.1.
Important! We enter the address in the address bar, and not in the search bar. Many people get confused and instead of a page with settings they end up on a page with the search results of some search engine.

On the login page you need to specify a username and password. The factory settings are indicated on the device body. Most often these are admin and admin. On some models, the default settings are not protected, and immediately after logging into the control panel, you need to set a login and password.
Articles that may be useful to you at this stage:
If the settings page has opened, we can continue. If not, then see the article with solutions to this problem at the link above.
How to set up a Wi-Fi router?
In order to use the Internet through a router, you need at least:
- Set up an Internet connection.
- Set up a Wi-Fi network.
In most cases this is enough. I also recommend changing the password that protects the router’s web interface. There are also settings for IPTV, USB drives, parental controls etc., but not everyone needs them.
In the control panel of almost every router there is a so-called “Quick Setup Wizard”, also known as “Quick Setup”. On some devices, it opens immediately after logging into the control panel. With its help, you can configure your Wi-Fi router step by step. Internet connection, wireless network, etc. For example, what it looks like at TP-Link:

You can try it, it's very convenient.
Internet setup. The most important step
The main thing is correctly configure the router to connect to the provider. If he cannot connect to the Internet, then all devices will have a “No Internet access” connection. Many users who try to configure everything themselves most often encounter problems at this stage.
Each Internet provider uses a specific type of connection. Dynamic IP (DHCP), Static IP, PPPoE, L2TP, PPTP. This type of connection must be specified in the control panel of the router, and certain parameters provided by the Internet provider must be specified.
Important! You must know exactly what type of connection your provider has. Also all the necessary data for connection (Username: Password), if they are necessary. As a rule, this information is specified in the contract that you received when connecting to the Internet.
Some providers bind by MAC address. It would also be desirable to clarify this.
If your provider uses a “Dynamic IP” (DHCP) connection, then the Internet should work immediately after connecting, since this type of connection is set by default on routers.
If the Internet through the router is already working (and you haven't run any connections on the computer), then you can skip this section and go straight to setting up Wi-Fi.
When the connection type is PPPoE, L2TP, PPTP, or Static IP (which is very rare), then you need to set the necessary parameters. Usually, this is the login and password that your provider gave you. In the control panel, the section with these settings is most often called: “WAN”, “Internet”, “Internet”.
For example, what the PPPoE connection setup looks like on an ASUS router:

Other examples:
Target: so that the Internet through the router works on all devices. Via cable and Wi-Fi. If this does not happen, then there is no point in continuing the setup.
You can always call the provider and clarify what parameters should be specified and where. They help many people over the phone.
Articles that may be useful to you:
I hope everything worked out for you.
Changing Wi-Fi network settings
I highly recommend changing your Wi-Fi network name and password. It is also advisable to set your region. Everything is simple there. This can be done in the section with wireless network settings. It can be called differently: “Wi-Fi”, “Wireless network”, “Wireless”, “Wireless mode”. If you have a dual-band router, then the settings must be set separately for the network at 2.4 GHz and 5 GHz.
- In the "Network name" (SSID) field you need to enter a new name. In English letters.
- In the "Password" field (wireless network key) create and write down a password. Minimum 8 characters. Security type - WPA2 - Personal.
- Well, there should be a “Region” field there. Change it to yours. IPTV on ASUS routers.
If something doesn’t work out for you during the setup process, you can always reset the settings to factory defaults and try setting everything up again. Find the “Reset” or “Reset” button on the case, press it and hold for about 10 seconds. The indicators will tell you when the reset occurred.
You can leave questions in the comments. I just have a small request, describe the problem in detail. Write the router model. Otherwise, it’s very difficult to understand and advise something when you don’t understand the question itself. Best wishes!
Installing a router using personal computer is not very difficult, despite the fact that massive instructions are usually supplied with the router, in which each step is explained in clear language. However, there are situations when desktop computer, there was no laptop or netbook, much less a specialist nearby, but there was a router and a strong need to use it right now.
Due to the existence of this problem and the fact that it sometimes really causes inconvenience, this article will explain in detail and consistently how to set up a Wi-Fi router without having a personal computer at hand. In this case, you will need to have a smartphone or tablet running Android, iOS, or Windows Phone, and of course the router itself.

If you decide to configure your router using a mobile device, then first of all you will need the router itself, as well as some kind of mobile device with which you can connect to the network. In addition, an Internet cable from the provider must be laid in the apartment (or house), that is, there must be Internet.
You can use different options for routers and mobile devices, in this case examples will be considered Tp-Link router WR-841N, and the ASUS-MeMO PadFHD10 tablet running on the Android operating system.

On a note! It is recommended to check in advance how they connect to the network, for example, by trying to connect to a free WI-FI point at some public catering outlet. This way you will get rid of problems with identifying internal problems of the mobile device, which you may confuse, for example, with problems with the router itself.
Speaking about the router itself, you can also choose any model that suits you, it doesn’t have to be Tp-Link. The most common and well-known models are considered to be such manufacturers as Upvel, Zyxel, D-LINK and others. They differ from each other for the average user mainly in the control panels.


Second step. Setting up a router using a tablet

Initially, according to the factory settings, there is no protection on Wi-Fi and your point is actually unprotected from anything. This way you can connect your mobile device (in this case we use the example tablet computer) to a Wi-Fi point with complete impunity, which is what you need to take advantage of.

So, you have connected your mobile device to the router. Next you need to configure it correctly.
Router settings via a browser on a mobile phone

This way you are in the settings menu of your router. Half the way has been completed, there is still a lot left.
Third step. Setting up Internet settings
From the very beginning, you must configure the router so that it is correctly associated with your Internet provider, that is, so that there are no further problems with connecting to the Internet and distributing Wi-Fi. To carry out this task, you must know a number of parameters that the Internet provider should have given you along with all the documents. First of all, such data includes the technology of the connection itself (Static (static), dynamic IP, PPPoE, PPTP, or L2TP), and thus, knowing how the connection works, the router parameters themselves. This information should be in the documentation supplied by the provider, but if it is not, you can check with technical support. In this case, you should clarify whether the supplier carries out the binding according to MAC address.

Advice! If your Internet service provider binds by MAC address, then it is recommended to contact this provider and ask them to bind your Internet to the MAC address of your router. This address itself can be found on the sticker below the router.
This is the most important aspect when setting up a router. If you do not take this into account, then although your devices will formally connect to the network, there will be no Internet itself.

These settings have a huge impact on the device and are essentially the core of its operation, so give them proper attention.
Fourth step. Setting up a Wi-Fi connection

Fifth step. Setting a password for a wireless network

Sixth step. Changing your access password
Now you need to change the standard login and password (those admin/admin) used when entering the settings menu in order to block access to the router settings menu for unauthorized people.

When the reboot is completed, the mobile device will most likely display an error stating that it should connect to this address (meaning IP:192.168.1.1). There is nothing terrible here: the point is that the device was disconnected from the router, but did not reconnect to it automatically, and in the future will no longer connect in this way, due to the fact that you set a password for this network connection, and when the device was rebooted - the protection took effect.
Therefore, in order to be able to work on the Internet, you will need to enter a password each time before connecting to the network.
To do this:

If everything goes smoothly, then everything is in order, and most likely there will be no additional problems during connection. This means that in this case the provider connects using “Automatic IP”, and thus the router sets all the parameters independently. In this case, at this stage you can already connect to the Internet and work.
However, there is another option: in some cases, providers use a connection such as Layer 2 Tuneling Protocol (L2TP), Point to Point Tuneling Protocol (PPTP), static IP, or Point to point protocol over Ethernet (PPPoE) (used by providers such as Beeline , or dom.ru) in this case, sometimes you have to manually configure a number of parameters.
Conclusion

Setting up a router without a personal computer using modern smartphone or tablet - this is not such a problem, since the operating systems on which modern mobile devices, are no different from classic desktop ones operating systems. Of course, it's best to use a tablet rather than mobile phone, since it is very difficult to see small text on a small screen, but technically the above operations can be carried out on any device that supports Android, iOS or Windows Phone.
Video - How to set up a router without a computer
Good afternoon friends! I am very glad to welcome you to our educational Internet portal “With a computer to “YOU”. We continue to analyze in detail the plan for building our own home network. Let me remind you that we have already chosen a specific technology local network(Wi-Fi or DSL), decided on the network architecture, purchased the necessary network components, completed a network education course in detail, and today an important and crucial stage awaits us - setting up a router (Wi-Fi router).
The router is the key device in the home network. It provides access to the Internet, connects users with each other, protects the network from intrusions from the outside, and is also capable of providing additional network services, making life easier for users.
preparing to configure the router
1. If you connect to the Internet via a dedicated Ethernet line (your provider has installed a network cable in your apartment), you will need a wireless LAN router, on the back panel of which there is a connector marked “WAN”. We will connect the provider’s Ethernet cable to it.

2. If your provider provides you with Internet access using DSL technology (via telephone line), then the following options are possible:
- Wi-Fi router with a built-in DSL modem (the most convenient option, but will cost a little more);
- DSL modem with a built-in router with a point connected to it via Ethernet Wi-Fi access(a little cheaper, but you’ll have to configure the access point separately and we can do it);
- DSL modem connected to Wi-Fi router(you will also have to configure two devices).
Which option to choose is up to you, it all depends on the price of the issue and what devices you already have at home.
Having prepared the devices, connect the provider's Ethernet cable to the WAN port of the router (or a telephone cable to the LINE port of the wireless DSL router). Next, you need to connect a computer to one of the free LAN ports of the router, with which we will configure the router (once the configuration is complete, the computer can be disconnected). We turn on the computer, but do not supply power to the router yet.
Next, you need to establish a connection (set up a network) between the computer and the router. If your router has a DHCP server enabled by default, whose task is to assign IP addresses to connected devices, then make sure that the automatic address acquisition function is enabled on your computer. To do this, do the following:
Double click on the icon network connection in the task area (lower right corner of the desktop), the “Local Area Network Connection Status” window will open. Click on the “Properties” button. After that, in the window that opens, select “Internet Protocol (TCP/IP)” and click on the “Properties” button.

In the “Properties: Internet Protocol (TCP/IP)” window that opens, set the switch to the “Obtain an IP address automatically” position. Confirm the settings by clicking on the “OK” button.
If the router is assigned a static IP address by default, you need to follow the same first steps, setting the switch in the last “Properties: Internet Protocol (TCP/IP)” window to the “Use the following IP address” position.

In the “IP address” field, enter a value that differs by one from the router’s IP address. In most routers, the default address 192.168.0.1 is set by the manufacturer (you can check this in the instructions for the router), therefore the IP address of our computer will be 192.168.0.2. Enter the appropriate subnet mask. Close all windows by clicking on the “OK” button.
Friends, if you have forgotten how to set IP addresses and a subnet mask, and what they are in general, then return to our article “ Network settings” and repeat everything again.
Great, we have made all the preparatory settings for configuring the router via the web interface. Now let's open the router settings window. To do this, enter the IP address of the router in the browser line and enter the credentials in the appropriate fields: username and password (see the instructions for the router).

setting up a router with an ethernet connection to the Internet
1. After entering your credentials correctly, the router settings page will open. For different router models, the settings may be slightly different, but the basic parameters are the same for all devices.
So, on the “SETUP” tab, click on the “Internet Setup” item and launch the Internet connection setup wizard by clicking on the “Internet Connection Setup Wizard” button.

2. Next, the wizard will offer to change the password, set the time zone, and only then proceed directly to setting up the Internet connection. The first step is to determine the type of Internet connection provided by the provider (you can clarify this point in the service agreement).

3. The following options are most common in our country:
- DHCP connection (obtaining a dynamic address);
- Username/Password connection (Internet connection that requires entering a login and password);
- Static IP Address connection (obtaining a static address).
We will not consider the first option, everything is extremely simple: the router will receive all the settings from the provider automatically. In the second option, you must indicate the IP address (if the provider provided it to you), username and password (specified in the service agreement), and the name of the provider (optional).

4. If you have a connection option with a static address, then indicate the IP address issued to you, subnet mask, gateway address and DNS server address.

5. If you are sure that you did everything according to the instructions, but there is still no connection to the Internet, then most likely your provider provides Internet access to devices with a specific MAC address. This situation may arise if your Internet provider has connected your PC to the Internet. Everything works, but when setting up the Internet through the router, there is no connection.
When connected, the provider's equipment remembers the MAC address of the device and subsequently provides services only to it. To fix this problem, you need to use the cloning function or manually entering the MAC address on the router.
To find out the MAC address of your computer, double-click on the network connection icon in the task area (lower right corner of the desktop), the “Local Area Network Connection Status” window will open. Go to the “Support” tab and click on the “Details” button. The “Network connection details” window will open, where the first line will be your MAC address.

If you did everything correctly, then the Internet connection should be available on the computer from which you made the settings. To do this, open any page in your browser and enter any website address, for example, our blog www.pc4me.ru. If the page opens, then the connection is established - everything is in order.
If you use a DSL connection, the settings will be approximately the same, you just need to specify additional parameters (Port, VPI, VCI) provided by the provider.
wifi setup
1. So, let's move on to setting up a wireless connection. Again, go to the router settings panel (see procedure above). On the “Setup” tab, select “Wireless Setup” and launch the “Wireless Connection Setup Wizard”.

2. Next, specify the network identifier (name) and indicate how to create a key to protect the Wi-Fi network with encryption. I advise you to use the option to automatically generate a key. And also check the box to use WPA encryption instead of the outdated WEP algorithm. Click the “Next” button.

3. Settings are completed, the encryption key has been generated.

Remember it, it will be useful to you when connecting other devices to the router via a wireless channel (you will need to specify the SSID network identifier and this key).
setting up wi-fi security
1. Change the access password for the access point configuration interface. The router has standard password access to the configuration interface, it is not a secret to anyone (it can be found on the equipment manufacturer’s website). To prevent scammers from gaining access to your Internet channel, first of all, replace the password with a stronger one (mix letters of different case and numbers, use symbols instead of letters, for example).
2. Disable the ability to remotely configure the router. This option is provided by default to facilitate the provision of support services via the Internet. They configure or verify your settings remotely over the Internet. Disable this feature.
3. Enable encryption protection (WPA or WPA2).
4. Turn off your wireless network when not needed. If you do not use the access point (for example, at night or when you leave home somewhere), then turn off the router. A network that is down cannot be hacked.
5. Limit network access. Even the simplest routers have the ability to configure filtering of computers by MAC addresses. Specify all devices on your network that you intend to provide Internet access to. All others will be unavailable.
6. Hide your network. In the wireless connection settings settings, there is a function that allows you to disable the transmission of the wireless network name (SSID). When searching for a network external devices your network will not be visible, and therefore you will not be able to connect to it.
So we looked at the basic steps of setting up a router. In the next article on updating router firmware, I will tell you about hidden possibilities routers - we will expand the capabilities of the router by changing the firmware of the equipment.
In routers such as TP-Link, Zyxel, Qtech, NetGear, Huawei, ZTE, D-Link, Asus, the principle of the default menu and settings is very similar.
pc4me.ru
General instructions for setting up routers
- Connect the 2KOM cable to the WAN port of your router.
- Connect your computer to the LAN port of your router.
- Type the router address into the address bar of your browser. It is usually indicated in the instructions for the router or on the router case.
- If the address does not open, you should reset the router to factory settings. Usually, to do this, you need to press the Reset button on the router for 5-15 seconds.
- In the window that appears, you must enter the Username and Password, which are usually indicated on the router itself or in the operating instructions. By default, the following options are possible:
- Username: admin
- Password: admin ( possible options: 1234, password, empty password)
- Next, you need to configure the Internet connection settings by selecting the Internet connection in the menu (possible options: Basic settings, Wan setup, Setup wizard, Connection setup, IP config). Connection settings:
- Configuring IP parameters (possible options: Connection Type): Automatic (possible options: Automatic, Dynamic IP, DHCP)
- MAC address: Take from computer (possible options: Clone MAC from computer)
- DNS address server: Automatic (if you need to specify an IP, leave the fields untouched)
- After completing the settings, you must click Apply (possible options: Save, Finish, Apply, Save, Finish).
- This completes the basic configuration of the router. After saving the settings and rebooting the router, a connection to the Internet should be established.
ATTENTION! The MAC address must match the MAC address entered in Personal Account, otherwise, when you try to access the Internet, you will see the “Your computer is not authorized” window.

- Select Wi-Fi Network, Connection from the menu (possible options: Wireless Settings, Setting up a wireless network).
- Enable Wireless Access (possible options: Wi-Fi, Wireless Network).
- Set the Network name (possible options: Network name, SSID): 2KOM-WiFi
- Leave the remaining fields unchanged.
- To protect your wireless network from unauthorized access, it is recommended to enable network security. To do this, in the Security submenu (possible options: Encryption, Security Mode, Encryption), you must select the WPA2-PSK type (possible options: WPA-PSK, WPA-Personal). It is strongly recommended NOT to select WEP encryption type as this type is not secure.
- Next, you need to specify the code word with which the signal of your Wi-Fi network will be encrypted. The code word must be from 8 to 63 characters and may contain letters and numbers. Enter the code word in the Network Key field (possible options: Pre-Shared Key, Password, Password).
- Click the Apply button (possible options: Save, Finish, Apply, Save, Finish).
- This completes the wireless network setup. After saving the settings and rebooting the router, you can connect to your network via Wi-Fi using a code word.
- First, you need to reserve IP addresses for specific computers on which DC++ will run. This is usually done through the Home Network menu (possible options: Network Settings, Local Network Settings, LAN Settings) and then Fix IP addresses for specific devices(possible options: Reserve addresses, Static DHCP, DHCP Reservation).
- Next, you need to configure Port Forwarding (possible options: Port Forwarding, Port Forwarding, Virtual Server, DMZ).
- Next you need to set the following parameters:
- Computer IP address (possible options: server IP address, Internal IP, Private IP, LAN IP, LAN Server): the address or name of your computer that was previously reserved
- Protocol (possible options: Protocol type): TCP and UDP (possible options: Both, *, TCP/UDP)
- Port settings, usually not all of the following items are present:
- Starting port: 4000
- End port: 4000
- Private port (possible options: Internal port, Server port, Port range): 4000
- Public port (possible options: External port): 4000
- After completing the settings, you must click Add (possible options: Add) and then Apply (possible options: Save, Finish, Apply, Save, Finish).
- If DC++ is intended to be used on several computers, then a similar operation must be performed for all other computers. When adding rules for other computers, you must specify other ports: 4001, 4002, 4003, etc. These ports must also be specified in the DC++ program settings on the corresponding computers.
- Usually, modern routers do not require additional configuration digital television. However, many models require Multicast support to be enabled (possible options: IPTV, IGMP).
- This completes the IPTV setup. After saving the settings and rebooting the router, you can watch IPTV on your computer, as well as on your TV via a set-top box.
- When watching IPTV on a TV via a set-top box on some models, you can improve the stability of IPTV. If the router has a STB Port section (possible options: TV port, IPTV STB), then it is necessary to indicate the numbers of the LAN ports of the router to which the set-top boxes are connected. In this section, you should not indicate the ports to which computers are connected - they will lose access to the Internet.
- Then click Apply (options: Save, Finish, Apply, Save, Finish).
- For the most stable operation of your router, it is recommended to update its firmware to the latest current version, which can usually be downloaded from the manufacturer’s website.
- To update the firmware, you need to connect to the router via cable. Otherwise, the router may break during flashing.
- It is also recommended to first reset the router settings to factory settings, otherwise the router may not work correctly after the update.
- To update the firmware, you must select the System section (possible options: Administration, Tools, System Setup, Advanced, Maintenance, Tools) and then Firmware Update (possible options: Firmware Update, Firmware Upgrade, Firmware Update).
- Next, you need to specify the path to the firmware file on your computer and start the update.
- Wait for the update to complete (usually takes about 5 minutes); under no circumstances disconnect the computer from the router and the router from the network until the update process is completed.
2KOM.ru
Home wireless network | How to set up a wi-fi router
Today, many families have long had a couple of computers or laptops, and sometimes both. Plus to all this there are also smart phones, and maybe a tablet. And, of course, the center of entertainment for every family member is a large TV. Up to a certain point, everything usually goes fine, as long as everyone in the house uses their devices, but then the desire for something more appears.

For this you need a home wireless network. It helps to get rid of unnecessary wires, be more mobile, and, of course, makes all the media content accumulated by family members available to everyone. Such a home wireless network is organized using wi-fi router a, which distributes a signal to many devices that support wireless connection. Or you can join the distribution using network cables, but for this you will need to register IP addresses for each connected device.
For greater comfort in accessing content, use a NAS server. This can be a separate system unit with several HDD drives, and a ready-made boxed solution. Such home server allows you to connect any device wirelessly and watch HD videos, music, play games and much more, and most importantly, store it all on your disks. The home server is also connected to the wi-fi router.
To access the NAS server you need to install special programs on your mobile devices, which provide access to your entire home network, and on your computer and laptop you can access multimedia content without them. Currently, any smartphone or tablet running iOS (Apple) or Android (Google) can open files from a home NAS using a file manager. The main thing is that it has the ability (or it would be more correct to say functionality) to access devices on the local network. For example, on my tablet I use file manager ES Explorer, with the help of which I can easily access any device on the network with shared content.
For example, Microsoft has long offered users of its operating systems the Windows Media Center shell with integration into the OS, starting with a special edition of Windows XP. This opportunity Modern Windows OS allows you to play HD video from a PC on your XBOX 360, bypassing your home NAS server, since its function is performed by a computer. Not to mention the popular Smart TVs supporting DLNA technology (Samsung Allshare, Home media server etc.), with the help of which multimedia content from a PC is available for playback on a TV.
So, enough theory and to start setting up a wireless home network, you need to take care of setting up a wi-fi router. By the way, all of the above can be configured thanks to the instructions on this site; use the search or site map.
How to set up a wi-fi router

Believe me, setting up a wi-fi router is much easier than you think.
Let's say you are connected to the Internet at home: a network cable is installed in your apartment and connected to a computer. Your task is to get simultaneous wireless Internet access from other devices (laptop, smartphone or tablet). For this you need a wireless router, which is more often called a wi-fi router.
Open the quick guide to the wi-fi router (Quick Start - Fast start) to get the big picture before I talk about how to set up a wi-fi router.
We need a router so that all devices on the network receive their network address (IP address) from the home subnet, since if an incorrectly entered IP is used, data exchange will be unacceptable. The router organizes that very small subnet (home wireless network), distributing IP to all devices. And the Internet provider, in turn, allocates only one IP address to each subscriber, which we use as a router.
Our home wireless network will be based on Wi-Fi technology. The IP addresses that the wi-fi router will distribute will be different, incompatible with the addresses accepted in the provider’s network. The connection between the provider's network and the home local wireless network will be provided by the router, transmitting the Internet to devices with a Wi-Fi connection at home.
To avoid unnecessary questions, I’ll say right away that other types of network devices: hub (network concentrator), switch (switch) or access point cannot be used for this purpose.
Modern wi-fi routers have a number of other useful functions:
- home network protection
- built-in FTP clients
- USB ports (for connecting hard drives, flash drives and printers), etc.
Attention!
The instructions for setting up routers for your home are not individual in nature. Setting up different models of wireless routers is approximately the same. It is only worth noting that each manufacturer (model) has its own configuration nuances.
Preparing to set up a wi-fi router
The router is configured by connecting all devices by wire. Let's assume that you have a dedicated line connection (Ethernet, twisted pair), that is, a network cable with an RJ45 connector is installed in the apartment. We take a wireless wi-fi router and connect the provider’s Internet cable (Ethernet) to the port called WAN (or Internet), located on its rear panel.

The router connection diagram for configuration can be as follows:
1. Using a classic wi-fi router (connection to the Internet via twisted pair cable (Ethernet))
2. With the participation of a wi-fi router with DSL modem functionality (connection to the Internet with a telephone cable)
The configuration device can be a PC or laptop. The use of one scheme or another will depend on the type of connection your Internet provider provides.
How IP addressing occurs between devices:
- WAN port on a wi-fi router - connection to the Internet cable from the provider. The IP is assigned by the provider (either it is in the contract or is assigned automatically)
- LAN ports on a wi-fi router - IP addresses for devices connected to these ports are assigned automatically or manually (at the time of setup a PC is connected to it) IP address interval 192.168.1.1 - 192.168.1.xx, where xx is from 2 to 254)
- LAN port network card PC - a cable from the LAN port of the Wi-Fi router is connected to it. IPs are assigned automatically or manually (according to the addresses configured on the router).
We figured out how to connect the router to the PC. Now turn on the computer, but do not plug the router into the outlet.
Now a little general information before going into details:
General algorithm for setting up a router
2 ways to set up a wi-fi router
- Auto. Using a special wizard program, which is located on the software disk included with the wireless router. All you need to do is insert the software disc into your computer's optical drive.
- Manual. Using the router's web interface. The setup is done via a PC browser.
The first method is the simplest: the router setup wizard will ask you to enter the necessary data (in the best case, it is enough to select your Internet provider from the list) and the program will configure the wireless connection itself. You need to refer to the user manual to find out when to turn on the power wireless router- before starting the setup program or after, as this is important for the correct operation of the setup program.
Of course, it may happen that your provider is not on the list offered by the program. In such situations, you have to manually configure the router through its web interface. I will dwell on this procedure in more detail and describe the 3 main steps of setting up the router:
- setting up a connection between a computer connected to the router’s LAN port and the router itself to gain access to its web interface
- setting up an Internet connection (WAN port parameter) using data from the provider
- setting up a wireless network, including setting security parameters (password, choice of encryption method, etc.), as well as physical parameters such as signal strength and selection of wireless channels
This, of course, is not all; you can optionally configure other parameters related to security and additional functions, but the latter depend on the router model.
Static and dynamic IP addresses
Information about what type of IP address you received from your provider is very important when setting up your router. If your computer, which was previously on a wired connection, had a specific IP address (usually specified in the contract), then your IP address is static.
If nothing is mentioned about IP, and, let’s say, there is only a login and password, then the router will receive it automatically. Thus your IP address is dynamic.
How to reset your router
Resetting your router (returning the router settings to factory settings) is necessary when problems arise during setup, you get confused, or something goes wrong. For such cases, there is a special button on the wi-fi router case - RESET. At what point to press it and how long to hold it pressed, it is said in the user manual, or focus on the change in the behavior of the indicators on the front side of the router, which will tell you if the reset was successful.
I would like to draw your attention to the fact that this the only way change forgotten password on the router.
This completes the theoretical preparation for setting up. Next, I will go into detail about each of the 3 steps.
Setting up a connection with a router on a computer
First, let's establish a connection between the router and a computer connected according to the above diagram.
A. If the DHCP server is enabled by default on the router, which automatically distributes IP addresses to connected devices, make sure that it is also enabled on the computer automatic receipt network address. To do this, follow these steps:
2. In the local network connection status window, click on “Properties”.

3. After that, in the next window, select “Internet Protocol version 4 (TCP/IPv4)” and click on the “Properties” button.

4. In the “Properties: Internet Protocol Version 4 (TCP/IPv4)” window on the “General” tab, the switches should be in the “Obtain an IP address automatically” and “Obtain DNS servers automatically” positions. If this is not the case, set them to the desired position and close all windows by clicking “OK”.

B. If your router is assigned a static IP address by default, follow these steps.
1. Find the default IP address in the router's user manual (often it is indicated on a sticker located on the bottom of the device). Repeat steps 1-3 above.
2. In the “Properties: Internet Protocol Version 4 (TCP/IPv4)” window, on the “General” tab, set the radio buttons to “Use the following IP address” and “Use the following DNS servers”. If this is not the case, set them to the desired position and close all windows by clicking “OK”.
3. In the “IP address:” field, enter the IP address, the last number (after the dot) of which is greater than the corresponding number in the router’s IP address. For example, if the default address for your router is 192.168.1.1, you can enter 192.168.1.2.
4. In the “Subnet mask:” field, enter the value 255.255.255.0, and in the “Default gateway:” and “Preferred DNS server:” fields - the IP address of the wi-fi router.

Close all windows by clicking the “OK” button. Now everything is ready to configure the router.
Setting up a router using the wizard
There is nothing tricky about this procedure. Insert the software CD that came with your Wi-Fi router. Run the installation wizard, accepting the license agreement when prompted.

Click next until you are prompted for information wireless connection. Enter the SSID of the wireless network (the name of your network that will be displayed when searching) and password in the appropriate fields, or leave the suggested ones, they can be changed later.

The wi-fi router will automatically determine your Internet connection settings. If your connection type uses a Login and Password, then you can enter them later, in the web interface, and in any other case you can use it if after automatic settings the Internet did not appear. Just don’t forget to write down the Login and password to access the router’s web interface (if the router generates them itself, in the installation wizard window).
At the very end of setting up the router, you will automatically go to its web interface to manually configure your Internet connection.
Attention!
If you did everything according to the instructions of the installation wizard and did not receive any error messages, but, unfortunately, you did not receive an Internet connection, there are 2 possible solutions to the problem:
- As I wrote above, you need to enter additional connection settings in the web interface.
- It is possible that the provider allows access to its network only to devices with a specific MAC address - an individual device number. It works as follows: the provider’s equipment remembers the MAC address of the client device when it first connects to the network and subsequently allows access only to it. This information may not be included in the connection setup information. To fix this problem, routers provide special function cloning and manually entering the MAC address, which I will talk about a little later.
Setting up a router manually (using the example of an Asus router)
If you cannot set up a connection using the wizard or you need to configure any parameters that are not provided in the router installation wizard, you can make the settings manually through the web interface. Open any browser and type the router's IP address in the address bar:
Enter your name and password in the appropriate fields in the window that appears (their default values are indicated in the router user manual) to access the web interface. Please note that after setting up your connection, it is recommended to change your username and password for security reasons.
In the LAN section of the router interface, select the “DHCP Server” tab and check the “Enable DHCP Server” - “Yes” box. This will enable the router to automatically distribute IP to devices connecting to it.
In the WAN section in the “Internet connection” tab, select the type of Internet connection. Which type of Internet connection should you choose, look in the documents issued to you by your provider or use the article: “How to determine the type of Internet connection.”
The most common Internet connection options
- With dynamic IP (Auto IP or DHCP)
- With a static IP address (Manual configuration of the WAN IP address setting field, mask, gateway...)
We will consider the 2nd option, with a static IP address. As soon as you select it, the fields for entering static connection parameters will become active - “Setting up the WAN IP address”, which must be filled in according to the data received from the Internet provider.

Click “No” and fill out all the fields one by one.

It is worth noting that in this case the IP address and other network parameters are fixed, they should be entered exactly as specified by the provider. If you select the option with a dynamic IP address, or PPPoE or L2TP, then the setup is simplified and the router will receive all connection parameters from the provider automatically. Only for the last two connection types you need to specify the name and password provided by the provider (or in rare cases, the “Service Name”).
Complete the settings by clicking the "Apply" or "Save" button.
In some cases, the provider binds the user to the MAC address (physical address) of his computer so that no one else can connect instead of him. In this case, attempting to access the Internet using the router will become impossible.
To avoid this, the MAC address of the router's external interface should be changed so that it matches the MAC address that your ISP assigned you to (usually the address of your computer's network interface).
This operation is called MAC address cloning, although this function in the router’s web interface does not always have the same name. To clone the MAC address of your computer, which was connected by cable to the Internet before installing the router, enter it in the MAC field of the “Special requirements of the Internet service provider” section in the WAN section, Internet connection tab.
Save the settings by clicking the "Apply" button.
How to find out the MAC address of a computer
To find out the MAC address of your computer and enter it when setting up an Internet connection on your router, do the following:
1. Click on the computer icon in the task tray (tray), click “Network and Sharing Center” shared access»
and in the window that opens, select “Local Area Connection”.
2. Click on the "Details" button to see the MAC address.

The MAC address will be located in the Physical Address field.

Configure Wi-Fi settings manually
If you did everything correctly and specified the correct connection parameters, then after rebooting the router you will have access to the Internet from the computer on which you made the settings. Open your browser and enter the address of any website, for example MediaPure.Ru. The site page has opened, so you can start setting up your wireless network (wi-fi).
In the router web interface menu, select the “Wireless” section, “General” tab.

Please note that some routers support wireless networks in two bands at once (5 GHz and 2.4 GHz). Set up your wireless network in the more popular 2.4 GHz band.
Specify the wireless network operating mode. The best option is a universal setup that ensures compatibility with both new and old versions of the Wi-Fi standard. It is called “Mixed” or “Auto” ( auto mode).

Enter the network SSID (Network name that will be displayed when scanning) in the field of the same name. Select a security option in the “Authentication method” field, I recommend WPA2-Personal, read why in the Wi-Fi section. Enter the password (or key) in the WPA Pre-Shared Key field. This key and network name (SSID) will be required to configure access on your wireless devices, so it is recommended that you save them to a file or write them down somewhere, keeping them in a safe place.
It is recommended to hide the SSID so that your home wireless network is not visible from the outside, but you can still connect to it since you already know the SSID. To save the settings, click on the “Apply” or “Save” button. By the way, a wireless network in the 5 GHz band is configured in the same way.
Attention! Be careful when updating your router firmware. The need for it is determined by incorrect operation of the router and communication problems. Carefully read the update section of the user manual software router and strictly follow the recommendations. Updating the router firmware is a last resort; you should not resort to it unless absolutely necessary, since initial setup There is no such need for a wireless network.
The issue of setting up a wi-fi network is also covered in detail in the article: How to set up a wi-fi router or wi-fi access point.
P.S. I would be very grateful if you point out those points that need to be examined in more detail.
MediaPure.ru
How to set up satellite Internet through an ASUS router?
Hello Svetlana. I cannot help you through remote assistance. I don't need payment either. Let's try to figure it out.
Did I understand correctly, you need to make sure that all devices that connect to your Wi-Fi network have access to the Internet through the ASUS router?
You wrote:
My task is to make sure that wi-fi distributes an IP address to laptops from our Internet, and not from the router.
Like this? I can not understand. And what does the IP address have to do with it anyway?
I don’t know what specific Internet you have and what equipment (I just know that it’s satellite). Does he work on a computer? Are you setting any settings on your computer? It's most likely just a network cable from satellite Internet equipment.
Try resetting your ASUS router (just in case). Then, connect the cable from the satellite Internet to the WAN port of the ASUS router. To a port that is signed by the Internet. If you don’t need to set any parameters for the Internet to work, the router will automatically distribute the Internet via Wi-Fi and a network cable.
I cannot tell you anything specific, since I did not understand the problem and task itself. I don't know what equipment you have and what settings you have. I don’t understand about the IP address, which you wrote about so often. Maybe you had to introduce something else.
You can answer me in the comments below.
Windows 10 - all instructions for setting up the Internet and solving problems Setting up a router - instructions for different models and manufacturers Useful programs- for setting up HotSpot, Wi-Fi, 3G/4G modems.
Subscribe to help-wifi.com
help-wifi.com
We set up the Internet on Windows via a modem or router and a local network at the same time

They asked me to tell you how to set up the computer on the Internet via an ADSL modem (we set it up in the same way with a router) and the computer on the local network via a local router.
We will configure the network in Windows XP, and similarly with Windows 7.
Given: 1. Local network 10.10.0.0/24 with router 10.10.0.12. An ADSL modem from the provider, configured by a router with IP 192.168.0.1, is included in the local network switch, that is, it distributes the Internet to the entire subnet 192.168.0.0/24, for whom it will be registered as the main gateway.
The task is to configure the operation of computers on the Internet with simultaneous operation on a local network through the router 10.10.0.1 and other networks that are located behind the router.
The first thing we do is disable the DHCP server in the modem. This is so that the modem does not distribute IP on the local network, we will register all the IPs manually. Secondly, open the settings of the network card and enter:
Open the network settings of your network card:


A window for entering parameters will open. Enter the IP address, mask, gateway and DNS into the network card settings and proceed to additional settings:
IP: 192.168.0.5Mask: 255.255.255.0Default gateway: 192.168.0.1DNS: 192.168.0.1
For each computer you are setting up, you must specify a different IP address, for example 192.168.0.5, 192.168.0.6, 192.168.0.7, etc.

After filling out all the fields as in the screenshot, click the Advanced button:

In the window that opens Extra options TCP/IP press button No. 1: Add, a window for entering an additional IP address will open. Enter the address of our computer on the local network No. 2: 10.10.0.5 and the mask 255.255.255.0, to save an additional IP address, click button No. 3: OK
Our additional IP No. 4 will appear in the IP address field: 10.10.0.5; to save the settings, click button No. 5: OK
We save the changes made to the TCP/IP settings of the network card by clicking OK in both windows:


After making the changes, we should already have Internet on the computer; to check, we can run the command and click OK:
Start - Run and enter the command:
Ping softnastroy.com -t
-t parameter ping will continue indefinitely, if you do not use it, then 4 pings will be made and the program will close
If the modem or router distributes the Internet, then we have the following system response:

We have set up the most important thing, we have the Internet, there is also a ping to the router, now for the local network to work, we need to add a permanent route behind the router.
To do this, we will simply add everything that goes on the network 10.0.0.0/8 to go through the local router 10.10.0.1, to do this, click Start - Run and enter the command::
Route add -p 10.0.0.0 mask 255.0.0.0 10.10.0.1
To check static persistent routes, run the command:
Route print
To ensure that your console window does not close during execution, run the command Start - Run - cmd and in the window that opens, execute the above commands.
If you have other addresses, simply change them to your own by analogy.
Network setup is complete. Sergei Lazarenko was with you.
Let's take a short break and watch a short video clip.
Currently, there is a huge range of different routers on the market from a variety of manufacturers. We spend a lot of time looking through all sorts of notes on the Internet about certain brands and models of routers in order to maximize the benefits of our purchase.
When the time comes to prepare the purchased router for operation, i.e. connecting it to the network, device and its subsequent configuration, then our eyes begin to run wild and our thoughts become confused. The thing is that setting up a router for the first time is not the easiest task, which is due to multiple factors: an alarming number of different connectors on the case, correct installation, device configuration, etc.
In this article we will outline detailed instructions on installing and configuring a router, which you can use with any model from any manufacturer. In the end, they are not that different from each other. So, let's begin.
First, let's go over some points that will be useful to know for anyone who is going to connect a router for the first time. Firstly, the connection principle is the same for all routers, i.e. it doesn’t matter which model and from which manufacturer you purchased - it doesn’t matter at all. Secondly, it also doesn’t matter which provider you use.
The only thing you should worry about is the type of Internet connection you will be working with when setting up the router, but more on that later in the instructions. So, let's roughly draw up your plan for the first installation of a router for your use:
- Your first obstacle to using the router will be its packaging, which we hope you won’t have any problems with. Having gotten rid of the packaging, next you need to connect the device to the computer you need, and then connect cables to both of them, i.e. power adapter, ISP cable, network cable between router and computer.
- Once you can run all this bunch of wires between the computer and the router, and then power it, you will next need to go into its settings. This is done in all cases the same way using a special IP address and a browser. We enter the IP address indicated on the router box into the address bar of the browser and a page with its settings will open. Everything is quite simple here.
- After going to the router settings, you will need to set the necessary parameters in it. Looking ahead a little, you will set the type of your Internet connection in the settings, as well as personal data from it, if required, but more on this later in the instructions.
- And the last thing left is to set a preferred name and password for your already configured Wi-Fi network. You can use the factory values, but it would still be better to set your own.
As you can see, everything is not so complicated...relatively. Most users still experience certain difficulties while performing the above steps. Let's go through them in more detail.
Installing a router for work
First, you need to decide on the location where the router will be located. But, you don’t have to choose much, since this place will be the location of your Internet provider cable. In general, start from the circumstances. However, it is still recommended to install the router higher.
Next, you need to connect the router to power using an adapter. You will immediately understand that it has started working by the lights on it. If they are not lit, then you probably have a power button on your router - press it.
Now you need to lay out the necessary cables for the router. If you are connecting the router to your computer, you will first need to connect the cable from your Internet provider to the WAN port (usually highlighted in one color on the device, usually blue or black). Then take the standard network cable that should have been in the box with the router, connect one end to the LAN port of your computer, and the other end to one of the four LAN ports of the router.

If you do not want to connect the router to your computer or you do not have such an opportunity, then you just need to connect it to the power supply and connect the cable from the Internet provider.
If you followed the above steps, then your router should have already created a wireless Wi-Fi hotspot. However, this connection will operate under a standard name and password, which should be indicated on the box or body of the device itself.
To connect to the created network from any device that has a Wi-Fi module on board, you need to activate this module and enter the password and login specified by the manufacturer.
Logging into the web interface of the installed router
To configure the installed router, you need to log into its web interface, which will contain all kinds of settings for this device. All you need to do is enter the IP address indicated on the router box or its case into the address field of your browser, for example, 192.168.1.1 , and follow it.
I would also like to point out that you do not need to already have a network connection in order to go to this address, i.e. setup can be done without connecting to the network.

The only thing you really need for setup is a computer or device connected to the router via a cable and logged into the Wi-Fi network created by the router.
So, you have found the address you need to log into the router’s web interface. You should see a screen asking you to enter your login and password. As mentioned earlier, it will not be difficult to find this data on the router box or on the router itself. It is also worth pointing out that in some cases the user will not even have to enter anything, i.e. the router will not be protected and you will have to immediately set up your username and password.
Configuring the router via the web interface
Now you are inside the settings of your router. To be honest, when you first get there, you will probably be confused due to the presence of a huge number of tabs in the web interface and the many settings that are located in these tabs.
However, there is no need to worry, since almost any router from any manufacturer has a special option - quick setup. It may look different, but its meaning is the same - to configure the device as quickly and easily as possible for the user.
You can find this item at home page web interface or in one of the tabs. For example, in a router from the manufacturer Netis (yes, not the most popular brand of routers, but it will do) quick setup can be done immediately on the start page. Here is a screenshot of the Netis web interface:

As you can see, you just need to check the box next to one of the Internet connection types and enter some data (if necessary) into the required fields. If you need more detailed settings, then click on the section Advance, and if simplified again - Quick Setup. On the page with quick setup you will have the opportunity to change the login and password for the network distributed by the router.
You should immediately point out that the web interface of each router model will be different, but this should not be a problem, since the principle of setting up these devices is the same. To get started, use the quick setup, and then, when necessary, use the advanced one.
Setting up a network connection
Well, we come to one of the most difficult parts of this topic - setting up a network connection for the router. If for the majority up to this point everything was normal and clear, then at this moment many users are really lost.
In most cases, a quick setup can automatically set everything as needed, but sometimes you may need to do everything manual settings. So, first you need to find out what type of connection you are using: DHCP, Static IP, PPPoE or other. This information you can find out by contacting your provider or you can find it out from the contract that you should have.
In most cases, providers prefer to use DHCP or Dynamic IP. If you also use this type of connection, then your router should already work fine, since it is pre-configured to work with a DHCP connection.
If you do not have access to the network, then in your case a different type of connection is used. Describing the steps for setting up other types of connections is not the easiest task due to the difference in the web interfaces of routers from different manufacturers. But let's still look at an example of setting up a PPPoE connection in a router from the same Netis:

As you can see, you just need to go to the Network tab, then select under the WAN tab. In these settings, click on the connection type drop-down menu and select PPPoE. Then enter the login and password for your Internet connection and everything will be ready.
Everything is intuitive and understandable if you have knowledge about the type of connection and the data to configure it. So, in the end you should get the following: connect the router, select the desired connection type and configure this connection, i.e. entered the required login and password (if required), etc. If you did everything correctly, your router will start distributing Wi-Fi and you can easily join it.
Changing your Wi-Fi name, password, and region
Everything works, you have access to the network and everything is literally great. But the last step in setting up your router is changing the default name of the Wi-Fi network, changing the password for it (saving the factory password is not the best solution) and setting the desired region.

Again, web interfaces vary, but you should find all of the above settings under Wireless. However, you need to clarify something about the name of the network - it can be set in the SSID field. The password, accordingly, is set in the line of the same name. Set the region according to your location, for example, if you live in Russia, then select the EU region.
Finally
Setting up a router may seem like a complicated series of steps, but in reality everything is incredibly simple. So let's take a quick look at what you need to do again:
- Install the router in a convenient place for you with a cable from the Internet connection.
- Connect the provider's cable to the WAN port, then connect one end of the network cable to one of the four LAN ports on the router, and the other to the LAN port of your computer's network card. If you do not connect the cable, only to the WAN port.
- Log into the router’s web interface through a computer browser or using another device via Wi-Fi.
- Configure according to your connection type.

That's all, actually. If you were unable to configure your router correctly on the first try, then it doesn’t matter, since you can always reset it and try to configure it again.
Found a typo? Select the text and press Ctrl + Enter
This article will help answer the following questions: how to set up an access point, how to set up a router and will bring clarity. According to Wi-Fi equipment manufacturers, setting up a wireless network (WLAN - Wireless Local Area Network) is a matter of minutes. Press the button and the device connects. In reality, Wi-Fi routers confuse even experienced PC users. Most are glad that the signal occurs at all - they usually forget about reliability. In this article, you will learn how to set up a Wi-Fi access point, how to set up a Wi-Fi router, and how to make your wireless connection reliable to protect your network from unwanted guests.
I want to say right away that new detailed material has appeared on setting up the router:. I recommend using it first of all to set up a wi-fi router.
Which Wi-Fi router or access point to choose?
Choosing a Wi-Fi router. The stumbling block for multimedia transmission is always the Wi-Fi standard. You can quickly transfer large files or watch HD videos over a wireless network only if it complies with the 802.11n standard, which supports speeds of up to 300 Mbps. I also advise you to read about the new wireless network standard - in order to buy a device with a reserve for the future. If this is not necessary, then choose any router from a well-known manufacturer ( D-Link, TP-Link, Asus or Netgear), which comply with the 802.11n standard - this is more than enough for any high-speed Internet connection.
Wi-Fi adapters. Users who use modern laptops or PCs with an integrated wireless network adapter do not need additional equipment, but owners of older laptops need to take care Wi-Fi modules on USB bus, or Wi-Fi Card-Bus adapters.
How to locate a Wi-Fi access point or Wi-Fi router
All three network standard Wi-Fi usually operates at 2.4 GHz. In this regard, several problems arise at once. One of them comes down to the fact that not only Wi-Fi equipment operates in this frequency range. For example, microwave ovens, cordless phones, and wireless extenders also use this frequency, which increases interference levels. Another problem is related to the signal transmission environment: the human body and reinforced concrete structures degrade the quality of the signal if they are located along its path. In order for the signal to be available throughout the entire room, it is important to choose the right location. The connection works best if the router is mounted as high on the wall as possible. In addition, the router should not be located directly next to a computer or other device that has strong radiation or interferes with radio waves due to the metal casing. Proper placement of the router's antennas is also critical. In most cases, you can get more coverage if you aim them vertically.
Connecting and setting up a Wi-Fi router (access point) for a local (internal) network
Connect the computer and the router with a network cable (use sockets for the external network; there are usually 3-5 of them, they are located nearby and labeled. Make sure that you have established a connection between the computer and your wi-fi router (the connection icon in the taskbar tray lights up) .
- IP address: 192.168.0.2
- Subnet mask: 255.255.255.0
- Default Gateway: 192.168.0.1
- DNS: 192.168.0.1
If you find other parameters in the manual, set them. Open command prompt ( Start - Run- in the window that opens, write “cmd” for Windows XP or click Start and enter “cmd” in the search bar). Next in the opened command line write: ping 192.168.0.1 . If packets arrive from 192.168.0.1, then you did everything correctly. If there is no response and we see messages about exceeding the waiting limit, it is worth trying to change IP 192.168.0.1 and 192.168.0.2 to 192.168.1.1 and 192.168.1.2, respectively, and then try to “ping” the address – 192.168.1.1 If you If you still fail, then consult the manual to understand what IP address the router accepts on the internal interface.
I also recommend checking again whether the network cable on the router is plugged into the right socket, and whether a crossover cable is being used. IN manual for wi-fi connection router it should be written how to get into the web interface to manage the router; if you cannot find this section or the manual itself is missing, you should check the addresses http://192.168.1.1 or 192.168.0.1 , depending on which address we were able to ping. in your computer's browser. If you have already tried to connect the router, then you need to first reset the settings with the button "Reset" on the back panel. It’s also worth checking the same addresses but with a secure protocol https://, instead of http://
On the page that opens, you will be asked to enter your login and password. If nothing is indicated in the instructions for connecting a wi-fi router, then you should try the admin/admin or admin/password pair - these are the most common pairs and they are found in almost all popular router models. After entering the administration mode, select the Russian language in the interface settings section so that everything becomes intuitive if it is present.
Most often, Wi-Fi routers allow packet forwarding in the internal network interface, so you can already turn on additional PCs and connect them through other sockets for the internal network, and start using the internal network.
How to set up a Wi-Fi router
We will look at how to enter data to access an Internet connection below, using the example of one of the Wi-Fi routers, but for now let’s go to the “Wireless Settings” settings section ( setting up a wireless network) or to the section “Wi Fi”, “Wireless”, etc.
Now give your name home Wi-Fi network in “Name (SSID)”. Under this name, the wireless network will appear in the list of available networks on the other device. Select your region (Europe - the American installation has a longer range, which, however, is prohibited here). In the “Channel” column, set the value to “Auto” - then the Wi-Fi router will analyze the air and use the channel with the least amount of interference. Confirm the settings by clicking on “Apply”.
Wireless Security
The network is installed, now it’s a matter of choosing protection. Without a strong password, anyone can access the Internet through your connection. There are three main encryption methods for protecting a Wi-Fi network: WEP, WPA and WPA2. All of them are vulnerable to one degree or another, but with my help your network will be quite reliably protected from hackers. Encryption using WEP is extremely unreliable - we recommend not using it. WPA (Wi-Fi Protected Access) encryption, which is based on the AES encryption method, is quite secure and difficult to crack. To select the keys, a hacker will need many years or a computer that is orders of magnitude faster than current PCs in speed.
WPA2 offers better protection. True, hackers were able to find a loophole here, but the costs of hacking are too high. However, all these security methods require a dedicated authorization server (RADIUS), which is not applicable in a home or small office network. They are encrypted using WPA and WPA2 with predefined keys. To use them, on the “Wireless Settings” tab, activate “WPA-PSK (TKIP)” or “WPA2-PSK (AES)”. When prompted for “Security Encryption”, specify a password - it is not recommended to use less than 15 characters for it. Confirm your entry by clicking “Apply”.
Optional Wi-Fi router setup
Each network device has its own MAC (Media Access Control) network address. In the router you should register the addresses of only devices known to you - others should not have access to the router. To do this, click on the “Advanced” menu item on the “Wireless Settings” tab and select “Setup Access List”. After this you will receive a list of connected devices. To know MAC address wifi module on a laptop or wifi network card on a PC is simple - in the command line, type “ ipconfig /all” Select the computers for which you want to open access and click on “Add”. Now check the box next to “Turn Access Control On”, click “Apply” - and the network protected from hackers is ready. Don't forget that it's best to do all this after you've set up a wireless connection on your client computers.
Restart the Wi-Fi router via the web interface and try setting up a network on your device using the following settings:
IP– from the range of free addresses
Mask – 255.255.255.0
Getway – 192.168.(0-1).1
Setting up the Internet on a Wi-Fi router or setting up an external network

If we need to distribute the Internet via the internal network, we need to connect the network cable with the “Internet” to the external interface on the wi-fi router (the external interface is usually located slightly away from the others and is signed accordingly WAN)
Then in the router settings you need to specify the settings for the external interface of your provider: usually they are in the contract, or call technical support. You should also not forget about DNS - the router probably has a caching DNS server or, as a last resort, a DNS tunnel, configure it. It is also worth checking whether the exchange of packets between interfaces is allowed; if so, then the Internet most likely already exists on your internal network.
By the way, I want to note that the latest wi-fi models routers and some of the previous ones (Asus, for example) have the ability to work with the PPPoE protocol - which has recently become more and more common among providers, so at the end of the article you will find a step-by-step instructions for setting up a Wi-Fi router with a connection via the PPPoE protocol . If your Internet is like this, then make sure that you have a router that supports PPPoE. Here I have described the main types of Internet connections so that you can determine yours.
Gh34EwF-MB4
P.S. Let me remind you once again about the “cherished button” that answers the question “ How to reset a password on a router, if I forgot the old one.” Each router has a “Reset” button - after clicking on it while the router is running, it reboots and all settings are set to their original settings.
Setting up a wi-fi router. Troubleshooting Wi-Fi Networks
Why doesn't Wi-Fi want to transfer data? You connect to Wi-Fi, but the browser cannot display the site. Let's find ways to solve this WLAN problem:
Weak Wi-Fi connection signal. Sometimes WLAN transmits data one and a half, two times slower and the signal is always bad, regardless of the location of the antenna. Reason: Your network is overlapped by another WLAN that operates on the same frequency. To allow multiple radio networks to exist side by side without overlapping each other, the 802.11b/g standard provides 13 channels at 2.4 GHz. Many routers are configured for channels eleven or six. WITH free application NetStumbler you can find and recognize neighboring WLANs and find out which channels they operate on. Download the app from the official website and start searching. After this, you will see the channels of the networks around you. Now, through the router's web configuration, set your WLAN to one of the channels that is not used on this network and check if the signal has improved.
How to increase the range of a Wi-Fi network. If the range of the Wi-Fi router is insufficient, WDS (Wireless Distribution System) technology is usually used. wireless system). It allows Wi-Fi access points to establish connections not only with clients, but also with each other. Each of them receives the signal from the other and transmits it further. However, this increase in range comes at the cost of another set of hardware for the access point. The next disadvantage: the access point must provide simultaneous connection to both the network and the client - this reduces efficiency by half. Another, less expensive, but often quite effective method To cope with the problem - replace the included antenna of the router with one that has a higher gain or even a directional one.
Wi-Fi Router or Wi-Fi access point loses connection. The network is functioning normally, but the connection is constantly being lost. The problem is most likely in the poor quality of the electrical network. Even a small voltage drop is enough for the router to lose connection. Solution: Buy a small source uninterruptible power supply and connect the router through it. If this happens rarely, most users turn the device off/on, but this is not the solution.
Wi-Fi connection disconnects. When the wi-fi router and computer adapter are made by different manufacturers, this can cause some problems. As a rule, updating the software helps here. Find a supplier on the website latest version and install it through the configuration menu. This problem is especially often solved by updating the firmware on D-Link access points and routers.
Common mistakes and setting up a Wi-Fi router

Incorrect IP configuration. In order for two network communication components to exchange files, each needs its own IP address. This network data is distributed by the DHCP (Dynamic Host Configuration Protocol) server in the router (don’t forget to check in the router’s web interface that the DHCP server is enabled). Open Control Panel and select Internet Connection. Select “Settings” from the WLAN connection menu. Next, double-click on “Internet Protocol” (TCP/IP) and activate the “Obtain an IP address automatically” option. Confirm by double-clicking “OK”. If you have several devices that can be DHCP servers, a conflict may arise between them. This leads to real chaos. To track which device is causing problems, use the DHCP Find app. It reports the MAC addresses of the DHCP server. MAC addresses are usually written on the bottom of devices. This way, you can quickly identify the troublemaker and disable their DHCP server. If communication is still not working, your browser's proxy settings may be to blame. Set up your browser: in Internet Explorer click on “Service | Internet Options" and go to "Connections". In the “LAN Settings” section, uncheck all the boxes, including “Automatic detection of parameters”. In other browsers, such as Firefox, Chrome or Opera, these functions have similar names.
Programs for setting up and optimizing Wi-Fi networks (WLAN)
DHCPFind — looking for WLAN troublemakers
PuTTY — configures WLAN routers
EasyWi— FiRadar — displays all WLAN connections in the area
Wireshark — finds unprotected data
NetworkShareBrowser — shows all free networks
Wlandscape — creates a WLAN coverage map
Wi fi router Netgear WNR3500L. Easy setup

Using the Chekhov.NET provider as an example
- We connect the cable from the provider to the router (the WAN port is yellow).
- We take another cable (twisted pair crimped on both sides). We connect one end of the cable to the router (LAN port - orange) and the other to the computer.
- We connect the router to an outlet. Let's turn it on.
- Insert the disk from the kit into the drive (Russian interface). Set up step by step. Everything is very clear.
- Next, watch the video (below) and set up a PPPoE connection: go to the web interface - www.routerlogin.net with the admin | password, select the connection type - PPPoE, set the login and password from the contract, IP automatically, change the password to access the router. Apply the settings, reboot - done!
9HQhe6H92iU
How to set up a NETGEAR JWNR2000 Wi-Fi router with a PPPoE connection
Go to Internet browser Explorer, Mozilla, Opera, Safari and type 192.168.0.1 in the address bar. In the window that appears, enter admin in the “Username” field, enter password in the “Password” field and click the “OK” button.
After this procedure, the router menu will appear:

Setting up a PPPoE connection
Click the "Ok" button in Fig. higher. “Basic settings” will appear (in the menu on the left it is: Installation - Basic settings).
To the question “Do I need to enter connection information when connecting to the Internet?” We answer “Yes”:

In “Internet Service Provider” select “Others” (which corresponds to the PPPoE connection type):
Connection mode – connection setup mode. "Always on" for permanent connection. “Connection on demand” - establishing a connection when necessary - that is, when traffic directed to the Internet appears, the device will establish a connection, and if there is no activity for more than the time specified in “Inactivity time before disconnecting (in minutes)”, it will disconnect. If you select “Connect manually”, the connection is established and terminated manually

“Internet IP address” leave “Obtain dynamically from Internet service provider” , if the IP is not issued to you by your provider (static) , as well as other parameters (everything must be in the contract):
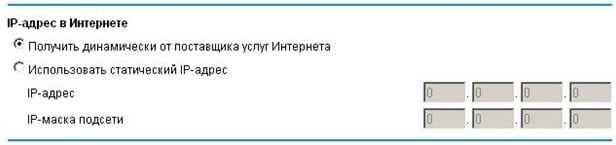
DNS server addresses can be specified manually, if available from your provider, or you can receive them automatically:
Main DNS: xxx.xxx.xx.x
Additional DNS: xxx.xxx.xx.x
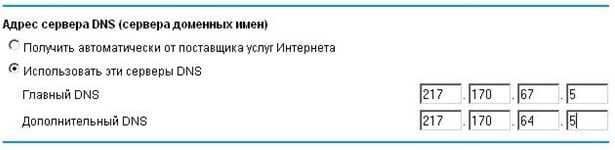
Leave the “router MAC address” as default:

Setting up Wi-Fi and security using an encryption key

Setting up Wi-Fi network security using MAC address filtering

Setting up a Netgear WG602 access point

Settings wi-fi points Netgear WG602 access is quite simple . Before starting the connection, hold down the “Reset” button, which is located on the back wall of the access point for 20 seconds to reset all settings to standard. Remember that if you are using an Internet connection via a login-password pair, then you need an access point that supports the PPPoE protocol, the connection of which is described above; the Netgear WG602 access point cannot be used with this type of Internet connection.
We connect the Netgear wg602 access point to the computer’s network card using twisted pair cable. In the connection settings of the network adapter (card) of the computer we set IP 192.168.0.2, mask 255.255.255.0, deleting the previous settings if they existed there, but you can also use a second network card on motherboard to configure the access point.
Open a browser to connect to the web interface of the access point, write 192.168.0.227 in the address bar, a dialog box should appear where you need to enter login: admin password: password (these settings are written on the bottom cover of your access point)
Go to the Wireless Settings menu, enter an arbitrary network name - Wireless Network Name (SSID) and region (Country/Region), click "Apply".


Now we need to go to IP settings and “drive in” the provider’s settings from the contract, unchecking DHCP. This checkbox will not need to be unchecked only for those whose provider assigns an IP automatically or you use a wired router (switch) with an IP assigned to it. Such routers are necessary to connect several devices in an apartment. Leave all other settings as default.

Reboot the access point (go to the Reboot AP menu section), remove the cable from the computer’s network card:
1) If you have an Internet cable connected to the above-mentioned switch with an assigned IP provider, then insert the end of the cable that you pulled out of the computer into the switch and connect to the newly created Wi-Fi network using any device that supports this technology wireless communication by entering only a password (for example, a smartphone). Skip this paragraph if you are not using such a router.
2) If you only have a cable from the provider in your apartment (house, office), then remove the end of the cable pulled out of the computer from the access point and connect the Internet provider cable to it. Check network functionality.


